File-level restore (FLR) on Hyper-V virtual machines
Apart from restoring entire virtual machine images using Druva, an administrator can restore a file from a virtual machine recovery point using the file-level restore (FLR) functionality. An administrator may need a file-level restore if:
- A file is accidentally deleted on the virtual machine
- A previous version of the file is needed
With file-level restore, there is no need for the administrator to perform the time and resource consuming task of restoring an entire virtual machine or a virtual disk if a few files are needed.
Note: You can restore files to a shared directory at the moment.
Prerequisite
To perform a file-level restore, deploy the Druva FLR proxy on your Hyper-V host. Ensure that you go through the system requirements for Hyper-V and prerequisites.
Things you should know
-
The original drive names for Windows partitions and mount points for Linux partitions will not be preserved. You will see partitions as volume0, volume1, and volume2.
-
Partitions with the corrupted file system, partition table, or incorrect partition boundaries may not get mounted.
-
Symbolic links will not be recovered.
-
File-level restore is not supported on GPT partitioned dynamic disk on Windows.
-
Sparse files on original disks will be recovered as Thick files.
-
/dev, /var/spool, /var/run, /proc, and /sys folders will be excluded, if selected from the restore set.
-
CryptnetUrlCache will be excluded if selected from restore set.
-
If you have CloudCache in your setup, make sure it is connected to the FLR proxy.
-
Encrypted volumes and files are not supported for File-level restore.
-
If some files are not restored, the progress log will show the number of files missed and the detailed log will list the names of the files missed.
Deploy the Druva Hyper-V FLR proxy
Steps to deploy the Hyper-V FLR proxy are described in the following two sections:
Step 1. Download the proxy and generate the activation token
- Log in to Management Console.
- select the workload from the Protect menu. Note that if the All Organizations menu is enabled, you have to first select an organization and then select the workload.
- In the left navigation pane, click FLR Proxies.
- On the FLR Proxies page, click Register FLR Proxy.
- In section 1 of the Register Hyper-V FLR Proxy wizard, click Download. The Hyper-V FLR proxy is a VHD that is downloaded.
- In section 2 of the wizard, under the Activation Token field, you can select a pre-existing activation token from the drop-down. An activation token can be used to activate up to 25 servers and expires in 7 days. If this token has expired, click Generate New Token. In the Generate Token dialog box, enter the following details, and then click Generate.
- Token Label: A short description of the activation token.
Note: You cannot leave this field empty.
- This token can activate: The number of hosts that the activation token can activate. The default value is 25.
- The token expires in: The number of days after which the activation token expires. The default value is 7.
- Token Label: A short description of the activation token.
- In the Generate Token window, you can copy the generated token by clicking the Copy Token icon. Click Done.
Step 2. Create an FLR proxy virtual machine on the host using the downloaded VHD.
- After you download the FLR proxy and generate an activation token, create a generation 1 virtual machine on your Hyper-V host and attach the Hyper-V FLR proxy VHD to it [External link to Microsoft documentation].
Ensure that you enable guest service for this virtual machine in the Hyper-V integration services [External link to Microsoft documentation].Note: Guest service is not available for Microsoft Windows Server 2008 and Windows Server 2008 R2.
- Start the FLR proxy virtual machine and connect to the virtual machine using PuTTy or any other similar tool.
- After you connect to the FLR proxy virtual machine, enter username and password to log in. The default username is root, and the default password is druvaphoenix.
- When prompted, reset the password.
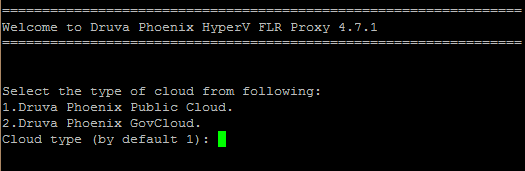
- On the Welcome screen, select GovCloud or Druva Public Cloud.
- On the next page, enter the required page number and provide the following details:
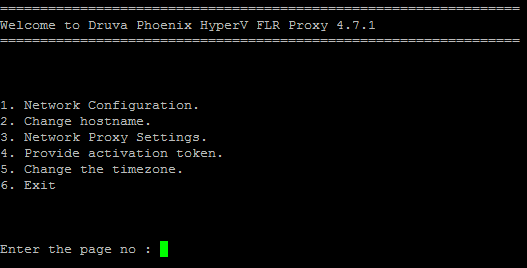
- Network Configuration: Druva Hyper-V FLR proxy provides two network interface cards for configuration. When you select a card for configuration, the proxy provides an option to enable the card. After you enable the card, you can configure the network settings.
Configure the network settings (Static/DHCP).
- If you select the Static IP, provide the following details:
- IP Address
- Netmask
- Gateway
- Primary DNS Secondary DNS Domain
- Secondary DNS
- Domain
- If you select DHCP, the DHCP IP is set.
- If you select the Static IP, provide the following details:
- Change hostname: After the network configuration completes, you can choose to change the CentOS hostname.
- To change the hostname, provide the new hostname when prompted.
- To leave the hostname unchanged, only press Enter.
- Network Proxy Settings:
-
If you are using a web proxy in your environment:
- Type yes, when you are prompted with Do you want to use Network Proxy Setting. After you enter yes, provide the following details:
- Proxy Type: Druva supports the following proxy types:
- HTTP
- socks4
- socks5
- Proxy Server IP: Valid IP of the proxy server.
- Proxy Port: Corresponding proxy port number.
- Username: Valid proxy username.
- Password: Valid proxy password.
- Proxy Type: Druva supports the following proxy types:
- Type No to continue.
Note: Before selecting DHCP setting, verify that no dhclient is running on the proxy.
- Type yes, when you are prompted with Do you want to use Network Proxy Setting. After you enter yes, provide the following details:
-
- Provide activation token: At the prompt, enter the activation token that Druva generated in section 3 of the Register Hyper-V FLR Proxy wizard. Wait till the virtual machine synchronizes with the NTP server. By default, the Druva Hyper-V FLR Proxy synchronizes with the CentOS NTP servers.
- Change the time zone:
- You can change the time zone on your system:
- Type yes, to change the time zone.
- From the displayed list of continents and oceans, type the number corresponding to the server location.
- From the displayed list of country, type the number corresponding to the country in which the server is located.
- Type 1, to set the selected time zone.
- The FLR proxy will reboot after you change the time zone.
- Type no, to keep the default time zone.
Note: You can also manually set the time zone.
- Type yes, to change the time zone.
- You can change the time zone on your system:
- Exit: Wait for the synchronization to complete and exit.
- Network Configuration: Druva Hyper-V FLR proxy provides two network interface cards for configuration. When you select a card for configuration, the proxy provides an option to enable the card. After you enable the card, you can configure the network settings.
Note: After you reset the default password of the FLR proxy virtual machine, the HyperVFLRProxyConf utility available at /opt/Druva/Phoenix/bin/ is invoked. The HyperVFLRProxyConf utility prompts you for inputs while performing tasks 4 through 6 to complete the configuration of the FLR proxy.
If you change the name of the FLR proxy virtual machine on the Hyper-V host, it is not updated on the Management Console immediately. Ensure that you reboot the FLR proxy virtual machine to see the new FLR proxy name on the Management Console.
Configure Druva Hyper-V FLR proxy to use a web proxy
If network infrastructure in your organization uses a web proxy, configure Hyper-V FLR proxy to use the web proxy so that it can connect to the Druva Cloud and restore files. To configure Hyper-V FLR proxy, perform the following steps:
- Connect to the Hyper-V FLR proxy virtual machine using PuTTy or any other similar tool.
- After you connect to the FLR proxy virtual machine, enter username and password to log in. The default username is root, and the default password is druvaphoenix.
- If you see a welcome screen, choose the cloud type you are using followed by option 3 (Network Proxy Settings). If you directly see a terminal window, with no options, enter the following command:
PhoenixHyperVFLRActivate set_proxy_details -t [proxy_type] -i [proxy_IP:port] -u proxy_user -p proxy_password
For example:PhoenixHyperVFLRActivate set_proxy_details -t http -i 127.0.0.1:8081 -u admin -p p@$$w0rD
For an unauthenticated proxy, enter * for username and password. For example:
PhoenixHyperVFLRActivate set_proxy_details -t http -i 127.0.0.1:8081 -u * -p *
- The Druva Hyper-V FLR proxy will now use the web proxy in your environment to connect to Druva Cloud.
Perform a file-level restore
- Log in to Management Console.
- select the workload from the Protect menu. Note that if the All Organizations menu is enabled, you have to first select an organization and then select the workload.
- In the left pane, click Configured VMs. In the right pane, select the virtual machines that you want to restore.
- Click Restore.
- On the Restore from VM page, the Data Restore option is selected by default.
- Select a recovery point from the drop-down.
- Select the Files & Folders tab.
- Select the volumes or files and click Restore.
If any of the selected volumes or files are not mounted, an error message will be displayed on the Restore from VM page.Note: boot/efi and swap partitions are not listed here.
- On the File Restore page, provide the following details:
- UNC Path: Valid UNC share (network share) path that is reachable from the selected FLR proxy.
- Valid format:
- \\<hostname> or<Ip address>\<Sharename>
- //Host/Folder
- Valid format:
- Username: Valid username of UNC share. Supported format for username with a domain is domain@username. Note that you can specify domain name in the username of the UNC share in the "domain@username" format.
- Password: Valid password for UNC share.
- FLR Proxy: From the drop-down list, select a proxy. It is recommended that you select a proxy that has low latency to the UNC share.
- UNC Path: Valid UNC share (network share) path that is reachable from the selected FLR proxy.
- Click Finish.
The restored file will be available on UNC share in the "Phoenix-Hyper-V-FLR-[jobid]" folder.
See Error messages, if you encounter any error while performing the procedure.
Note: The file and folder names are case-sensitive in Linux. If you are restoring files and folders from a Linux virtual machine and:
- the name of the target folder and the folder for restore is same, the files are restored alongside the existing files on the target folder
- a file with the same name already exists in the target folder, it is overwritten with the restored file
Error messages
You may encounter the following error messages while performing file-level restores:
Error message: Could not mount volumes.
Description: This error is displayed on the Restore Data page when some of the volumes are not mounted for restore. Click More details, to know the reason why the volume could not be mounted.
Solution: Hyper-V FLR proxy may not mount a volume if it is incompatible with Druva. For more information on supported disk partitions, see Support matrix.
Error message: Invalid credentials. Please provide correct username and password for the correct UNC share.
Description: This error is displayed when the credentials you enter at the time of restore are incorrect. Without correct username and password, Hybrid Workloads agent cannot connect to the shared drive and restore files and folders.
Solution: Provide correct UNC share username and password.
Error message: Selected FLR proxy is not in a connected state. Please select another proxy for restore.
Description: This error is displayed when the FLR proxy is turned off or the proxy cannot connect to the Druva Cloud.
Solution: Possible solutions:
- Turn on the FLR proxy
- See if your network infrastructure uses a web proxy. If it does, ensure that the FLR proxy is configured to use it.
- Use a different proxy for restore
Limitations
- FLR is not supported for virtual machines that have user recovery points. The backup job for such virtual machines is marked as successful with errors. See Troubleshooting.
- FLR is not supported for differencing disks.