Install the Hybrid Workloads agent on a SQL Failover Cluster Instance (FCI)
This article contains the instructions on installing and configuring Druva on a SQL failover cluster environment that has multiple nodes.
Prerequisite
Cluster shared disk/storage that is configured and accessible to the cluster and all nodes.
Steps
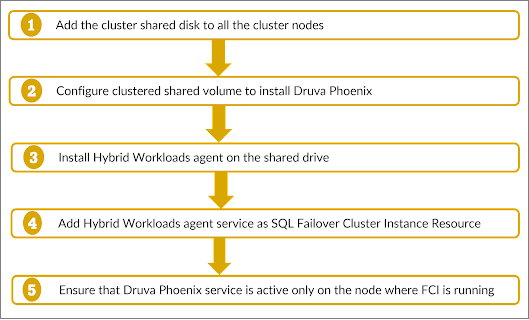
On a high level, there are five steps to configure Druva for the backup of a SQL failover cluster. As an example for this article, there are three nodes in the cluster, NODE01, NODE02, and NODE03.
- Step 1: Add the cluster shared disk/storage to all the cluster nodes
- Step 2: Configure clustered shared volume to install Druva
- Step 3: Install Hybrid Workloads agent on the shared drive
- Step 4: Add Hybrid Workloads agent service as SQL Failover Cluster Instance Resource
- Step 5: Ensure that Druva service is active only on the node where FCI is running
The following flow diagram summarizes the procedure for configuring Druva for the backup of a node-based SQL failover cluster:
Step 1: Add the cluster shared disk/storage to all the cluster nodes
- Log on to the NODE01 machine.
- Launch the Disk Management console.
- Right-click on the shared disk and select Online to bring it online.
- Right-click again on the disk and start the New Simple Volume Wizard.
- On the first dialog, click Next.
- Specify the Simple Volume Size in MB. Click Next.
- For easier access, assign a drive letter to the disk; for example, P and click Next.
- Enter a volume label in the Volume Label text box; for example, Druva and click Next.
- Click Finish and wait for a few seconds for the format operation to complete. Your disk is formatted with the NTFS file system.
Step 2: Configure clustered shared volume to install Druva
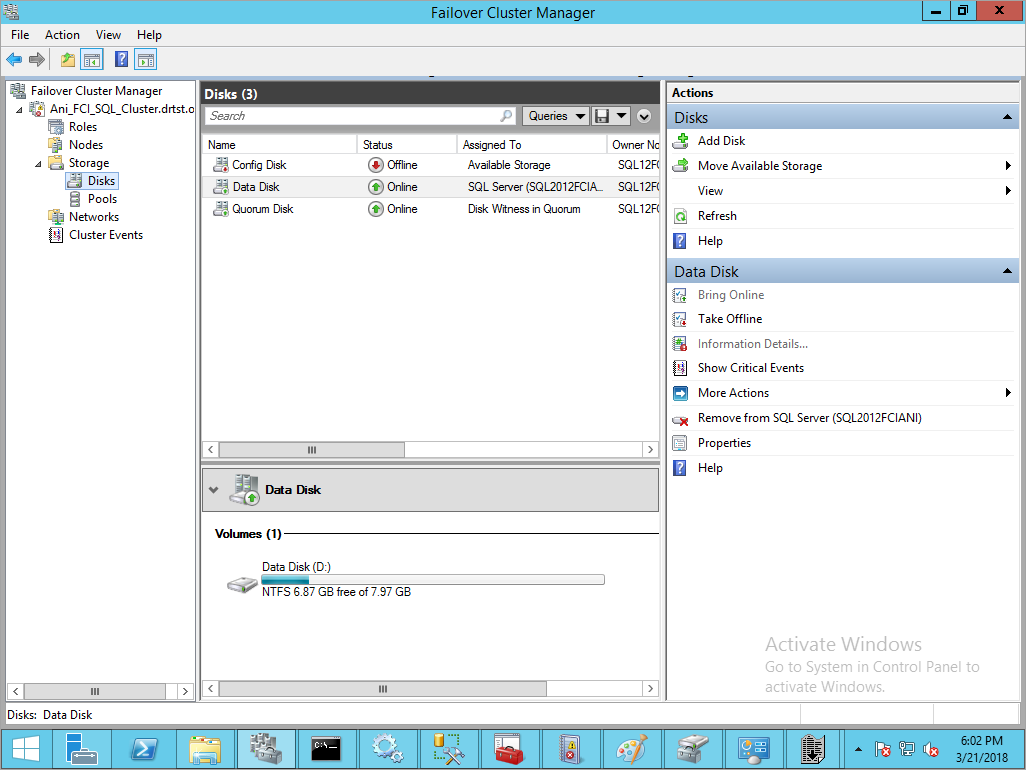
- Launch the Failover Cluster Manager console.
- On the left pane, expand Storage and select Disks.
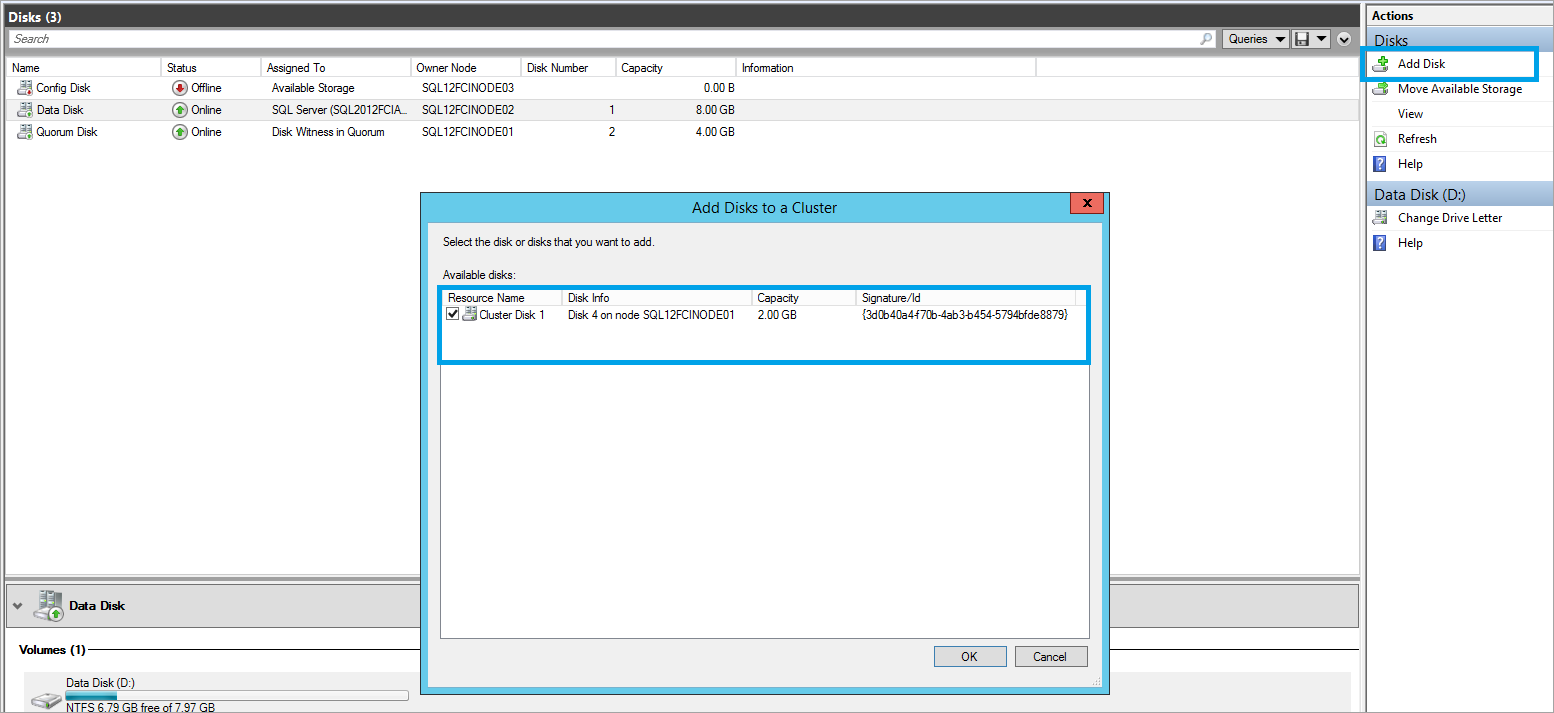
- Click Add Disk in the Actions pane on the right-hand side. You can see your newly added shared disk in the pop-up window. Select the disk and click OK.
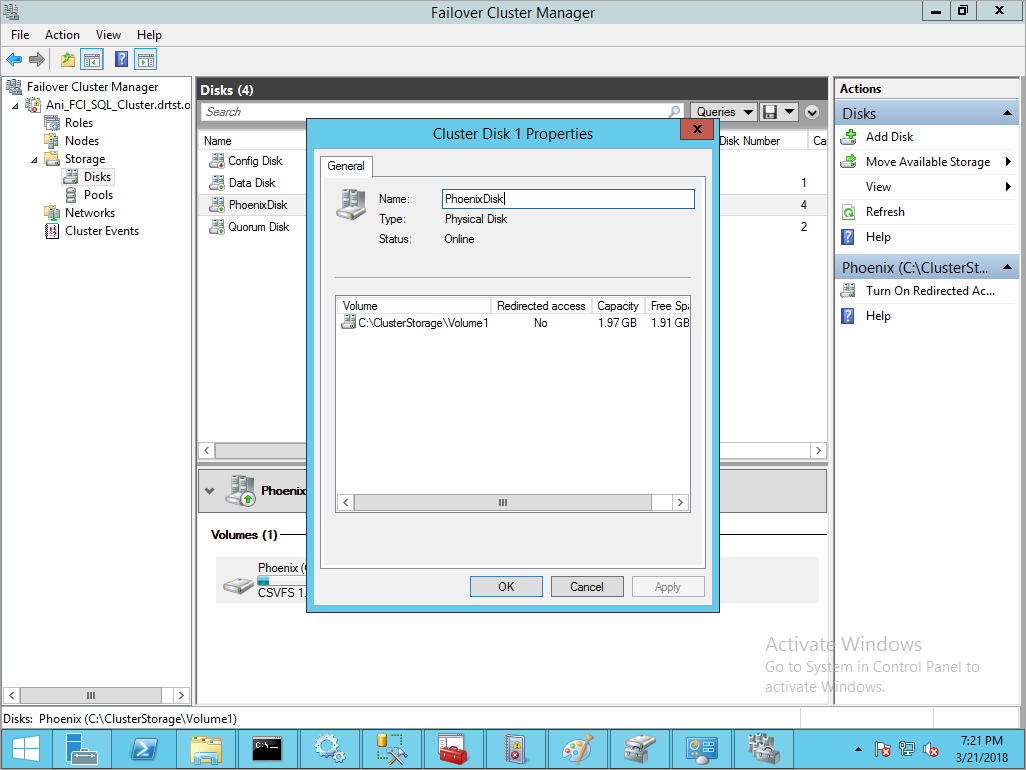
- In the Disks section, right-click on the disk and select Properties. Rename the disk as PhoenixDisk (or any name that you may prefer). Click Apply and OK.
- Right-click on the disk and select Add to Cluster Shared Volumes. The drive is added to your node. Now, the drive is added as a CSVFS disk. Assign a letter to this disk.
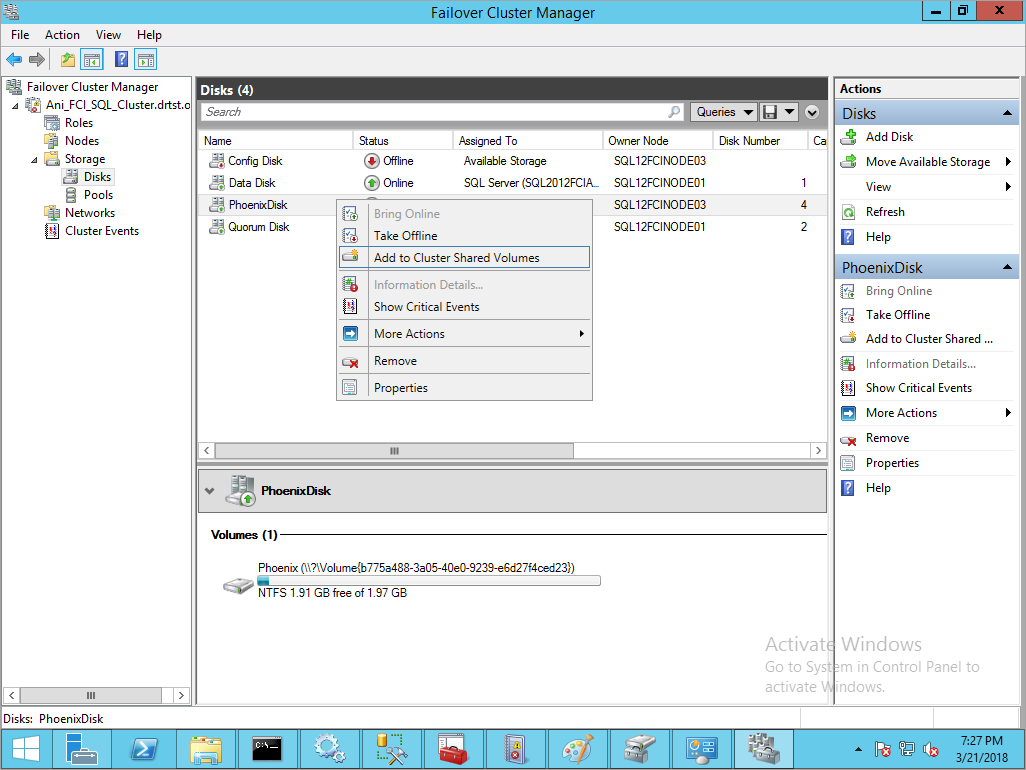
- Before you can assign a letter to the disk, the Owner Node of the disk must be the same as the node you have logged on to (in this case NODE01). To ensure that NODE01 is the Owner Node:
- Select the CSVFS disk (in this example, the disk with PhoenixDisk as its name).
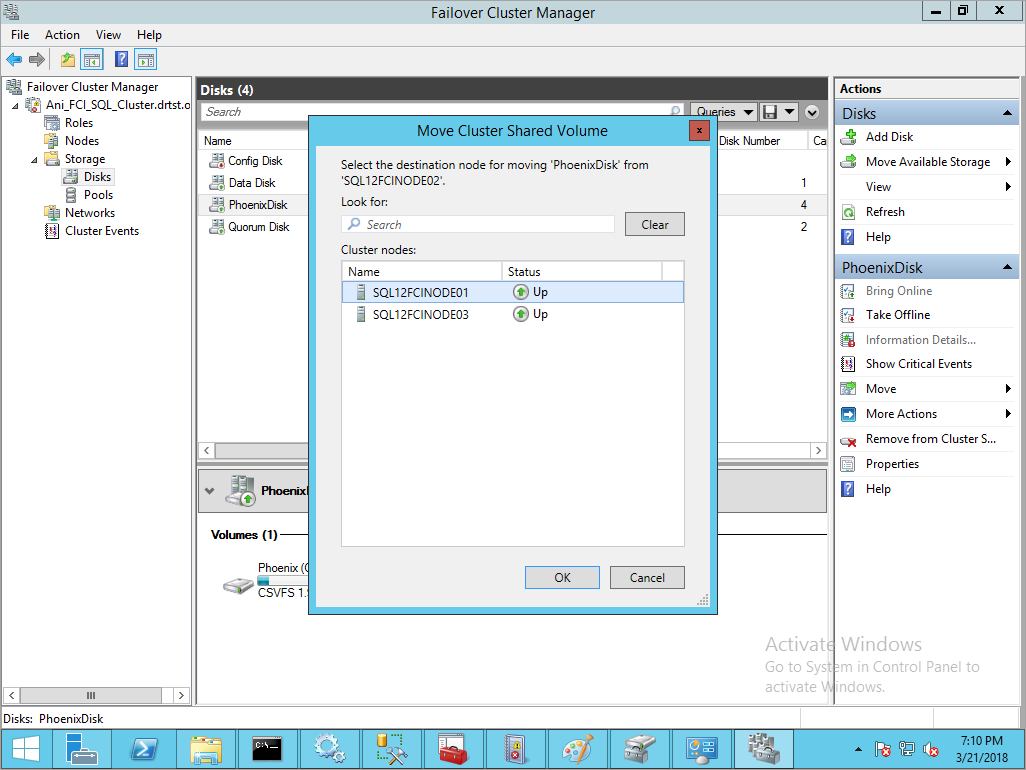
- After you select the disk, click Move Available Storage > Select Node.
- On the Move Cluster Shared Volume dialog box that appears, select the node you are logged on to (NODE01 in this example).
- To assign a letter to this disk, launch the Disk Management console.
- On the Disk Management console, right-click on the shared disk and launch the New Simple Volume Wizard. Follow the steps in the wizard and assign a letter to the disk (for example, P).
Step 3: Install Hybrid Workloads agent on the shared drive
- Download the MS-SQL agent for Druva Cloud on all nodes in the cluster.
- Log on to NODE01. For the sake of simplicity, assume that drive P: is the shared drive that you have created as clustered shared volume across all nodes on which you want to install Druva.
- Start the installation for Druva using the downloaded Installer.
- Accept the license and click Next.
- If you want to use a domain account, disable the Use Local System Account option and provide the domain account credentials. Provide the domain account username in the format: domain\username.
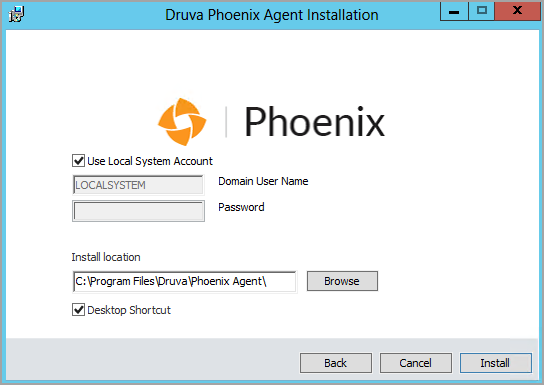
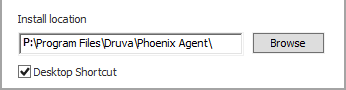
- In the Install Location box, enter the directory of the shared storage; for example, if P: drive is your shared directory, replace C with P and click Install. The installer copies all the necessary files on the given shared directory P:.
- After the installation completes, click Finish. The Hybrid Workloads agent is now installed on the P: drive.
If you use a domain account while installing the Hybrid Workloads agent, ensure that you add the same account in the Credential store to ensure that the credentials are preserved post an agent upgrade. For more information see Manage credentials for MS-SQL servers.
- Stop the Druva service.
- Go to the C:\ProgramData directory. Move the Phoenix folder to the shared directory P:; for example, move it to P:\SharedProgramData\.
Note: This step of moving the Druva folder is required only at the first login on the first node. For the other nodes, you can delete the Druva folder from C:\ProgramData directory after stopping the Druva service as you have moved the Druva folder to the shared location P:\SharedProgramData. This location is accessible to all nodes.
-
To make Druva access its local data and configuration files, create a junction point that points to the newly created Druva folder location on the shared drive P\SharedProgramData\Phoenix. This step must be performed on all nodes. Launch the Command Prompt and create a junction point using the following command:
Mklink /j C:\ProgramData\Phoenix P:\SharedProgramData\Phoenix -
Log on to the next node, NODE02, and follow steps 10 and 11 on the remaining nodes. Run the below command to create Phoenix Service:
sc.exe create PhoenixCPHService binpath="P:\Program Files\Druva\Phoenix Agent\PhoenixCPHwnet64.exe" start=auto
- Register NODE01 and configure it for backup. To know the procedure for registering a server, refer to Register a Server.
Step 4: Add Hybrid Workloads agent service as a SQL Failover Cluster Instance Resource
- Open Failover Cluster Manager and select Roles in the left pane.
- Right-click on the SQL Server role and click Add Resource > Generic Service. The New Resource Wizard pop-up window appears.
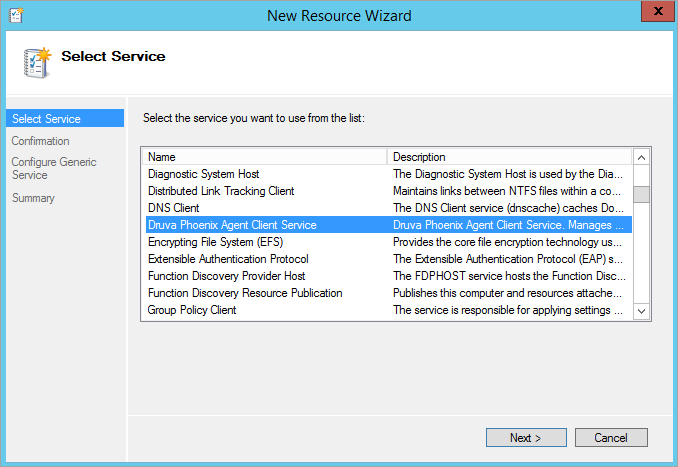
- Select Druva Hybrid Workloads agent Client Service from the list of services displayed and click Next.
- The Confirmation section on the pop-up window appears. Verify the details and click Next to continue.
- The Configure Generic Service section on the pop-up window appears. Verify the details and click Next to continue.
- In the Summary section, to view the report created by the wizard, click View Report. Click Finish.
Step 5: Ensure that Druva service is active only on the node where the FCI cluster is running
Ensure that the Druva service is active only on the node where the FCI cluster is running. Stop the Druva service on the rest of the nodes in the cluster. This is required for Druva service failover.
To configure the Hybrid Workloads agent to use the Microsoft CSV Shadow Copy Provider, see How do I make the Hybrid Workloads agent use the Microsoft CSV Shadow Copy Provider?
You are now ready to back up your SQL failover cluster. Follow the steps described in Configure registered servers for backup for creating a SQL backup set.