Restore SQL server databases using recovery points
Recovery points
Druva supports three types of restores for MS-SQL server:
- Recovery point Restore
- Point in Time Restore
- Transaction Mark
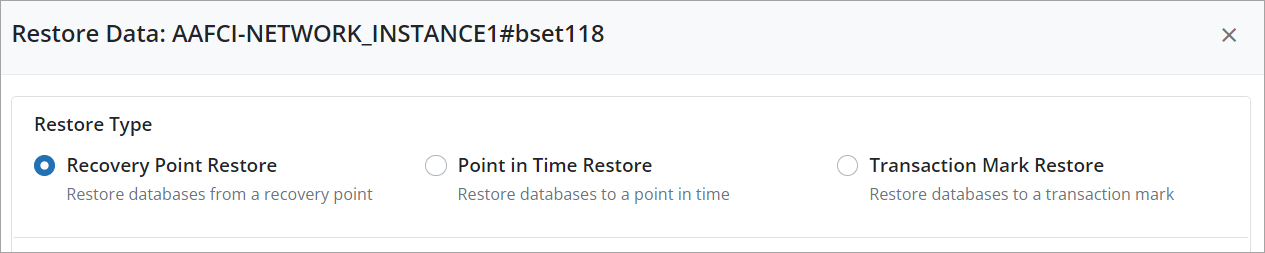
Point in Time restores and Transaction Mark restores are performed using MS-SQL transaction logs. In this article, we discuss Recovery point Restores. Druva allows you to restore from Hot, Warm and Cold recovery points of MS-SQL server.
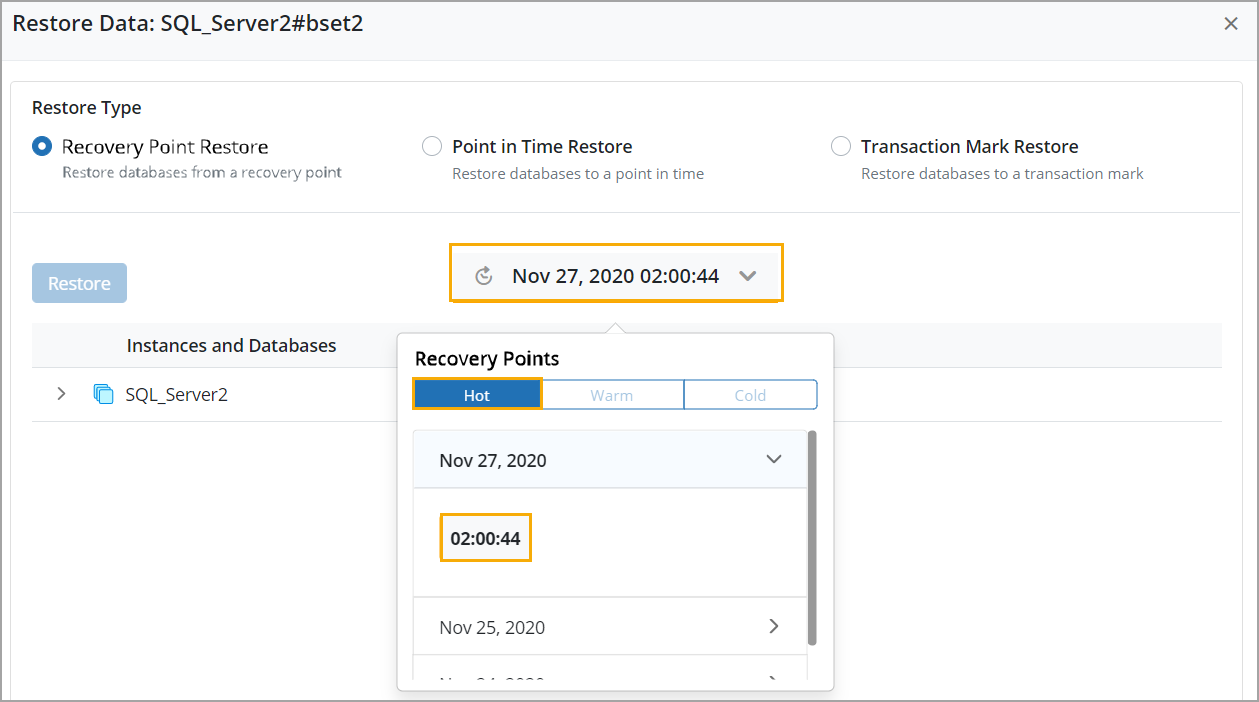
To restore the databases, you select a recovery point. When you trigger a restore job, you can see that the recovery points are categorized as:
Note: The account used for SQL backups and restores must also have the CREATE DATABASE permission for successful restores from recovery points. If the account used for SQL backups and restores does not have the CREATE DATABASE permission, the restores may fail with the SQL7 error. For more information, see GRANT Database Permissions
Hot recovery point restore
A restore from a hot recovery point is an on-demand restore of server data that resides on CloudCache. Hot recovery points are point-in-time images of backup data stored on the CloudCache. Such a restore operation continues until the server data is restored to the location that you specified.
In the navigation pane on the left, click All SQL Resources. In the right pane, click the instance or availability group whose Hot recovery point you want to restore. In the instance or availability group details page, under the Configured Backup Sets section, select the backup set, and click Restore. The Recovery point Viewer displays the date and timestamp of the latest recovery point. Click the drop-down next to it, click the Hot tab, and then select the recovery point you want to restore.
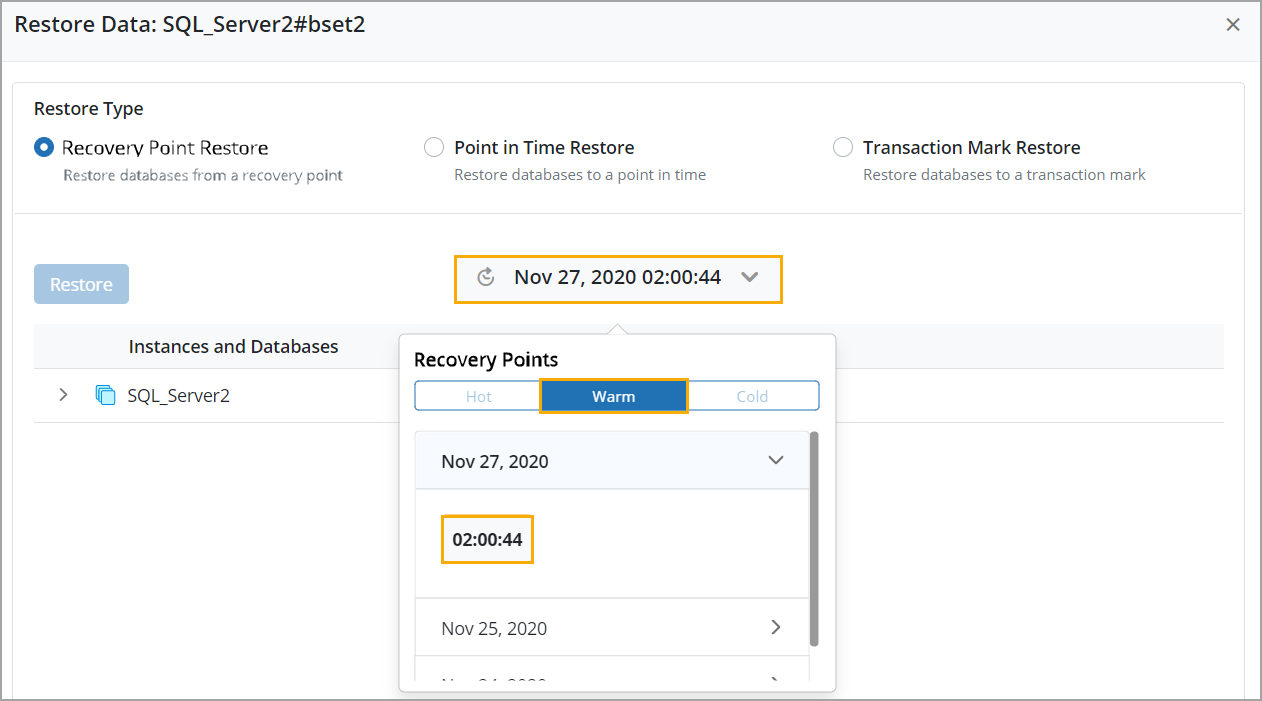
Warm recovery point restore
Warm recovery points are point-in-time copies of backup data of the last 15 days. These recovery points are stored in the Amazon S3 storage. Data from warm recovery points can be restored immediately.
In the navigation pane on the left, click All SQL Resources. In the right pane, click the instance or availability group whose Warm recovery point you want to restore. In the instance or availability group details page, under the Configured Backup Sets section, select the backup set, and click Restore. The Recovery point Viewer displays the date and timestamp of the latest recovery point. Click the drop-down next to it, click the Warm tab, and then select the recovery point you want to restore.
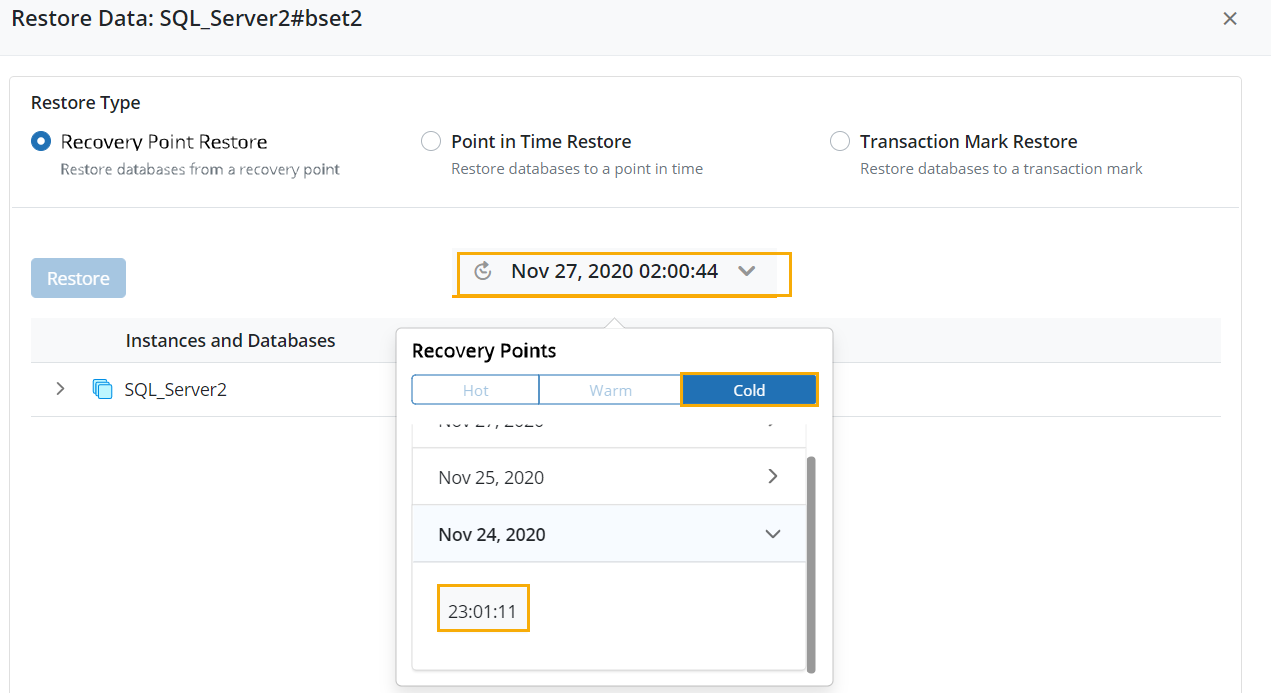
Cold recovery point restore (Applicable to LTR customers)
Cold recovery points are point-in-time copies of backup data older than 15 days. These recovery points are stored in the Amazon Glacier Deep Archive. At the time of restore, data from the cold tier is retrieved, moved temporarily to the warm tier, and then restored. Once you click Restore and initiate the restore, the data retrieval from cold tier and its restore from the warm tier happens automatically. Warmed up data is deleted from the warm tier after 10 days.
In the navigation pane on the left, click All SQL Resources. In the right pane, click the instance or availability group whose Cold recovery point you want to restore. In the instance or availability group details page, under the Configured Backup Sets section, select the backup set, and click Restore. The Recovery point Viewer displays the date and timestamp of the latest recovery point. Click the drop-down next to it, click the Cold tab, and then select the recovery point you want to restore.

To restore your cold-tier data
To restore data from the cold tier, perform the following tasks:
- Log in to the Management Console.
- Select the workload from the Protect menu. Note that if the All Organizations menu is enabled, you have to first select an organization that has the MS-SQL server availability group and then select the workload.
- On the All SQL Resources page, click the standalone instance or availability group whose cold-tier data you want to restore.
- From the standalone instance or availability group details page, under the Configured Backup Sets section, select the backup set and click Restore. You can also search for a resource, backup set, or database by using the search box in the SQL Backup Sets page, select the backup set, and click Restore.

-
In the Restore Data dialog box, under Restore Type, select Recovery point Restore.
- Click the drop-down next to the date and timestamp, and select the Cold tab. Select the database(s) in the selected recovery point, and click Restore.
Restore the master database using Restore database files
- Log in to the Management Console.
- Select the workload from the Protect menu. Note that if the All Organizations menu is enabled, you have to first select an organization that has the MS-SQL server instances and availability groups, and then select the workload.
- On the All SQL Resources page, click the standalone instance or availability group whose master database you want to restore.
- From the standalone instance or availability group details page, under the Configured Backup Sets section, select the backup set and click Restore.
or
You can also search for the master database from the SQL Backup Sets page using the search box. Select the database, and click Restore.
-
In the Restore Type, ensure that Recovery point Restore is selected.
- Click the drop-down next to the date and timestamp, and select a Hot, Warm or Cold recovery point.
Note: The recovery point timestamps for backup sets of the standalone instances are displayed according to the server time zone. For example, for servers located in New York and London, the timestamps are displayed according to EST and UTC zones, respectively. The recovery point timestamps for backup sets of the AGs are displayed according to the time zone configured during the creation of the backup set.
-
From the list of databases, select the master database.
- Click Restore.

Note: Druva displays an error if you select other databases along with the master database.

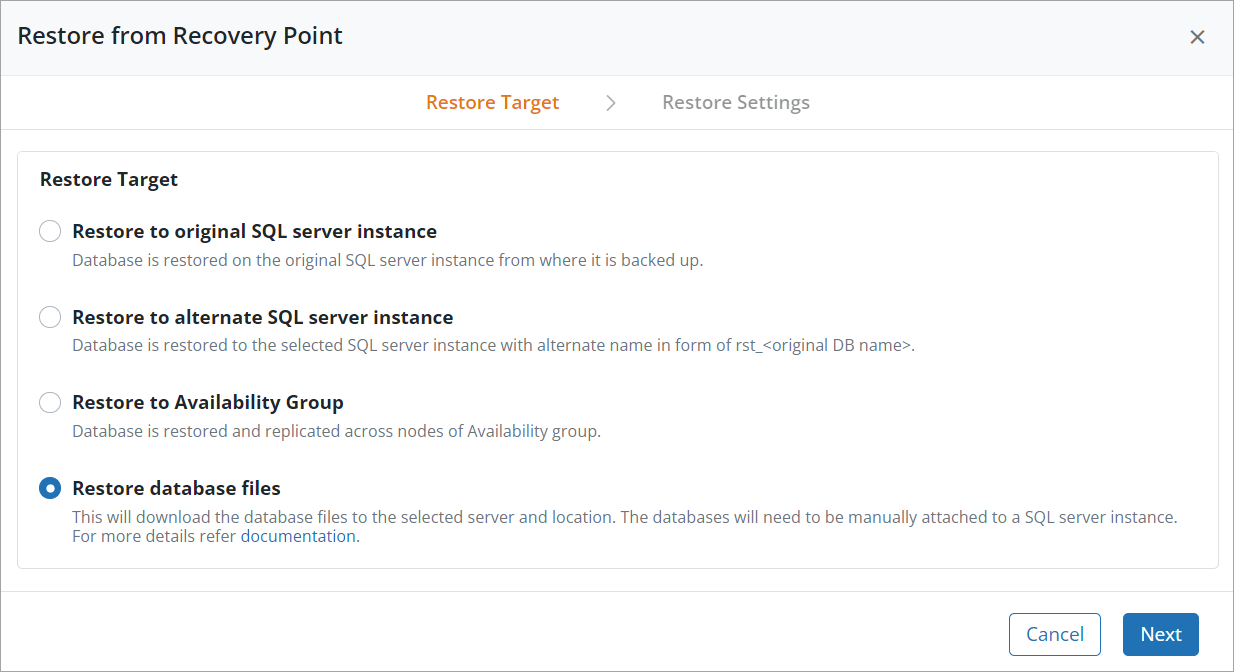
- In the Restore Target screen, select Restore database files.
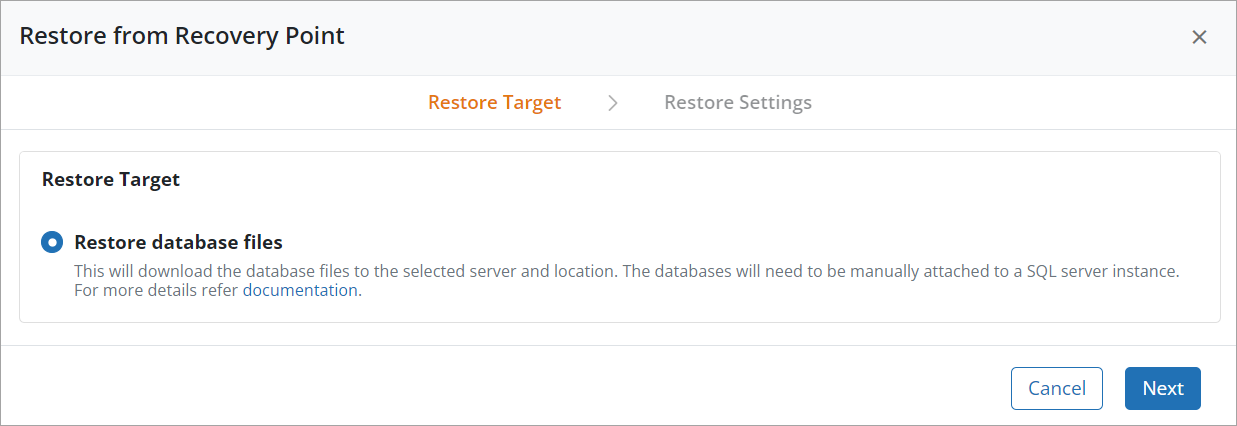
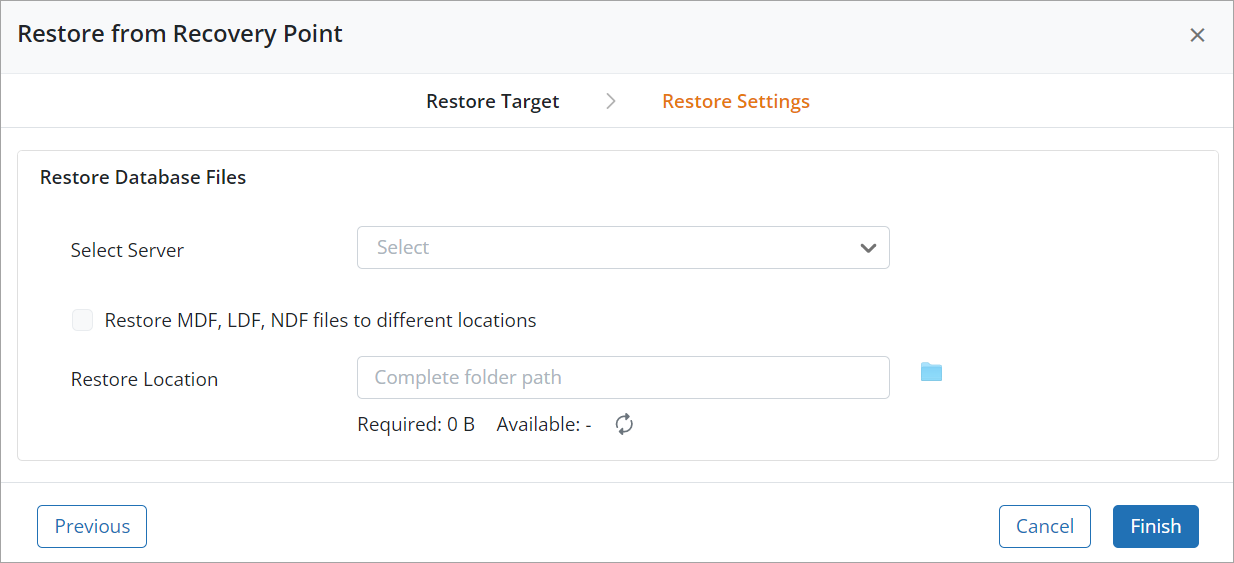
- In the Restore Settings screen, under Restore Database Files, perform the following tasks:
- In the Select Server drop-down list, select an MS-SQL server instance or availability group to which you want to restore the master database. Servers that you configured as MS-SQL servers, along with the original server,are available for selection in this list.
- Select the Restore MDF, LDF, NDF files to different locations checkbox to restore the MDF, LDF, and NDF files of the master database to different locations on the selected server. If this option is selected, the option to browse to or enter an absolute path to the MDF, LDF, and NDF file locations is enabled. Enter the absolute path to MDF, LDF, and NDF files or browse to the locations.
- Restore location: In the Restore Location field, type or select the absolute path to the restore location. This field disappears if you enable the Restore MDF, LDF, NDF files to different locations check box.
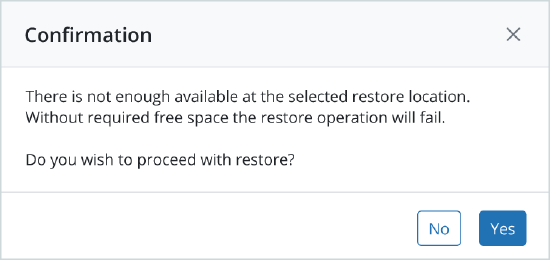
If there is not enough available free space at the selected restore location, then a warning message is displayed to the user that without the required free space, the restore operation will fail.

If the server is not connected to the Druva Cloud, Druva cannot fetch the folder structure data. To initiate a restore, you must type the absolute path to the restore destination. The restore operation remains in a pending state, and starts only after the server connects to the Druva Cloud.
- Click Finish.
- Use the database_files.txt file to determine the database mapping. See Hybrid Workloads agent metadata for more information on database_files.txt.
- Stop the instance to which you want to attach the master database.
- Attach the restored master database files to a database within the instance. For a full set of instructions, see Moving the master database in Move System Databases.
- Start the instance again.
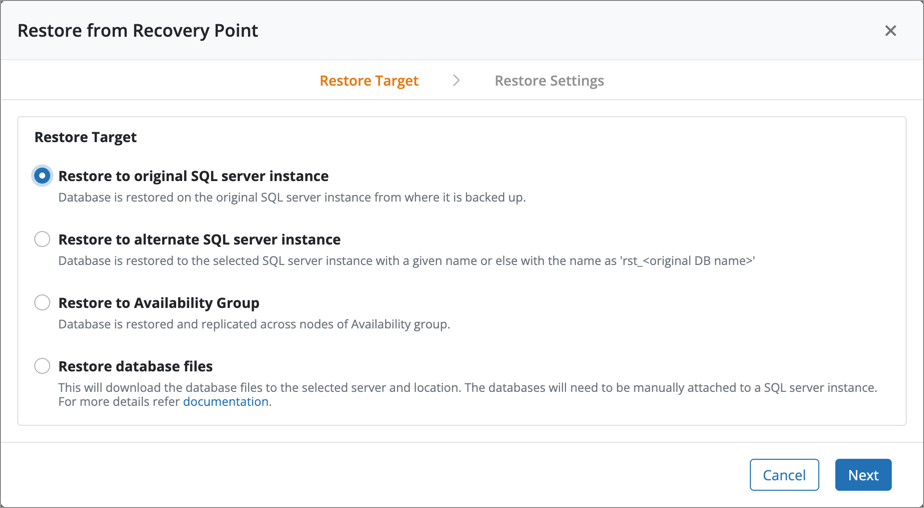
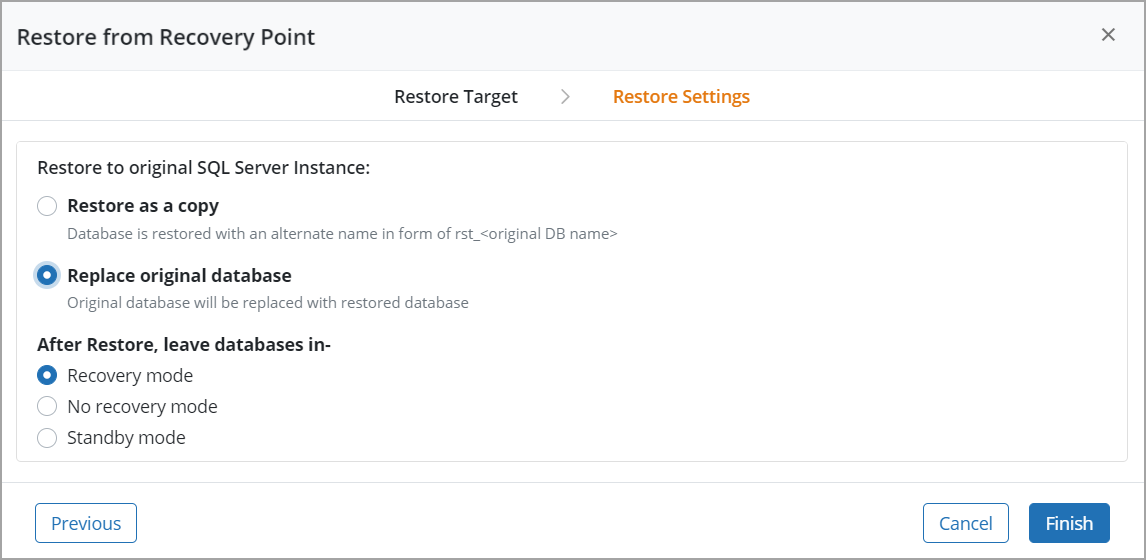
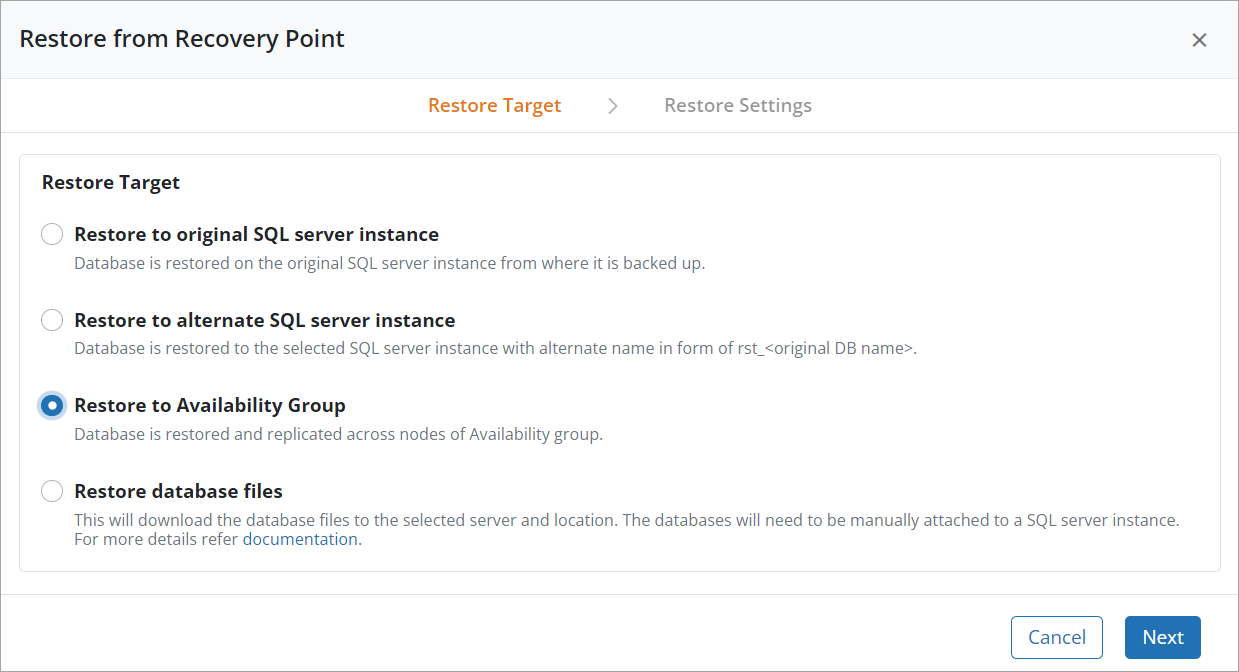
Restore to the original SQL server instance
When you restore a database on a standalone instance to its original SQL server instance, you can restore it as a copy or you can replace the database on the SQL server instance with the restored database. If you replace the original database, Druva terminates connections to the database on the original instance and then replaces the database with the restored database. When you restore a database on an availability group (AG) to the original SQL server instance, Druva restores the database to the instance of the primary server.
Restore as a copy
- Log in to the Management Console.
- Select the workload from the Protect menu. Note that if the All Organizations menu is enabled, you have to first select an organization that has the MS-SQL server instances and availability groups, and then select the workload.
- On the All SQL Resources page, click the standalone instance or availability group that hosts the database you want to restore.
- From the standalone instance or availability group details page, under the Configured Backup Sets section, select the backup set and click Restore.
or
You can also search for the database from the SQL Backup Sets page using the search box. Select the database, and click Restore.
- In the Restore Type, ensure that Recovery point Restore is selected.
- Click the drop-down next to the date and time stamp, and select a Hot, Warm or Cold recovery point.
Note: The recovery point timestamps for backup sets of the standalone instances are displayed according to the server time zone. For example, for servers located in New York and London, the timestamps are displayed according to EST and UTC zones, respectively. The recovery point timestamps for backup sets of the AGs are displayed according to the time zone configured during the creation of the backup set.
-
Select the database to be restored, and then click Restore.
- In the Restore Target page, select Restore to original SQL server instance, and click Next.
- The Restore Settings page is displayed.
Note: While restoring to original SQL Server Instance in case of an Availability Group, only Restore as a copy option is supported, and the Replace original database option is not supported as in standalone.
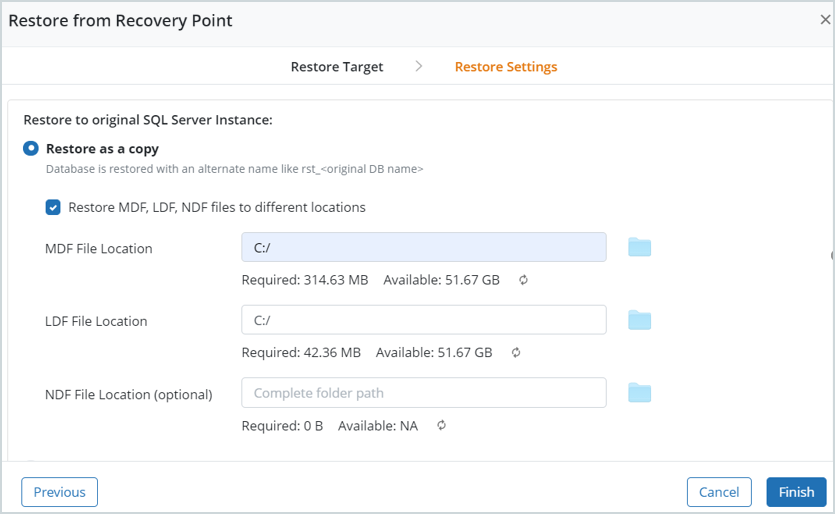
Replace original database option is not allowed for Availability Group as replacing the original database requires you to first remove the database from the Availability Group, which is a complex operation and can add inconsistencies to the Availability Group. Druva does not perform any operation that incurs or adds inconsistencies in the application. - In the Restore Settings page, select Restore as a copy and perform the following tasks:
- Restore MDF, LDF, NDF files to different locations: Select this checkbox to restore the MDF, LDF, and NDF files of the database to different locations on the original server. If this option is selected, the option to browse or enter an absolute path to the MDF, LDF, and NDF file locations is enabled. Enter the absolute path to MDF, LDF, and NDF files or browse to the locations.
- Restore Location: Enter the absolute path to the restore location. You can also browse to the path. The database files are restored to the location you specify. This field disappears if the Restore MDF, LDF, MDF files to different locations option is selected.
If there is not enough available free space at the selected restore location, then a warning message is displayed to the user that without the required free space, the restore operation will fail.

- Restored Database Name: Optionally, specify the new name of the database that will be created as a result of the restore. This option is available only if you are restoring a single database. If you do not provide a custom name in this field, the name of the database will be rst_<original database name>.
- Under After restore, leave databases in, select one of the following:
- Recovery mode: In this mode, Druva rolls back all the uncommitted transactions and keeps the database in the ready state. Druva also ensures that all the data sets restored are consistent with the database and reports errors in case of inconsistencies.
- No recovery mode: In this mode, Druva does not roll back any uncommitted transactions. The database is not usable in this intermediate, non-recovered state. This mode is used for restoring a database backup and multiple transaction logs, or when multiple RESTORE statements are needed.
- Standby mode: In this mode, Druva allows a database to be brought up for the read-only access between the transaction log restores. This mode is used in the warm standby server situations or special recovery situations to inspect the database between the log restores. If you select this mode, provide the absolute folder path of the location where you want to restore additional transaction logs in the Specify Location field.
- Click Finish. After the restore job completes, Druva leaves the database in the selected mode.
Replace original database
- Log in to the Management Console.
- Select the workload from the Protect menu. Note that if the All Organizations menu is enabled, you have to first select an organization that has the MS-SQL server instances and availability groups, and then select the workload.
- On the All SQL Resources page, click the standalone instance or availability group that hosts the database you want to restore.
- From the standalone instance or availability group details page, under the Configured Backup Sets section, select the backup set and click Restore.
or
You can also search for the database from the SQL Backup Sets page using the search box. Select the database, and click Restore.
- In the Restore Type, ensure that Recovery point Restore is selected.
- Click the drop-down next to the date and time stamp, and select a Hot, Warm or Cold recovery point.
Note: The recovery point timestamps for backup sets of the standalone instances are displayed according to the server time zone. For example, for servers located in New York and London, the timestamps are displayed according to EST and UTC zones, respectively. The recovery point timestamps for backup sets of the AGs are displayed according to the time zone configured during the creation of the backup set.
- Select the database to be restored, and then click Restore.
- In the Restore Target page, select Restore to original SQL server instance, and click Next.
- In the Restore Settings page, select Replace original database.
Note: Druva automatically deletes the renamed copies of the original file, if a restore is successful.
- Under After restore, leave databases in, select one of the following:
- Recovery mode: In this mode, Druva rolls back all the uncommitted transactions and keeps the database in the ready state. Druva also ensures that all the data sets restored are consistent with the database and reports errors in case of inconsistencies.
- No recovery mode: In this mode, Druva does not roll back any uncommitted transactions. The database is not usable in this intermediate, non-recovered state. This mode is used for restoring a database backup and multiple transaction logs, or when multiple RESTORE statements are needed.
- Standby mode: In this mode, Druva allows a database to be brought up for the read-only access between the transaction log restores. This mode is used in the warm standby server situations or special recovery situations to inspect the database between the log restores. If you select this mode, provide the full folder path of the location where you want to restore additional transaction logs in the Specify Location field.
- Click Finish. After the restore job completes, Druva leaves the database in the selected mode.
Note: If the server is not connected to Druva Cloud, Druva cannot fetch the folder structure data. To initiate a restore, you must type the absolute path to the restore destination. The restore operation remains in a pending state, and starts only after the server connects to the Druva Cloud.
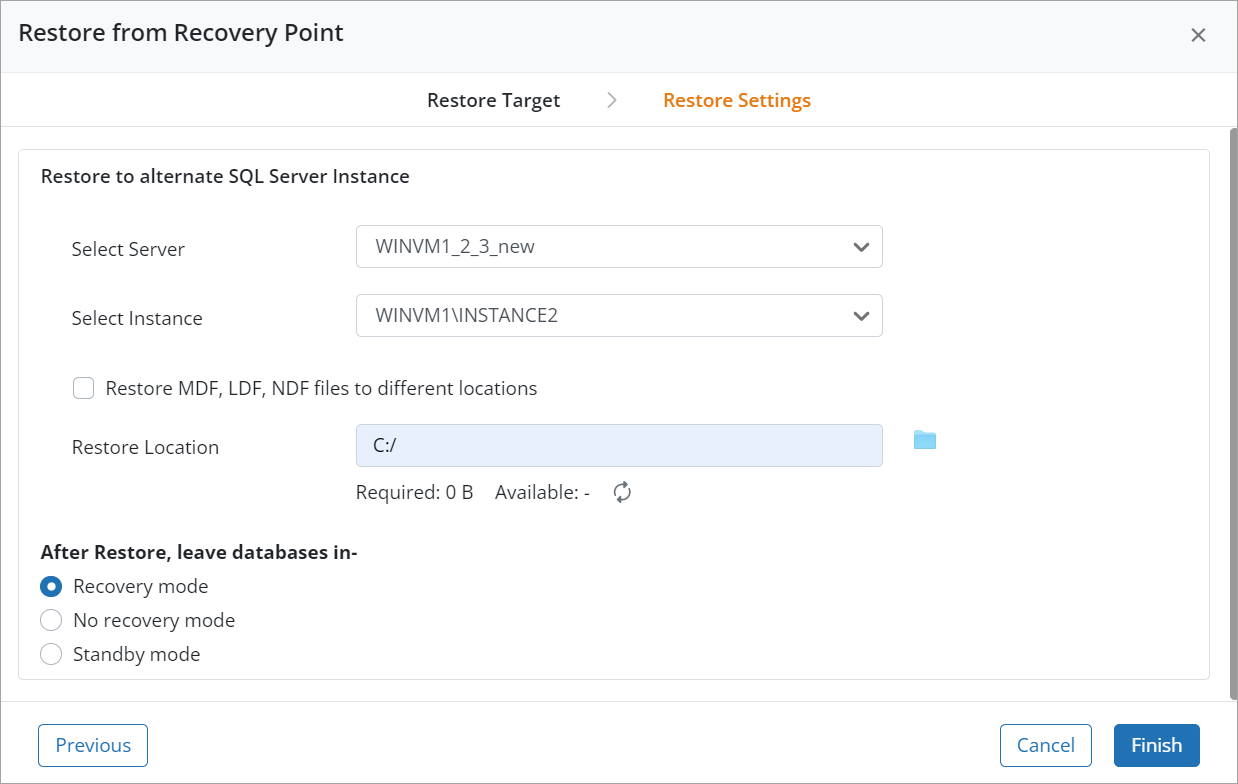
Restore to alternate SQL server instance
- Log in to the Management Console.
- Select the workload from the Protect menu. Note that if the All Organizations menu is enabled, you have to first select an organization that has the MS-SQL server instances and availability groups, and then select the workload.
- On the All SQL Resources page, click the standalone instance or availability group that hosts the database you want to restore.
- From the standalone instance or availability group details page, under the Configured Backup Sets section, select the backup set and click Restore
or
You can also search for the database from the SQL Backup Sets page using the search box. Select the database, and click Restore.
- In the Restore Type, ensure that Recovery point Restore is selected.
- Click the drop-down next to the date and time stamp, and select a Hot, Warm or Cold recovery point.
Note: The recovery point timestamps for backup sets of the standalone instances are displayed according to the server time zone. For example, for servers located in New York and London, the timestamps are displayed according to EST and UTC zones, respectively. The recovery point timestamps for backup sets of the AGs are displayed according to the time zone configured during the creation of the backup set.
- Select the database to be restored, and then click Restore.
- In the Restore Target page, select Restore to alternate SQL server instance, and click Next.

- In the Restore Settings page, perform the following tasks:
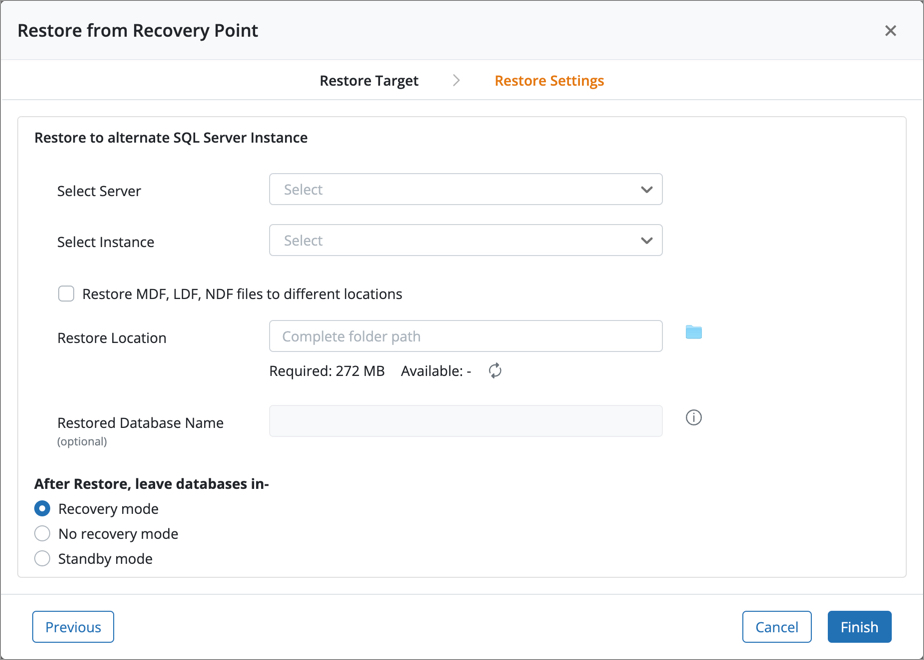
- Select Server: Select the MS-SQL server to which you want to restore the database.
- Select Instance: Select the instance on the selected MS-SQL server to which you want to restore the database.
- Restore MDF, LDF, NDF files at different locations: Select this checkbox to restore the MDF, LDF, and NDF files of the database to different locations on the selected server. If this option is selected, the option to browse or enter an absolute path to the MDF, LDF, and NDF file locations is enabled. Enter the absolute path to MDF, LDF, and NDF files or browse to the locations.
- Restore Location: Enter the absolute path to the restore location or browse to it. Database files are restored to the location you specify. This field disappears if you select the Restore MDF, LDF, NDF files to different locations checkbox. If there is not enough available free space at the selected restore location, then a warning message is displayed to the user that without the required free space, the restore operation will fail.

- Restored Database Name: Optionally, specify the new name of the database that will be created as a result of the restore. This option is available only if you are restoring a single database. If you do not provide a custom name in this field, the name of the database will be rst_<original database name>.
- After Restore, leave databases in-
- Recovery mode: In this mode, Druva rolls back all the uncommitted transactions and keeps the database in the ready state. Druva also ensures that all the data sets restored are consistent with the database and reports errors in case of inconsistencies.
- No recovery mode: In this mode, Druva does not roll back any uncommitted transactions. The database is not usable in this intermediate, non-recovered state. This mode is used for restoring a database backup and multiple transaction logs, or when multiple RESTORE statements are needed.
- Standby mode: In this mode, Druva allows a database to be brought up for the read-only access between the transaction log restores. This mode is used in the warm standby server situations or special recovery situations to inspect the database between the log restores. If you select this mode, provide the full folder path of the location where you want to restore additional transaction logs in the Specify Location field.
- Click Finish. After the restore job completes, Druva leaves the database in the selected mode. Druva disables the No recovery and Standby modes for the Hybrid Workloads agents older than version 4.7.6.
Restore to Availability Group
Databases restored to an availability group are replicated across all the primary and secondary nodes in the AG. A database can be restored to an AG only if the file structure across all nodes of the AG is the same.
- Log in to the Management Console.
- Select the workload from the Protect menu. Note that if the All Organizations menu is enabled, you have to first select an organization that has the MS-SQL server instances and availability groups, and then select the workload.
- On the All SQL Resources page, click the standalone instance or availability group that hosts the database you want to restore.
- From the standalone instance or availability group details page, under the Configured Backup Sets section, select the backup set and click Restore,
or
You can also search for the database from the SQL Backup Sets page using the search box. Select the database, and click Restore.
- In the Restore Type, ensure that Recovery point Restore is selected.
- Click the drop-down next to the date and time stamp, and select a Hot, Warm or Cold recovery point.
Note: The recovery point timestamps for backup sets of the standalone instances are displayed according to the server time zone. For example, for servers located in New York and London, the timestamps are displayed according to EST and UTC zones, respectively. The recovery point timestamps for backup sets of the AGs are displayed according to the time zone configured during the creation of the backup set.
- Select the database to be restored, and then click Restore.
- In the Restore Target page, select Restore to Availability Group, and click Next.
- In the Restore Settings page, perform the following tasks:
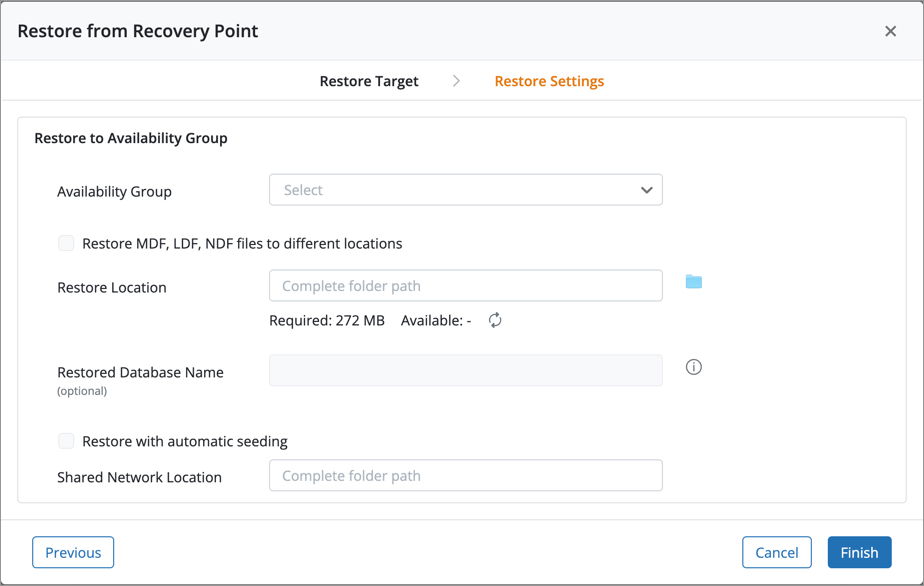
- Availability Group: Select an AG to restore the database to. You cannot restore a database to an AG if an AG isn't configured, or the configured AG has an older client version.
- Restore MDF, LDF, NDF files to different locations: Select this checkbox to restore the MDF, LDF, and NDF files of the database to different locations on the availability group. If this option is selected, the option to browse or enter an absolute path to the MDF, LDF, and NDF file locations is enabled. Enter the absolute path to MDF, LDF, and NDF files or browse to the locations.
- Restore Location: In the Restore Location box, type or select the absolute path to the restore location. This option disappears if you enable the Restore MDF, LDF, NDF files at different locations check box.
If there is not enough available free space at the selected restore location, then a confirmation message is displayed to the user that without the required free space, the restore operation will fail.
SQL Server 2016 and later versions support the Automatic Seeding feature for an AG. This feature allows you to automatically replicate the restored databases to all the nodes in the AG. If the automatic seeding feature is enabled in your setup, we recommend selecting the Restore with automatic seeding check box. Else, you can specify the shared network location to manually replicate the database across the nodes in the AG. -
Restored Database Name: Optionally, specify the new name of the database that will be created as a result of the restore. This option is available only if you are restoring a single database. If you do not provide a custom name in this field, the name of the database will be rst_<original database name>.
- Restore with automatic seeding: Select this option to automatically replicate the restored databases to all the nodes in the AG. When you select this check box, the Shared Network Location field disappears from the page. You can use this option for SQL Server 2016 and later versions. For SQL Server 2012 and SQL Server 2014, you must manually replicate the database to all the nodes in the AG by specifying the shared network location.
- Shared Network Location: Enter the absolute path to the network location to synchronize the database across the primary and secondary nodes in the AG. Ensure that this shared network location is accessible to all the nodes in the AG. The Shared Network Location field is mandatory in SQL Server 2012 and SQL Server 2014; however, it is optional in SQL Server 2016. This field disappears if the Restore with automatic seeding check box is enabled.
- Click Finish.
Restore database files
This is a Limited Availability draft of the documentation. This documentation is not final, and it will get updated until the General Availability of the feature.
- Log in to the Management Console.
- Select the workload from the Protect menu. Note that if the All Organizations menu is enabled, you have to first select an organization that has the MS-SQL server instances and availability groups, and then select the workload.
- On the All SQL Resources page, click the standalone instance or availability group that hosts the database whose database files you want to restore.
- From the standalone instance or availability group details page, under the Configured Backup Sets section, select the backup set and click Restore, or
You can also search for the database from the SQL Backup Sets page using the search box. Select the database, and click Restore.
- In the Restore Type, ensure that Recovery point Restore is selected.
- Click the drop-down next to the date and timestamp, and select a Hot, Warm or Cold recovery point.
Note: The recovery point timestamps for backup sets of the standalone instances are displayed according to the server time zone. For example, for servers located in New York and London, the timestamps are displayed according to EST and UTC zones, respectively. The recovery point timestamps for backup sets of the AGs are displayed according to the time zone configured during the creation of the backup set.
- From the list of databases, select the user or system databases.
- Click Restore.
- In the Restore Target screen, select Restore database files and click Next.
- In the Restore Settings screen, under Restore Database Files, perform the following tasks:
- Select Server: Select an MS-SQL server instance or availability group to which you want to restore the databases. Servers that you configured as MS-SQL servers, along with the original server, are available for selection in this list. If the recovery point has a VDI differential recovery point, then this server list only contains the servers that are on SQL agent version 4.9.4-110537 or later.
- Restore MDF, LDF, NDF files at different locations: Select this checkbox to restore the MDF, LDF, and NDF files of the selected databases to different locations on the selected server. If this option is selected, the option to browse to or enter an absolute path to the MDF, LDF, and NDF file locations is enabled. Enter the absolute path to MDF, LDF, and NDF files or browse to the locations.
If the server is not connected to the Druva Cloud, Druva cannot fetch the folder structure data. To initiate a restore, you must type the absolute path to the restore destination. The restore operation remains in a pending state, and starts only after the server connects to the Druva Cloud.
- Restore Location: In the Restore Location box, type or select the absolute path to the restore location. Database files are restored to the location you specify. This field disappears if the Restore MDF, LDF, NDF files at different locations check box is enabled.
12. Click Finish.
After restoring the database files:
-
Copy the system database files to C:\Program Files\Microsoft SQL Server\<Instance Name>\MSSQL\DATA.
-
Use the database_files.txt file to determine the database mapping. Attach the restored databases to an instance. For a full set of instructions, see Attach a Database.
MS-SQL server database recovery point restore workflow
The following steps describe the restore job when you trigger a recovery point restore of your databases of the instances or AG.
| Step | Operation |
|---|---|
|
1 |
You or another administrator initiates a restore. |
|
2 |
Druva checks if the Hybrid Workloads agent is running.
|
| 3 | Druva validates the restore destination (original instance or another MS-SQL server). |
|
4 |
Druva validates if the restore destination is not a drive. For example, a restore to D:\ fails.
|
| 5 | Druva validates if the instance to which restore is initiated is available. |
| 6 | Druva validates if the databases for restore are available. |
| 7 | Druva checks the free space available at the restore destination. |
|
8 |
Druva starts the restore operation by identifying filesets for restore. Druva sequentially downloads filesets to the restore destination. Within a fileset (which might contain data belonging to more than one database), Druva performs a simultaneous download of files belonging to different databases. After the download of a fileset completes, Druva downloads the next fileset (which might also contain data belonging to one or more databases) to the restore destination. |
|
9 |
Druva uses the following syntax for the restore: <destination path>\<snapshot>\<Request ID>\<Fileset>\<Actual file>. The <Request ID> folder uniquely identifies each restore request. |
|
10 |
Additionally, Druva also creates the database_files.txt file at D:\restore\<snapshot>\<Request ID>. This file contains details of how the database files are mapped to the database, and how the database is mapped to its instance in a Unicode format. |
|
11 |
At the location that you specified, Druva restores the databases as rst_<Database Name>. However, if Druva finds that rst_<Database Name> is already present at the location, it appends an incremental counter to the database name. For example, at the time of restoring database DB, if Druva finds rst_DB from a previous restore operation, the database DB is restored as rst_DB_1. The counter increments by 1 for every occurrence of an existing restore dataset. |
| 12 | In case of restore to AG, Druva repeats Step 9 on all the secondary nodes of the AG. Druva backs up the database to the shared network location provided by you and the restored database is replicated on all the primary and secondary nodes of the AG. |
|
13 |
After the restore completes,
|
30345