Restore a SQL server database using transaction logs
 Business Enterprise Elite
 Druva backs up SQL transaction logs and lets you restore your databases to a point in time. Transaction log backups are triggered after a full backup job completes, and a recovery point exists. Transaction logs are backed up every few minutes based on your backup schedule settings. Druva uses the recovery point and the logged transactions to perform a point-in-time restore. See the Point-in-time restore workflow to know more.
Druva allows you to restore databases to a point in time to:
Restore the database to the original SQL server instance
When you perform a point-in-time restore of a database to its original location, you can:
When you restore a database on a standalone instance to its original location, you can restore it as a copy or you can replace the database on the SQL server instance with the restored database. If you replace the original database, Druva terminates connections to the database on the original instance and then replaces the database with the restored database. When you restore a database on an availability group (AG) to the original location, Druva restores the database to the instance of the primary server.
Restore as a copy
- Log in to the Management Console.
- Select the workload from the Protect menu. Note that if the All Organizations menu is enabled, you have to first select an organization that has the MS-SQL server instances and availability groups, and then select the workload.
- On the All SQL Resources page, click the standalone instance or availability group that hosts the database you want to restore.
- From the standalone instance or availability group details page, under the Configured Backup Sets section, select the backup set and click Restore, or
You can also search for the database from the SQL Backup Sets page using the search box. Select the database, and click Restore.

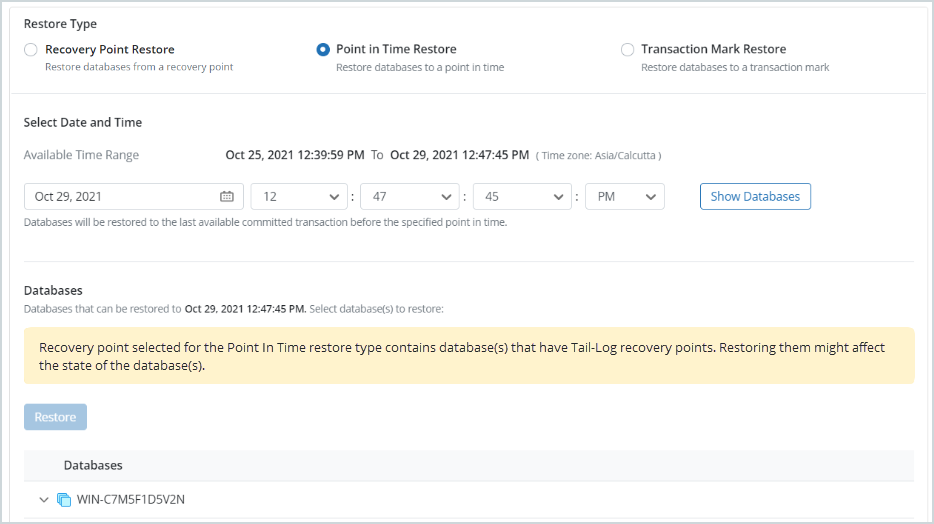
- In the Restore Type, select Point in Time Restore.
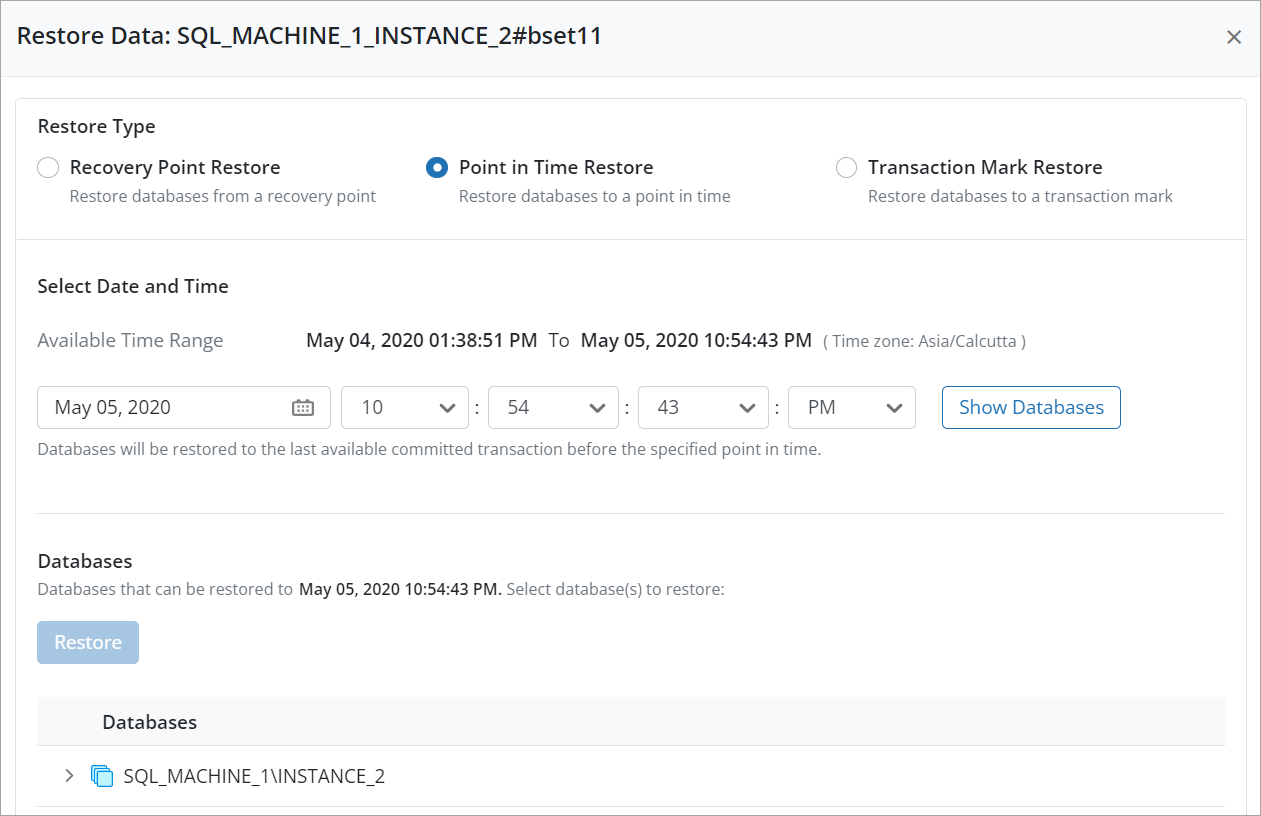
- In the Select Date and Time section, you can see the time range of the latest transaction log backup by default. You can also see the databases corresponding to this recovery point. Select the point-in-time to which you want to restore the databases, and then click Show Databases. Druva restores the databases to the last available committed transaction before the specified point in time.
Note: A point-in-time restore triggered for a backup set, which was deleted and then recovered, fails because log backups do not exist for such a backup set.
For the point-in-time restore to succeed, you must trigger a full backup after recovering the backup set. - Select the database(s) and click Restore.
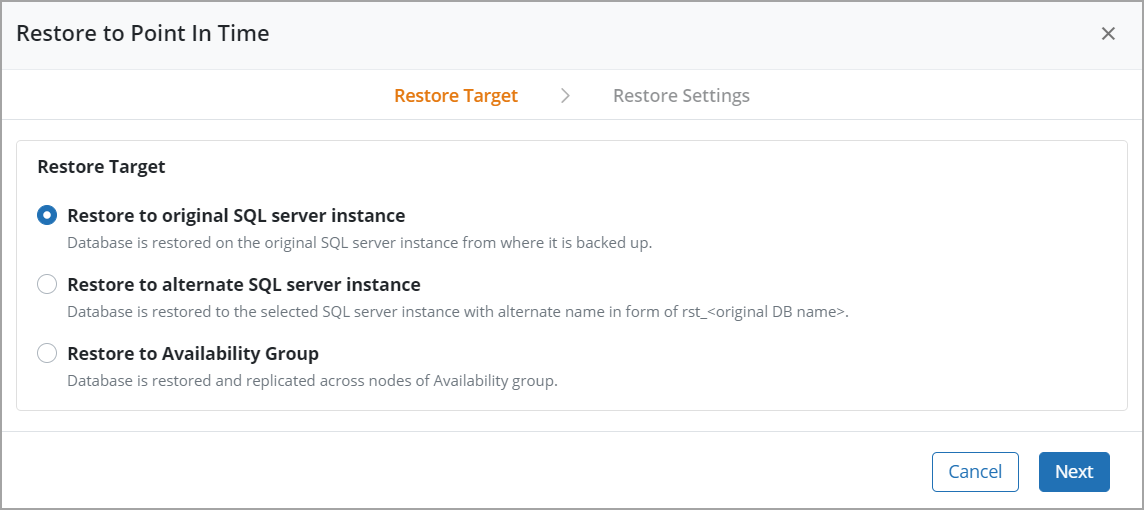
- In the Restore Target page, select Restore to original SQL server instance, and click Next.
- In the Restore Settings page, select Restore as a copy and perform the following tasks:
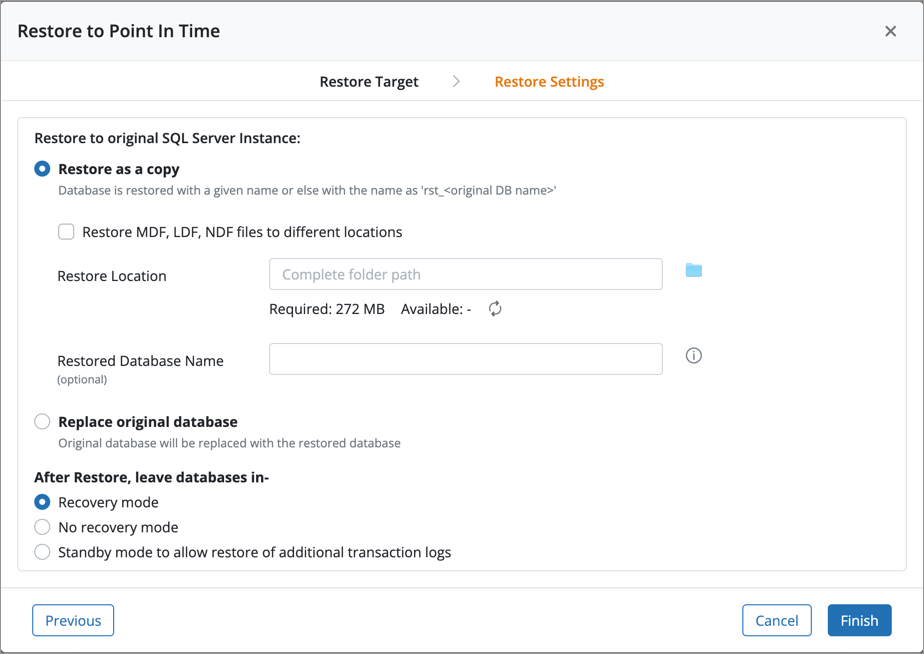
- Restore MDF, LDF, NDF files to different locations: Select this checkbox to restore the MDF, LDF, and NDF files of the database to different locations on the original server. If this option is selected, the option to browse or enter an absolute path to the MDF, LDF, and NDF file locations is enabled. Enter the absolute path to MDF, LDF, and NDF files or browse to the locations.
- Restore Location: Enter the absolute path to the restore location. You can also browse to the path. The database files are restored to the location you specify. This field disappears if the Restore MDF, LDF, MDF files to different locations option is selected.
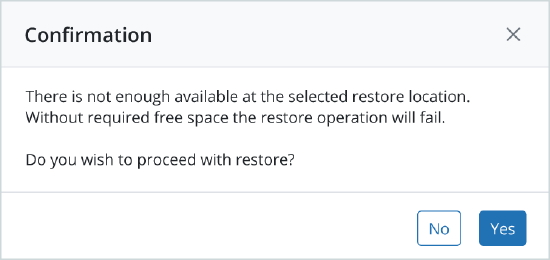
If there is not enough available free space at the selected restore location, then a warning message is displayed to the user that without the required free space, the restore operation will fail.
- Restored Database Name: Optionally, specify the new name of the database that will be created as a result of the restore. This option is available only if you are restoring a single database. If you do not provide a custom name in this field, the name of the database will be rst_<original database name>.
- Under After restore, leave databases in, select one of the following:
- Recovery mode: In this mode, Druva rolls back all the uncommitted transactions and keeps the database in the ready state. Druva also ensures that all the data sets restored are consistent with the database and reports errors in case of inconsistencies.
- No recovery mode: In this mode, Druva does not roll back any uncommitted transactions. The database is not usable in this intermediate, non-recovered state. This mode is used for restoring a database backup and multiple transaction logs, or when multiple RESTORE statements are needed.
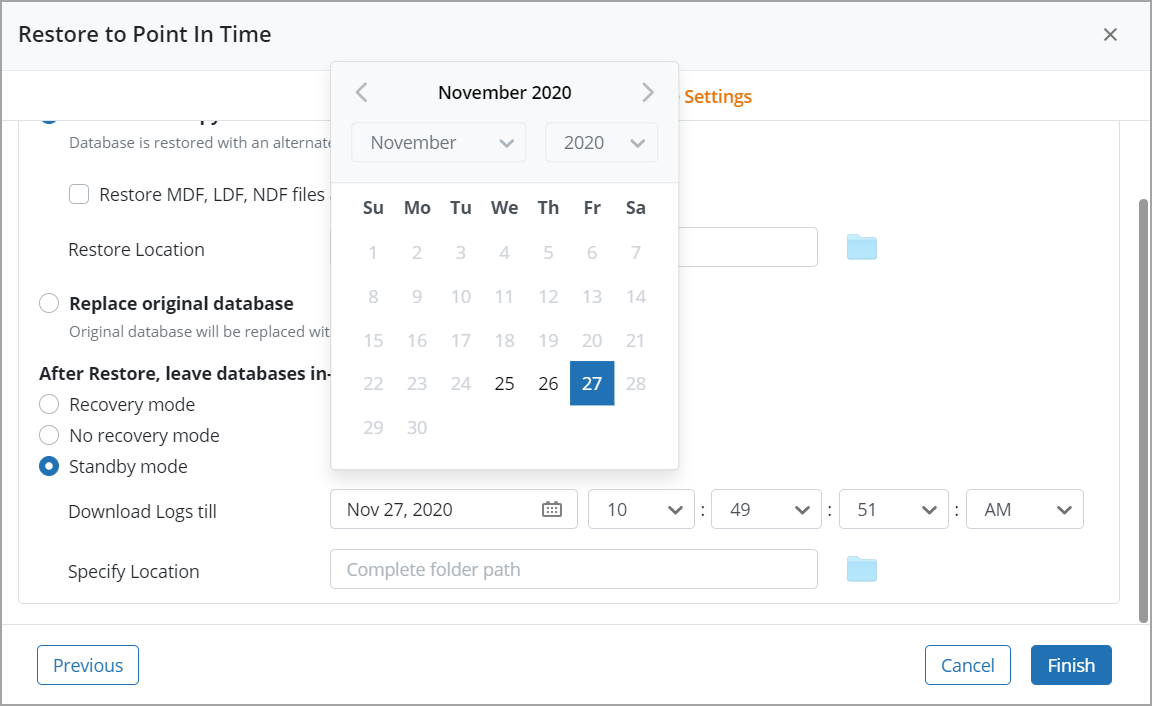
- Standby mode to allow restore of additional logs: In this mode, Druva allows a database to be brought up for the read-only access between the transaction log restores. This mode is used in the warm standby server situations or special recovery situations to inspect the database between the log restores. If you select this mode. perform the following tasks:
- Download Logs till: You can download the transaction logs between the time frame specified above this field. Select a date and time.
- Restore Location: Enter an absolute path of the location where you want to restore additional transaction logs. You can also browse to that location.
- Click Finish. After the restore job completes, Druva leaves the database in the selected mode.
Replace original database
- Log in to the Management Console.
- Select the workload from the Protect menu. Note that if the All Organizations menu is enabled, you have to first select an organization that has the MS-SQL server instances and availability groups, and then select the workload.
- On the All SQL Resources page, click the standalone instance or availability group that hosts the database you want to restore.
- From the standalone instance or availability group details page, under the Configured Backup Sets section, select the backup set and click Restore, or
You can also search for the database from the SQL Backup Sets page using the search box. Select the database, and click Restore.
- In the Restore Type, select Point in Time Restore
- In the Select Date and Time section, select the point in time to which you want to restore the databases. Databases will be restored to the last available committed transaction before the specified point in time.
- Click Show databases to see all the databases that can be restored to the point in time.
- Select the database(s) and click Restore.
- In the Restore Target page, select Restore to original SQL server instance, and click Next.
- In the Restore Settings page, select Replace original database.

- You can select the Take tail-log backup before restore option to trigger a tail log backup before the restore is triggered. For more information on Tail-Log backup, see SQL Tail Log Backup.
Note: Ensure that the Point in Time restore range is latest before triggering the tail-log backup. Also, ensure that no other backup is initiated during the tail-log backup process.
Note: Tail Log backup option will be available under Point in Time Restore only when user restores by selecting Replace original database option under Original SQL server instance.
You can select the Abort restore if tail-log backup fails option to abort restore if the tail-log backup fails.
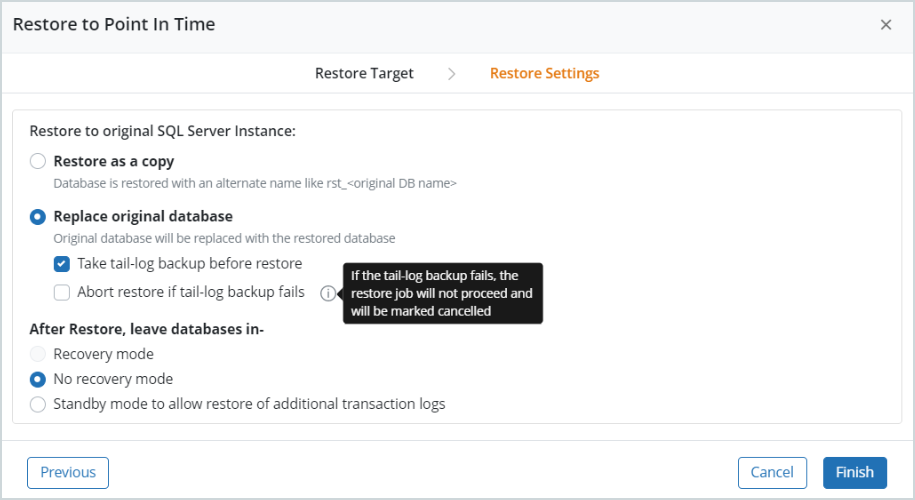
Note: The Recovery mode setting under After Restore, leave database in- section is disabled if Take tail-log backup before restore option is selected.
Note: You must ensure that the SQL agent is upgraded to the latest version in order to use the tail-log feature.
If a Tail-Log backup is in progress, and you trigger another restore job with Tail-Log backup, the following pop-up message is displayed:

After the tail-log backup process is completed, if you try to trigger a PIT restore with PIT range that contains tail-log backup, then a message Recovery point selected for the Point in Time restore contains database(s) that have Tail-Log recovery points. Restoring them might affect the state of the database(s) is displayed.
Note: Tail-log backup will not be restored automatically. You can restore it manually from a local copy created at a path mentioned in the associated Restore job logs.
- Under After restore, leave databases in, select one of the following:
- Recovery mode: In this mode, Druva rolls back all the uncommitted transactions and keeps the database in the ready state. Druva also ensures that all the data sets restored are consistent with the database and reports errors in case of inconsistencies.
- No recovery mode: In this mode, Druva does not roll back any uncommitted transactions. The database is not usable in this intermediate, non-recovered state. This mode is used for restoring a database backup and multiple transaction logs, or when multiple RESTORE statements are needed.
- Standby mode to allow restore of additional transaction logs: In this mode, Druva allows a database to be brought up for the read-only access between the transaction log restores. This mode is used in the warm standby server situations or special recovery situations to inspect the database between the log restores. If you select this mode, perform the following tasks:
- Download Logs till: You can download the transaction logs between the time frame specified above this field. Select a date and time.
- Restore Location: Enter an absolute path of the location where you want to restore additional transaction logs. You can also browse to that location.
- Click Finish. After the restore job completes, Druva leaves the database in the selected mode.
Note: After restoring to Replace Original Database is completed, log backup fails until the next scheduled Full backup is triggered. You can avoid this scenario by manually triggering backup from Backup Now.
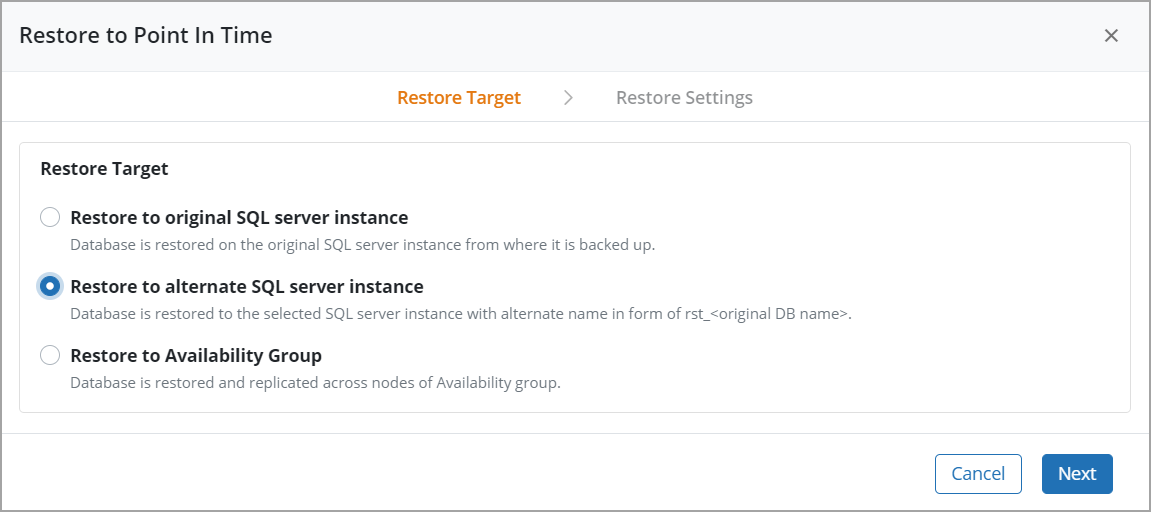
Restore to alternate SQL server instance
- Log in to the Management Console.
- Select the workload from the Protect menu. Note that if the All Organizations menu is enabled, you have to first select an organization that has the MS-SQL server instances and availability groups, and then select the workload.
- On the All SQL Resources page, click the standalone instance or availability group that hosts the database you want to restore.
- From the standalone instance or availability group details page, under the Configured Backup Sets section, select the backup set and click Restore, or
You can also search for the database from the SQL Backup Sets page using the search box. Select the database, and click Restore.
- In the Restore Type, select Point in Time Restore
- In the Select Date and Time section, select the point in time to which you want to restore the databases. Databases will be restored to the last available committed transaction before the specified point in time.
- Click Show databases to see all the databases that can be restored to the point in time.
- Select the database(s) and click Restore.
- In the Restore Target page, select Restore to alternate SQL server instance.
- In the Restore Settings page, perform the following tasks:
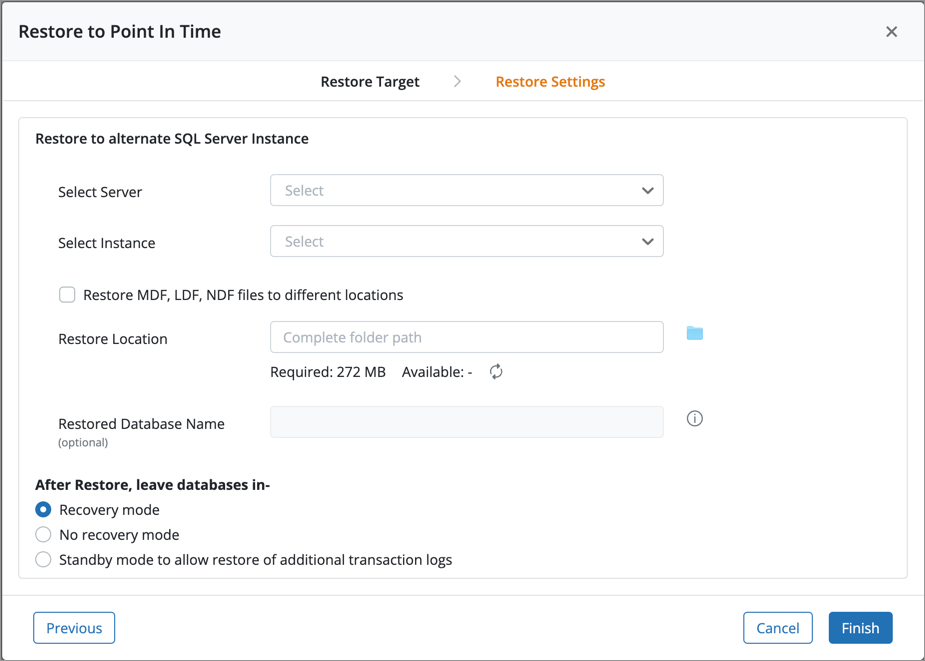
- Select Server: Select the MS-SQL server to which you want to restore the database.
- Select Instance: Select the instance on the selected MS-SQL server to which you want to restore the database.
- Restore MDF, LDF, NDF files to different locations: Select this checkbox to restore the MDF, LDF, and NDF files of the database to different locations on the selected server. If this option is selected, the option to browse or enter an absolute path to the MDF, LDF, and NDF file locations is enabled. Enter the absolute path to MDF, LDF, and NDF files or browse to the locations.
- Restore Location: Enter the absolute path to the restore location or browse to it. Database files are restored to the location you specify. This field disappears if you select the Restore MDF, LDF, NDF files to different locations checkbox.
If there is not enough free space at the selected restore location, then a warning message is displayed to the user that without the required free space, the restore operation will fail.

- Restored Database Name: Optionally, specify the new name of the database that will be created as a result of the restore. This option is available only if you are restoring a single database. If you do not provide a custom name in this field, the name of the database will be rst_<original database name>.
- After Restore, leave databases in-
- Recovery mode: In this mode, Druva rolls back all the uncommitted transactions and keeps the database in the ready state. Druva also ensures that all the data sets restored are consistent with the database and reports errors in case of inconsistencies.
- No recovery mode: In this mode, Druva does not roll back any uncommitted transactions. The database is not usable in this intermediate, non-recovered state. This mode is used for restoring a database backup and multiple transaction logs, or when multiple RESTORE statements are needed.
- Standby mode to allow restore of additional transaction logs: In this mode, Druva allows a database to be brought up for the read-only access between the transaction log restores. This mode is used in the warm standby server situations or special recovery situations to inspect the database between the log restores. If you select this mode, perform the following tasks:
- Download Logs till: You can download the transaction logs between the time frame specified above this field. Select a date and time.
- Restore Location: Enter an absolute path of the location where you want to restore additional transaction logs. You can also browse to that location.
- Click Finish. After the restore job completes, Druva leaves the database in the selected mode.
Restore to Availability Group
Use Druva to recovery point in time databases to an AG. The restored databases are replicated across all the primary and secondary nodes in the AG.
- Log in to the Management Console.
- Select the workload from the Protect menu. Note that if the All Organizations menu is enabled, you have to first select an organization that has the MS-SQL server instances and availability groups, and then select the workload.
- On the All SQL Resources page, click the standalone instance or availability group that hosts the database you want to restore.
- From the standalone instance or availability group details page, under the Configured Backup Sets section, select the backup set and click Restore, or
You can also search for the database from the SQL Backup Sets page using the search box. Select the database, and click Restore.
- In the Restore Type, select Point in Time Restore
- In the Select Date and Time section, select the point in time to which you want to restore the databases. Databases will be restored to the last available committed transaction before the specified point in time.
- Click Show databases to see all the databases that can be restored to the point in time.
- Select the database(s) and click Restore.
- In the Restore Target page, select Restore to Availability Group, and click Next.
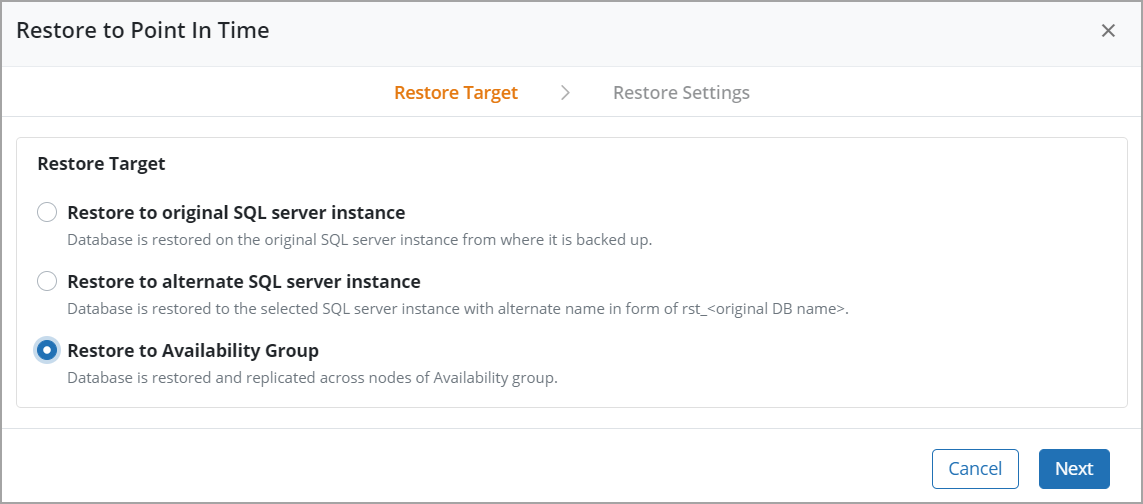
- In the Restore Settings page, perform the following tasks:
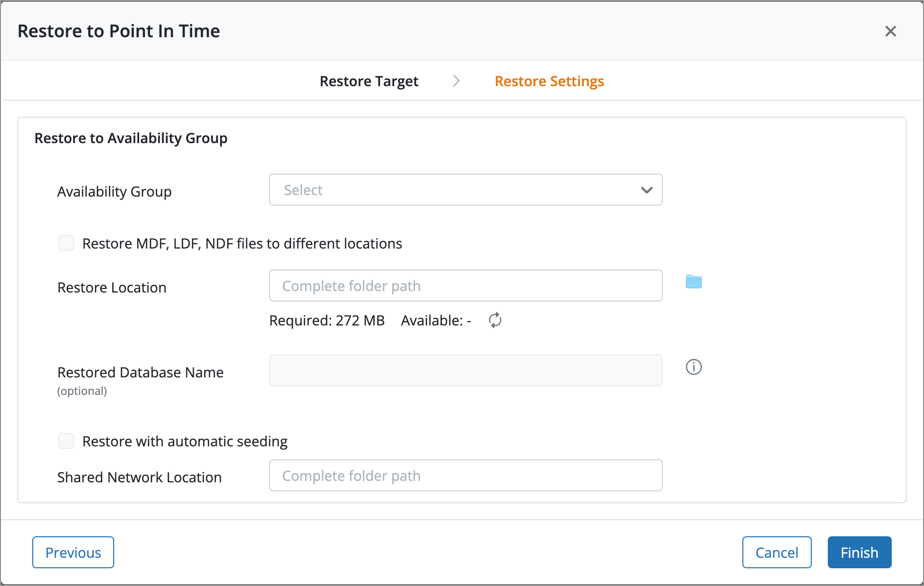
- Availability Group: Select an AG to restore the database to. You cannot restore a database to an AG if an AG isn't configured, or the configured AG has an older client version.
- Restore MDF, LDF, NDF files to different locations: Select this checkbox to restore the MDF, LDF, and NDF files of the database to different locations on the availability group. If this option is selected, the option to browse or enter an absolute path to the MDF, LDF, and NDF file locations is enabled. Enter the absolute path to MDF, LDF, and NDF files or browse to the locations.
- Restore Location: In the Restore Location box, type or select the absolute path to the restore location. This option disappears if you enable the Restore MDF, LDF, NDF files at different locations check box.
If there is not enough available free space at the selected restore location, then a warning message is displayed to the user that without the required free space, the restore operation will fail.

SQL Server 2016 and later versions support the Automatic Seeding feature for an AG. This feature allows you to automatically replicate the restored databases to all the nodes in the AG. If the automatic seeding feature is enabled in your setup, we recommend selecting the Restore with automatic seeding check box. Else, you can specify the shared network location to manually replicate the database across the nodes in the AG. - Restored Database Name: Optionally, specify the new name of the database that will be created as a result of the restore. This option is available only if you are restoring a single database. If you do not provide a custom name in this field, the name of the database will be rst_<original database name>.
- Restore with automatic seeding: Select this option to automatically replicate the restored databases to all the nodes in the AG. When you select this check box, the Shared Network Location field disappears from the page. You can use this option for SQL Server 2016 and later versions. For SQL Server 2012 and SQL Server 2014, you must manually replicate the database to all the nodes in the AG by specifying the shared network location.
- Shared Network Location: Enter the absolute path to the network location to synchronize the database across the primary and secondary nodes in the AG. Ensure that this shared network location is accessible to all the nodes in the AG. The Shared Network Location field is mandatory in SQL Server 2012 and SQL Server 2014; however, it is optional in SQL Server 2016. This field disappears if the Restore with automatic seeding check box is enabled.
- Click Finish.
Restoring database to a point-in-time with the standby mode enabled
When you restore the database using a transaction log, Druva provides an option to leave the database in the standby mode. If you select the option to leave the database in the standby mode, you can restore your database to another point-in-time using transaction logs.
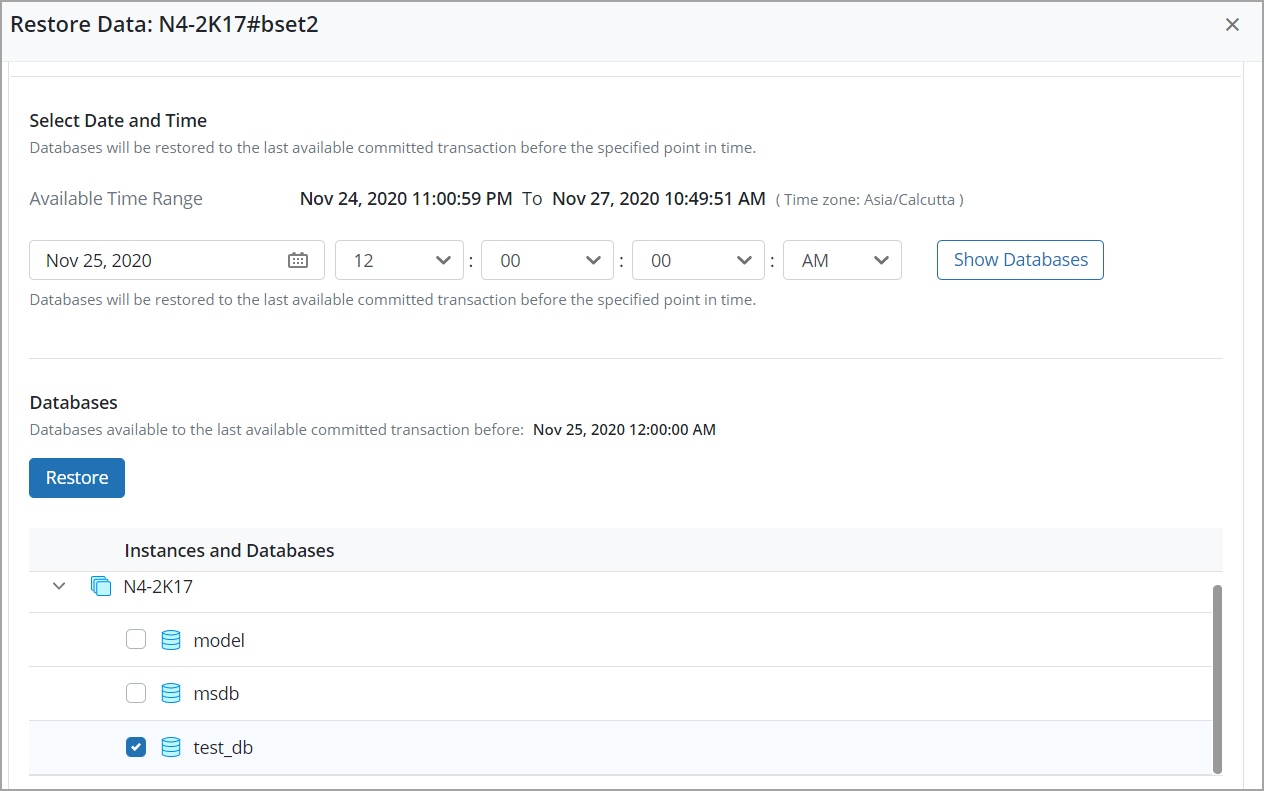
Assume that your available time range is Nov 24, 2020 11:00:59 PM to Nov 27, 2020 10:49:51 AM, and you select Nov 25,2020, 12:00:00 AM as your point in time. Druva shows you all the available databases to the last available committed transaction before Nov 25, 2020, 12:00:00 AM for restore.
After restore, you can choose to leave the databases in Standby mode. Druva allows you to download logs from the specified point-in-time till the last available committed transaction before Nov 27, 2020, 10:49:51 AM. If you select Nov 26, 2020 12:00:00 AM, your database is restored to the transaction on Nov 25,2020, 12:00:00 AM, and you can download logs that you can use to restore your database upto Nov 26, 2020 12:00:00 AM.
Use the following command to apply logs:
Restore log [DB_name] from disk=’log location’ with standby=’path_to_standy_file’, stopat=’timestamp’
Where the timestamp format is: 2020-11-26 12-00-00.
If the standby mode is not enabled:
- Your database is restored to the transaction that was logged closest to the time you specified.
- Your database is made operational.
- All the subsequent transaction logs are deleted, and there is no way you can restore your database to a transaction that was logged after the time you specified. In this example, you cannot restore your database to a transaction that was logged after Nov 26,2020 12:00:00 AM.
Point-in-time restore workflow
The following table depicts the point-in-time restore workflow using transaction logs:
| Step | Operation |
|---|---|
|
1 |
You initiate a point-in-time restore. |
|
2
|
Druva checks if the Hybrid Workloads agent is running.
|
|
3 |
Druva validates the restore destination (Original, alternate, or availability group) and the location on the restore destination.
|
| 4 | Druva validates if the SQL Server instance is available for restore. If the restore job replaces the original database, Druva also checks if the database is available for restore. |
| 6 | Druva checks the free space available for restore and starts the restore job by identifying filesets for restore. Druva sequentially downloads filesets to the restore destination. Within a fileset (which might contain data belonging to more than one database), Druva simultaneously downloads files that belong to different databases. After the download of a fileset completes, Druva downloads the next fileset (which might also contain data that belongs to one or more databases) to the restore destination. |
| 7 | Druva uses the following syntax for the restore: <destination path>\<snapshot>\<Request ID>\<Fileset>\<Actual file>. The <Request ID> folder uniquely identifies each restore job. |
|
8 |
The Hybrid Workloads agent picks up the transaction logs from the restore location, and:
If the original database is getting replaced, the Hybrid Workloads agent terminates all connections to the database and then restores it using the downloaded transaction logs. |
| 9 | If the database is restored to an availability group, the Hybrid Workloads agent either restores the database to the specified shared network location and syncs the database to all the secondary nodes or uses the automatic seeding if available. |
After the restore completes:
- If Recovery mode is selected, the database appears as active for the instance that you specified.
- If No recovery mode is selected, the database appears as Restoring for the instance that you specified.
- If Standby mode to allow restore of additional transaction logs is selected, the database appears as Standby/Read-Only for the instance that you specified.
- If Restore to Availability Group is selected, the database appears as synchronized on all the nodes of the AG.
Restoring the database to a marked transaction
Druva allows you to restore your database to a transaction you marked while committing a transaction. The transaction mark restores let you restore your databases to a consistent state until a particular transaction updated your database. Transaction mark restores use log backups that are triggered incrementally after a full backup completes and a recovery point exists.
Restore of an AG to the original server restores the database to the instance of the primary server. MS-SQL server does not replicate marked transactions related to the transaction logs on the secondary nodes for AG databases. If you try to restore a transaction mark for an AG backup set from Druva, you may or may not see marked transactions that were created on the MS-SQL server, depending on whether the log backup happened from the primary or secondary node.
Procedure
- Log in to the Management Console.
- Select the workload from the Protect menu. Note that if the All Organizations menu is enabled, you have to first select an organization that has the MS-SQL server instances and availability groups, and then select the workload.
- On the All SQL Resources page, click the standalone instance or availability group that hosts the database you want to restore.
- From the standalone instance or availability group details page, under the Configured Backup Sets section, select the backup set and click Restore, or
You can also search for the database from the SQL Backup Sets page using the search box. Select the database, and click Restore. - In the Restore Type, select Transaction Mark Restore.
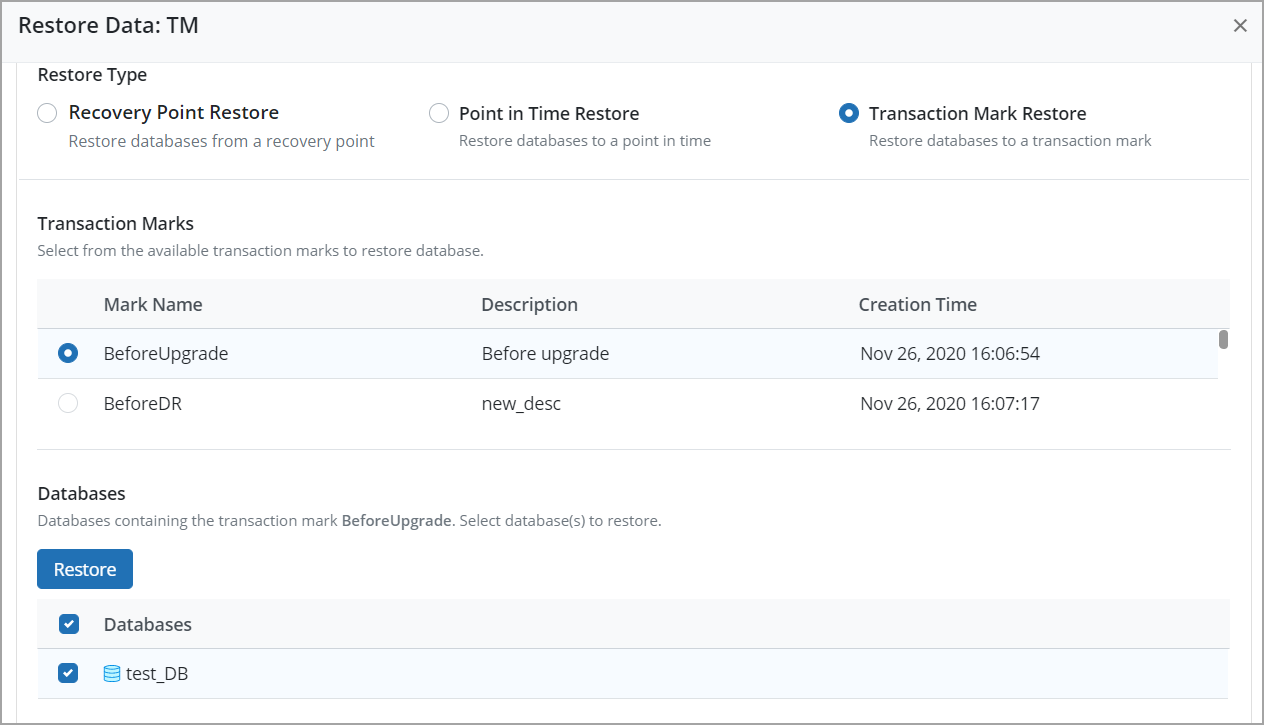
- In the Transaction Marks section, select the transaction mark.
- In the Databases section, select the databases that contain the transaction mark, and click Restore.
- You can either select Restore to original SQL server instance or an Restore to alternate SQL server instance.
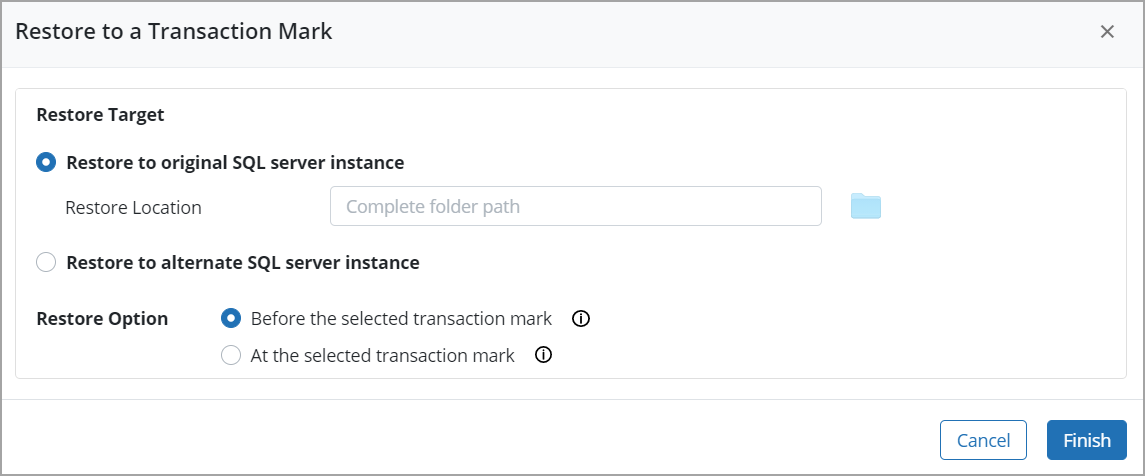
- If you choose to Restore to original SQL server instance, enter the complete folder path of the location on the original server, where you want to restore the database in the Restore Location field.
If you choose to Restore to alternate SQL server instance, enter the following details:

- Restore Location: Enter the complete folder path of the location on the alternate SQL server.
- Select Server: Select the alternate server.
- Select Instance: Select the instance on the alternate server.
- In the Restore Option section, select one of the following:
- Before the selected transaction mark: Roll forward to the marked transaction, and exclude the marked transaction from the roll forward.
- At the selected transaction mark: Roll forward to the marked transaction, and include the marked transaction in the roll forward.
- Click Finish.
Note: Transaction mark restore can fail with SQL8 error if the transaction marks were recorded before logs were backed up.
30352