Configure the inSync Connector
Step 1: Ensure that the inSync Connector can communicate with inSync Cloud or GovCloud
The following table describes the configuration process to enable the inSync Connector to communicate with inSync Cloud or inSync GovCloud.
| Configure inSync Connector with inSync Cloud |
For the inSync Connector to communicate with the inSync Cloud by using a proxy server, see Configure inSync Connector with inSync Cloud by using a proxy server. |
|---|---|
| Configure inSync Connector with inSync GovCloud | For the inSync Connector to communicate with the GovCloud, see Configure inSync Connector with GovCloud. |
Configure inSync Connector with inSync Cloud by using a proxy server
If the inSync Connector has to access the Internet through a proxy server, add the proxy configuration details to the inSyncADConnector.cfg file that is located in the C:\inSyncADConnector directory.
To add the proxy server details
- On the computer where the inSync Connector is installed, stop the Druva inSync Connector service.
- Open the C:\inSyncADConnector directory.
- Open the inSyncADConnector.cfg using a text editor, such as Notepad.
- Provide the required proxy server details for the following parameters in the .cfg file.
Parameter Description PROXY_SERVER IP address and port of the proxy server. Ensure that the port number is for the proxy server that is using HTTP or SOCKS4 or SOCKS5. For example, 192.168.54.100:1080. PROXY_USER Username required for proxy server authentication. This is required only if authentication is necessary to access the Internet. PROXY_PASSWD Password required for proxy server authentication. This is required only if authentication is necessary to access the Internet. PROXY_TYPE Proxy protocol that you are using. inSync supports http, socks4, and socks5 proxy protocols. WPAD_URL The URL of the WPAD location. This parameter is optional and can be used to fetch the PAC file based on the following requirements:
- If you want the inSync Connector to use an internal URL to fetch the PAC file, specify WPAD_URL="http://<internal-wpad-url>.com/wpad.dat"
This URL is accessible only from your organization's internal network/LAN. - You can also configure the inSync Connector to automatically detect the WPAD URL location. In this case, specify WPAD_URL="AUTO"
inSync will try to connect to http://wpad/wpad.dat URL and fetch the PAC file.
- If you want the inSync Connector to use an internal URL to fetch the PAC file, specify WPAD_URL="http://<internal-wpad-url>.com/wpad.dat"
- Save the inSyncADConnector.cfg file.
- Start the Druva inSync Connector service.
Configure the inSync Connector with inSync GovCloud
If the inSync Connector has to communicate with the inSync GovCloud, update the Cloud Master IP parameter in the inSyncADConnector.cfg file that is located in the C:\inSyncADConnector directory.
To update the Cloud Master IP
- On the computer where the inSync Connector is installed, stop the Druva inSync Connector service.
- Open the C:\inSyncADConnector directory.
- Open the inSyncADConnector.cfg file using a text editor, such as Notepad.
- Update the CM_IP parameter to govcloud.druva.com.
- Save the inSyncADConnector.cfg file.
- Start the Druva inSync Connector service.
Note: inSync Connector v5.8 and above for inSync GovCloud is FIPS 140-2 Compliant.
Step 2: Generate a registration key for the inSync Connector
To generate a registration key for the inSync Connector
- On the inSync Management Console, click
 > inSync Settings.
 - Click the Connectors tab.
- In the Connectors area, click Add Connector. The Add Connector window appears.
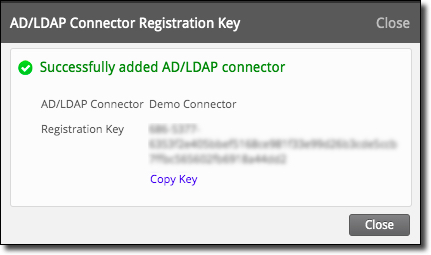
- In the Connector name box, type a name for this inSync Connector, and then click Add and Generate Registration Key. The inSync Connector registration key appears.
- Copy the registration key.
Step 3: Register the inSync Connector
To register the inSync Connector
- On the computer where you have the inSync Connector installed, click Start > Druva inSync Connector Configuration. The Register AD Connector window appears.
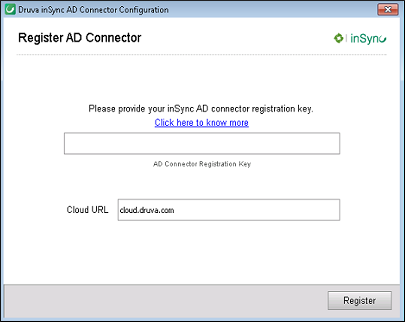
- Type or paste the registration key, and then click Register. For more information on how you can obtain the registration key, see Step 2: Generate a registration key for the Connector.
After the inSync Connector is successfully registered, the connection status appears as Connected.
Note: Do not regenerate the registration key after the inSync Connector is registered. If you regenerate the key, the existing registration key is deactivated.
About inSync Connector Status
Once configured, inSync tracks the inSync Connector status dynamically. Hence, you must refer the > inSync Settings > Connectors tab > Connectors page to verify the inSync Connector status whenever required. inSync also raises alerts on the inSync Management Console and sends alert notifications whenever a Connector is down.
On the contrary, Druva recommends avoiding checking the connector status from its host as it displays a static value and may differ from its status displayed on the inSync Management Console.