Co-branding inSync
Overview
As an organizational policy, you may want your logo and company name to appear on the inSync Client and the alert email notifications sent to the
With
- Display your logo and company name on the inSync Client, inSync Web interface, and alert email notifications.
- Redirect help links to custom help files on inSync Web and alert email notifications.
- Redirect help links to custom Quick Start Guide for inSync Share (if Share is enabled).
- Display support contact information on the inSync Client, inSync Web interface, and alert email notifications.
Add your logo and company name
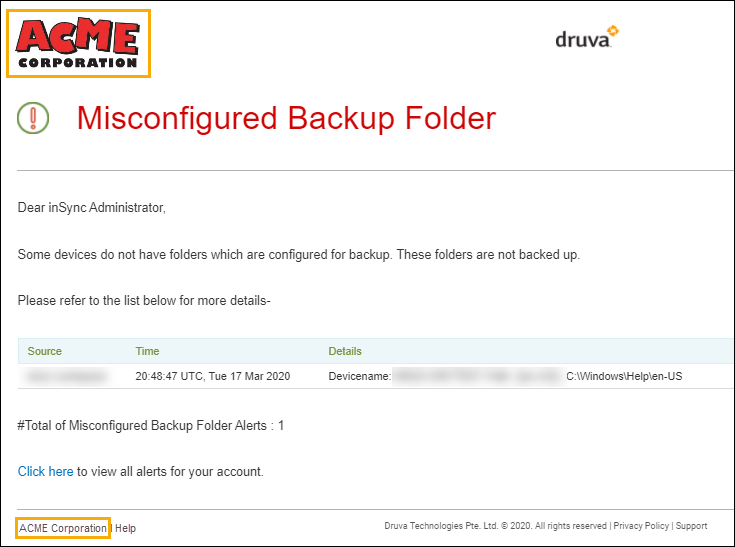
The company name and logo added through this procedure are displayed on:
- inSync Client
- inSync alert notification emails sent to administrators and
end users - inSync Web page
The logo and company name
| inSync Client | 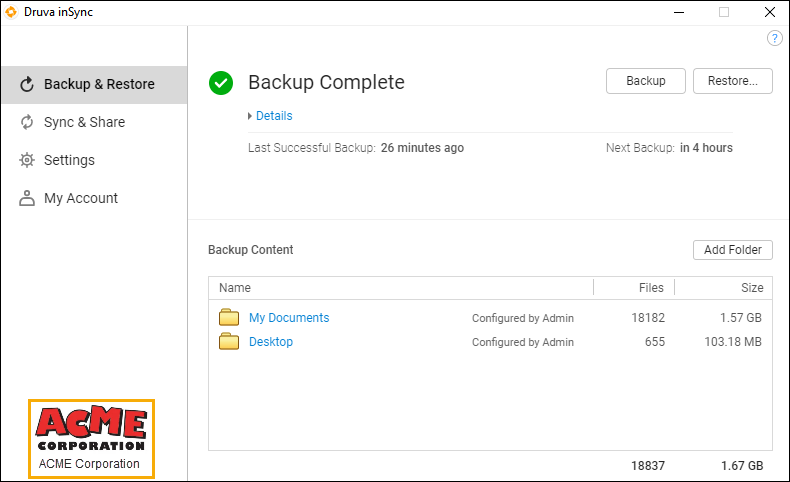 |
| inSync alert notification emails |
Since inSync uses base64 encoded images, co-branded logos are not displayed on emails in Microsoft Outlook. |
| inSync Web | 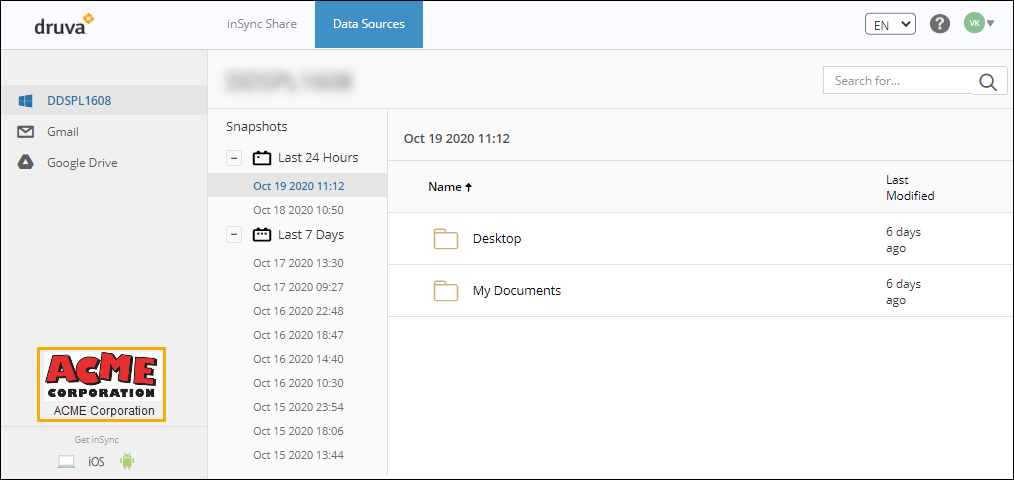 |
Company logo image file specifications
Before you add your logo and company name, ensure that you have the company logo file on the inSync Master. The image file must meet the following criteria:
- Dimension: 120x120 pixels
- Size: up to 32 KB
- File Format: .png
To add your company name and logo:
- On the inSync Management Console menu bar, click
 > Settings.
 - Click the Co-branding tab.
- Click Edit. The Edit Settings window appears.
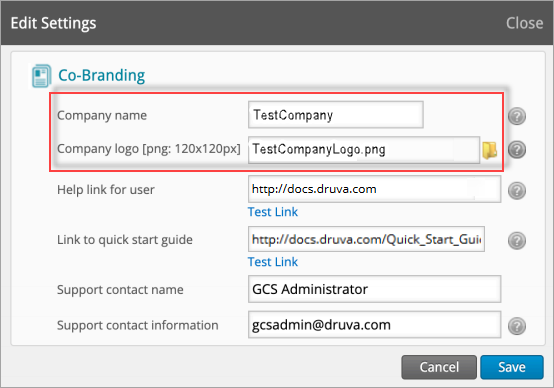
- Provide the appropriate information for each field.
- In the Company name box, type the name of your company. The name should not be more than 50 characters.
- In the Company logo box, browse and select your company's logo.
- Click Save. The company name and log are synced with the inSync Client in the first backup after this configuration.
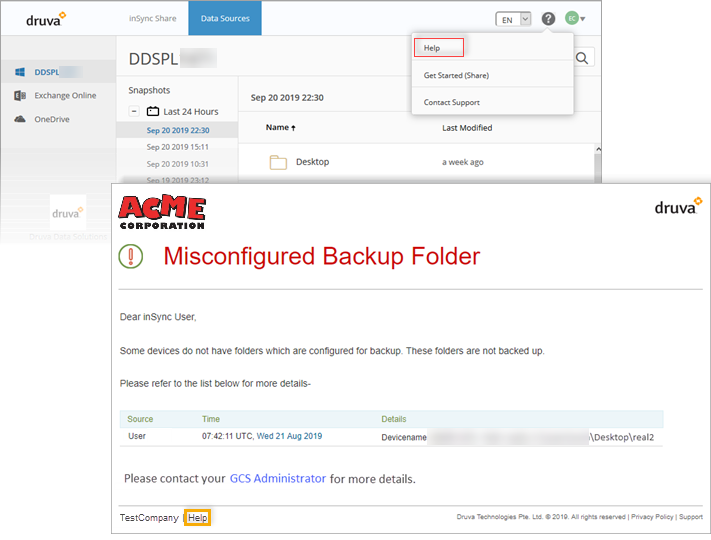
Redirect help links to custom help files
The link configured through this procedure is linked to the Help menu of inSync Web and the help link in the inSync alert notification emails. You can redirect users to custom help files or files and folders shared internally in your environment.
Hence before you add the link, ensure that you
By default, the help link on the inSync Web points to the latest inSync Client documentation.
To add links to custom help files:
- On the inSync Management Console menu bar, click
 > Settings.
 - Click the Co-branding tab.
- Click Edit. The Edit Settings window appears.
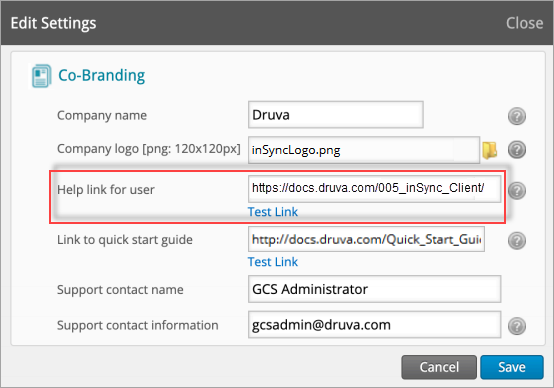
- In the Help link for user box, type the URL to the location of the custom help files.
- Click Save. This custom link is synced with the inSync Client in the first backup after this configuration.
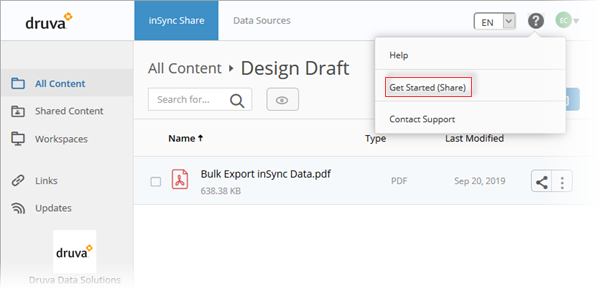
Redirect help links to custom Quick Start Guide for inSync Share
As a Cloud administrator, you can provide a link to
After you specify the link to custom Quick Start Guide, the link will be updated during next inSync Client backup on your device. If you do not specify a link to Quick Start Guide, the users would be redirected to default inSync Share documentation.
Before you begin
Before you add
- The organization has purchased the inSync Share add-on.
- You have created
custom Quick Start Guide for users in your organization, and uploaded the guide to a shared location or on your intranet. - The link to custom Quick Start Guide does not contain special characters. For example, 'ø'.
To add a link to custom Quick Start Guide:
- On the inSync Management Console menu bar, click > Settings.
- Click the Co-branding tab.
- Click Edit. The Edit Settings window appears.
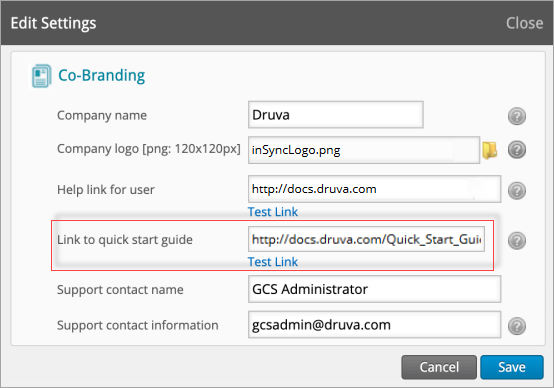
- In the Link to quick start guide box, type the URL to the custom Quick Start Guide.
- Click Save. This custom link is synced with the inSync Client in the first backup after this configuration.
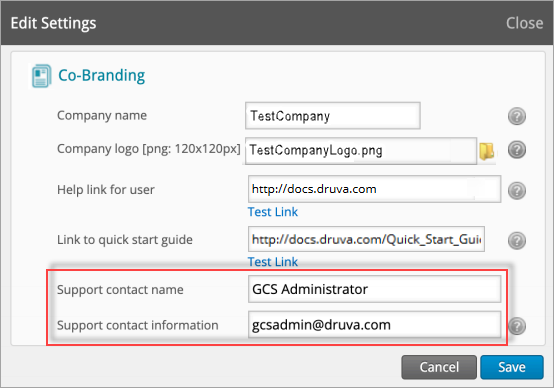
Display support contact information
The support contact information added through this procedure is displayed on inSync alert notification emails sent to
inSync Client users may require your assistance at any point in time. The users can route their support queries through the contact information that you configure through this procedure. You can configure a value, such as names, designations, numbers, or an email address, which can open an email client, a phone dialing application, a support link, or a shared folder on your intranet. The contact information is displayed as a
To add support contact information:
- On the inSync Management Console menu bar, click > Settings.
- Click the Co-branding tab.
- Click Edit. The Edit Settings window appears.
The text in the Support contact name field is displayed as a hyperlink and resolves to open an email client, a phone dialing app, or a support link depending on what you configure in the Support contact information field. -
Refer the table below to configure the values in the Support contact name and Support Contact information fields.
Ensure you use tel: or mailto: while specifying the phone contact or email address. In absence of tel: or mailto:, the hyperlink fails to find the default phone or email application and redirects to a browser.
Support contact name
(Example values)Support contact information
Displayed as
When clicked
GCS Administrator
http ://<website URL>or
https://<website URL>
or
file:///
- On inSync Client and inSync Web:
- Displays the entire web link or folder path.
- In alert notification emails:
- Displays GCS Administrator as a hyperlinked text.
Opens the web page (specified in <website URL>) or the file location
GCS Administrator
mailto: <email address>
For example:
- On inSync Client and inSync Web:
- Displays the entire email address prefixed by mailto: ..
- In alert notification emails:
- Displays GCS Administrator as a hyperlinked text.
Opens the default email application of the user's device
GCS Administrator
tel:<+X-XXX-XXX-XXXX>
For example:
tel:+XX-XXX-XXX-XXXX
- On inSync Client and inSync Web:
- Displays the entire phone number prefixed by mailto:
- In alert notification emails:
- Displays GCS Administrator as a hyperlinked text.
Opens the default phone dialing
application of the user's device. - On inSync Client and inSync Web:
- Ensure the configured values, such as web link, email address, or phone numbers are working and click Save.
This support contact information is synced with the inSync Client in the first backup after this configuration.