Configure Single Sign-On with Okta for Managed Services Center
Learn about how to configure SSO with Okta for Managed Services Center.
Overview
Using Okta as an Identity Provider, administrators can allow users to sign in directly to Managed Services Center.
Keep the following information handy
- ACS URL: https://login.druva.com/api/commonlogin/mspsamlconsume
- Audience URI (Entity ID): MSC-login
Procedure
Step 1: Launch Okta to select the sign-in method
- In the Okta Admin Console, go to Applications > Applications.
- Click Create App Integration.
- Select SAML 2.0 as the Sign-in method.
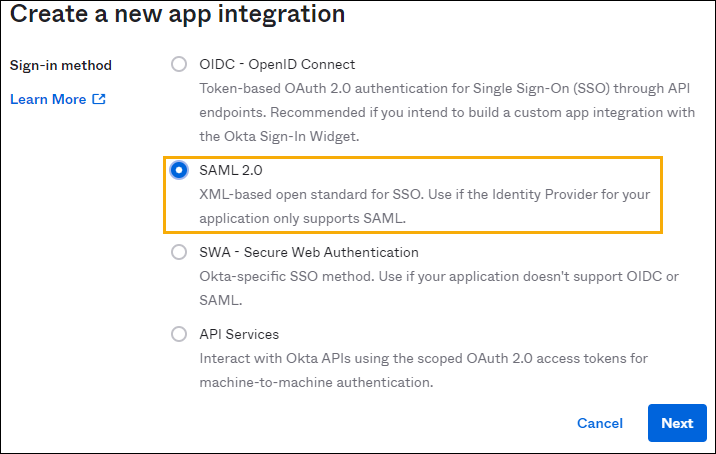
- Click Next.
Step 2: Configure General Settings
- Specify the name of your app. You can use any name.

- Add a logo for your app (optional).
- If you want to hide your app from your users' homepage, select the App visibility checkbox (optional).
Step 3: Configure SAML General settings
- Provide the Single Sign-on URL (Copy the ACS URL given in the overview section).
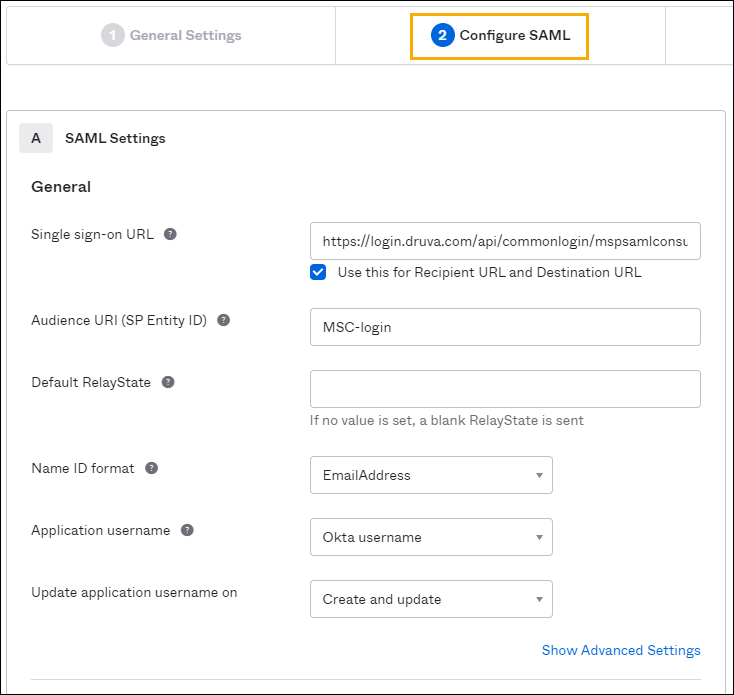
- Provide the Entity ID (Copy the Entity ID given in the overview section).
- Select the EmailAddress from the drop-down lists of formats for the Name ID format.
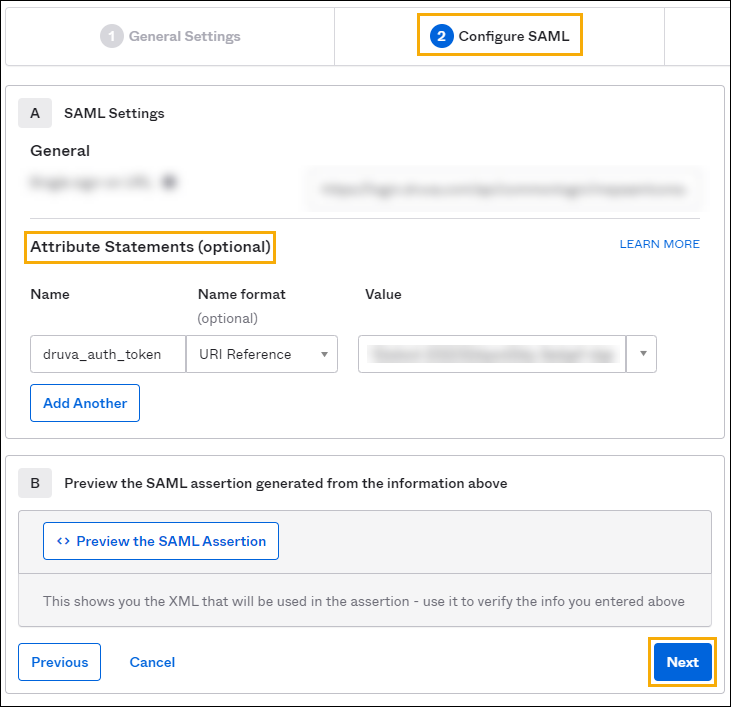
Step 4: Configure the SSO token obtained from Managed Services Center:
- Generate and copy the SSO token from Managed Services Center.
- Navigate to the OKTA Application, and go to Configure SAML tab. Under the Attribute Statements (Optional) section, enter the following attributes:
Attribute Value Name druva_auth_token Value Paste SSO token generated in MSC - Click Next.
Step 5: Select the option to configure Druva MSC in Okta
- Select I'm a software vendor. I'd like to integrate my app with Okta.
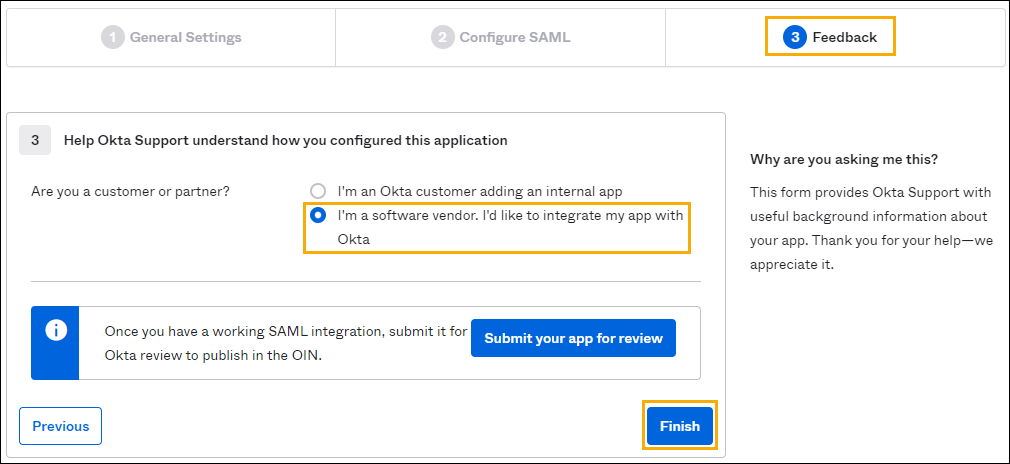
- Click Finish. Your integration is created in your Okta org.
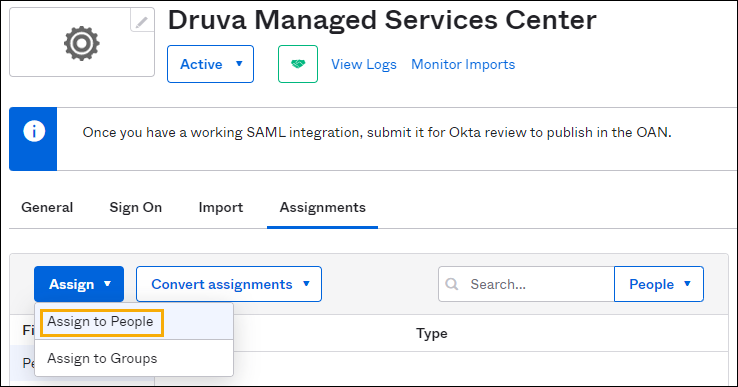
Step 6: Assign the MSC app to administrators (users)
- Select the MSC app and go to the Assignment tab.
- Click the Assign button from the top-left corner, and then select Assign to People from the drop-down list.
- Search for administrators and click the Assign button available in front of that administrator.
- If you want to change the user name, edit it and then click the Save and Go back button.
Note: The username should match the email address used for MSC Administrators. - Click Done to complete the action.
Step 7: Get IdP login URL and Certificate
- To update the Single Sign-on settings in the Managed Services Center
- Copy the IdP login URL and certificate from Okta.
- Go to Managed Services Center and paste the IdP login URL and certificate in the appropriate fields.
(Optional) SAML Authentication requests and encrypt assertions
The AuthnRequests Signed and Encrypt assertions are optional settings in Managed Services Center. If you want to add more security to your SSO, you can enable these settings.
Procedure
Step 1: Enable AuthnRequests Signed or Encrypt Assertions setting
- Sign in to Managed Services Center.
- Go to Settings > Access Settings.
- In the Single Sign-on section, click Configure SSO (if this is your first time configuring SSO) or click Edit to modify existing settings. This will open the Single Sign-on Settings window.
- In the ID Provider Configuration section, select the AuthnRequests Signed or Encrypt Assertions checkbox.
- Click the Save button to complete the action.
Step 2: Save the SSO SAML certificate
- Copy the following SSO SAML Druva certificate and save it in a .crt format to update it in your IdP:
-----BEGIN CERTIFICATE-----
MIII1jCCB76gAwIBAgIQDkkz4BakMOMKdVy+94znqjANBgkqhkiG9w0BAQsFADB1
MQswCQYDVQQGEwJVUzEVMBMGA1UEChMMRGlnaUNlcnQgSW5jMRkwFwYDVQQLExB3
d3cuZGlnaWNlcnQuY29tMTQwMgYDVQQDEytEaWdpQ2VydCBTSEEyIEV4dGVuZGVk
IFZhbGlkYXRpb24gU2VydmVyIENBMB4XDTIzMDIxNzAwMDAwMFoXDTI0MDMxOTIz
NTk1OVowgcYxEzARBgsrBgEEAYI3PAIBAxMCVVMxGTAXBgsrBgEEAYI3PAIBAhMI
RGVsYXdhcmUxHTAbBgNVBA8MFFByaXZhdGUgT3JnYW5pemF0aW9uMRAwDgYDVQQF
Ewc0ODI0NDY3MQswCQYDVQQGEwJVUzETMBEGA1UECBMKQ2FsaWZvcm5pYTESMBAG
A1UEBxMJU3Vubnl2YWxlMRMwEQYDVQQKEwpEcnV2YSBJbmMuMRgwFgYDVQQDEw9s
b2dpbi5kcnV2YS5jb20wggEiMA0GCSqGSIb3DQEBAQUAA4IBDwAwggEKAoIBAQDm
MpOVn2R8Y9AAUigJ3GwdaIBw8pR4Ez/7uokcGw5+hxBdNlylPoyHKBrtaZ1bDRaj
KpLm9a38VOOD0ftbhTWQJwHkgJZ1ALeGZArbcc8OPRPVAYx7ofLkqP7hnkKGlZrn
E317+7du2vrfyP3O5OrmBAprDgaLmcM5Y9B+Ce/n3euwWAEz/DkLn6HKHiz9mLXh
Pd4v6ChHuW2f9fRPCTW6zHCCztoWEpggk7ETAZQP+/dWV570O/0caJW/6DXUWq01
9TWQEFBIgne37NTsjHa9+FSsUjCZHkR0oci6fbCcnrdU/gs0zDsdzKnLoT3s9ycB
PR1YzSrICPpRxrIi0cI7AgMBAAGjggUOMIIFCjAfBgNVHSMEGDAWgBQ901Cl1qCt
7vNKYApl0yHU+PjWDzAdBgNVHQ4EFgQUy9is/5NPZIBlGOIElH8NvuYJUL4wggG9
BgNVHREEggG0MIIBsIIPbG9naW4uZHJ1dmEuY29tghFjb25zb2xlLmRydXZhLmNv
bYISZDFhdXRodjMuZHJ1dmEuY29tghVnb3ZkMWF1dGh2My5kcnV2YS5jb22CEmdv
dmxvZ2luLmRydXZhLmNvbYIUZ292Y29uc29sZS5kcnV2YS5jb22CFGRlbGwtbG9n
aW4uZHJ1dmEuY29tghZkZWxsLWNvbnNvbGUuZHJ1dmEuY29tgg5kZWxsLmRydXZh
LmNvbYIXZGVsbC1nb3Zsb2dpbi5kcnV2YS5jb22CGWRlbGwtZ292Y29uc29sZS5k
cnV2YS5jb22CEWdvdmRlbGwuZHJ1dmEuY29tghRnbG9iYWxhdXRoLmRydXZhLmNv
bYIXZ2xvYmFsZ292YXV0aC5kcnV2YS5jb22CFWFwMS1jb25zb2xlLmRydXZhLmNv
bYIaYXAxLWRlbGwtY29uc29sZS5kcnV2YS5jb22CGmFwMS1kMWF1dGh2My1kY3Au
ZHJ1dmEuY29tghZhcDEtZDFhdXRodjMuZHJ1dmEuY29tghpkZWxsLWFwMS1jb25z
b2xlLmRydXZhLmNvbTAOBgNVHQ8BAf8EBAMCBaAwHQYDVR0lBBYwFAYIKwYBBQUH
AwEGCCsGAQUFBwMCMHUGA1UdHwRuMGwwNKAyoDCGLmh0dHA6Ly9jcmwzLmRpZ2lj
ZXJ0LmNvbS9zaGEyLWV2LXNlcnZlci1nMy5jcmwwNKAyoDCGLmh0dHA6Ly9jcmw0
LmRpZ2ljZXJ0LmNvbS9zaGEyLWV2LXNlcnZlci1nMy5jcmwwSgYDVR0gBEMwQTAL
BglghkgBhv1sAgEwMgYFZ4EMAQEwKTAnBggrBgEFBQcCARYbaHR0cDovL3d3dy5k
aWdpY2VydC5jb20vQ1BTMIGIBggrBgEFBQcBAQR8MHowJAYIKwYBBQUHMAGGGGh0
dHA6Ly9vY3NwLmRpZ2ljZXJ0LmNvbTBSBggrBgEFBQcwAoZGaHR0cDovL2NhY2Vy
dHMuZGlnaWNlcnQuY29tL0RpZ2lDZXJ0U0hBMkV4dGVuZGVkVmFsaWRhdGlvblNl
cnZlckNBLmNydDAJBgNVHRMEAjAAMIIBfQYKKwYBBAHWeQIEAgSCAW0EggFpAWcA
dQB2/4g/Crb7lVHCYcz1h7o0tKTNuyncaEIKn+ZnTFo6dAAAAYZelJIaAAAEAwBG
MEQCIHDufjfLexvJkNgFpxATTlNODzl/Ldgn7cqUSc5gCYrpAiAda4xcfTcJDF61
C9sNjGKdrCvSVrEckSXCNQTTWWj7WAB2AHPZnokbTJZ4oCB9R53mssYc0FFecRkq
jGuAEHrBd3K1AAABhl6UkkEAAAQDAEcwRQIhALaSRUx5xzBKvkYbKsutTIDMP5Kz
6ckLvnduV2jnnnlfAiAaqbtH7JfQUturLdUYYUzx1j7zW8epl/TUwy18eKTG4QB2
AEiw42vapkc0D+VqAvqdMOscUgHLVt0sgdm7v6s52IRzAAABhl6UkhEAAAQDAEcw
RQIhAIPxlpSVc6lVGRCyaMQMBmPAKD7DIhhj3Bqf2/rsJR+RAiB8QzZojoz2Fzj5
M9tlmbMeL+J13+FaWKha1s6l3RGeLDANBgkqhkiG9w0BAQsFAAOCAQEAMM5vAR7X
B29lBdIUMx5SbU+H9EO1O7EGfKysqyBjOj1s6tBsdqHnEsHTaTqPh0RcABRx55k7
6Cdgr22eFYegD9ScYrN6PFLsi6nqQdERF+WTNvBPL2U4F0jOJEmPUrwCln+top0s
XAK5b37UDllE7MDyHQsPMP2T4HYwsA71FC8WBTq0Q91FBTYFRnkkuWvx1s6vfyEY
TYnKDFsq/kBOKipGgkOdPPQAls1c6CPYHYR84v6X5faPvBdyNMd7F+Ns2WK1JZ0O
dcbO6p64x4IT2Ig7KEW3O7tCh2MHSYBVg9T4rWLnP7zAYhnQ5Aq54ZIeTW+iiXm7
C4ZvtNnUAoD51w==
-----END CERTIFICATE-----
This certificate will be the same for both AuthnRequests Signed and Encrypt Assertions.
Step 3: Upload SSO SAML Certificate to IdP
- Copy the SSO SAML Druva certificate provided above and save it in a .crt format.
- Navigate to the OKTA Application, search and select the application from the list.
- In the General tab, edit the SAML settings.
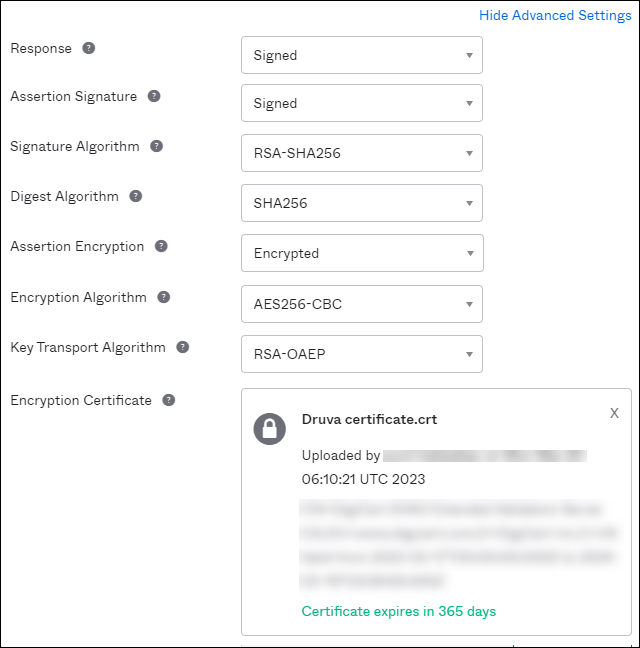
- Click Next, and then click Show Advanced Settings in the Configure SAML tab.
- Change “Assertion Encryption” from Unencrypted to Encrypted.
- Click Browse files for the Encryption Certificate, and then select the saved SSO SAML Druva certificate.
- Click the Next button, and then click finish on the feedback tab to complete the update.