Configure inSync to manage users using SCIM
Overview
Pre-requisite
Procedure
Step 1: Configure Druva inSync to use SCIM to manage users
On the Microsoft 365 / Google Workspace dashboard , click Users > User Provisioning .Click Use SCIM to use SCIM based IdPs to import and manage users. A confirmation box appears. Click Continue. You are redirected to generate a token to integrate IdP with inSync.
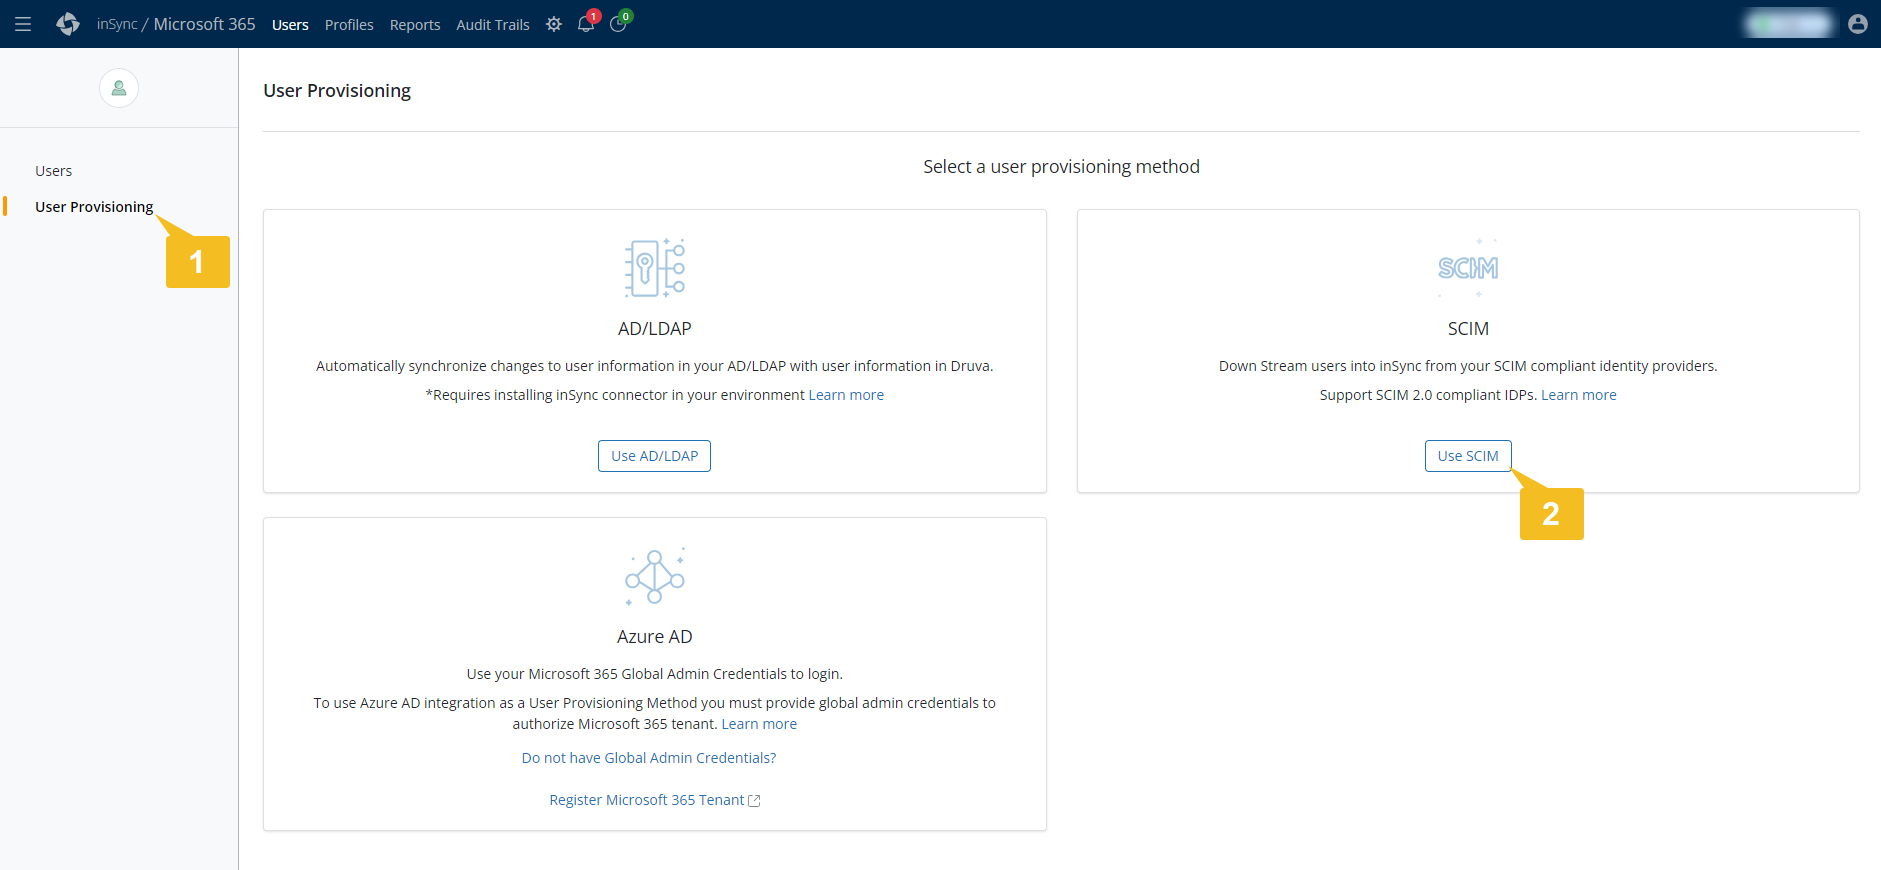
Once you select SCIM for user management in the inSync Management Console, you cannot use AD or LDAP for user management.
Step 2: Generate a token to integrate IdP with Druva inSync
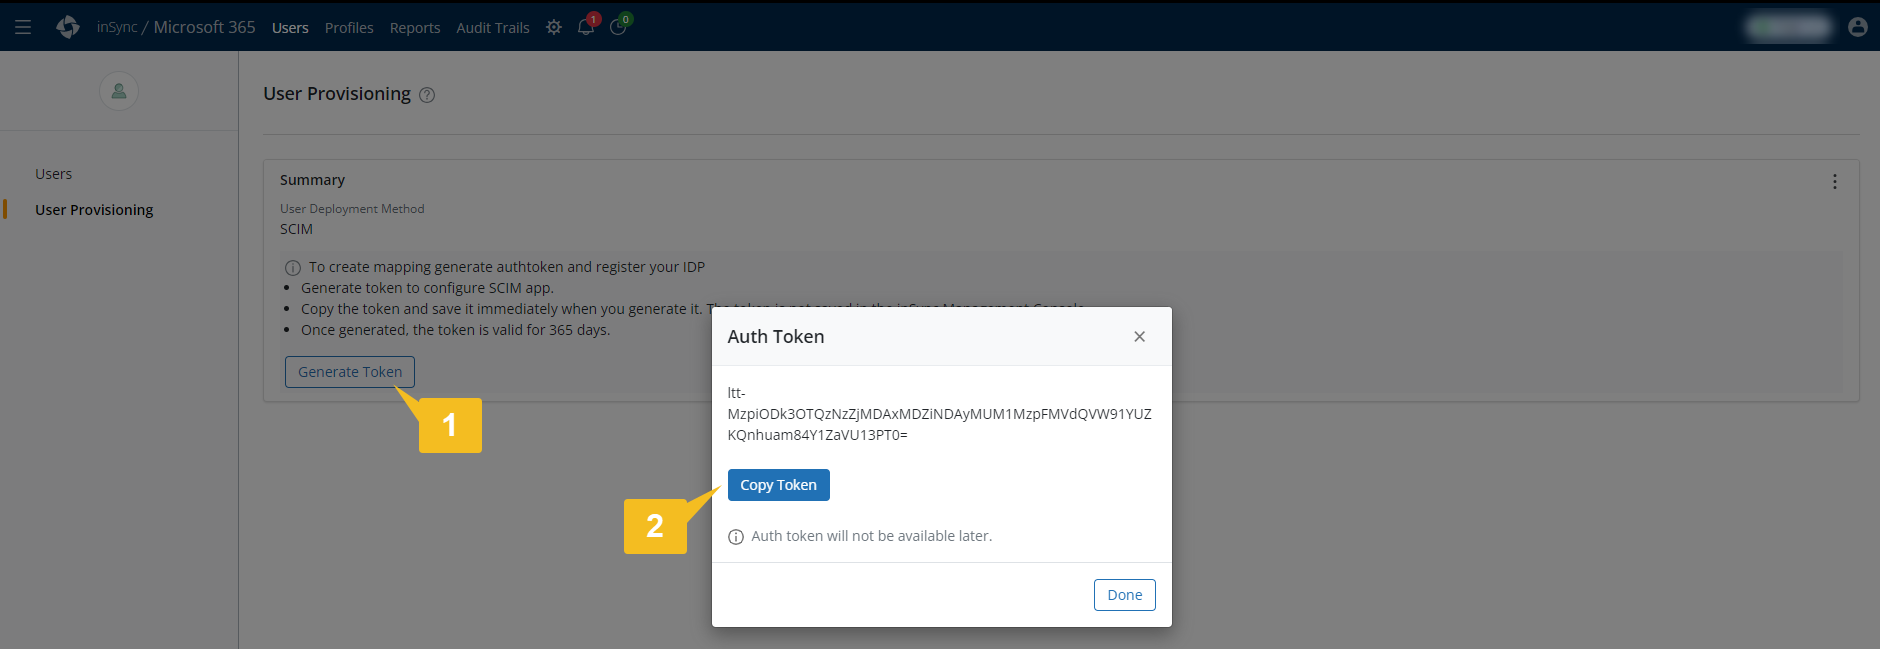
If you see the message - API gateway feature is disabled for your account, kindly contact Druva Support to enable this feature for your account. Only a Druva Cloud administrator and inSync Cloud administrator can generate a token. You must copy the token and save it immediately when you generate it. The token is not saved in the Druva Console. Once generated, the token is valid for 365 days. If you or any other inSync Cloud administrator regenerates a token, the previous token becomes invalid. The new token must be used to reconfigure the existing SCIM app.
In the previous step, after you click Use SCIM , you are redirected to the User Provisioning Summary page. Click Generate Token .- Once generated, copy the new token and securely save it. You will need it for enabling API Integration of IdP with inSync later in Step 5.
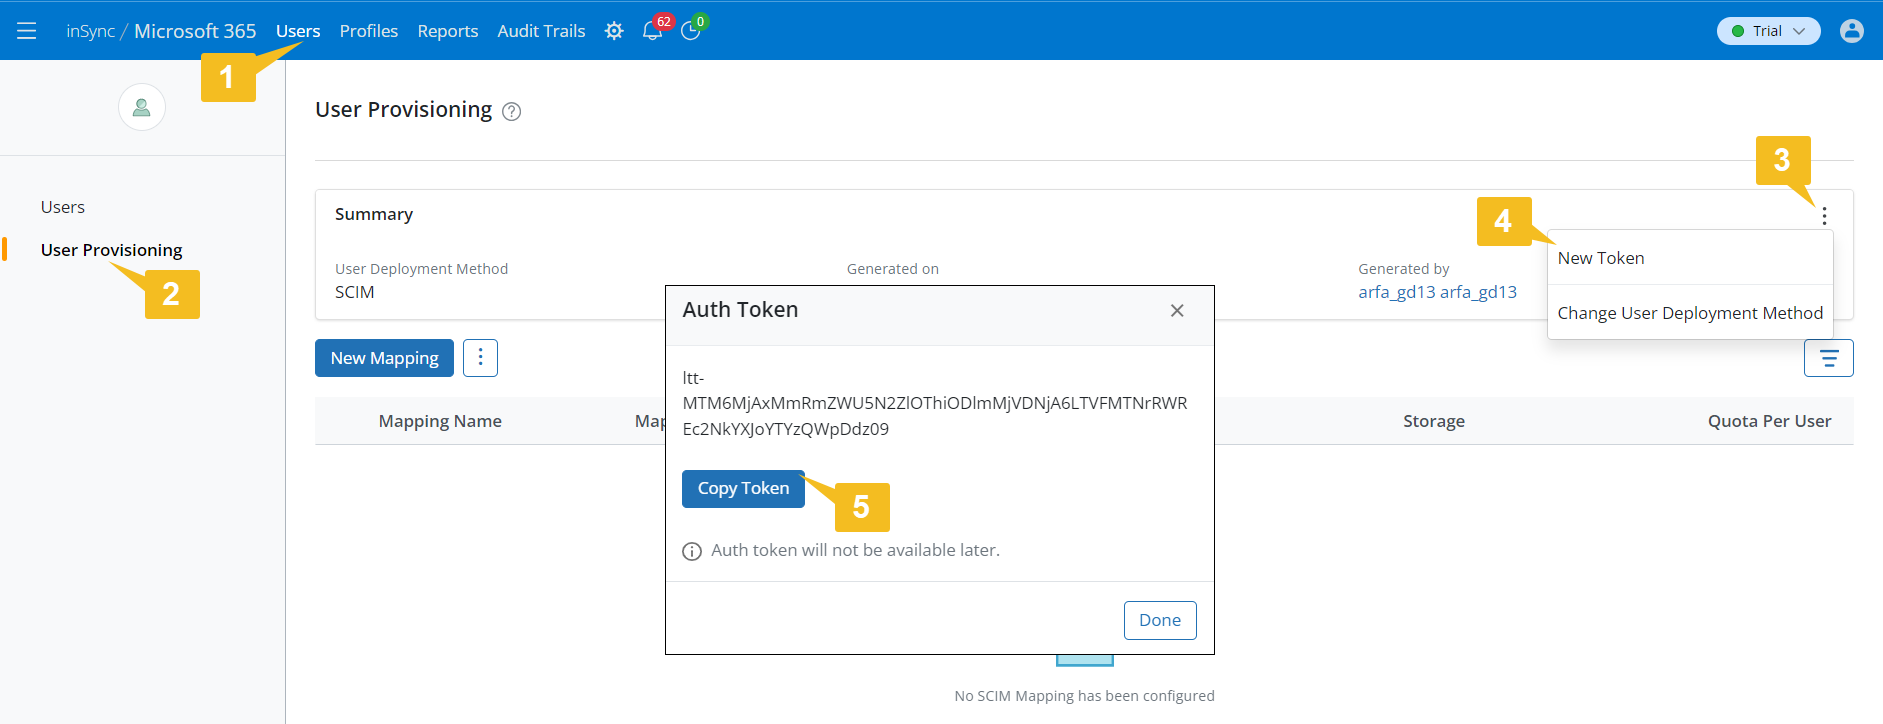
Creating a new token will expire the existing one, and all APIs using the existing token will cease to function.
- Navigate to the Druva Console menu bar and click on Users > User Provisioning.
- On the User Provisioning page, locate and click on the vertical three-dot menu.
- Click New Token.
- Once generated, copy the new token and securely save it. You will need it for enabling API Integration of IdP with inSync later in Step 5.
Step 3: Create a SCIM mapping
The SCIM attributes that you define in the SCIM mapping must be mapped to the IdP attributes in the IdP ; else the user creation fails. If a user does not classify or fall under any SCIM mapping created in Druva inSync , the user account creation fails. Druva recommends that you also create a default mapping with the configuration ' Allow any user '. This default mapping will ensure that any users who do not classify or fall under any of the mappings are created with a default configuration. The priority of this default mapping can be set to lowest. Once you create a SCIM mapping, you can only modify the Mapping Name and inSync configuration. You cannot modify the Users criteria to filter users. The filter is case sensitive. The value you specify in the SCIM mapping and the attribute value in IdP should be in the same case.
Created a Profile - A profile is a set of configuration that is applied to a set of users. Using profiles, you can define the data sources for backup, generic backup configuration parameters that are automatically applied to all the users that belong to that profile. For more information, see Create and manage profiles .Your Druva inSync storage region is configured.
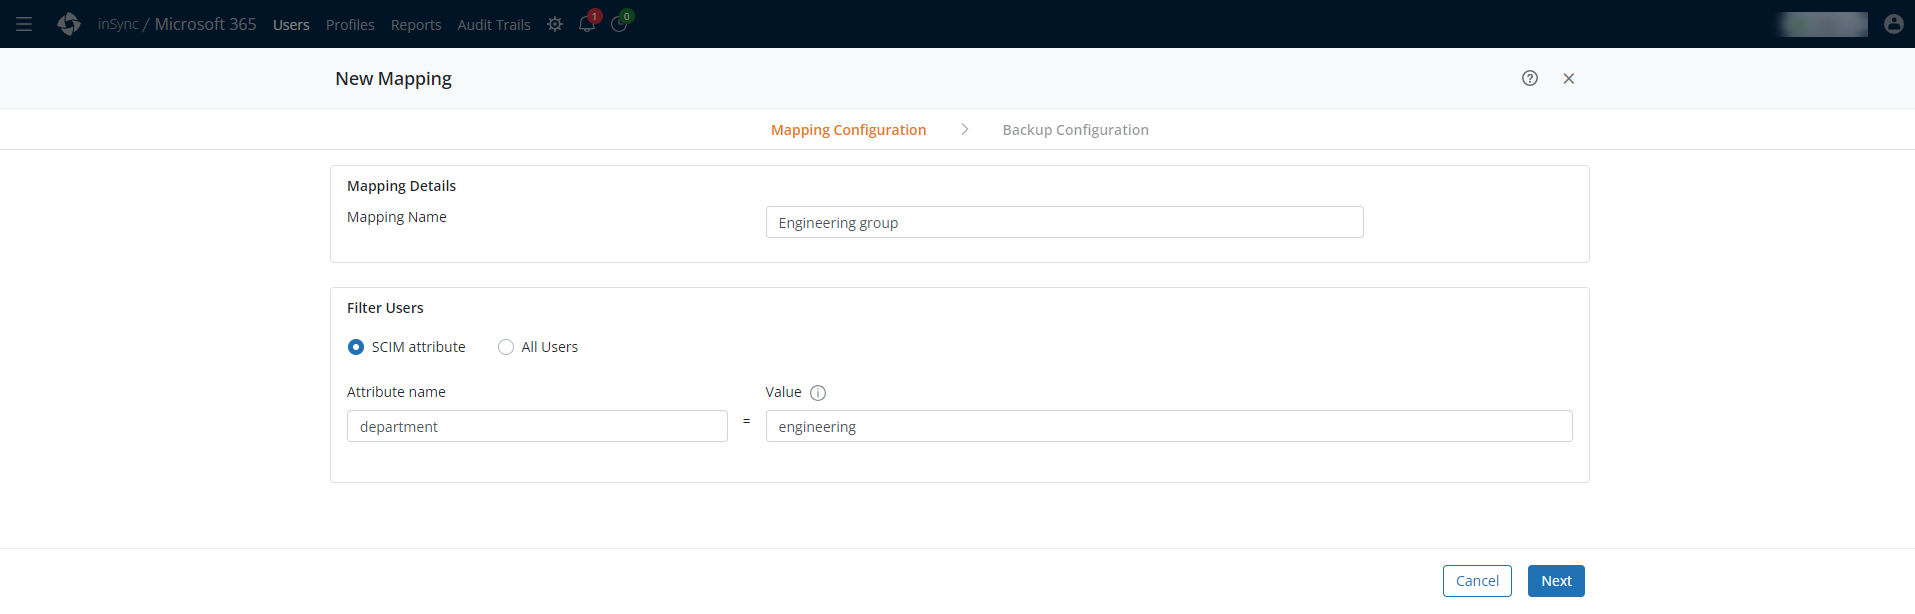
On the Druva Console menu bar, click Users > User Provisioning . Click New Mapping . - On the New Mapping wizard, under
Mapping Configuration tab, specify the following details:Mapping Name - Specify a name for the SCIM mapping. - Under the
Filter Users section,Select SCIM attribute , if you want to configure users based on a specific SCIM attribute and matching values. Specify the SCIM Attribute name . In the Value(s) box, type the value for the attribute.
Click Next .
- On the
Backup Configuration tab, specify the following details:Select the Storage on which the user data should be saved. Select the Profile to which the users should be assigned to if they are mapped using this SCIM mapping. The data lock enabled profile has the lock icon. If you select this profile, you cannot:
Delete the snapshots, users, and devices associated with the profile. Change profile of users. Remove the license of the user.
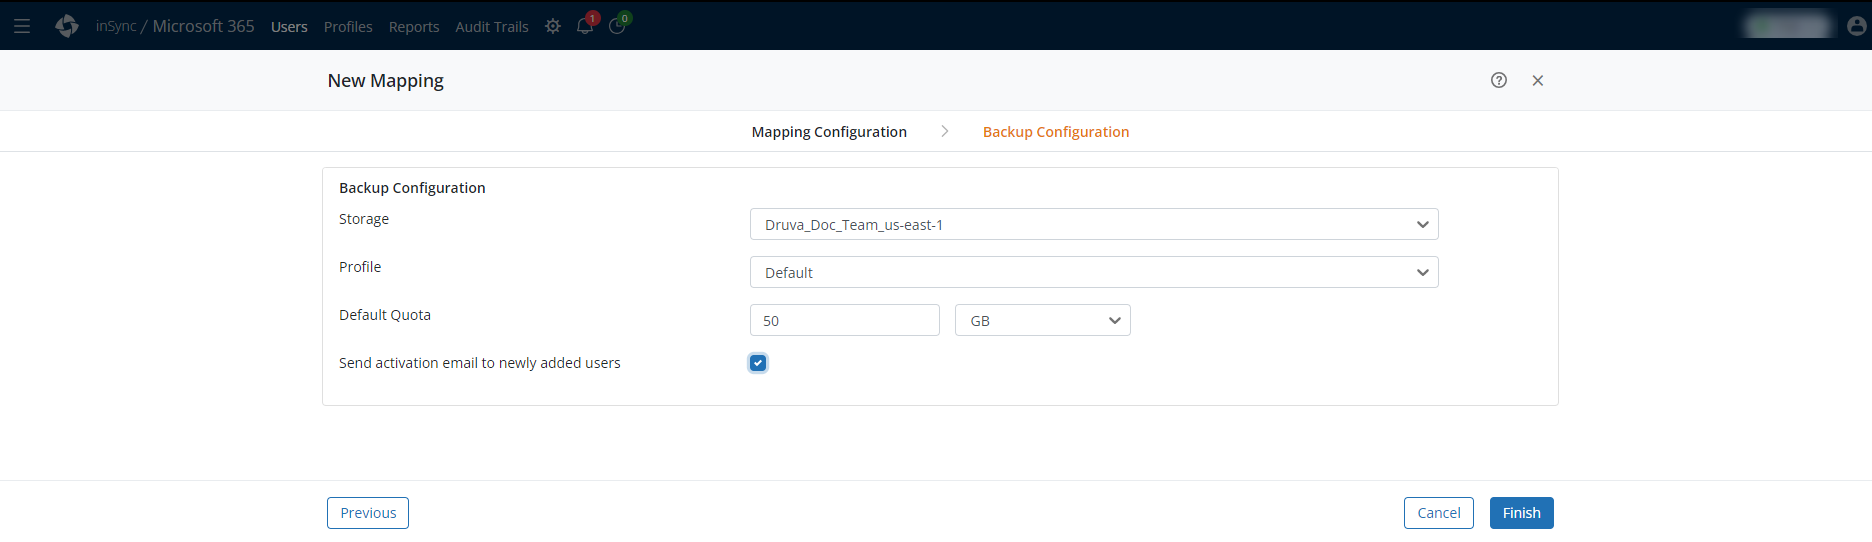
Click Finish .
(Optional) Step 4: Define priority for the SCIM mapping
- General Users Mapping
Import all users from the Engineering department Assign them to General Profile 1 Per-user storage - 5 GB
- Executive Users Mapping
Import Executive users that are also from the Engineering department Assign them to Executive Profile Per-user storage - 50 GB
To change the priority of a SCIM mapping, follow these steps:
- Go to the Druva Console and click on Users > User Provisioning.
- On the User Provisioning page, you can view the details of existing SCIM mappings. Locate the vertical three-dot menu next to New Mapping and click on it.
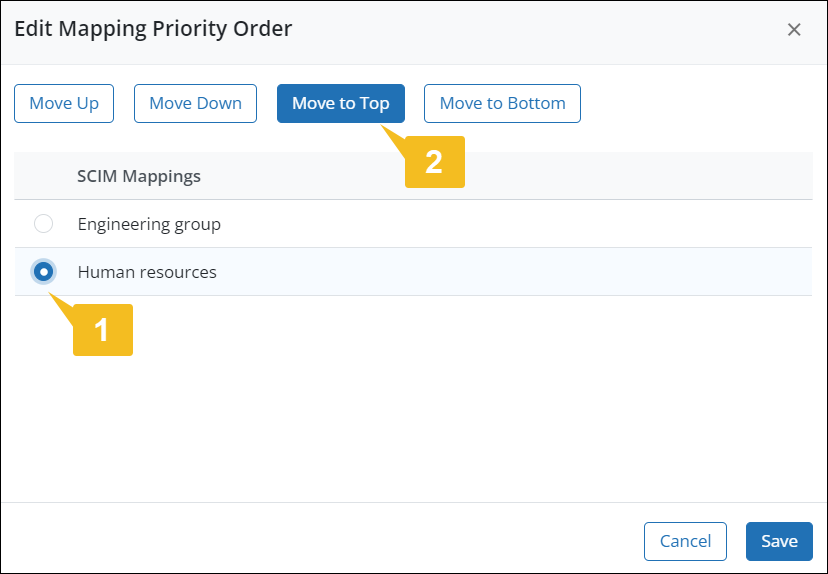
- Select Set Mapping Priority Order from the options provided.
- In the Edit Mapping Priority Order section, you can view the existing SCIM mappings listed according to their defined priorities.
- Choose the SCIM mapping whose priority you want to change.
- Utilize the following options appropriately to adjust the priority of the selected SCIM mapping:
- Move Up: Click this button to increase the priority by one level.
- Move Down: Click this button to decrease the priority by one level.
- Move to Top: Click this button to set the priority to the highest level.
- Move to Bottom: Click this button to set the priority to the lowest level.
- Click Save.
The priority of the selected mapping is updated. inSync classifies users based on the updated priority of the mapping and assigns them the profile and storage
Step 5: Configure IdP to integrate with inSync to manage users
Create a custom SCIM app in the IdP .Enable API Integration with inSync . Configure and map the SCIM attributes with the IdP attributes in the SCIM app. Assign users to the SCIM app.