Restore Data
Overview
The capability to restore data without any downtime is critical to any business. A stable disaster recovery solution ensures business continuity.
Here are a few examples requiring the restoration of Salesforce data with minimal impact on day-to-day business operations.
- If manual errors cause changes to the metadata of an organization, it can impact critical configuration changes. In this situation, you would quickly like to recover only the impacted metadata changes.
- Recover your data quickly when a malicious activity impacts your business-critical data
- Avoid impact on business data due to unintended user errors. Achieve this using selective restore of records or metadata to roll back to the previous stable state of data.
You can select records or metadata from a snapshot and restore them to the same or different Salesforce organization. You can also perform a direct restore of records from a snapshot.
Note: By default, when restoring a deleted record, Salesforce replaces the name of the record creator with the Admin user who initiated the restore in the CreatedBy field. To populate the original name of the record creator, enable the 'Create Audit Fields' permission. For detailed steps, see Salesforce documentation.
Data Restore Workflow
The following workflows are available for enhanced data restoration.
- Restore specific records or metadata from a snapshot
- Restore specific records or metadata from a snapshot using the comparison method
- Bulk restore using a Data Template
When restoring records, the Salesforce App provides the capability to restore all levels of parent-child relationships and also orphan records.
For more information, see Understanding Object Relationships.
Compare and Restore Records
You can restore records using a comparison view of the created, updated, and deleted records. This enables you to reduce the overall recovery time.
Procedure
- On the Salesforce App console, click Data Backup.
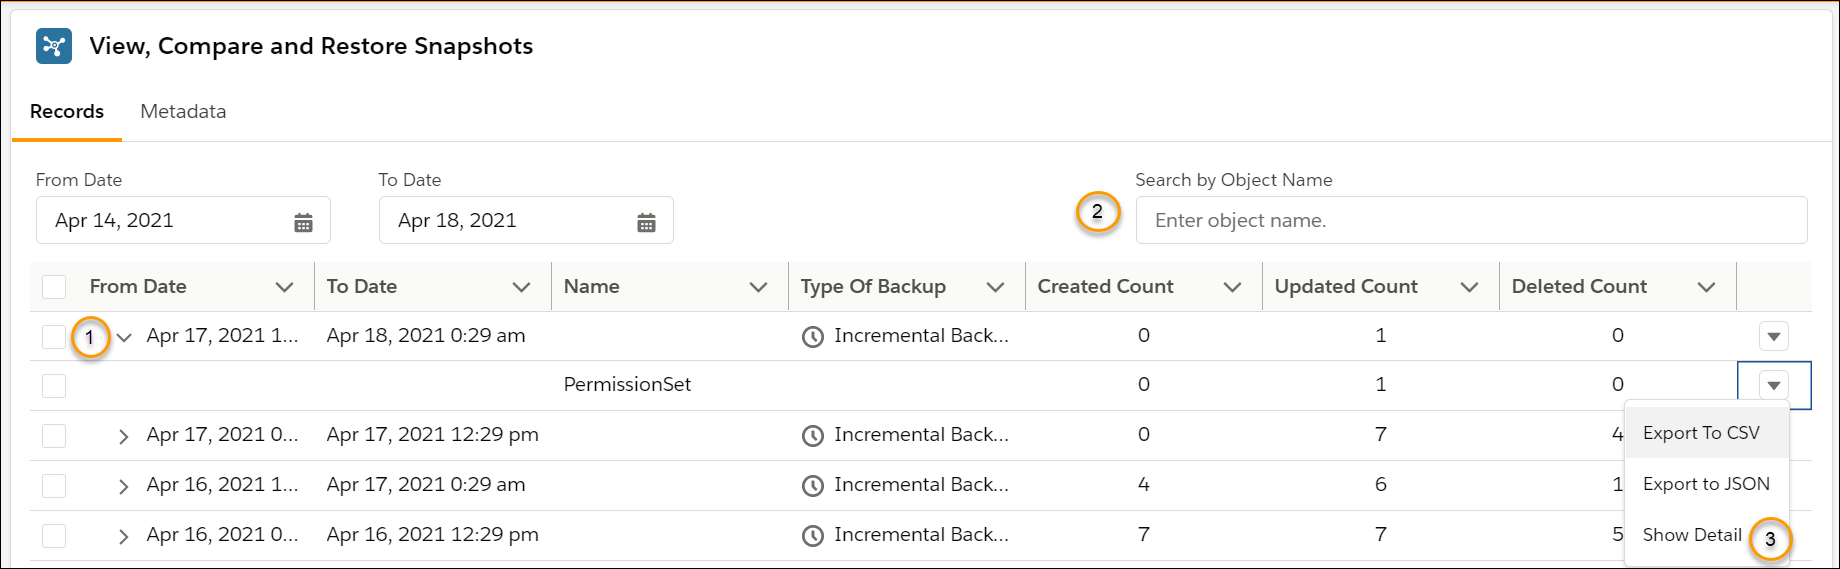
- In the View, Compare, and Restore Snapshots area, click Records.
- Specify the date range to find the list of snapshots within the specified date range. A list of snapshot details with the list of associated records appears.
- Select the records for comparison.
Note:
- A deleted record means the record is deleted from both Salesforce Organization's Recycle Bin and Salesforce User’s Recycle Bin.
- If you have deleted a file saved as a ContentDocument object record, the deleted count does not reflect this update as the replicateable property for this object in Salesforce is set to false. As a result, the object is not replicated via the API. For more information, see getDeleted() call.
| Steps | Description |
|---|---|
| Step 1 | Click the arrow corresponding to a snapshot listing. This displays the snapshot details with a list of associated records, which were created, updated, or deleted. |
| Step 2 | Enter the search criteria in the Search by Object Name search box to filter the records. |
| Step 3 |
Click Export to CSV or Export to JSON to download the record details in CSV or JSON format respectively. Click Show Detail to display details about the associated record. A window with the record details appears. |
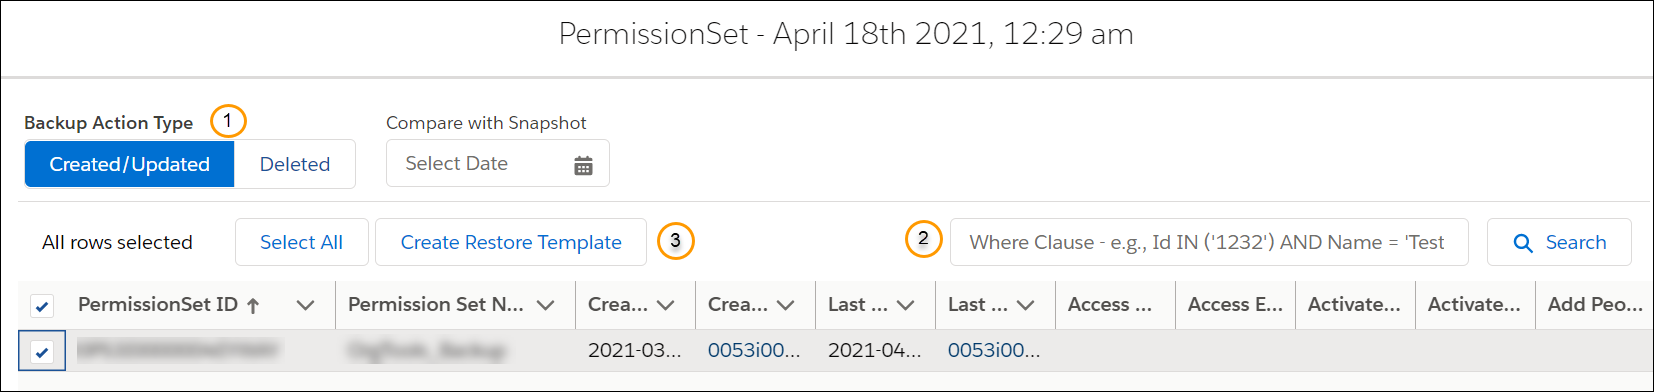
5. Perform the following steps to restore records from the selected snapshot listing.
| Steps | Description |
|---|---|
| Step 1 |
Click Created/Updated or Deleted to filter the records.
|
| Step 2 |
Click Select All to select all displayed records. Alternatively, specify a SOQL statement in the search box, click Search to filter specific records, and then select individual records.
|
| Step 3 |
Click Create Restore Template to create a restore template for the selected records. Enter the following information.
For more information, see Understanding Object Relationships. |
6. If you want to compare records from the selected snapshot with records from another snapshot instance, perform the following steps.
| Steps | Description |
|---|---|
| Step 1 | Enter the date and time of another snapshot instance in the Compare with Snapshot date field. |
| Step 2 |
Click Created/Updated or Deleted to filter the records.
|
| Step 3 |
Click Select All to select all displayed records. Alternatively, specify a SOQL statement in the search box, click Search to filter specific records, and then select individual records.
|
| Step 4 |
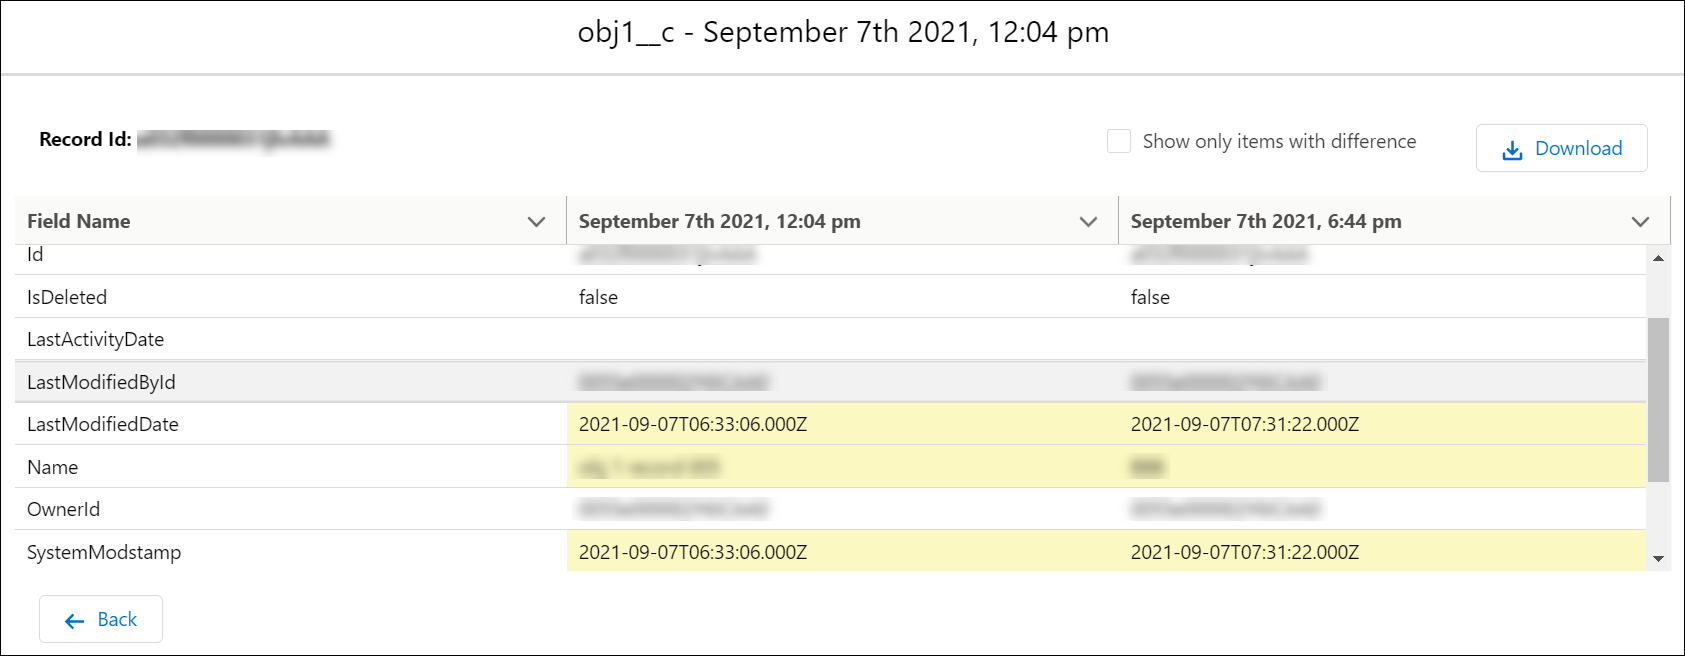
Click View Detailed Record Comparison to display comparison results for a single record selection. This displays a window highlighting the changes to the record as per both snapshots.
Select Show only items with difference to view differences in data at the top of the list for quick analysis.
Click Download to download the record comparison results in a CSV format. |
| Step 5 |
Click Create Restore Template to create a restore template for the selected records. Enter the following information.
For more information, see Understanding Object Relationships. |
7. Select the template and click Show Details. The Data Template window appears.
8. Click Start Data Restore in the top-right corner. A Confirmation - Data Restore Summary window appears.
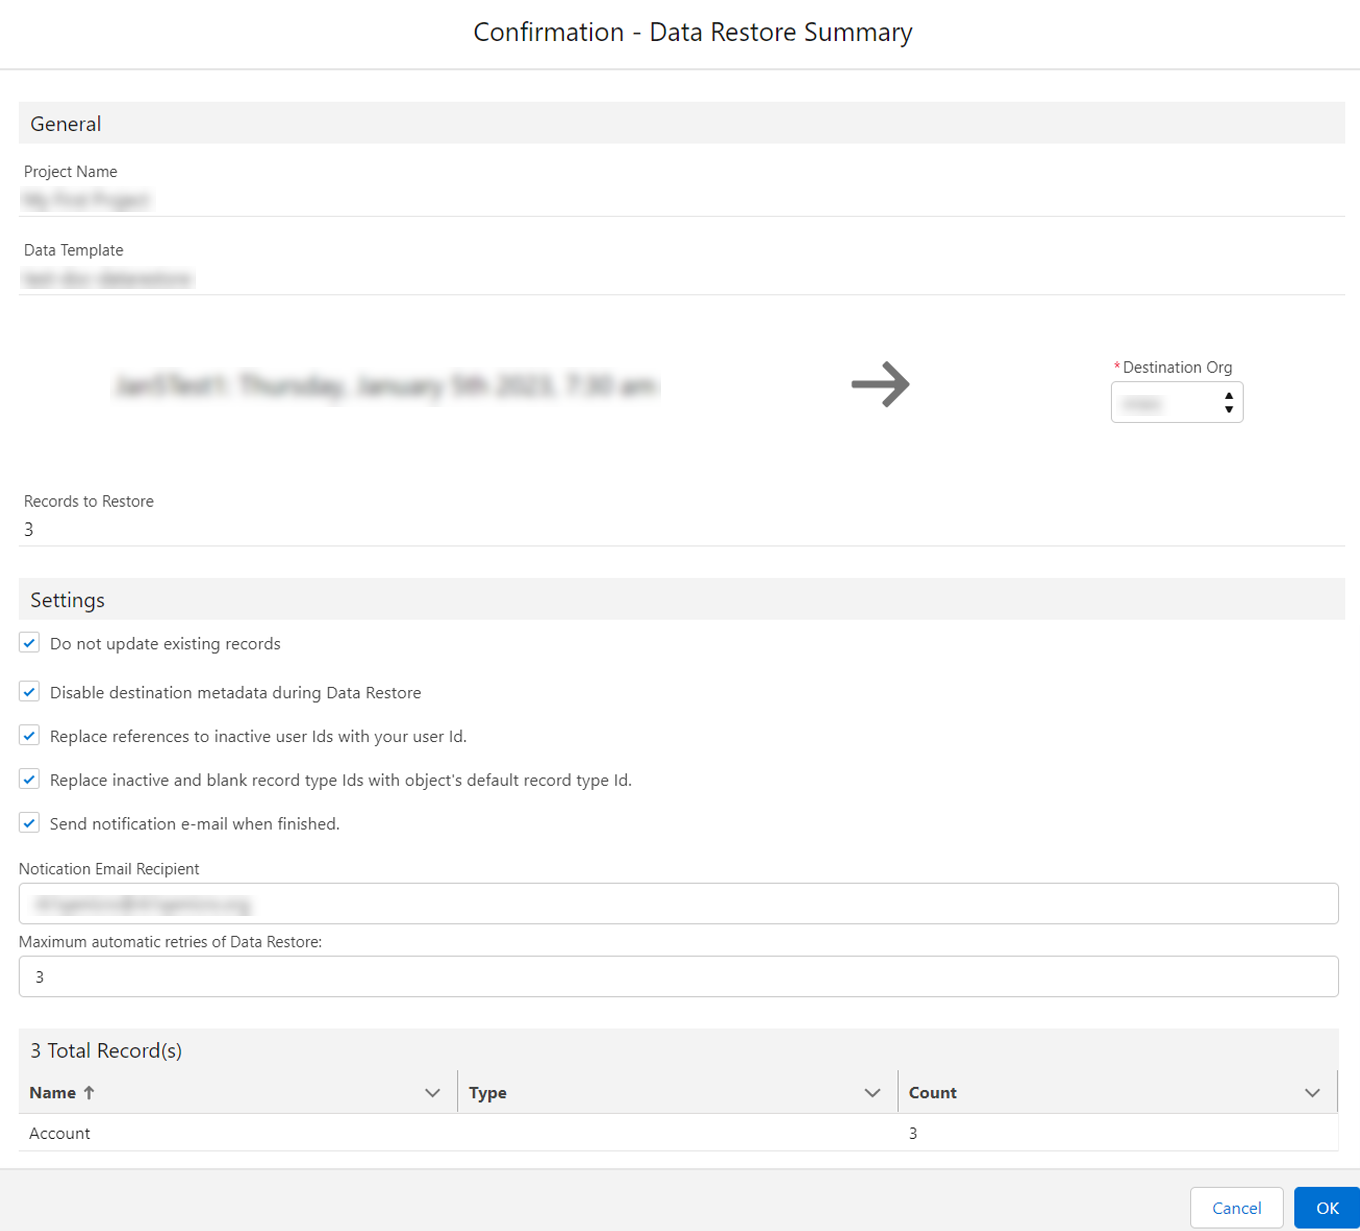
8. (Optional) Select the required destination organization in the Destination Org list.
9. Review the Details and click OK.
To ensure validations are present within your production instance during a data restore activity, do not select the Disable destination metadata during Data Restore option.
The restore process begins for the selected records.
You can check the status of your data restore tasks from the Tasks page. For more information, see Managing Tasks.
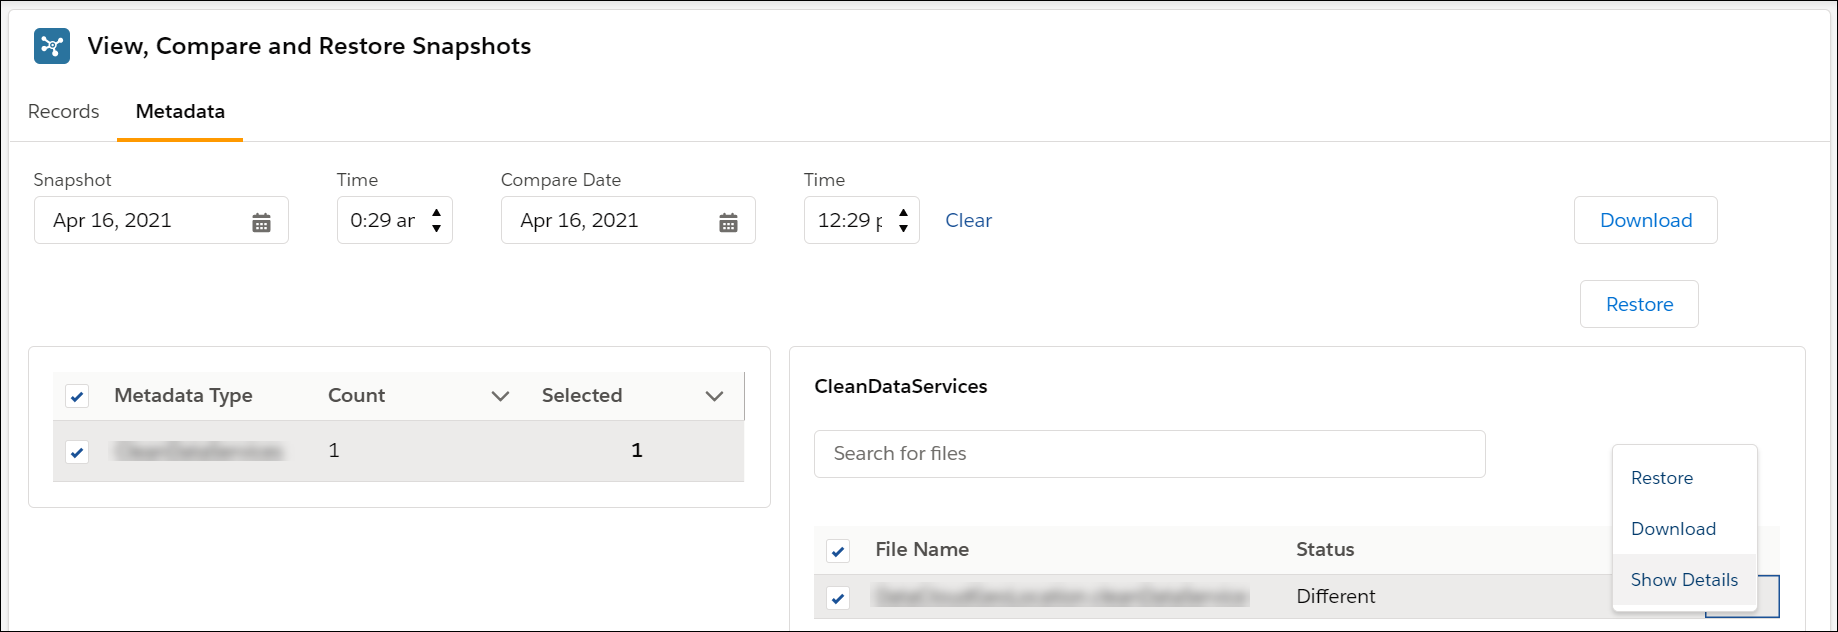
Compare and Restore Metadata
You can restore metadata using a comparison view of the created, updated, and deleted changes in the metadata files. This enables you to reduce the overall recovery time.
Procedure
- On the Salesforce App console, click Data Backup.
- In the View, Compare, and Restore Snapshots area, click Metadata.
- Specify the date and time to find snapshot details within a date range. A list of metadata types with the count of files appears.
- Select a metadata type. The details for the selected metadata type appear on the right pane.
- Select required metadata files. Alternatively, you can also search files using the search box.
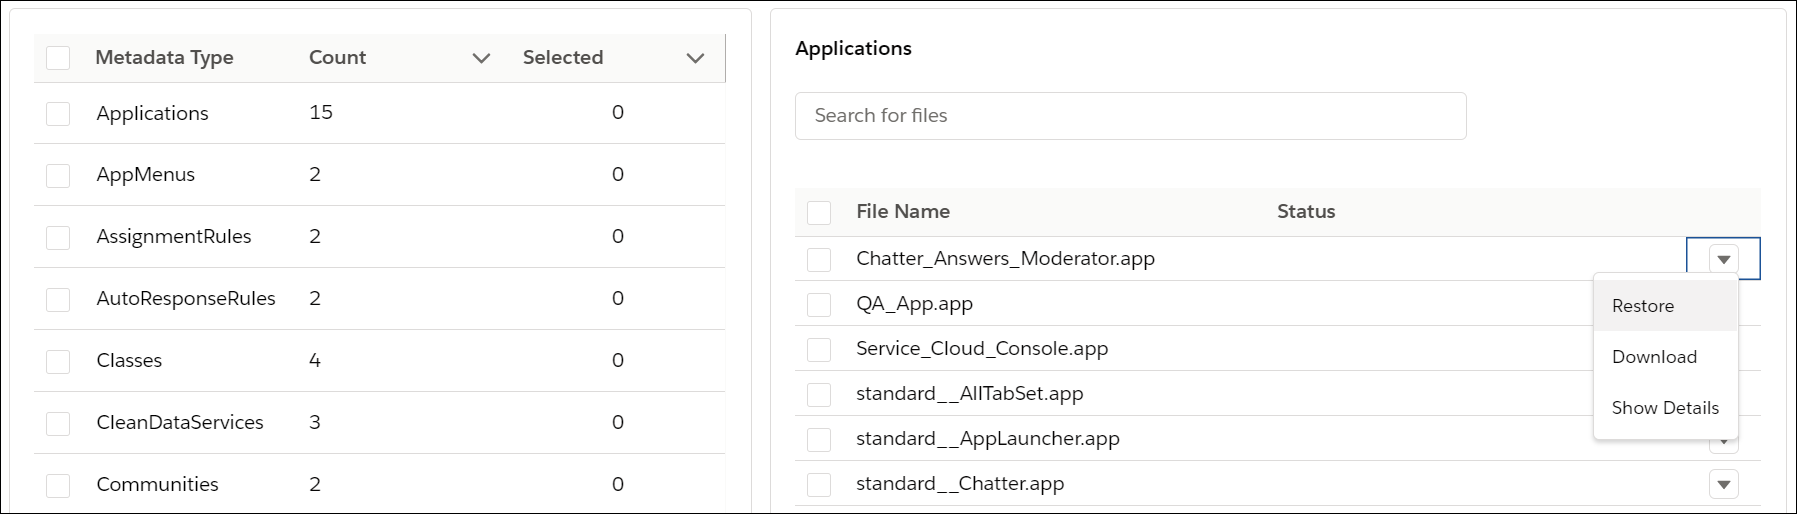
6. Perform the following steps to restore, download, or view details about the selected metadata file from the snapshot listing.
| Steps | Description |
|---|---|
| Step 1 |
Click Show Details to preview the selected metadata file. |
| Step 2 |
Click Restore to restore the metadata file. The Restore window appears. Enter the following information.
3. Click Confirm.
|
| Step 3 |
Click Download to download the metadata file.
|
7. If you want to compare metadata from the selected snapshot with metadata from another snapshot instance, perform the following steps.
| Steps | Description |
|---|---|
| Step 1 |
Enter the date and time of another snapshot instance in the Compare Date and Time fields. A list of metadata types with the count of files appears. |
| Step 2 |
Select a metadata type. The details for the selected metadata type appear on the right pane |
| Step 3 |
Select required metadata files. Alternatively, you can also search files using the search box.
|
| Step 4 |
Click Show Details to preview the updated and deleted changes for the selected metadata file between the two snapshots. The highlighted changes display the delta between the two snapshots. |
| Step 5 |
Click Restore to restore the metadata file. The Restore window appears. Enter the following information.
3. Click Confirm.
|
| Step 6 |
Click Download to download the metadata package file.
|
You can check the status of your data restore tasks from the Tasks page. For more information, see Managing Tasks.
Bulk Restore using Data Template
You can select an entire snapshot for backup and restore the snapshot to the same or a different Salesforce organization. In the event of a data loss incident, you can quickly and easily restore the data with limited downtime using the bulk data restore mechanism.
The following series of steps describes the workflow to restore bulk data to a destination environment.
Step 1: Create a Data Restore template. For more information, see Creating a Data Template.
Step 2: Select the data to restore using individual records selection, query-based selection, and data template settings.
| Selection Method | Description |
|---|---|
| Records Selection | Records Selection enables you to select individual records and related records from an object to restore or copy. |
| Query-based Selection | Use object queries to select records dynamically. You can add a single object query or multiple object queries. |
| Data Template Settings |
Manage the data template settings, such as:
|
For more information, see Configuring Data Template.
Step 3: Start Data Restore.
Procedure
- On the Salesforce App console, click Data Backup.
- Specify the destination environment in the Destination dropdown list.
- Click Start Data Restore in the top-right corner. The Data Restore Confirmation window appears.
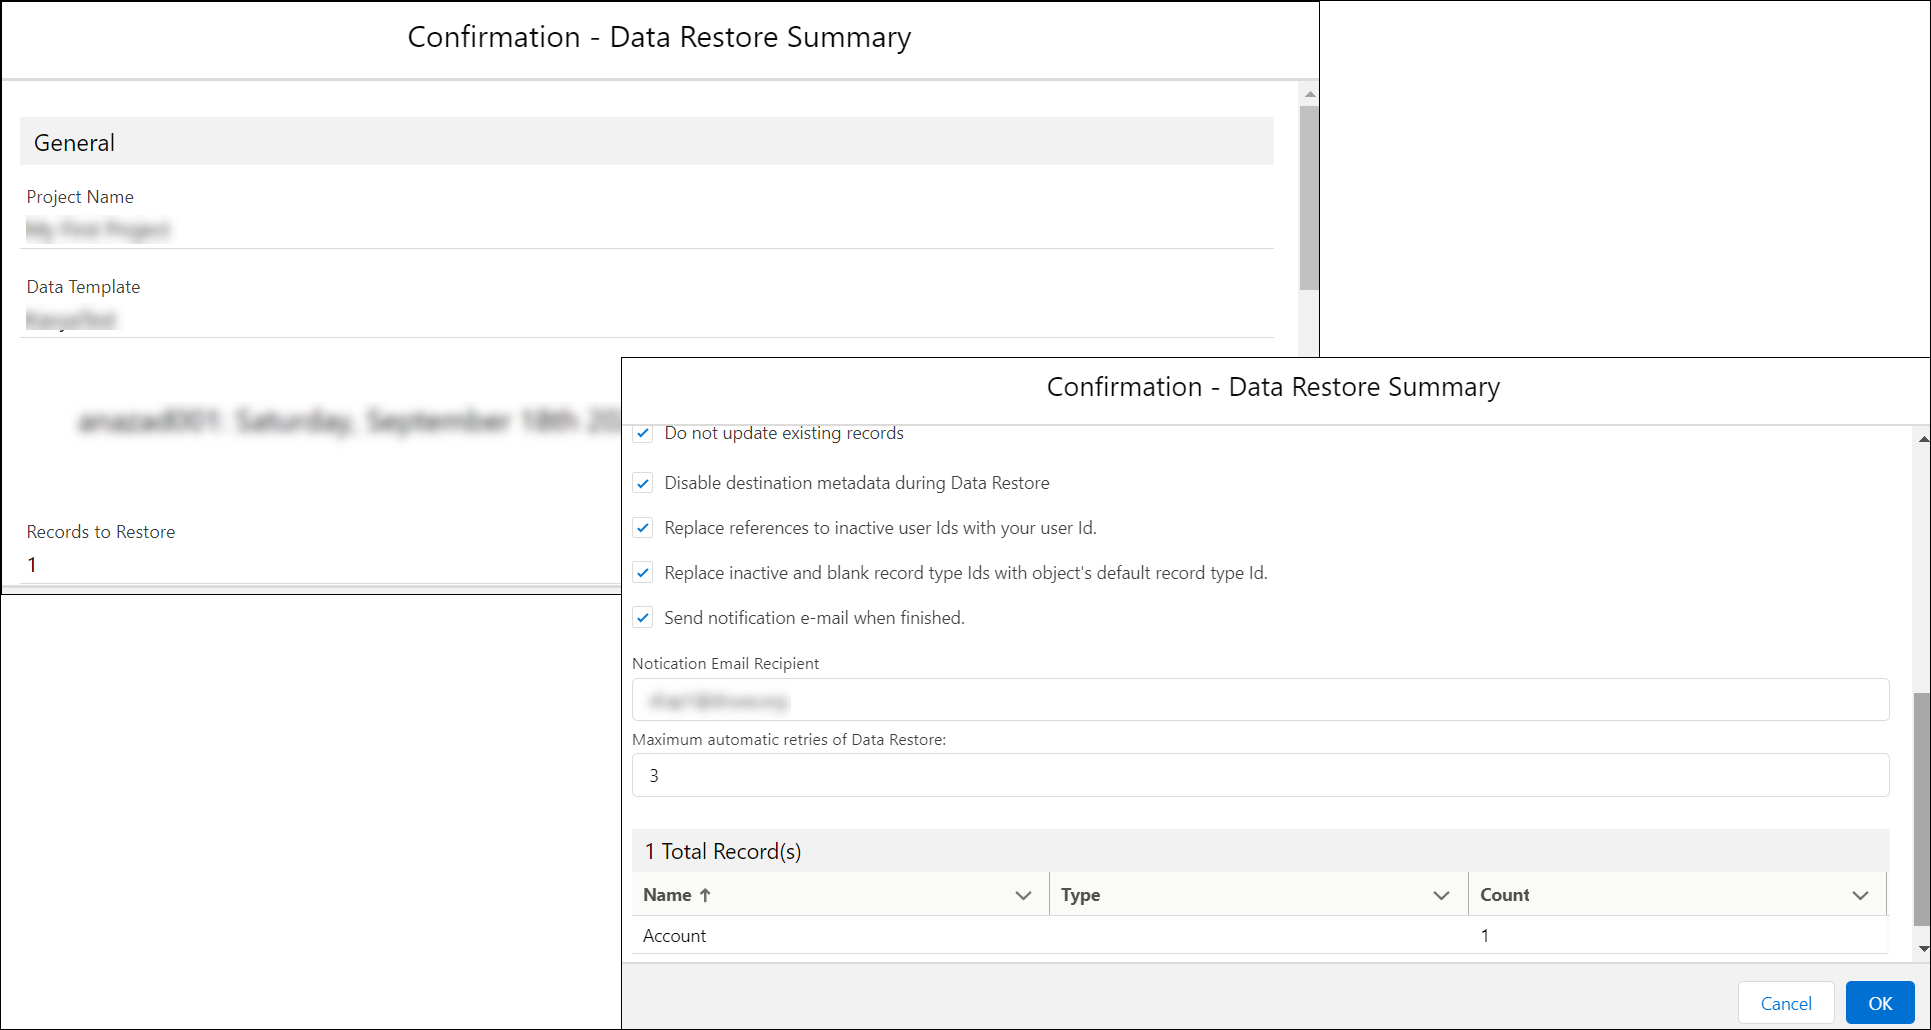
4. Review the details and click OK to start the data restore.
To ensure validations are present within your production instance during a data restore activity, do not select the Disable destination metadata during Data Restore option.
Monitor Restore
You can view the progress of a restore activity using one of the following options from the Salesforce App console:
- Click Tasks from the taskbar at the bottom-right of the page.
- Click Tasks from the navigation bar and view details about the pending restore job.
For more information about the Tasks page from the navigation bar, see Managing Tasks.
Also, as an inSync Cloud Administrator, you can view data restore details available through a report. For more information about the generated report, see Salesforce Backup and Restore Report.