Manage failover recovery workflow
Enterprise Workloads Editions
❌ Business| ✅ Enterprise (Purchase Separately) | ✅ Elite
Overview
The recovery workflow works as a runbook and can be executed based on your application’s requirements. It enables you to define steps to logically group the virtual machines in a DR plan to perform operations in a defined order.
When you create a DR plan, Druva creates a default recovery workflow with a virtual machine boot (VM boot) step containing all virtual machines configured in that DR plan. You can edit this default recovery workflow and add multiple steps to the workflow based on the failover requirements. You can perform the following tasks:
- Add VM boot steps to the recovery workflow and specify their sequence of execution.
- Add on-boot scripts for execution after virtual machines boot up.
- Specify a timeout for the execution of the script.
- Enable abort settings for a step if you want to cancel a failover job when failover of any virtual machines fails during that step.
- Add time delays between the execution of the two steps.
- Move virtual machines from one boot step to another boot step, as required.
- Change the order of the execution of the steps.
- Remove a VM boot step from the recovery workflow. To remove a VM boot step, you must first move all virtual machines from that step to another VM boot step.
- Remove a time delay step from the recovery workflow.
Procedure
- Log in to the Management Console.
- On the menu bar, click All Organizations, and select the required organization from the drop-down list.
- Click Disaster Recovery.
The Disaster Recovery page is displayed. - From the left navigation bar, you can select a DR plan from the Select DR plan dropdown list or from the DR plan list.
- In the left navigation bar, click Recovery Flow. You can edit the following attributes of recovery flow:
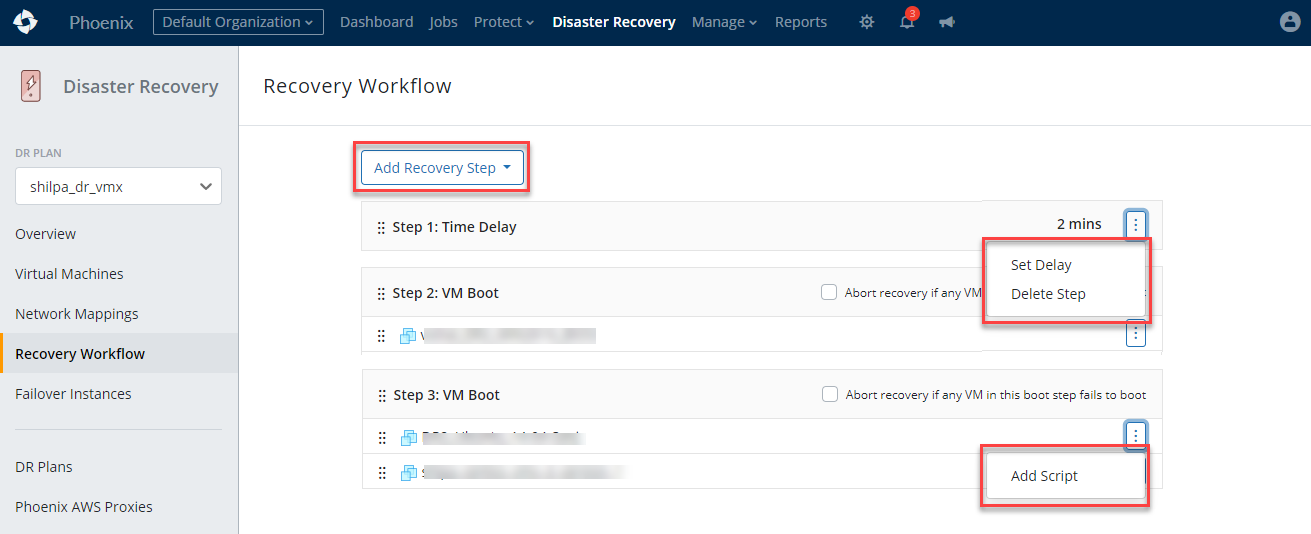
- Click Add Recovery Step and select the VM Boot or Time Delay option to add a new step for virtual machines.
- VM Boot: This option enables you to define a boot sequence for your virtual machines in the DR plan.
- In the VM Boot step, click the
icon and click Boot Settings.
- On the Step X: VM Boot dialog box, select the Abort recovery operation if any VM in this boot step fails to boot checkbox to cancel the failover operation on failure of any virtual machine during the execution of this step. Repeat the step to add multiple VM boot steps.
- In the VM Boot step, click the
- Add script: This option enables you to execute a script after the virtual machines boot up.
- Click the
icon corresponding to the virtual machine for which you want to add a script and click Edit Script.
- On the <virtual machine: Script> dialog box, provide the following details:
- S3 URL: The URL of the script's location in the S3 bucket of your AWS account.
- Execution Command: The command to be executed.
- Script Timeout: The script timeout in minutes. You can specify a value between 1 and 1440.
- Abort failover for this VM if script execution fails: Enable the checkbox to cancel the failover operation on the failure of the script.
- Click Save.
- Click the
- Time Delay: This option enables you to insert a time delay between the execution of the two steps.
- Click Add Recovery Step > Time Delay.
- On the Time Delay dialog box, enter the time in minutes in the Time Delay box to delay the execution of the next step in the recovery process. You can specify a value between 1 and 1440.
- Click Save.
You can also edit the time delay that you set while adding a step. You can also delete a step that you need no longer. To edit a time delay or delete a step, click theicon and click Set Delay or Delete Step.
- VM Boot: This option enables you to define a boot sequence for your virtual machines in the DR plan.