Deploy the backup agent or proxy using the common agent user interface on a Windows system
 Business Enterprise Elite
You can protect File Servers, MS SQL, NAS, Hyper-V workloads, and deploy Nutanix Backup proxy with the common agent.
The workloads can be deployed using the following modes of deployment:
Local agent installation
The workloads such as File Servers, MS SQL, NAS, and Hyper-V follow local agent installation.
Before you begin
Druva Proxy Deployer supports Windows Server 2008 R2 and later. For more information on supported operating systems, refer to Support matrix.
How to use the common agent for local agent installation
The following diagram depicts the steps to use the common agent.
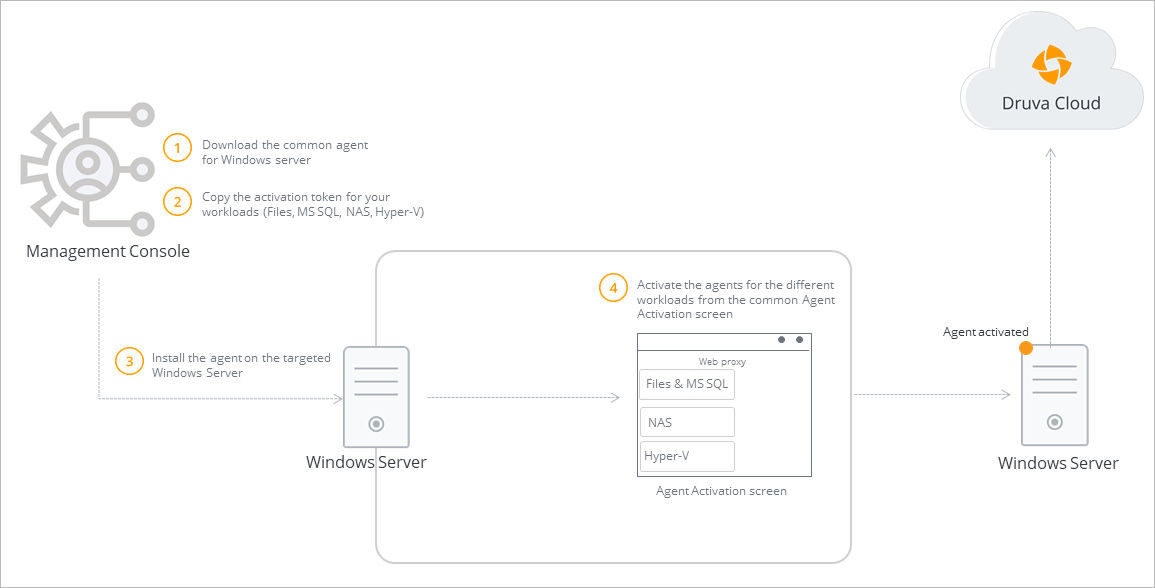
| Steps | Description |
|---|---|
| Step 1 | Download the common agent for the Windows server. |
| Step 2 | Copy the activation token for your workloads (File, MS SQL, NAS, Hyper-V). |
| Step 3 | Install the agent on the targeted Windows server. |
| Step 4 | Activate the agents for different workloads from the common Agent Activation screen. |
Watch video
Downloading agent and generating activation token
You can protect different types of workloads using the common agent. For example, if you download the agent for File Servers, the same can be used to protect MS SQL, NAS, and Hyper-V workloads and vice-versa. The agent is also available for download on the Druva Downloads page. The steps to download an agent and generate an activation token are as follows:
- Log in to the Management Console.
- Select the workload from the Protect menu. Note that if the All Organizations menu is enabled, you have to first select an organization and then select the workload.
- For each workload, select the following option:
- Click Register New Server for File Servers and MS SQL Servers.
- Click Add Proxy for NAS.
- Click Register Hyper-V Host for Hyper-V.
The respective registration screens appear.
- Under the Download and Install Agent on the Server section, in the Select OS drop-down, select Windows - 64 bit.
Note:
- You can click Check Pre-requisite to check the Hybrid Workloads agent prerequisites.
- For Hyper-V and NAS, directly select the Windows Download option.
- Click Download.
The agent download starts on the same browser page. - Under the Activation Token section, if there aren't any existing tokens, a Default Activation Token is generated. This token is valid for 25 servers and for 7 days.
Note: If this token has expired, click Generate New Token. In the Generate Token dialog box, enter the required details, and click Generate.
- Select the Copy Token icon.
The activation token is copied successfully.
Deploying the agent
Installing the agent
- Go to the location where you have downloaded the Hybrid Workloads agent installer.
- Double-click the Hybrid Workloads agent installer.
- Click Next.
- Use a local system account to install the agent on the Windows server.
Note: Ensure that the available disk space is at least twice the size of the installer file.
- Type or select the full path to the installation home directory in the Install location box.
- Click Install.
- After the installation completes, click Finish.
Activating the agent
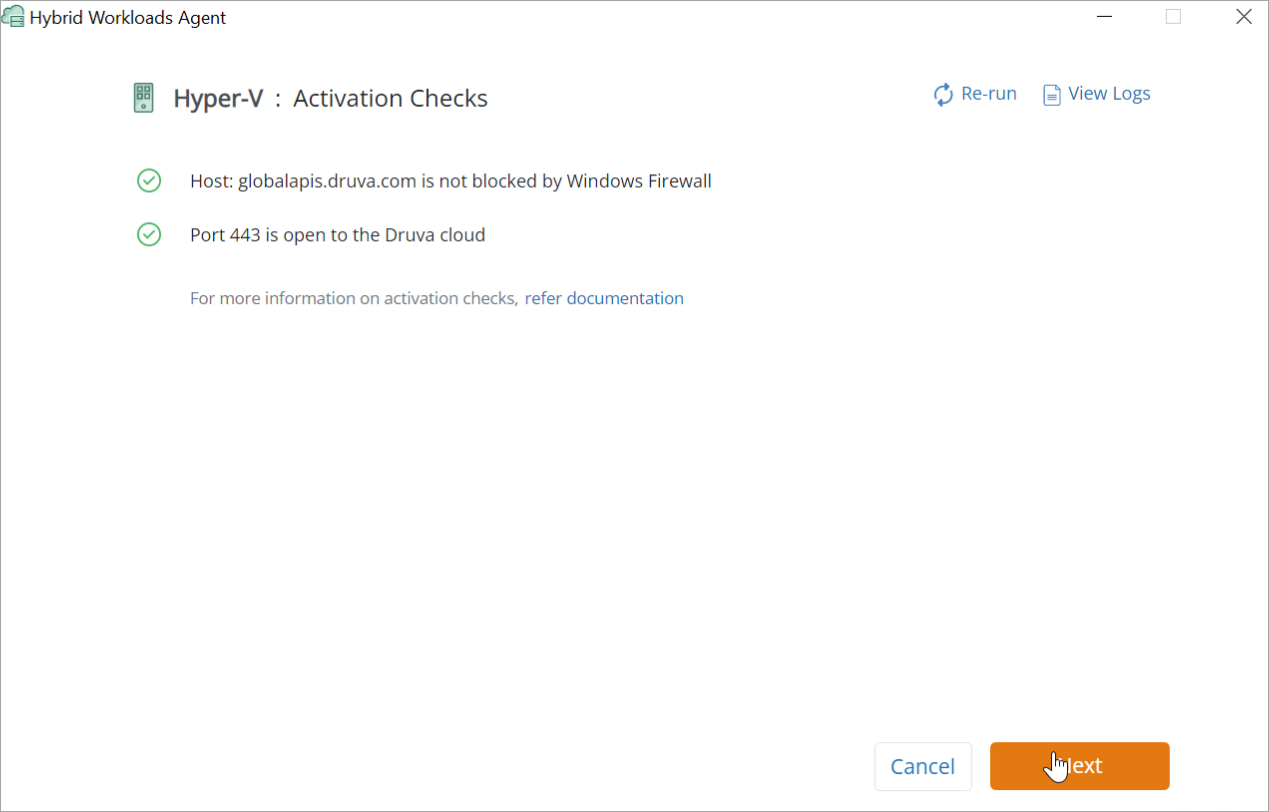
After installing the Hybrid Workloads agent on a Windows server; you must activate that Hybrid Workloads agent using the activation token that Management Console generated when registering servers. The following example shows the steps to activate the File Servers, MS SQL Servers, NAS, and Hyper-V using the Hybrid Workloads agent. Once the agent is installed, a set of checks is run to ensure that the system is ready for activation of the agent and all the required conditions are met. If not, it will provide a curated set of errors that might have occurred and will also provide the solution to tackle and fix the same. For more information, see Activation and first backup readiness checks for successful backup.
Note:
- You can activate the agents for your workloads in any required sequence. In the following example, the File Servers, NAS, and Hyper-V agents are activated in the listed order.
- If your network infrastructure uses a Web proxy, you must configure it before activation. For more information, see Configure Web proxy.
- Refer Avoiding third party/anti-virus interference with Hybrid Workloads Agent to add the executables to the Antivirus exclusion list.
Procedure:
- Double-click the Hybrid Workloads Agent shortcut on the server where the agent needs to be activated.
The Hybrid Workloads Agent window is displayed.
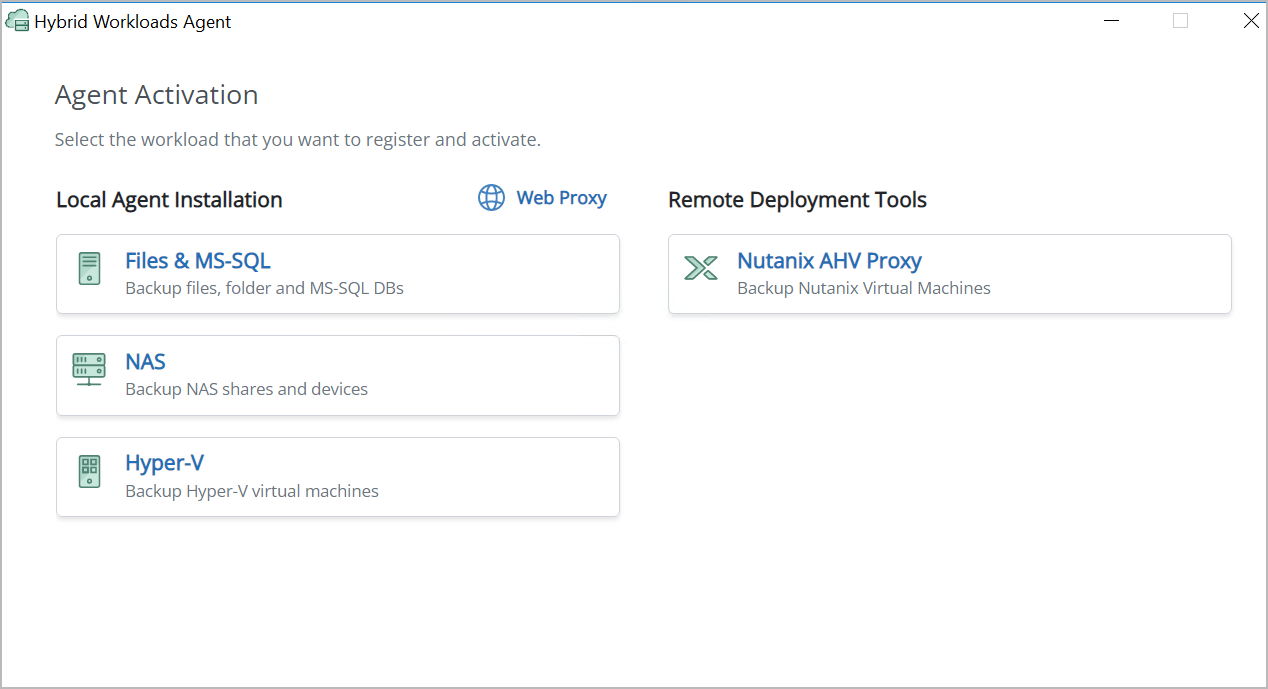
- In the Hybrid Workloads Agent window, select Files & MS-SQL workload to activate.
A set of in-built activation checks are run and the result is displayed.
- The Agent Activation page for Files & MS-SQL is displayed.
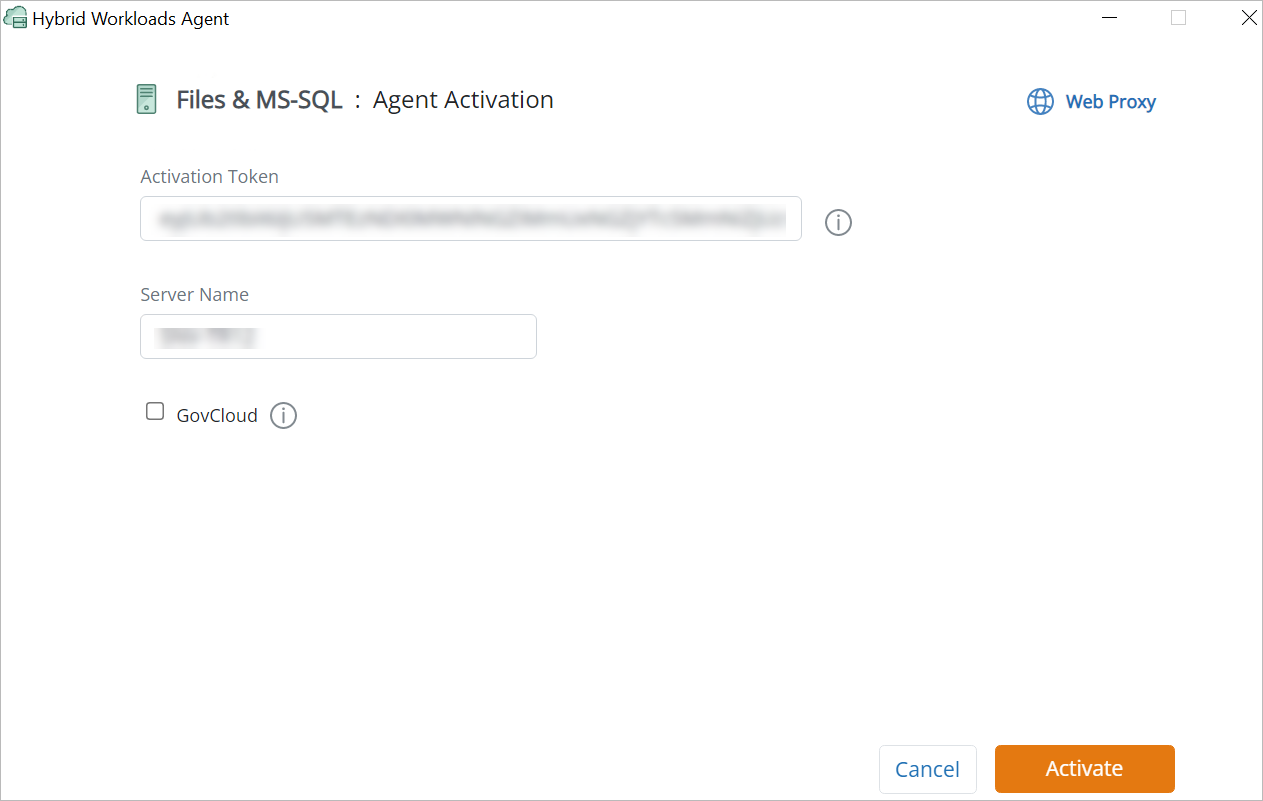
- Enter the following details:

| Field | Description |
|---|---|
| Activation Token | Paste the copied activation token.
Note: This is the token copied from the Register New Server dialog box. |
| Server Name | Enter a unique server name in the current Organization for each workload of the same type.
Note: The server name should not contain any special characters. |
Note: If you are activating the Hybrid Workloads agent for Druva Public Cloud, do not select the GovCloud check box.
- Click Activate.
The backup readiness checks will run to ensure that your system is equipped for successful backup operation.
The File & MS-SQL agent is successfully activated.Note: After successful activation, a green tick displays next to the workload on the mentioned common agent activation screen.
- In the Hybrid Workloads Agent window, select NAS.
A set of in-built activation checks are run and the result is displayed.
- The Agent Activation page for NAS is displayed.
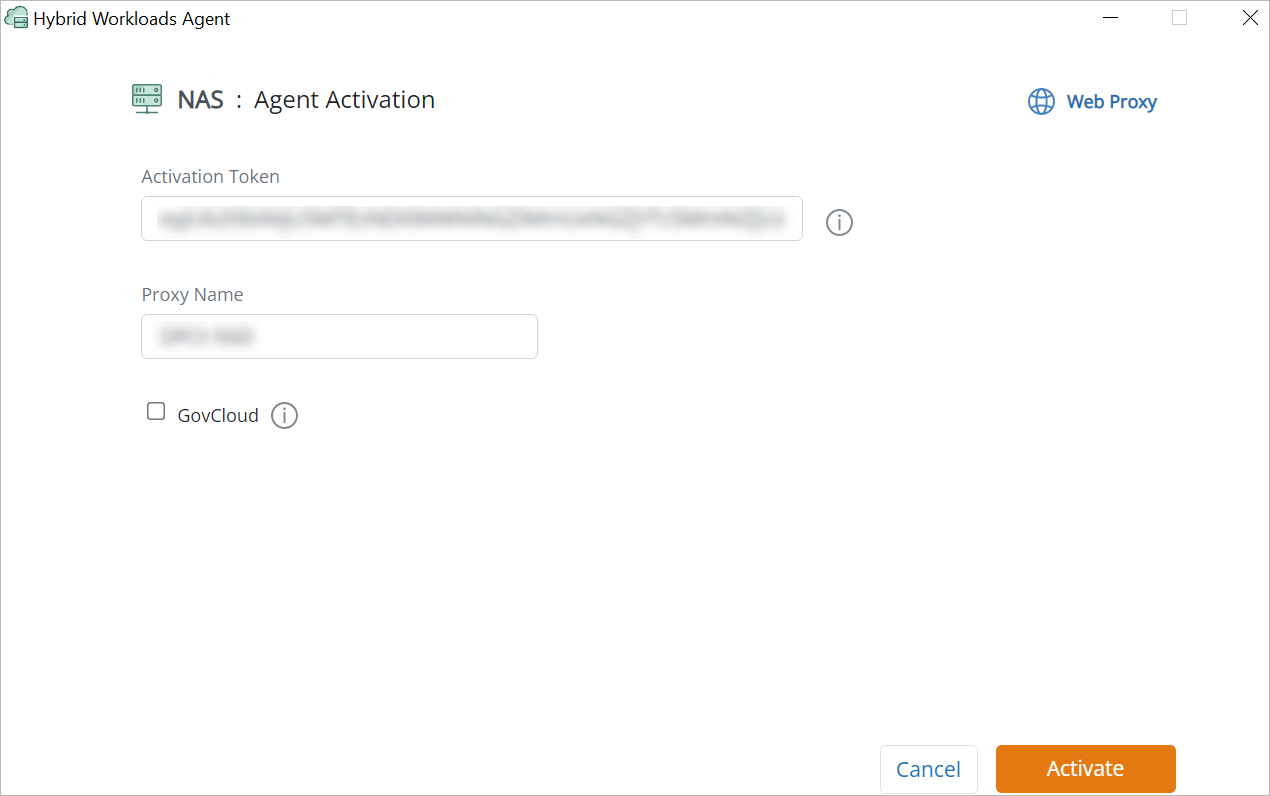
- Enter the following details:


| Field | Description |
|---|---|
| Activation Token | Paste the copied activation token.
Note: This is the token copied from the Add NAS Proxy dialog box. |
| Proxy Name | Enter a unique proxy name in the current Organization for each workload of the same type.
Note: The proxy name should not contain any special characters. |
Note: If you are activating the Hybrid Workloads agent for Druva Public Cloud, do not select the GovCloud check box.
- Click Activate.
The backup readiness checks will run to ensure that your system is equipped for successful backup operation.
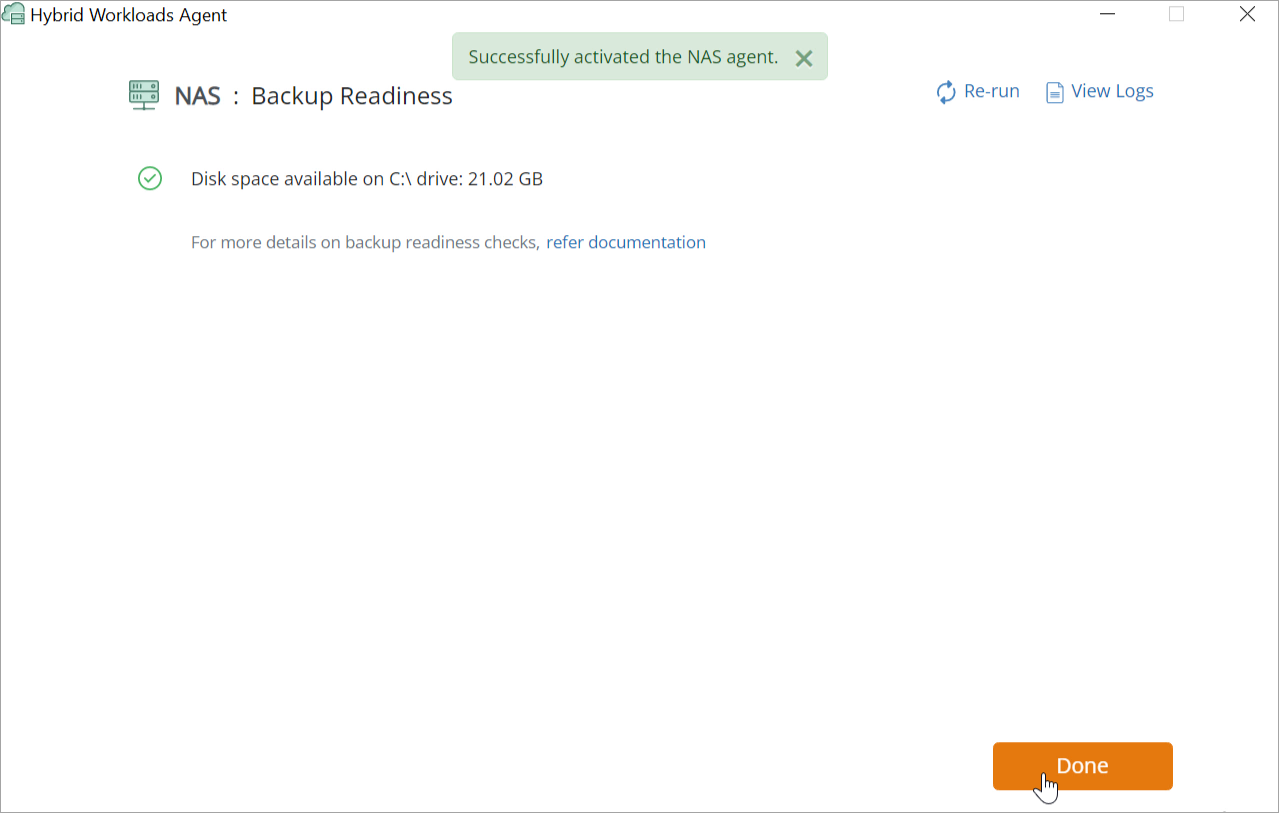
The NAS agent is activated successfully.Note: After successful activation, a green tick displays next to the workload on the mentioned common agent activation screen.
- In the Hybrid Workloads Agent window, select Hyper-V.
A set of in-built activation checks are run and the result is displayed.
- The Agent Activation page for Hyper-V is displayed.

- Enter the following details:
Field Description Activation Token Paste the copied activation token. Note: This is the token copied from the Register New Hyper-V Host dialog box.
Register Host As Select the host type based on your setup. The available options are SCVMM, Cluster, Standalone. The default option is Standalone. SCVMM FQDN Provide IP address or Fully Qualified Domain name.
This field displays only when you select SCVMM as the host type in the Register Host As field.Username Enter a valid user name.
This field displays only when you select SCVMM or Cluster as the host type in the Register Host As field.Password Enter a valid password.
This field displays only when you select SCVMM or Cluster as the host type in the Register Host As field.Note: If you are activating the Hybrid Workloads agent for Druva Public Cloud, do not select the GovCloud check box.
- Click Activate.
The backup readiness checks will run to ensure that your system is equipped for successful backup operation.
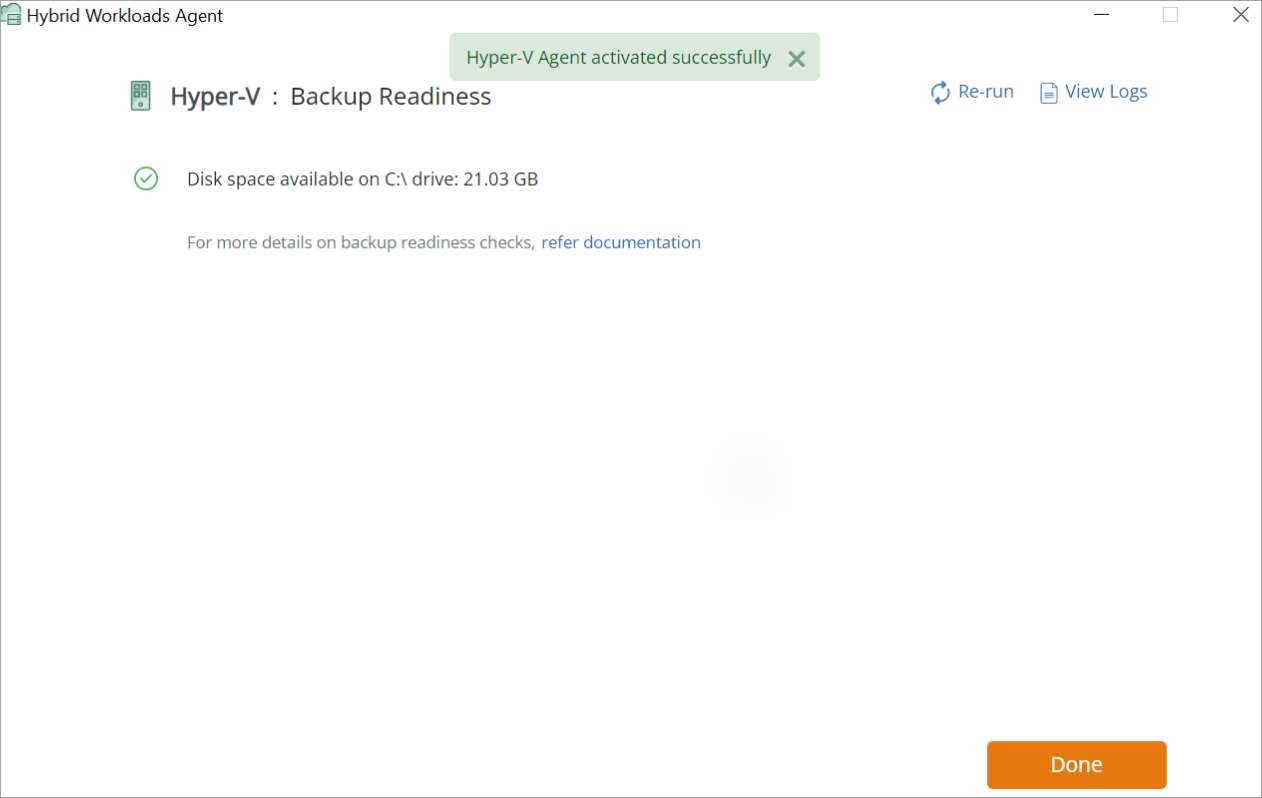
The Hyper-V agent is activated successfully.Note: After successful activation, a green tick displays next to the workload on the mentioned common agent activation screen.
Configure Web proxy using the user interface
Hybrid Workloads agent connects to the Druva Cloud through the internet. If your network infrastructure uses a Web proxy, configure the Hybrid Workloads agent to use Web proxy to establish a connection with the Druva Cloud.
Before you begin
Ensure that the Hybrid Workloads agent service is running before starting proxy settings.
Procedure:
- Double-click the Hybrid Workloads Agent application.
- In the Agent Activation window, select Configure Web Proxy.
- Select the My network infrastructure uses a Web proxy check box to enter the details.
The Web Proxy options are displayed.
- In the Proxy Type drop-down list, select one of the supported proxy types (http, socks4, socks5). The default selection is http.
- In the Proxy Server IP Address field, enter a valid IP address of the proxy server.
- In the Proxy Port field, enter the respective port number.
- If your proxy requires authentication, select the Proxy server requires authentication check box and add relevant username and password in their respective fields.
- Select the My network infrastructure uses a Web proxy check box to enter the details.
- Click Save.
The Web proxy is configured.Note: You can delete the Web proxy in the Windows file server once it is set up successfully by following the below procedure:
- Clear the My network infrastructure uses a Web proxy check box.
- Click Save.
Remote deployment tool
The user interface and steps for macOS are the same as those for the Windows client.
The remote deployment tool section covers the proxy deployment workflow for the Nutanix AHV workload.
Before you begin
- The Druva Proxy Deployer supports the following:
- Ensure that the SSH connection is allowed and you can execute the SSH commands.
- Ensure that the ICMP protocol is not blocked and you can execute PING commands.
Considerations for proxy image verification
-
Proxy image signature verification is a security check done during the agent deployment. This is done when you upload the proxy image file.
-
The digital signature needs to be successfully verified to continue with deployment.
- While uploading the proxy image file, we recommend you to use the latest version.
- Depending on the configuration of your machine, the proxy image extraction may take some time.
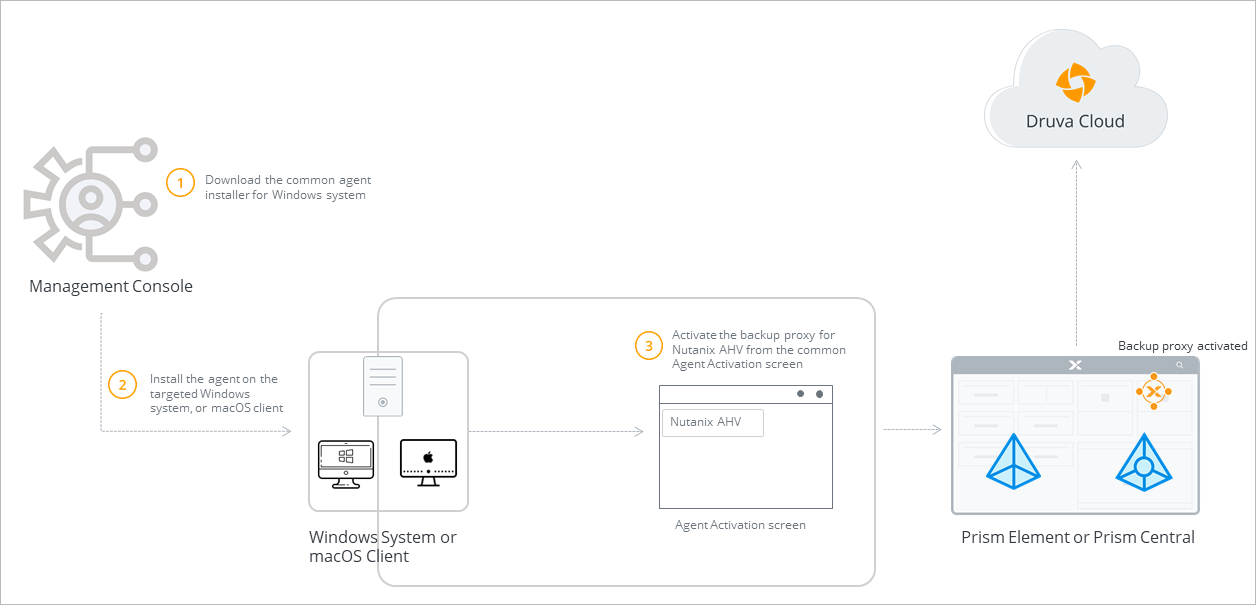
How to use the common agent for remote deployment tool
The following diagram depicts the steps to use the common agent.
Watch video
The steps to deploy the proxy are as follows:
Downloading agent installer and generating activation token
The steps to download the agent installer and generate an activation token are as follows:
- Log in to the Management Console.
- Select the workload from the Protect menu. Note that if the All Organizations menu is enabled, you have to first select an Organization and then select the workload.
- Click Register Prism for Nutanix AHV.
The Register Prism page displays. - Under the Deploy Backup Proxy section, click Download.
The agent installer download starts on the same browser page. - Under the Activation Token section, if there aren't any existing tokens, a Default Activation Token is generated. This token is valid for 25 servers and for 7 days.
Note: If this token has expired, click Generate New Token. In the Generate Token dialog box, enter the required details, and click Generate.
- Select the Copy Token icon.
The activation token is copied successfully.
Deploying the agent
Installing the agent
- Go to the location where you have downloaded the Hybrid Workloads agent installer.
- Double-click the Hybrid Workloads agent installer.
- Click Next.
- Use a local system account to install the agent installer on the Windows system.
Note: Ensure that the available disk space is at least twice the size of the installer file.
- Type or select the full path to the installation home directory in the Install location box.
- Click Install.
- After the installation completes, click Finish.
Configuring the Prism details and activating the agent
After installing the Hybrid Workloads agent on a Windows/Mac system; you must activate that Hybrid Workloads agent using the activation token that Management Console generated when registering servers.
Procedure:
- Double-click the Hybrid Workloads Agent shortcut on the system where the agent needs to be activated.
The Hybrid Workloads Agent window is displayed.
- In the Hybrid Workloads Agent window, select Nutanix AHV Proxy workload to activate.
The Nutanix AHV configuration page is displayed. - Perform the following:
- In the Connect to Prism page, enter the following to connect to your Prism Element or Prism Central:

Field Description Prism Type Select the target Prism Element or Prism Central on which you intend to create the Backup proxy.
Note: Select the target Prism Element or Prism Central cautiously. To change from Prism Element to Prism Central or vice-versa, will require you to delete the already registered Prism Central or Prism Element and register a new one. You cannot register a Prism Central if there is a registered Prism Element for that Prism Central and vice-versa.
Prism IP/FQDN Enter the IP address or FQDN for the Prism Element or Prism Central. Port Enter the port for the Prism Element or Prism Central. Note: The default port for Nutanix AHV prism is 9440.
Username Enter a valid user name. Password Enter a valid password. - Click Next.
- On the Proxy Image page, select the image file by entering the following:
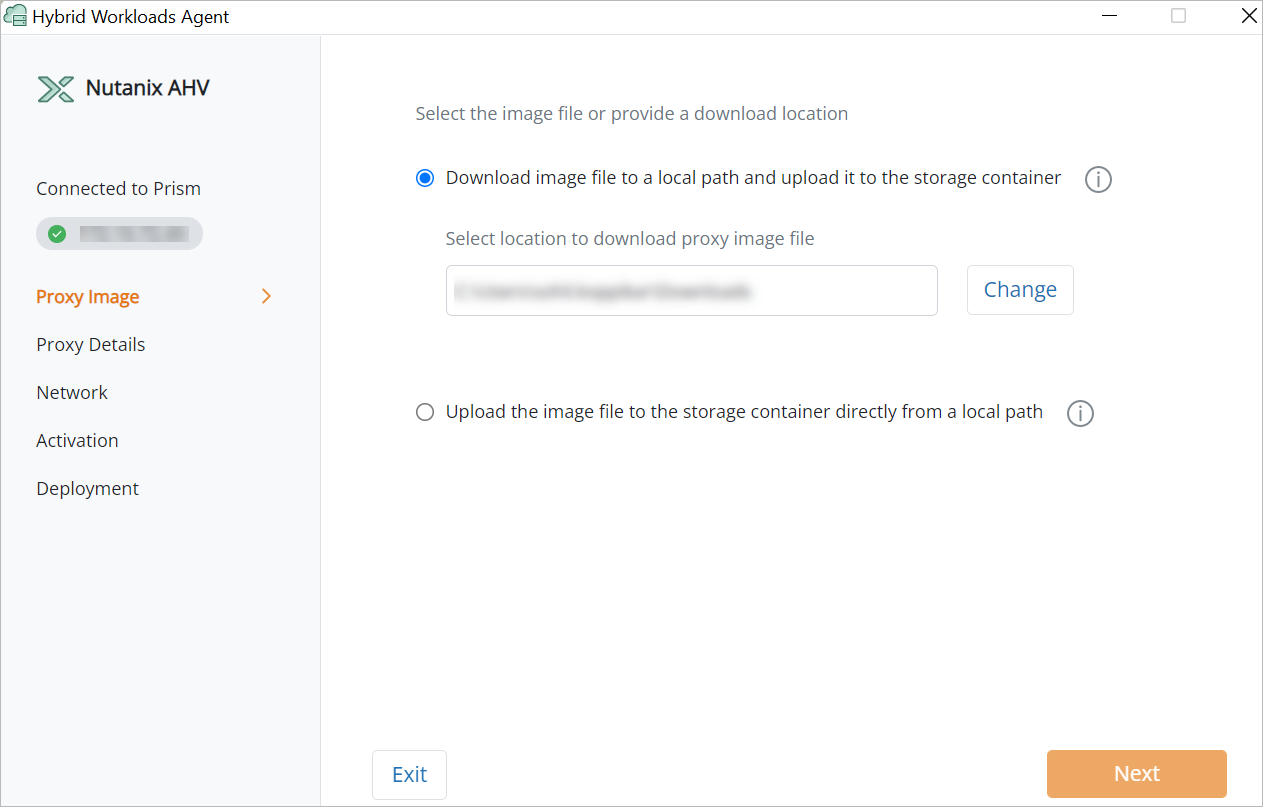
Field Description Download image file to a local path and upload it to the storage container Select or enter the location where you want to download the proxy image file. Note: If there is insufficient space in the selected location, click Change to change the location.
Upload image file to the storage container directly from a local path Select the location from where you want to upload the proxy image file. Notes:
- This option is applicable only if you have already downloaded the required proxy image file.
- Once you select the proxy image file for upload, the proxy image verification starts. For more information, refer to Considerations for proxy image verification.
- You can only upload .ova files.
- Click Next.
Note: You can proceed with the next steps even if the proxy image file verification is still in progress.
- On the Proxy Details page, enter the following details where you want to deploy the proxy:
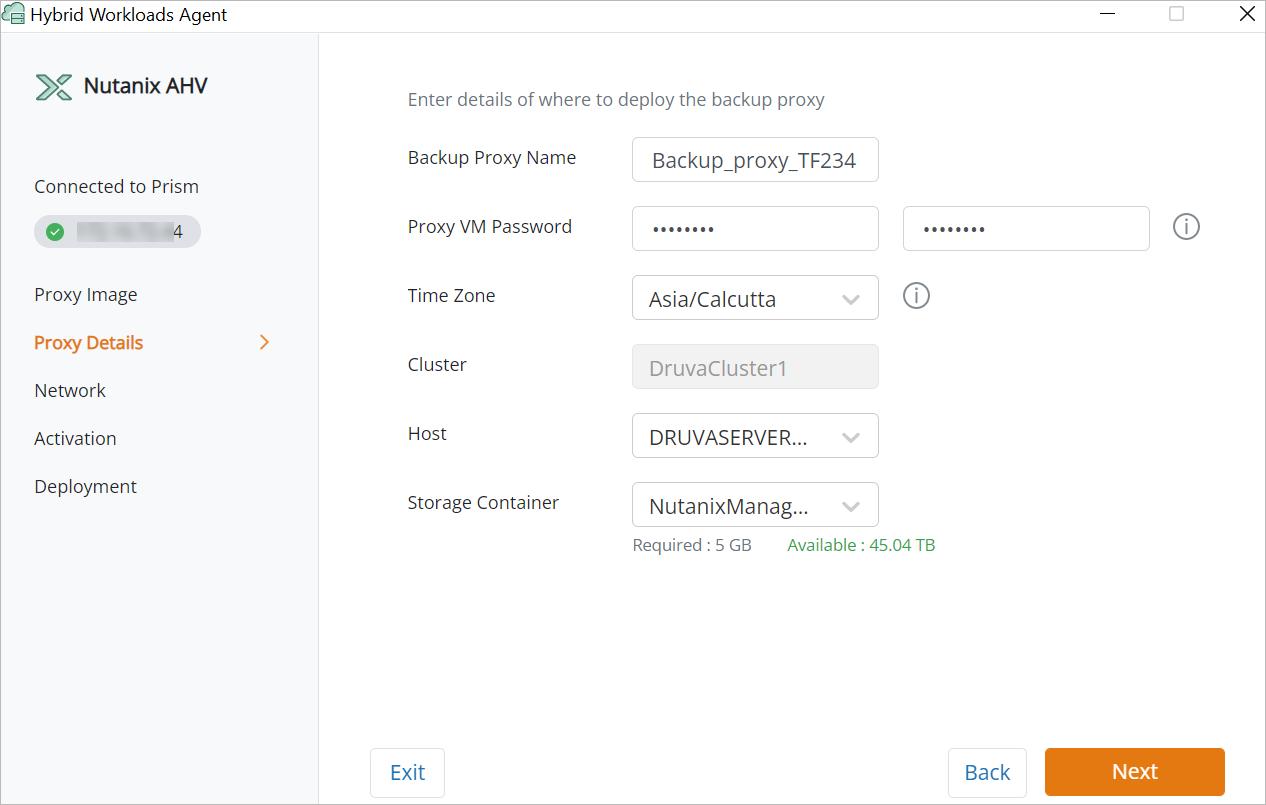
Field Description Backup Proxy Name Enter a unique name for the Backup proxy VM. Proxy VM Password Enter a password for the proxy VM. In addition, reenter the password for confirmation. Time zone Select your applicable time zone from the drop-down list. Cluster Select the target Nutanix cluster from the drop-down list on which you intend to create the Backup proxy VM. Host Select the target host from the drop-down list on which you intend to create the Backup proxy VM. Storage Container Select a storage container from the drop-down list. - Click Next.
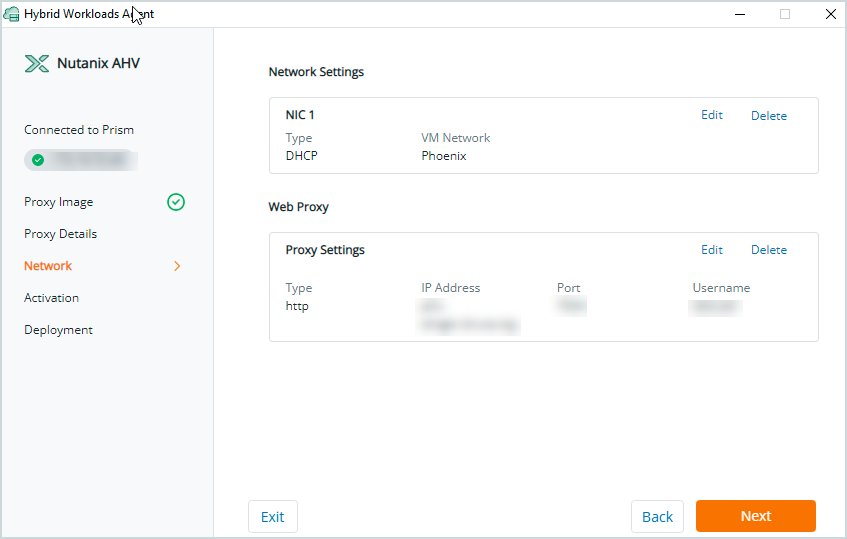
- On the Network page, under the Network Settings section, click Add NIC and enter the network details for the Backup proxy as follows:
Field Description Static IP
Enter the Static IP details.
Note: You can add only two static IPs.
vLAN Select the network from the auto-populated drop-down list. IP Address Enter the IP address for the Prism Element or Prism Central. Netmask Enter the netmask of Nutanix AHV cluster's network. Gateway Enter the gateway of Nutanix AHV cluster's network. Primary DNS Enter the IP address for the primary DNS. Secondary DNS Enter the IP address for the secondary DNS. DHCP
Select the dynamic IP address to be assigned.
Note: You can add only one dynamic IP.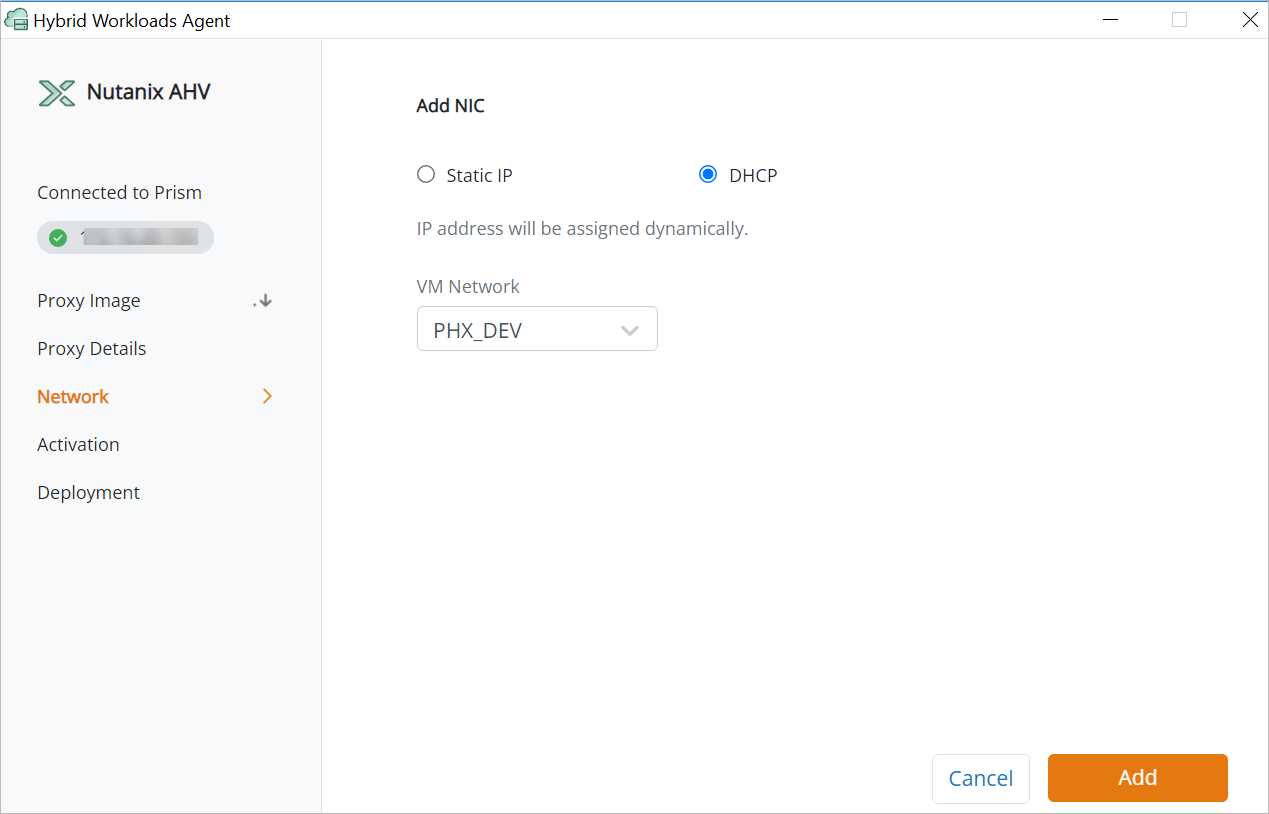
VM Network Select the network on which the required VM resides. The applicable values are auto-populated in the drop-down list. - On the Network page, under the Web Proxy section, click Add Web Proxy and enter the network infrastructure details, if you want to connect through a web proxy.
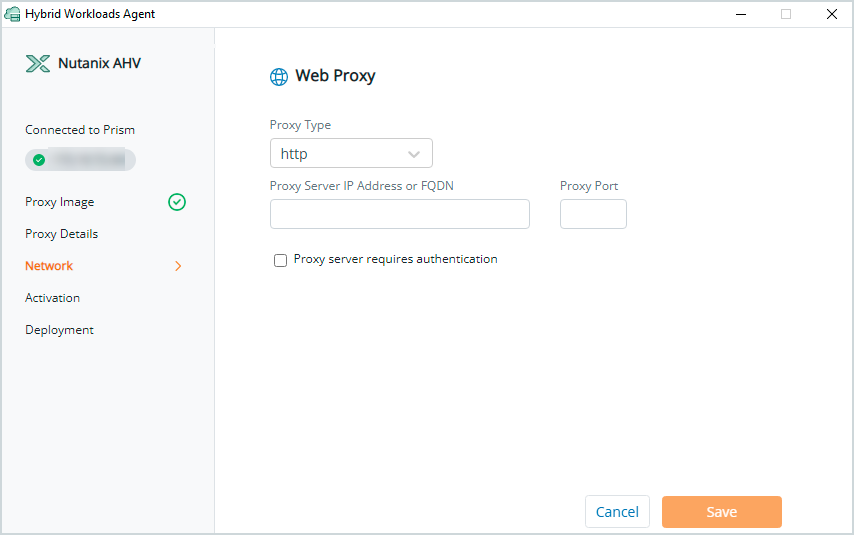
Field Description Proxy Type Select the type of proxy for example, http. Proxy Server IP Address or FQDN Enter the valid proxy server FQDN. Proxy Port Enter the corresponding proxy port number. Proxy server requires authentication Select this option to provide the username and password for proxy server authentication. Indicates that the proxy is secured. Username Enter a valid web proxy username. Password Enter the valid web proxy password. - Once the network and web proxy is successfully added, Click Save.
- Verify the network and web proxy settings on the next page. Click Edit or Delete to change web proxy settings or remove a web proxy. Click Next.
- On the Activation page, enter the applicable activation token.
Note: This is the token copied from the Register Prism dialog box.

- Select Deploy Proxy to start the proxy deployment.
The Deployment starts running the deployment checks.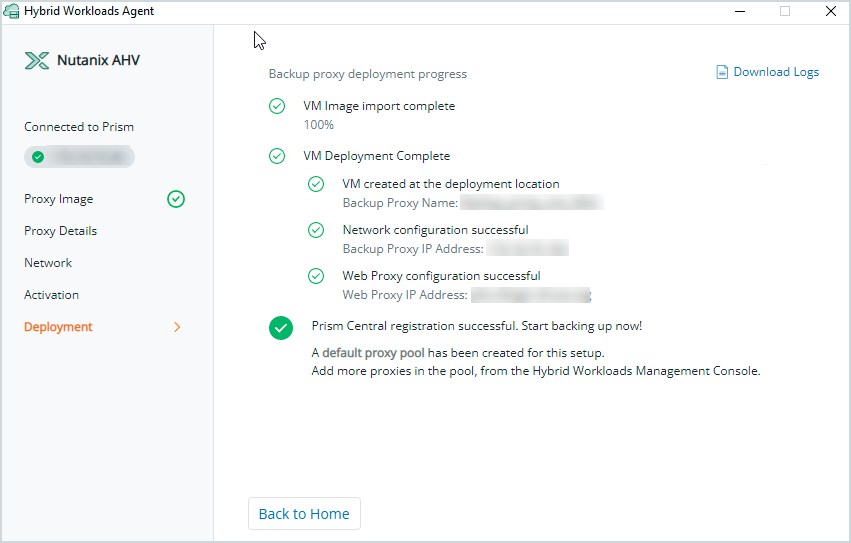
- In the Connect to Prism page, enter the following to connect to your Prism Element or Prism Central:
Note: Click the Download Logs to check the logs for any troubleshooting.
The deployment is successful and registered Prism Element or Prism Central display in the Prism page on the Management Console.
Related details
48483