Set up Snowball Edge device
This article describes the process of setting up a Snowball Edge device.
Before you begin
Ensure that you have the following information that Druva provides after delivering the Snowball Edge device:
- Snowball Edge manifest file
- Snowball Edge unlock code
- SSH key for accessing the EC2 instance on Snowball Edge device
- Snowball Edge ID, available in the Snowball Edge ID column on the AWS Snowball Edge page
- Example: JID7fa3b0c4-xxxx-xxxx-9bd3-5fb0136e4bae
- Ensure that the Snowball Edge ID on the E Ink shipping label matches the manifest filename prefix and the Snowball Edge ID on the AWS Snowball Edge page
- For better performance, we recommend having minimum 1GB Ethernet connectivity to the Snowball device.
- Make sure you have domain-based whitelisting *.druva.com for Port 443 in your Firewall environment. If you do not have the domain-based whitelisting option in firewall rules, contact Support for IP-based whitelisting details.
- Two IP addresses
- Snowball Edge will communicate with the Internet via one IP address over HTTPS
- Both the IP addresses can be assigned through DHCP
- Access the following links to install resources for setting up Snowball Edge device:
- AWS Snowball Edge Client
- AWS Command Line Interface
- Putty or similar SSH Client to connect to your Linux instance using PuTTY, a free SSH client for Windows
- WinSCP
Note: WinSCP is required only when the {{phoenix}} EC2 instance requires a software update.
Procedure
1. Download and install the Snowball client and AWS CLI
- Log in to the Management Console.
- On the menu bar, click the dropdown next to All Organizations, and select the Organization where the seeding device needs to be configured.
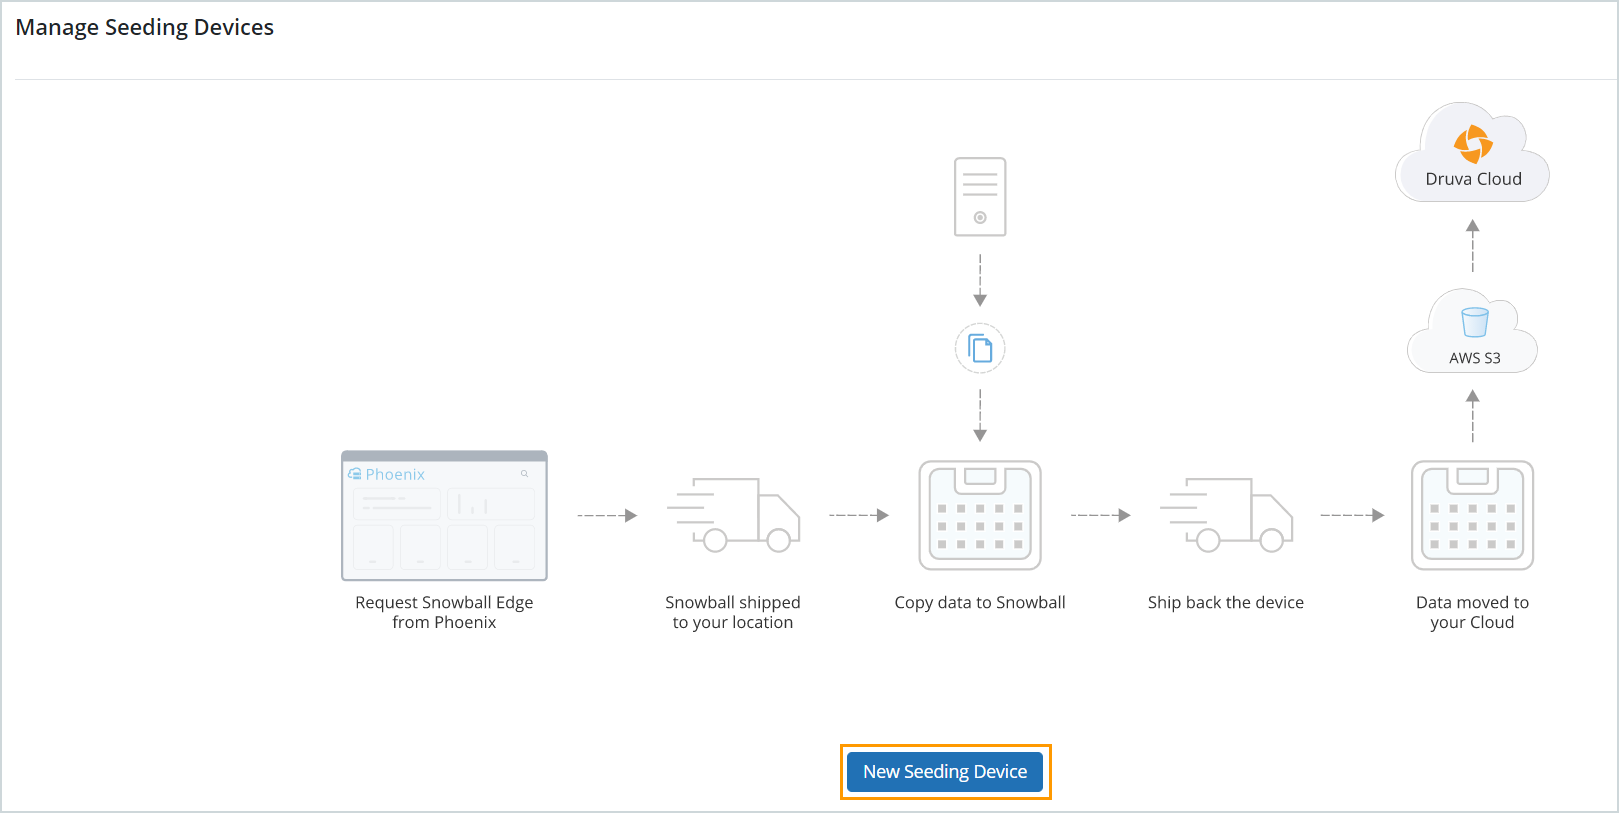
- In the menu bar at the top, click Manage > Seeding Devices.
- On the Manage Seeding Devices page click New Seeding Device.
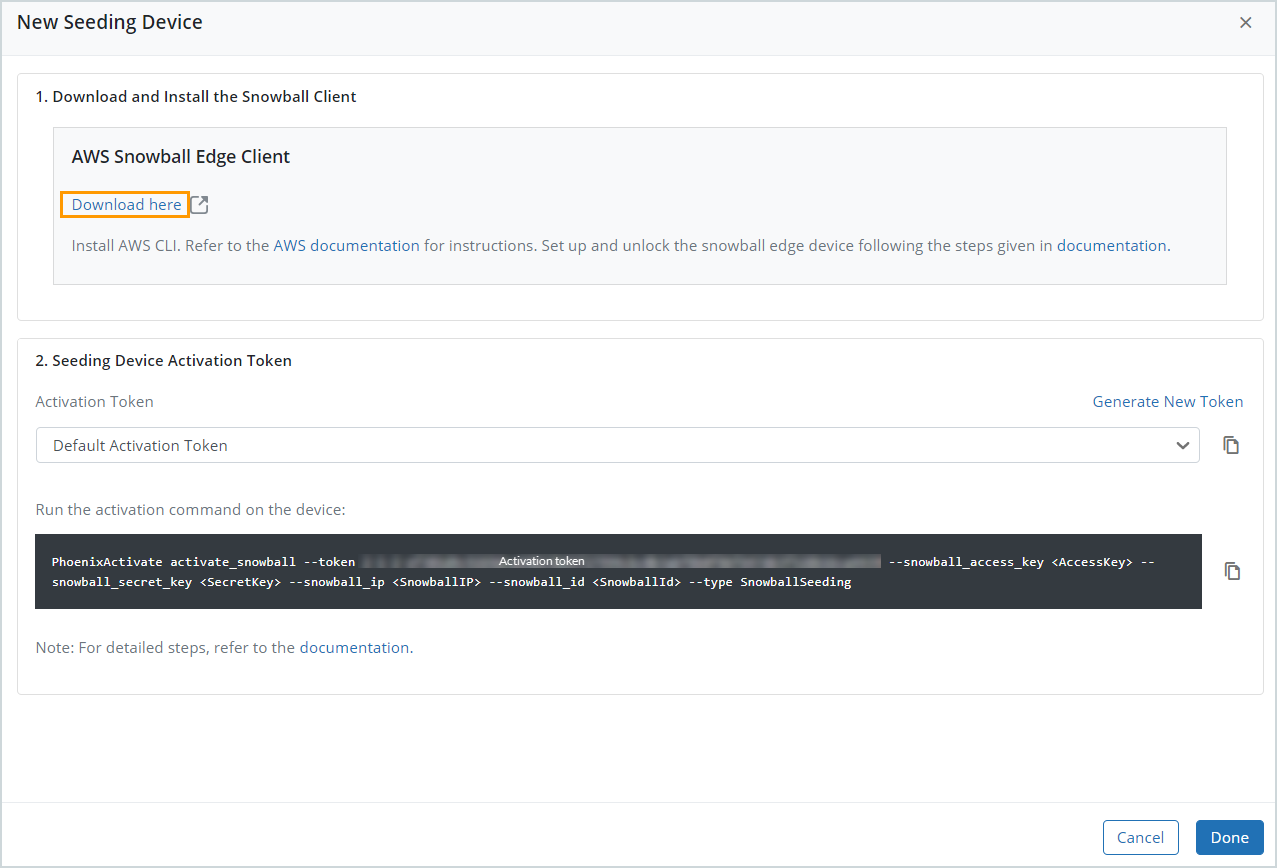
- On the New Seeding Device page, under Download and Install the Snowball Client, click Download here. You are redirected to the AWS Snowball Resources page.
-
On the AWS Snowball resources page, navigate to the Snowball Edge Client section.
-
Download the AWS Snowball Edge client installation package for your operating system.
-
After downloading, install the Snowball Edge Client on the resources that you want to connect with the Snowball Edge device.
-
-
Download the AWS CLI by using the instructions given on the Installing the AWS Command Line Interface page.
- In the Seeding Device Activation Token section, click the Copy Command icon.
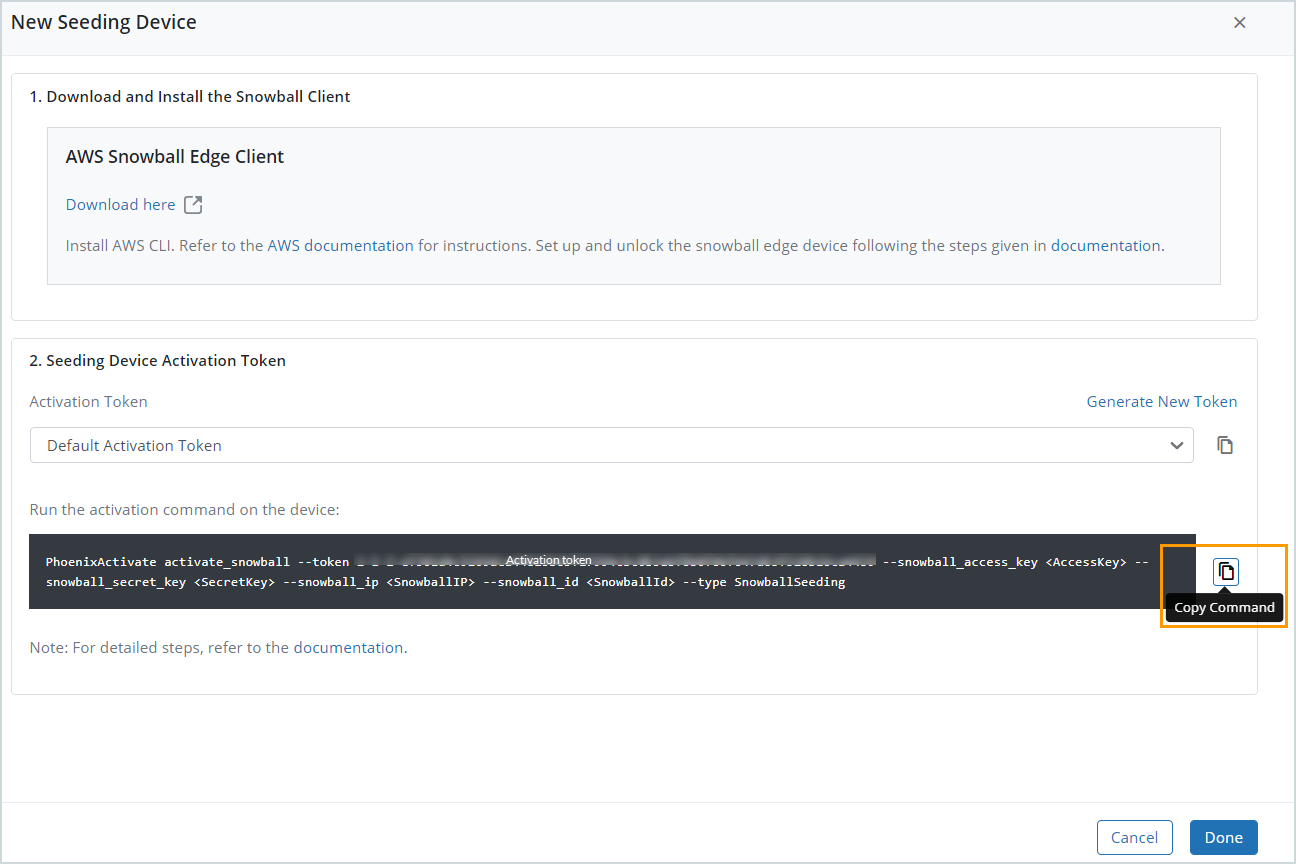
- This activation command will be used in the procedure described in the Activate the Snowball Edge device section.
Note: This activation token for the seeding device is saved on the Cloud and can be accessed from the Manage > Activation Tokens page if required.
-
In the New Seeding Device dialog box, click Done.
2. Set up and unlock Snowball Edge
- Connect the Snowball Edge device to your internal network and turn the device on.
- Wait for a few minutes while the device boots up.
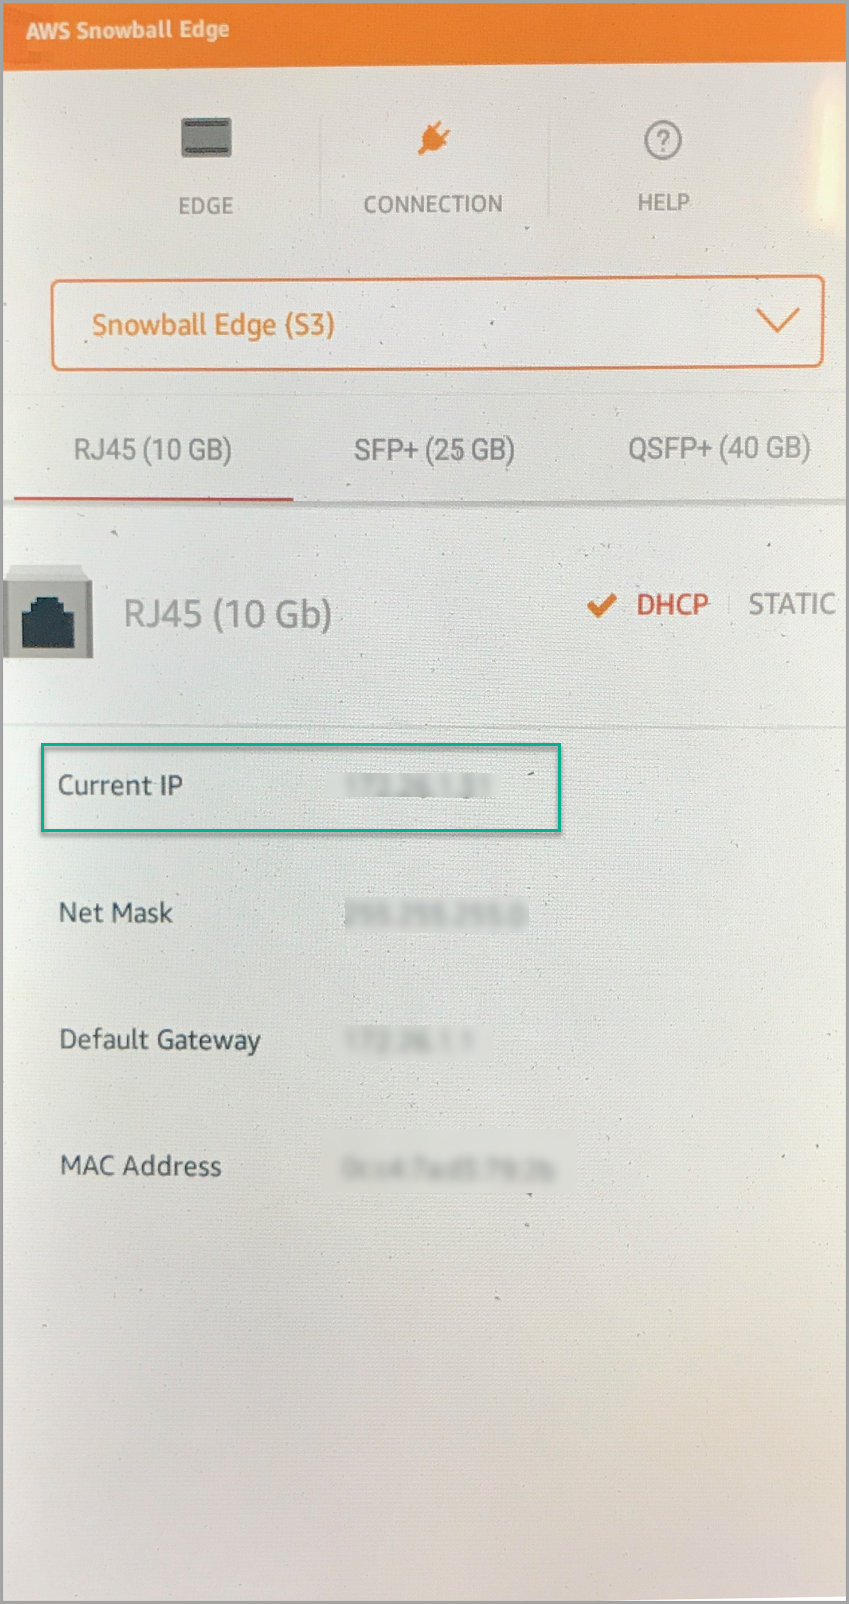
Note: In the case of DHCP, you will know you are properly connected to the network when the IP address is displayed in the Connection tab. In the case of STATIC, you will need to enter these fields manually on the LCD.
- Note the IP address of the Snowball Edge device on its LCD.
- Run the
pingcommand from the Snowball Client CLI with the IP address of the Snowball Edge device to ensure that it is connected.
Perform the following steps on the Snowball client
Note: As an example, we are using the values of Snowball Edge IP address as 172.x.x.10 and the EC2 IP address as 172.x.x.45.
- Run the following command on the command prompt of the Snowball Edge client to unlock the AWS Snowball Edge device. The value of the endpoint field is the IP address of the Snowball Edge device. Use the manifest file and unlock code provided by {{phoenix}} to unlock the Snowball Edge device.
snowballEdge unlock-device --endpoint https://Snowball_Edge_IP_address --manifest-file path/to/manifest/file --unlock-code 29-character_unlock_code
Example:
snowballEdge unlock-device --endpointhttps://172.x.x.10--manifest-fileJID7fa3b0c4-xxxx-xxxx-9bd3-5fb0136e4bae_manifest.bin--unlock-code89faf-xxxxx-xxxxx-f892c-9c141 - Verify that the Snowball Edge device is unlocked by running the following command:
snowballEdge describe-device --endpoint https://Snowball_Edge_IP_address --manifest-file path/to/manifest/file --unlock-code 29-character_unlock_code
Example:
snowballEdge describe-device --endpoint https://172.x.x.10 --manifest-fileJID7fa3b0c4-xxxx-xxxx-9bd3-5fb0136e4bae_manifest.bin--unlock-code89faf-xxxxx-xxxxx-f892c-9c141Note: The message
“State” : “UNLOCKED”appears as part of the output upon the success of the unlock operation. Note the value of thePhysicalNetworkInterfaceIdfield associated with the IP address of the Snowball Edge device.
If the message“State” : “UNLOCKED”does not appear, wait for some time as the unlocking process might take some time. Alternatively, you can verify the manifest file and unlock codes and check if the LCD display on the AWS Snowball Edge device's front indicates that the device is ready for use.
- Check the status of s3 and ec2 services by running the following commands:
- For s3:
snowballEdge describe-service --endpoint https://Snowball_Edge_IP_address --manifest-file path/to/manifest/file --unlock-code 29-character unlock code --service-id s3
Example:snowballEdge describe-service --endpointhttps://172.x.x.10--manifest-fileJID7fa3b0c4-xxxx-xxxx-9bd3-5fb0136e4bae_manifest.bin--unlock-code89faf-xxxxx-xxxxx-f892c-9c141--service-id s3 - For ec2:
snowballEdge describe-service --endpoint https://Snowball_Edge_IP_address --manifest-file path/to/manifest/file --unlock-code 29-character unlock code --service-id ec2
Example:snowballEdge describe-service --endpointhttps://172.x.x.10--manifest-fileJID7fa3b0c4-xxxx-xxxx-9bd3-5fb0136e4bae_manifest.bin--unlock-code89faf-xxxxx-xxxxx-f892c-9c141--service-id ec2
Note: This command returns a status value for a service. It also includes state information that might be helpful in resolving issues you encounter with the service. These states are as follows:
ACTIVE: The service is running and available for use.
ACTIVATING: The service is starting up, but it is not yet available for use.
DEACTIVATING: The service is in the process of shutting down.
INACTIVE: The service is not running and is not available for use.
Ensure that the output states the status of the services as ACTIVE. If the state does not appear as ACTIVE, contact Support. - For s3:
- Create a virtual private network interface. The following examples show the execution of this command with the two different IP address assignment methods, either DHCP or STATIC, depending on the network configuration. Use the value of the
--physical-network-interface-idfield as the one that you noted in Step 2.- For DHCP:
snowballEdge create-virtual-network-interface --physical-network-interface-id physical network configuration ID --ip-address-assignment DHCP --endpoint https://Snowball_Edge_IP_address --manifest-file path/to/manifest/file --unlock-code 29-character unlock code
Example:snowballEdge create-virtual-network-interface --physical-network-interface-id snow.ni-81c83c258386c98fc --ip-address-assignment DHCP --endpointhttps://172.x.x.10--manifest-fileJID7fa3b0c4-xxxx-xxxx-9bd3-5fb0136e4bae_manifest.bin--unlock-code89faf-xxxxx-xxxxx-f892c-9c141 - For STATIC:
snowballEdge create-virtual-network-interface --physical-network-interface-id physical network configuration ID --ip-address-assignment STATIC --static-ip-address-configuration IpAddress=EC2_IP_address,Netmask=netmask --endpoint https://Snowball_Edge_IP_address --manifest-file path/to/manifest/file --unlock-code 29-character unlock code
Example:snowballEdge create-virtual-network-interface --physical-network-interface-id snow.ni-abcd1234 --ip-address-assignment STATIC --static-ip-address-configuration IpAddress=172.x.x.45,Netmask=255.xxx.xxx.x --endpointhttps://172.x.x.10--manifest-fileJID7fa3b0c4-xxxx-xxxx-9bd3-5fb0136e4bae_manifest.bin--unlock-code89faf-xxxxx-xxxxx-f892c-9c141
- For DHCP:
- Obtain the access key and the secret access key for accessing the EC2 instance on Snowball Edge by running the following commands:
- For the access key:
snowballEdge list-access-keys --endpoint https://Snowball_Edge_IP_address --manifest-file path/to/manifest/file --unlock-code 29-character unlock code
Example:snowballEdge list-access-keys --endpointhttps://172.x.x.10--manifest-fileJID7fa3b0c4-xxxx-xxxx-9bd3-5fb0136e4bae_manifest.bin--unlock-code89faf-xxxxx-xxxxx-f892c-9c141 - For the secret access key:
snowballEdge get-secret-access-key --endpoint https://Snowball_Edge_IP_address --manifest-file path/to/manifest/file --unlock-code 29-character unlock code --access-key-id access key
Example:snowballEdge get-secret-access-key --endpoint https://172.x.x.10 --manifest-file JID7fa3b0c4-xxxx-xxxx-9bd3-5fb0136e4bae_manifest.bin --unlock-code 89faf-xxxxx-xxxxx-f892c-9c141 --access-key-id 2OEYMELHRKVSOE5xxxx
- For the access key:
- Create an AWS profile to store the access credentials by using the following command:
aws configure --profile profile_name
Example:
aws configure --profile sb2
You are prompted to enter the AWS Access Key ID, AWS Secret Access Key, Default region name, and Default output format. Provide the value of the default region name as snowball. The default output format is json. - Configure the EC2 instance on the Snowball Edge device by running the following command:
aws ec2 describe-images --endpoint http://Snowball_Edge_IP_address:8008 --profileprofile_name
Example:
aws ec2 describe-images --endpoint http://172.x.x.10:8008 --profile sb2 - Note the value of ImageId from the previous step and use it while executing the following command to launch the EC2 instance:
aws ec2 run-instances --image-id ImageId --count 1 --endpoint http://Snowball_Edge_IP_address:8008 --instance-type sbe1.4xlarge --profile profile_name
Example:
aws ec2 run-instances --image-id snow.ami-7xxxxx03 --count 1 --endpoint http://172.x.x.10:8008 --instance-type sbe1.4xlarge --profile sb2 - Check the status of the EC2 instance by running the following command:
aws ec2 describe-instances --endpoint http://Snowball_Edge_IP_address:8008 --profile profile_name
Example:
aws ec2 describe-instances --endpoint http://172.x.x.10:8008 --profile sb2
TheStatefield in the output should appear as the following example.InstanceIdfield.
"State": {

           "Code": 16,

           "Name": "running"
}
Note: It takes a few minutes for the status to change from Pending to Running.
- Check the IP address of the virtual private network interface that we created in Step 4 by running the following command:
aws ec2 describe-addresses --endpoint http://Snowball_Edge_IP_address:8008 --profile profile_name
Example:
aws ec2 describe-addresses --endpoint http://172.x.x.10:8008 --profile sb2
The output should appear as the following example:
{

 "Addresses": [

 {

"PublicIp": "172.x.x.45"

  ]

}
- Associate the IP address of the virtual private network interface with the EC2 instance by running the following command. The IP will be used to access the EC2 instance and to connect to Cloud.
aws ec2 associate-address --public-ip PublicIp(EC2_IP_address) --instance-id InstanceId --endpoint http://Snowball_Edge_ip_address:8008 --profile profile_name
Example:
aws ec2 associate-address --public-ip 172.x.x.45 --instance-id "snow.i-84e798xxxxxd16d4b" --endpoint http://172.x.x.10:8008 --profile sb2 - Connect to the EC2 instance using the SSH key that is shared by Druva by running the following command:
ssh -i keyProvidedbyDruva root@EC2_IP_address
Example:
ssh -i local_xyz.pub root@172.x.x.45 - Add the Snowball Edge EC2 instance IP address in either the DNS table of the DNS server or in the hosts file of the server to be backed up. The location of the hosts file is as follows:
- For Windows: C:\Windows\System32\drivers\etc\hosts
- For Linux: /etc/hosts
3. Activate the Snowball Edge device
Activate the seeding device (EC2 instance) by running the following command. The value of <SnowballID> can be obtained from the AWS Snowball Edge page.
PhoenixActivate activate_snowball --token ActivationToken --snowball_access_key AccessKey --snowball_secret_key SecretKey --snowball_ip SnowballIP --snowball_id SnowballId --type SnowballSeeding --region snowball
Example:PhoenixActivate activate_snowball --token 13603-228-2497-bba520f69b97a8ac9249844xxxxxx13f91101182c4f6bc8b2e2c7c58578e8 --snowball_access_key 2OEYMELHRKVSOE5xxxx --snowball_secret_key 19GxxxxxxmXCAbGLxxxxxHwybQzxxxxxidgVaI --snowball_ip 172.x.x.10 --snowball_id JID7fa3b0c4-xxxx-xxxx-9bd3-5fb0136e4bae --type SnowballSeeding --region snowball
The Snowball Edge device is now set up, unlocked, and activated as a seeding device.