Deploy and register a Phoenix Backup Store
 Business Enterprise Elite
Druva backs up the Oracle RMAN backups created by Oracle Recovery Manager (RMAN). When the Oracle Database Administrator triggers a backup using RMAN, RMAN creates an Oracle RMAN backup and stores it on a specified target location. Deploy the Phoenix Backup Store and create a backup mount on the Phoenix Backup Store that serves as the RMAN target location.
You can create a Phoenix Backup Store on an Ubuntu server, AWS EC2 instance, or a virtual machine. Druva provides the following deployment packages:
- A Debian package that is installed on an Ubuntu server that can work as a Phoenix Backup Store, or can be deployed on an Amazon EC2 instance with Ubuntu as its operating system and can work as the Phoenix Backup Store
- An Open Virtual Appliance package that is deployed on a VMware setup to create a virtual machine and use the virtual machine as the Phoenix Backup Store
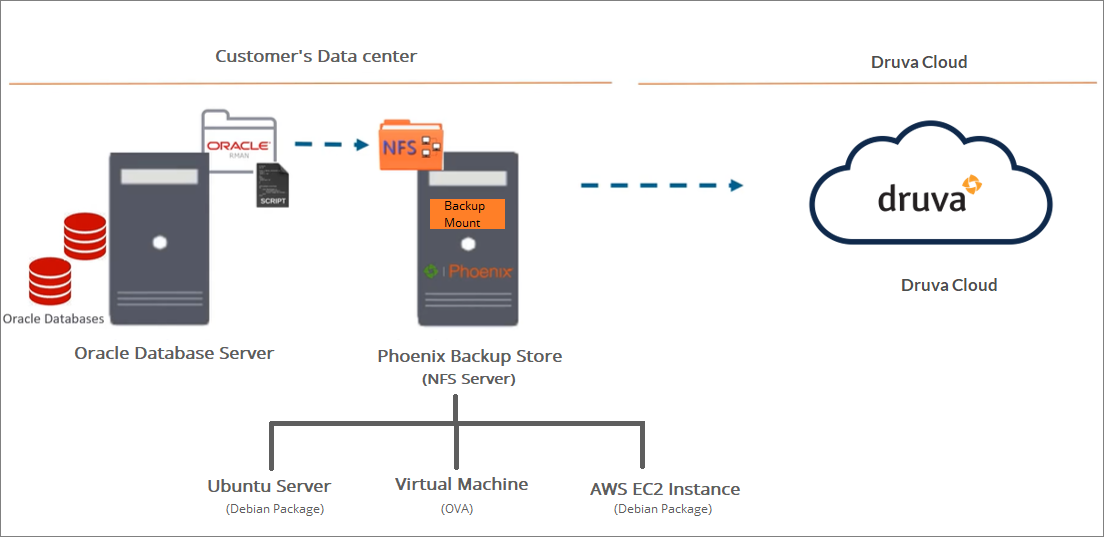
After you deploy the package:
- The Ubuntu server, AWS EC2 instance, or the virtual machine becomes the Phoenix Backup Store that works as an NFS server.
- A mount created on the Phoenix Backup Store is configured as a location to store Oracle RMAN backups.
Before you begin
Before you deploy the package and create the Phoenix Backup Store:
- Ensure that the Ubuntu server, AWS EC2 instance, or the virtual machine meets the hardware and software requirements specified in the system requirements article.
- To deploy a Debian package on an Amazon EC2 instance, read the recommended configuration for the AWS EC2 instance.
- Ensure that the Phoenix Backup Store uses Ubuntu 18.04.
- Set up the Phoenix Backup Store in your IT infrastructure so that the RMAN can access the mount on it and store the backups it creates.
- Ensure that Internet access is enabled for the Phoenix Backup Store.
- Read the quick steps article.
Step 1: Download the Phoenix Backup Store package and generate activation token
If you want to set up the Phoenix Backup Store on an Ubuntu server, download the Debian package. To set up the Phoenix Backup Store as a virtual machine, download the Open Virtual Appliance (OVA) package.
Procedure
- Log in to the Management Console.
- Click Oracle > Phoenix Backup Store from the Protect menu. Note that if the All Organizations menu is enabled, you have to first select an organization where the Phoenix Backup Store needs to be configured and then click Oracle > Phoenix Backup Store. The Oracle page appears.
- On the Oracle page, click Register Phoenix Backup Store.
The Register Phoenix Backup Store page appears.
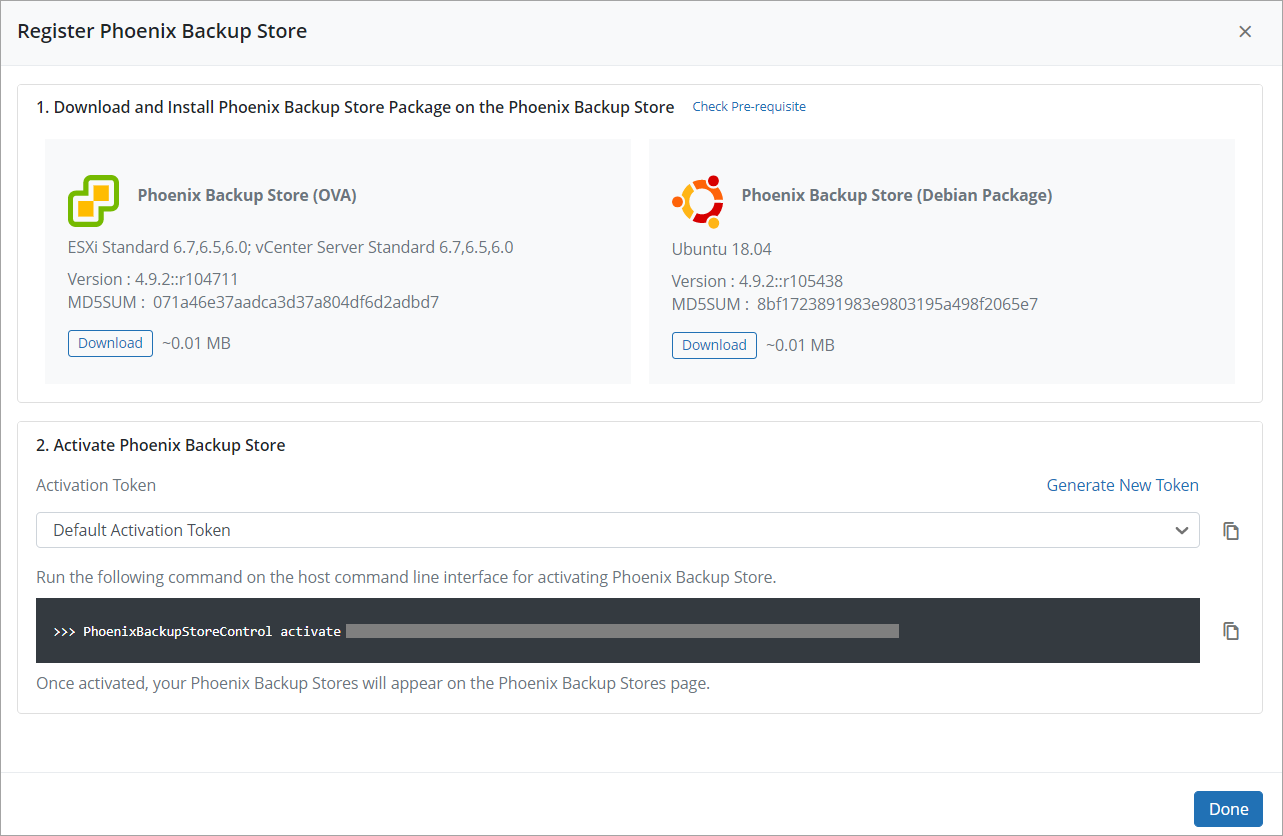
- In the Download and Install Phoenix Backup Store Package on the Phoenix Backup Store section, click Download under Phoenix Backup Store (OVA) or Phoenix Backup Store (Debian Package) sections to download the OVA package or the Debian package, respectively.
Note: The Phoenix Backup Store package is also available on the Druva downloads page.
- In the Activate Phoenix Backup Store section, use the Default Activation Token provided by Druva to activatePhoenix Backup Store. This token is valid for 25 servers and for 7 days.
- Click Copy Command to copy the activation script containing the activation command and activation token, save it to a text file, and click Done.
You can also navigate to Manage > Activation Tokens from the top menu bar to get the activation token again. - If this token has expired, click Generate New Token. In the Generate Token dialog box, enter the following details, and click Generate.
Field Description Token Description Specify a description to help you identify the token. This token can activate <the number of> stores Specify the number of Phoenix Backup Stores that can be activated using this token. The token expires in Specify the number of days after which the token cannot be used for activating a Phoenix Backup Store. - Click Done.
After you generate an activation token, deploy the Debian or OVA package to set up Phoenix Backup Store.
Step 2: Deploy the Debian package or OVA and register the Phoenix Backup Store
- Deploy the Debian package on an AWS EC2 instance to use the instance as a Phoenix Backup Store
- Deploy the Debian package on an Ubuntu server to use the Ubuntu server as a Phoenix Backup Store
- Deploy the OVA package on a VMware setup to use the virtual machine as a Phoenix Backup Store
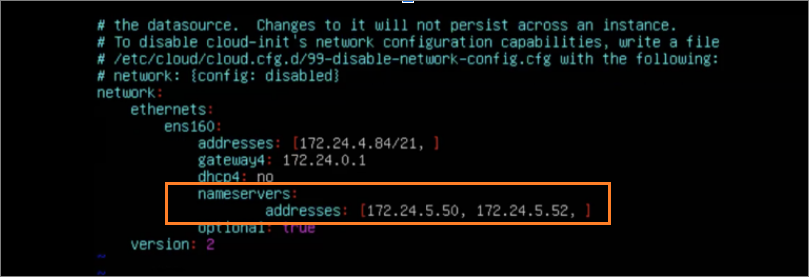
- To retain the DNS resolution, add a DNS server entry to the 50-cloud-init.yaml as shown in the following screenshot, and save the changes made.
- You can set the hostname by running the hostnamectl command:
hostnamectl set-hostname <hostnameofthePBS>
Deploy the Debian package on an Amazon EC2 instance with Ubuntu as its operating system
The Debian package that you download is installed on the EC2 instance to use it as a Phoenix Backup Store. The mount created on the Phoenix Backup Store serves as the location to store Oracle RMAN backups.
Prerequisites
- Read the system requirements to use an EC2 instance as a Phoenix Backup Store and create an EC2 instance on the AWS Management Console with the recommended settings.
- Select the General Purpose SSD (gp2) Volume type instead of the Throughput Optimized HDD (st1) for better performance.
- Create the EC2 instance with only one disk for the operating system.
- Create and attach at least three volumes for the following resources
Note: Ensure that you create volumes in the same availability zone as that of the EC2 instance.
- Two volumes for ZFS pools
- One volume for the restore mount
- Ensure that the auto-enable public IP setting is enabled before launching a fresh EC2 instance for PBS deployment.
Ensure that the DNS resolution is working. Add a named server (8.8.8.8) entry in the AWS PBS Server Steps. See AWS documentation for details.
Ubuntu 18.04
By default on Ubuntu 18.04, the netplan.io package handles the network interface configuration, and the systemd-resolved service handles DNS queries using a stub resolver. The stub resolver IP is located in /etc/resolv.conf.
In turn, the /etc/resolv.conf file is a symlink to the /run/systemd/resolve/stub-resolv.conffile. The supersede statement in /etc/dhcp/dhclient.conf might not work as expected if either of the following is true for the /etc/resolv.conf file:
The file is not a symlink on your instance. The file is a symlink pointing to a different file, such as /run/systemd/resolve/resolv.conf. Either of these conditions indicate customization of the default Ubuntu 18.04 configuration.
Run the following steps to override the DNS server values:
- Netplan typically stores configuration files in /etc/netplan directory. Create a file named
/etc/netplan/99-custom-dns.yaml, and then populate it with the following lines. Be sure to replace the placeholder DNS server IP addresses with your preferred addresses:
network:

    version: 2

    ethernets:

        eth0:

            nameservers:

                    addresses: [1.2.3.4, 5.6.7.8]

            dhcp4-overrides:

                    use-dns: false
-
After these changes, you'll still see the stub resolver IP in /etc/resolv.conf. This is expected. The stub resolver IP is local to your operating system, and in the background, the stub resolver uses the DNS servers that you specified in the preceding 99-custom-dns.yaml file.
-
Reboot the instance.
-
Run the systemd-resolve command to confirm that the system picks up the intended DNS server IP addresses correctly:
systemd-resolve --status
Procedure
- Connect to the EC2 instance terminal.
- Run the following command to update the apt package.
sudo apt-get updatePhoenix Backup Store requires ZFS and NFS packages that are dependent on the latest Advanced Packaging Tool (apt). Ensure that you run the command to update the apt package.
- Install the ZFS package. The command to install the ZFS package is:
sudo apt install zfsutils-linux=0.7.5-1* - Install the NFS kernel package. The command to install the NFS kernel package is:
sudo apt install nfs-kernel-server=1:1.3.4-2.1*Note: If you run into an error at this step, ensure that you have updated the apt package. Refer to step 2.
- Create partitions on one of the disks using the fdisk command and choose the default values of the sector to use the whole disk.
For example:
fdisk /dev/xvdf
- Create a file system on the disk using the following command:
mkfs.ext4 <partition path>
For example:
mkfs.ext4 /dev/xvdf1Note: Note the UUID of the partition created using either of the following commands:
- blkid
- ls -l /dev/disk/by-uuid/
We recommend you to add the UUID entry to the fstab so that the partition gets automatically mounted on the machine’s next reboot.
For example:
UUID=<uuid_of_xvdf1> /mnt/restores ext4 defaults 0 0 -
Run the following command to create the default directory for restore:
mkdir /mnt/restoresNote: Do not perform Steps 7 and 8 for Phoenix Backup Store deployments that use AMI or OVA because the /mnt/restores file system is already built into these deployments.
Proceed with Steps 7 and 8 only for deploying Phoenix Backup Store using the Debian package.
- Run the following command to mount the restore disk at the /mnt/restores path:
mount -a - On the terminal, run the dpkg command with the path to the Debian package to install it.
sudo dpkg -i <path-to-the-Phoenix-Backup-Store-debian-package>
For example:
sudo dpkg -i /home/test-usr/Downloads/druva-phoenix-backupstore-4.7.6-110.amd64.debEnsure that you provide the correct path to the location of the Debian package and its name.
These steps install the ZFS package, the NFS kernel, and the Druva binaries that Druva needs to create the Phoenix Backup Store. - After the package is installed, perform the following steps to create a ZFS pool using the disks on the Ubuntu server:
- To create a ZFS pool, run the following command:
zpool_config_no_raid.sh <disk-name-of-EBS-volume1> <disk-name-of-EBS-volume2> ...
For this example, the command to use the EBS volumes xvdh and xvdg is:
zpool_config_no_raid.sh xvdh xvdg
- You can run the lsblk command to get the EBS volume names. The following example shows the output of the lsblk command on EC2 instance:
root@ec2-instance:/opt/Druva/Phoenix/PhoenixBackupStore/bin# lsblk
The output of the command looks like:ubuntu@ip-172-31-80-145:~$ lsblk NAME MAJ:MIN RM SIZE RO TYPE MOUNTPOINT loop0 7:0 0 55.5M 1 loop /snap/core18/1997 loop1 7:1 0 33.3M 1 loop /snap/amazon-ssm-agent/3552 loop2 7:2 0 55.5M 1 loop /snap/core18/1988 loop3 7:3 0 31.1M 1 loop /snap/snapd/11036 loop4 7:4 0 32.3M 1 loop /snap/snapd/11588 xvda 202:0 0 15G 0 disk └─xvda1 202:1 0 15G 0 part / xvdf 202:80 0 10G 0 disk └─xvdf1 202:81 0 10G 0 part /mnt/restores xvdg 202:96 0 10G 0 disk ├─xvdg1 202:97 0 10G 0 part └─xvdg9 202:105 0 8M 0 part xvdh 202:112 0 10G 0 disk ├─xvdh1 202:113 0 10G 0 part └─xvdh9 202:121 0 8M 0 part
In the output, the block devices that have the type listed as disk correspond to the EBS volumes of the EC2 instance. This is an example output and the device names can change based on the configuration and settings of your EC2 instance. Ensure that you use the correct device names based on your EC2 instance. For example, if you are using a Nitro-based instance, the EBS volumes can get names such as nvme0n1 and nvme1n1. In such a case, use the names of the EBS volumes as listed in the output of the lsblk command that you run on your EC2 instance.
Disk name of an EBS volume may change if it is detached from the EC2 instance and then re-attached.
The above disk names are examples. Ensure that you provide the correct disk names when you create a ZFS pool. To create a ZFS pool with RAIDZ configuration:
-
Use zpool_config_raidz1.sh in place of zpool_config_no_raid.sh
-
RAIDZ configuration requires at least three disks.
-
The scripts are stored under the /opt/Druva/Phoenix/PhoenixBackupStore/bin folder on the Phoenix Backup Store.
-
- To create a ZFS pool, run the following command:
- Run the following command to restart the Phoenix Backup Store service:
sudo service PhoenixBackupStore restart
-
After installing the package and configuring the ZFS pool, run the activation command with the token you generated above to activate the Phoenix Backup Store:
Note: Ensure that ZFS pool is created before you activate the Phoenix Backup Store.
The Phoenix Backup Store is deployed and registered with Druva. You must now configure the Phoenix Backup Store and RMAN hosts to backup databases.
Deploy the Debian package on an Ubuntu server and register the Phoenix Backup Store
The Debian package that you download is deployed on an Ubuntu server to create the Phoenix Backup Store. The mount created on the Phoenix Backup Store serves as the location to store Oracle RMAN backups.
Prerequisite
Ensure that the package is accessible on the Ubuntu server.
Procedure
- Connect to the Ubuntu server using PuTTy or launch the terminal on the Ubuntu server.
- Run the following command to update the apt package.
sudo apt-get update
Phoenix Backup Store requires ZFS and NFS packages that are dependent on the latest Advanced Packaging Tool (apt). Ensure that you run the command to update the apt package. - Install the ZFS package on the Ubuntu server. The command to install the ZFS package is:
sudo apt install zfsutils-linux=0.7.5-1*
- Install the NFS kernel package. The command to install the NFS kernel package is:
sudo apt install nfs-kernel-server=1:1.3.4-2.1*Note: If you run into an error at this step, ensure that you have updated the apt package. Refer to step 2.
- Create partitions on one of the disks using the fdisk command and choose the default values of the sector to use the whole disk.
For example:
fdisk /dev/xvdf - Create a file system on the disk using the following command:
mkfs.ext4 <partition path>
For example:
mkfs.ext4 /dev/xvdf1Note: Note the UUID of the partition created using either of the following commands:
- blkid
- ls -l /dev/disk/by-uuid/
We recommend you to add the UUID entry to the fstab so that the partition gets automatically mounted on the machine’s next reboot.
For example:
UUID=<uuid_of_xvdf1> /mnt/restores ext4 defaults 0 0 -
Run the following command to create the default directory for restore:
mkdir /mnt/restores - Run the following command to mount the restore disk at the /mnt/restores path:
mount -a - On the terminal, run the dpkg command with the path to the Debian package to install it.sudo dpkg -i <path-to-the-Phoenix-Backup-Store-debian-package>
For example:
sudo dpkg -i /home/test-usr/Downloads/druva-phoenix-backupstore-4.7.6-110.amd64.deb
Ensure that you provide the correct path to the location of the Debian package and its name.These steps install the ZFS package, the NFS kernel, and the Druva binaries that Druva needs to create the Phoenix Backup Store.
-
[Optional] If the Ubuntu server on which you are deploying a Phoenix Backup Store Debian package is a VMware virtual machine, perform the following steps to set disk.EnableUUID = True on the virtual machine:
-
On the vSphere client that is connected to the vCenter/ESXi host, select the virtual machine that you are configuring as a Phoenix Backup Store and then turn it off.
-
Select the virtual machine on the vSphere client, and then click Edit Settings.
-
In the Virtual Machine Properties dialog, select the Options tab.
-
In the Options tab, select General under Advanced on the left pane.
-
On the right pane, click Configuration Parameters... in the Configuration Parameters section. The Configuration Parameters dialog appears.
-
In the Configuration Parameters dialog that appears, update the value of the parameter with the name disk.EnableUUID to true and then click OK.
If disk.EnableUUID parameter is not listed under the Name column, click the Add Row button to add it and then set its value to true. -
Turn the virtual machine on.
-
- After the package is installed, perform the following steps to create a ZFS pool using the disks on the Ubuntu server:
- To get the disk IDs, run the following command on the command line terminal:
ls -l /dev/disk/by-id/
The output of the command looks like:drwxr-xr-x 2 root root 460 Jan 2 07:21 ./
drwxr-xr-x 7 root root 140 Jan 2 07:21 ../
lrwxrwxrwx 1 root root 9 Jan 2 07:17 ata-VMware_Virtual_SATA_CDRW_Drive_00000000000000000001 -> ../../sr0
lrwxrwxrwx 1 root root 9 Jan 2 07:21 scsi-36000c291a9ac60a4f33cfce60c7b3860 -> ../../sdc
lrwxrwxrwx 1 root root 9 Jan 2 07:21 scsi-36000c29484ebb93eaece5ac0dc845d08 -> ../../sdb
lrwxrwxrwx 1 root root 9 Jan 2 07:17 scsi-36000c29b9dce7313dfdb13871518563a -> ../../sdd
lrwxrwxrwx 1 root root 9 Jan 2 07:17 scsi-36000c29f3116f1d4f65e63c182d3ecf0 -> ../../sda
lrwxrwxrwx 1 root root 10 Jan 2 07:17 scsi-36000c29f3116f1d4f65e63c182d3ecf0-part1 -> ../../sda1
lrwxrwxrwx 1 root root 10 Jan 2 07:17 scsi-36000c29f3116f1d4f65e63c182d3ecf0-part2 -> ../../sda2
lrwxrwxrwx 1 root root 9 Jan 2 07:21 wwn-0x6000c291a9ac60a4f33cfce60c7b3860 -> ../../sdc
lrwxrwxrwx 1 root root 9 Jan 2 07:21 wwn-0x6000c29484ebb93eaece5ac0dc845d08 -> ../../sdb
lrwxrwxrwx 1 root root 9 Jan 2 07:17 wwn-0x6000c29b9dce7313dfdb13871518563a -> ../../sdd
lrwxrwxrwx 1 root root 9 Jan 2 07:17 wwn-0x6000c29f3116f1d4f65e63c182d3ecf0 -> ../../sda
lrwxrwxrwx 1 root root 10 Jan 2 07:17 wwn-0x6000c29f3116f1d4f65e63c182d3ecf0-part1 -> ../../sda1
lrwxrwxrwx 1 root root 10 Jan 2 07:17 wwn-0x6000c29f3116f1d4f65e63c182d3ecf0-part2 -> ../../sda2 - To create a ZFS pool, run the following command:
./zpool_config_no_raid.sh <disk-id-of-disk1> <disk-id-of-disk2> ...
For this example, the command to use the disks sdb and sdc is:
./zpool_config_no_raid.sh scsi-36000c29484ebb93eaece5ac0dc845d08 scsi-36000c291a9ac60a4f33cfce60c7b3860 -
The above disk IDs are examples. Ensure that you provide the correct disk IDs when you create a ZFS pool. To create a ZFS pool with RAIDZ configuration:
- To get the disk IDs, run the following command on the command line terminal:
- Use zpool_config_raidz1.sh in place of zpool_config_no_raid.sh
- RAIDZ configuration requires at least three disks.
- The scripts are stored under the /opt/Druva/Phoenix/PhoenixBackupStore/bin folder on the Phoenix Backup Store.
-
Run the following command to restart the Phoenix Backup Store service:
sudo service PhoenixBackupStore restart -
After installing the package and configuring the ZFS pool, run the activation command with the token you generated above to activate the Phoenix Backup Store:
PhoenixBackupStoreControl activate <govcloud> <activation_token>
Example activation command for Public cloud:
PhoenixBackupStoreControl activate ExampleToken1234
Example activation command for Gov cloud:
PhoenixBackupStoreControl activate govcloud ExampleToken1234
Ensure that you replace example values with real values. In the above syntax, replace ExampleToken1234 with the token that you generate.Note: Ensure that ZFS pool is created before you activate the Phoenix Backup Store.
The Phoenix Backup Store is deployed and registered with Druva. You must now configure the Phoenix Backup Store and RMAN hosts to backup databases.
Deploy the OVA package on a VMware setup and register the Phoenix Backup Store virtual machine
In addition to the Debian package, Druva provides an open virtual appliance (OVA) package that you can use to create a Phoenix Backup Store on a VMware setup. The OVA package that you download is deployed on a VMware setup to create the Phoenix Backup Store virtual machine. The mount created on the Phoenix Backup Store serves as the location to store Oracle RMAN backups.
Prerequisite
Ensure that the OVA package is downloaded.
Procedure
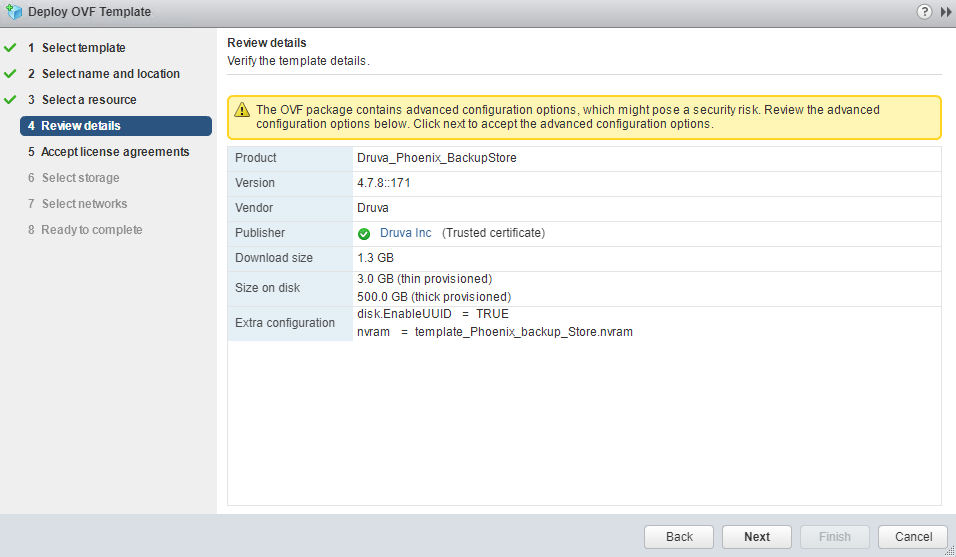
To deploy the Phoenix Backup Store OVA on a VMware setup, see Deploy an OVF or OVA template [External link to VMware documentation].
Note: When the vSphere client prompts you to review the deployment details in the fourth step of the deployment process, ensure that you click Next. The vSphere client shows this warning due to the advanced configuration options that Druva adds in the OVA package to ensure that the virtual disks get a static disk-ID which is required for creating a ZFS pool.
The OVA package can be deployed for vCenter/ESXi version 6.0 or later. When you deploy the OVA, assign the right amount of storage for backup and restore based on the sizing calculated, and assign a static IP address to the Phoenix Backup Store.
After you deploy the Phoenix Backup Store OVA, start the virtual machine and connect to the virtual machine using PuTTy or any other remote utility. To log in to the Phoenix Backup Store enter the default credentials:
- root as the username
- PBS@123 as the password
After logging in, perform the following steps on the terminal:
- Create a ZFS pool using the virtual disks. The following procedure describes how to create a ZFS pool.
- To get the disk IDs, run the following command on the command line terminal:
ls -l /dev/disk/by-id/
The output of the command looks like:drwxr-xr-x 2 root root 460 Jan 2 07:21 ./
drwxr-xr-x 7 root root 140 Jan 2 07:21 ../
lrwxrwxrwx 1 root root 9 Jan 2 07:17 ata-VMware_Virtual_SATA_CDRW_Drive_00000000000000000001 -> ../../sr0
lrwxrwxrwx 1 root root 9 Jan 2 07:21 scsi-36000c291a9ac60a4f33cfce60c7b3860 -> ../../sdc
lrwxrwxrwx 1 root root 9 Jan 2 07:21 scsi-36000c29484ebb93eaece5ac0dc845d08 -> ../../sdb
lrwxrwxrwx 1 root root 9 Jan 2 07:17 scsi-36000c29b9dce7313dfdb13871518563a -> ../../sdd
lrwxrwxrwx 1 root root 9 Jan 2 07:17 scsi-36000c29f3116f1d4f65e63c182d3ecf0 -> ../../sda
lrwxrwxrwx 1 root root 10 Jan 2 07:17 scsi-36000c29f3116f1d4f65e63c182d3ecf0-part1 -> ../../sda1
lrwxrwxrwx 1 root root 10 Jan 2 07:17 scsi-36000c29f3116f1d4f65e63c182d3ecf0-part2 -> ../../sda2
lrwxrwxrwx 1 root root 9 Jan 2 07:21 wwn-0x6000c291a9ac60a4f33cfce60c7b3860 -> ../../sdc
lrwxrwxrwx 1 root root 9 Jan 2 07:21 wwn-0x6000c29484ebb93eaece5ac0dc845d08 -> ../../sdb
lrwxrwxrwx 1 root root 9 Jan 2 07:17 wwn-0x6000c29b9dce7313dfdb13871518563a -> ../../sdd
lrwxrwxrwx 1 root root 9 Jan 2 07:17 wwn-0x6000c29f3116f1d4f65e63c182d3ecf0 -> ../../sda
lrwxrwxrwx 1 root root 10 Jan 2 07:17 wwn-0x6000c29f3116f1d4f65e63c182d3ecf0-part1 -> ../../sda1
lrwxrwxrwx 1 root root 10 Jan 2 07:17 wwn-0x6000c29f3116f1d4f65e63c182d3ecf0-part2 -> ../../sda2 - To create a ZFS pool, run the following command:
./zpool_config_no_raid.sh <disk-id-of-disk1> <disk-id-of-disk2> ...
For this example, the command to use the disks sdb and sdc is:./zpool_config_no_raid.sh scsi-36000c29484ebb93eaece5ac0dc845d08 scsi-36000c291a9ac60a4f33cfce60c7b3860
The above disk IDs are examples. Ensure that you provide the correct disk IDs when you create a ZFS pool. The OVA that Druva provides comes with three disks. However, the first two disks with the storage capacity of 100 GB each are for backup and the third disk with the storage capacity of 200 GB is for restore. Ensure that you do not use the third disk with 200 GB storage capacity for creating the ZFS pool. -
To create a ZFS pool with RAIDZ configuration:
-
Use zpool_config_raidz1.sh in place of zpool_config_no_raid.sh
-
RAIDZ configuration requires at-least three disks. Since the OVA ships with two disks for backup and one disk for restore, add a fourth virtual disk with the storage capacity of 100 GB and use the fourth disk along with the first and second disk. The Phoenix Backup Store uses the third disk with the storage capacity of 200 GB for restore. Ensure that you do not use the third disk with 200 GB storage capacity for creating the ZFS pool.
To add a new disk, perform the following steps on the vSphere client:-
Right-click the PBS virtual machine and click Edit Settings.
-
Add a new virtual disk with storage capacity 100 GB or more as per your storage requirement.
-
Click OK.
-
Right-click the Phoenix Backup Store virtual machine and click Power > Power On to start the Phoenix Backup Store.
-
-
The scripts are stored under the /opt/Druva/Phoenix/PhoenixBackupStore/bin folder on the Phoenix Backup Store. Perform the following steps:
-
Run the following commands:
-
cd /opt/Druva/Phoenix/PhoenixBackupStore/bin
-
./zpool_config_raidz1.sh <disk-id-of-disk1> <disk-id-of-disk2> <disk-id-of-disk3>
-
-
Wait for the pool to be created.
-
-
- To get the disk IDs, run the following command on the command line terminal:
- Run the following command to restart the Phoenix Backup Store service.
sudo service PhoenixBackupStore restart
- Run the activation command with the token you generated above to activate the Phoenix Backup Store:
PhoenixBackupStoreControl activate <govcloud> <activation_token>
Example activation command for Public cloud:
PhoenixBackupStoreControl activate ExampleToken1234
Example activation command for Gov cloud:
PhoenixBackupStoreControl activate govcloud ExampleToken1234
Ensure that you replace example values with real values. In the above syntax, replace ExampleToken1234 with the token that you generate.Note: Ensure that ZFS pool is created before you activate the Phoenix Backup Store.
The Phoenix Backup Store is deployed and registered with Druva. You must now configure the Phoenix Backup Store and RMAN hosts to backup databases.
Configure the Phoenix Backup Store to use a web-proxy