
How can we help you?

Druva Documentation

Manage backup policies

Enterprise Workloads Editions: File:/tick.png Business File:/cross.png Enterprise File:/tick.png Elite


This topic describes the following sections:

Overview of backup policy

Backup policies are rules that define the schedule for automatic backups, the retention period, and other advanced backup settings. After you configure servers for backup, the data from these servers is backed up and retained according to the backup policy. A File server can have one or more backup sets, which can be independently configured, backed up, and restored.

A backup policy for a File server defines the following:

  • When a backup job is triggered.
  • The Bandwidth available for the agent to execute a backup job.
  • The period for which a recovery point is retained. 
  • The backup scan methods.
  • The pre and post custom script settings.

 It is possible to create backup policies for File server and MS-SQL server with the same name.

Note: Druva creates a default backup policy for your setup. The default backup policy is configured to back up all file types. You can assign the default backup policy to one or more backup sets. You can also update or delete this backup policy.

Best practices for creating a backup policy

  • Druva allows you to attach the same backup policy to different backup sets. 
  • You can assign only one backup policy to a backup set.
  • The backup policy can be of the only type, such as File or MS-SQL, but not both. 
  • You can create as many backup policies as you want, depending on the number of servers and the frequency of data change on these servers. For example, for File servers that change frequently, you can create a backup policy, and define a schedule for a weekly backup for a longer duration, along with short-burst backups every second day.
  • In a production environment, we recommend that you create platform-specific backup policies. Additionally, if you want Druva to back up different types of data from different versions of Windows and Linux servers, create a separate backup policy for each version of Windows and Linux servers, respectively. 
  • The backup policy defines the backup schedules for your File servers. The schedules that you set depends on the volume and frequency of data change on your File servers. The schedules also depend on the availability of bandwidth for data transmission to Druva Cloud. If you expect a large dataset during backups, you can schedule backups to run during off-peak hours, such as weekends or after a workday. 

Note: The backup schedule that you define in a backup policy depends on your organization's policies. 

About retention

Retention defines the rules for retaining your backups (recovery point)  within the storage. Use the retention period to define the duration for which you want to retain your historical backups.

The objective of retention is to keep important data for future access, depending on how critical it is. Retention also ensures that backups that are no longer required are cleaned from your storage periodically, resulting in less storage utilization and costs.

The retention period would not be honored for the most recent recovery point when a server or VM or backup set is disabled. This allows you to restore the latest recovery point later if required.

Retention should consider the value of your data and the compliance requirements. The different types of data will be retained for different durations. For example, a bank's retention period for customers' financial records is different from facilities inventory records.

The main factors to consider while defining a retention period are:

  • Compliance requirements
  • Storage costs
  • Type of data

Retention period settings

Druva follows the Grandfather-Father-Son (GFS) retention model wherein, in case of an overlap, the retention setting of the longer period (Son-Father-Grandfather relation) is considered. The recovery point is expired as per the settings of the higher period.  For example, in case there is an overlap between the daily and weekly retention period, the weekly retention period is considered. So daily is the smallest unit and weekly overrides daily > monthly overrides weekly  > yearly overrides monthly. 

Also, Druva follows the Gregorian calendar for tracking days.

While backup schedules are configured on an hourly, daily, or weekly basis the last recovery point created by the backups on that particular day will be retained as per the retention setting.  

You can define the following durations to retain recovery points.

Retention Period Description
Daily recovery points

Druva retains all the recovery points that are created for the number of days specified in Daily recovery points.  

Druva considers midnight as the end of a day.

If you have configured Druva to back up your server multiple times within a day, Druva retains all the recovery points for the days specified.
Weekly recovery points (Son)

The number of weekly recovery points that Druva should retain. Druva treats the latest recovery point in the week as the weekly recovery point.

Druva considers midnight on Sunday as the end of the week.

Monthly recovery points (Father)

The number of monthly recovery points that Druva should retain. Druva treats the latest recovery point in the month as the monthly recovery point.

Druva considers midnight of the last day of a month as the end of the month.

Yearly recovery points (Grandfather)

The number of yearly recovery points that Druva should retain. Druva treats the latest recovery point in the year as the yearly recovery point.

Druva considers the midnight of the last day of the year as the end of the year.

The recovery point name displayed on the Management Console is recovery point creation time as per the server time zone, on which the backup occurred. Druva considers the time zone of the server for retaining the recovery points as per the retention setting.

Default retention period settings 

If you are registering the server under default organization, Druva provides a default backup policy with the following retention settings:

  • Daily recovery points: 14 days
  • Weekly revisions: 4 weeks
  • Monthly revisions: 3  months
  • Yearly revisions: 3  years

Note: The above default retention settings are applicable for Warm storage and Long Term Retention (LTR) tiers.

The following diagram illustrates the recovery points that will be available on a given day ( Feb 9 in this example) based on the retention settings you have configured. In this example the policy is created and backups start on Dec 30 of the previous year.

Retention for Enterprise workloads.png

On 9 Feb you will have 17 recovery points or recovery points to restore as described in the table. 

Note: Daily is the smallest unit and weekly overrides daily and monthly overrides weekly and yearly overrides monthly.

Recovery points resulting from

Description

Daily retention setting You will have 11 ( 14 daily less 2 weekly less 1 monthly)  recovery points (starting from 27 Jan) created due to the daily retention settings.
Weekly retention setting You will have 4 recovery points for 14 Jan, 21 Jan, 28 Jan and 4 Feb created due to the weekly settings.

The weekly recovery points that coincide with the daily recovery points (28 Jan and 4 Feb) will be considered and retained as per the weekly setting. So, even though the daily retention period expires for these dates the recovery points will be retained as per the weekly settings (4 weeks).
Monthly retention setting You will have 1 monthly recovery point of 31 Jan. This recovery point will be available for the next 3 months as it is a monthly retention point. So even though the 14 days daily retention period expires after 9 Feb, the recovery point will be available for the next 3  months.
Yearly retention setting You will have one recovery point for 31 Dec due to the yearly retention setting. This recovery point will be available for 3 years.

Impact of retention period settings on recovery point objective (RPO)

In continuation with the example above, so let us say malware was detected on 9 Feb evening.  After investigation, it was discovered that the data till 7 Feb is corrupted.  In that case, the recovery point available to you will be of 6 Feb which is available due to the daily recovery point.  However, there could be a data loss of data backed between 7 Feb and 9 Feb.

Retention Setting and RPO.png

Considerations

  • Any changes that you make to the existing retention policies will be applied to all the new as well as the existing recovery points.
  • Retention periods are applicable for recovery points that reside on CloudCache and Druva Cloud.
  • Druva runs a retention expiration algorithm to delete the recovery points that have crossed the expiration period. This algorithm does not delete thawed recovery points. For more information, see Recovery points.

Add a backup policy

This topic provides instructions to create a backup policy for the File servers.

Before adding a backup policy for File servers, ensure you have read:

Step 1: Provide general information

  1. Log in to the Management Console. 
  2. Select the workload from the Protect menu. Note that if the All Organizations menu is enabled, you have to first select an organization and then select the workload.
  3. In the navigation pane on the left, click Backup Policies.
  4. In the right pane, click New Backup Policy
  5. In the New Backup Policy dialog box, enter the following details in the Overview section.

    New Backup Policy- General.png
  •  Name: The name for the backup policy that you want to create
  • Description: A short description of the backup policy.
  1. Click Next to define the backup schedule.

Step 2: Define a backup schedule

  1. Under the Backup Schedule tab, provide the following information:

    backupscheduleFS1.png
  •  Backup Frequency: The days on which you want backups to repeat.
  • Start at (Server Timezone): The time when you want backups to start.
  • Backup Window (Hrs): The duration after which you want backup operations to stop. For example, if you set Start at to 9 AM and you set the duration to 2 hours, backups from your server start at 9 AM and stop at 11 AM, even if they do not complete.
  • Max Bandwidth: The maximum bandwidth that each server can consume while backing up data to Druva.  For a scheduled backup, the job will consume the assigned bandwidth. However, for manually triggered backup, the job will consume the available bandwidth on your network. The maximum bandwidth that a backup job can consume is 2 Gbps (2000 Mbps).
  • Remove: The remove icon is enabled if you have added more than one schedule. If you have added only one schedule, it cannot be removed.
  • Add Schedule: Use Add Schedule to create as many schedules as you want.
  • Ignore backup window for first backup: The option to ignore the specified backup duration for the first backup job. You can disable this option to enforce backup duration for the first backup job.

Advanced Settings for Linux Servers

advancedsettings1.png

  • Enable Smart Scan: For Linux server backup sets, you can enable Smart Scan if you have a lot of files that haven’t changed recently. Skipping these files makes incremental backups faster.
    This option does not apply to Windows servers since Windows servers use the USN journal to detect changed data.
  • Smart Scan Settings: You can select the following settings if Smart Scan is enabled. Smart scans follow the backup schedule for the policy.
    • Skip Scanning ACLs or permissions for unmodified files: Select this option to skip scanning the Access Control Lists or permissions of files that have not changed recently.
    • Only scan files created/modified in the last X months: Only scan files that were created or modified in the last <number of > months. You can select 1, 3, 6, 9, or 12 months for the duration. All files that are older than the specified duration are skipped from Smart Scans.
    • Full Scan Schedule: Even if you enable the smart scan, you can still run a full scan. You can choose to run a full scan every 24 weeks or less. We recommend that you run a full scan every four weeks. Also, specify the preferred day, time, backup window, and bandwidth.

      Backup Window is the duration after which you want backup operations to stop. For example, if you set Start at to 9 AM and you set the duration to 2 hours, backups from your server start at 9 AM and stop at 11 AM, even if they do not complete.

      Max. Bandwidth specifies the maximum bandwidth that each server can consume while backing up data to Druva. For a scheduled backup, the job will consume the assigned bandwidth. However, for manually triggered backup, the job will consume the available bandwidth on your network.

      Note: The maximum bandwidth that a backup job can consume is 2 Gbps (2000 Mbps).

      Note:

      • Smart scan does not apply to Windows server backup sets since Windows uses the USN journal to scan and detect changed files.  If you enable the Smart scan option for Windows servers (NTFS or ReFS), Druva ignores the Smart scan setting in the configuration and displays the Smart scan is not needed for NTFS/ReFS message in the progress logs.
      • If you change the Backup Content setting under the backup set, the subsequent scan is a full scan.
  1. Click Next to define the retention details.

Step 3: Define retention

In the Retention tab, select the storage tier and enter the duration for which the daily, monthly, weekly, and yearly recovery points should be retained. Click Next.

Storage Tier settings

RetentionTab.png

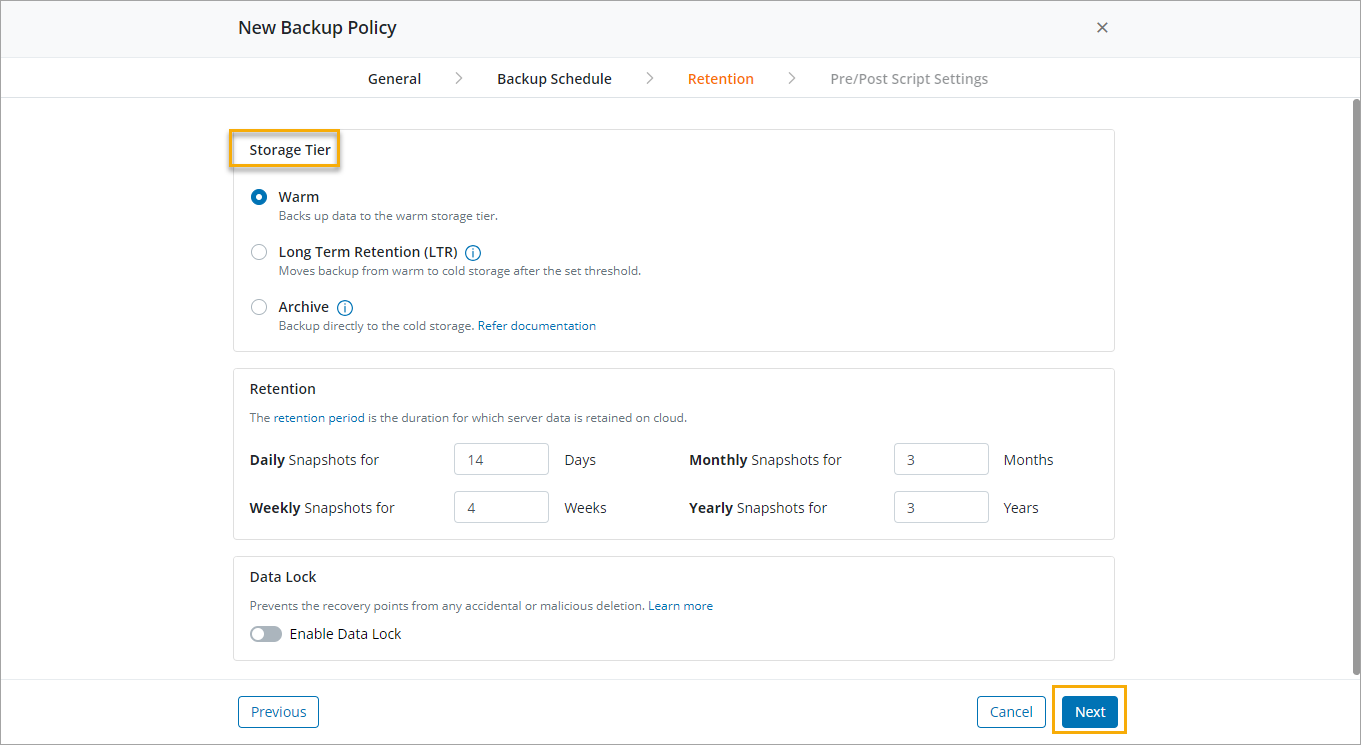
You can select Warm, Long Term Retention (LTR), or Archive options.

Warm 

By default, the warm storage tier is selected.

In the Retention tab, enter the duration for which the daily, monthly, weekly, and yearly recovery points should be retained.

Long Term Retention (LTR)

Select Long Term Retention (LTR) for backup sets that need to be retained for a year or longer.

In the Retention tab, enter the duration for which the daily, monthly, weekly, and yearly recovery points should be retained and the value of the Long Term Retention Threshold.

Recovery pointss older than the set threshold value are moved to the cold storage. This lowers the total storage cost for the LTR backup sets. 

For more information, see About Long Term Retention, and Enabling Long Term Retention.

Archive

Select Archive to move the backup data directly to the cold storage.

In the Retention tab, enter the duration you want to retain the archived data. For example, a retention value of 22 years means that all the recovery points are retained for 22 years.

Archive is used for storing data that is rarely accessed or restored but required to be protected for future reference and compliance purposes. Archive allows you to bypass the warm storage tier and directly backup the data to the cold tier. Data stored in the cold tier incurs up to 50% lower fee.
For more information, see Protect File Server and NAS data in Archive storage tier.

Enable Data Lock

You enable the Data Lock for the backup policy. Data Lock prevents your backup recovery points from accidental or malicious deletion or modification.

Note: Once you apply Data Lock to the backup policy, you cannot:

  • Disable Data Lock.
  • Delete the recovery points, backup sets, and backup policy.
  • Edit the retention period in the backup policy.
  • Associate another backup policy to the Data Lock-enabled backup set. 

For more information about Data Lock, refer to  Data Lock for preventing malicious or accidental deletion of recovery points

Notes: 

  • Ensure that you enter a value in at least one of the fields. Druva treats the values in the empty fields as zero.
  • Any changes that you make to the existing retention policies will be applied to all the new as well as the existing recovery points.

Step 4: Define pre and post script settings

You can optionally define settings for executing the pre-backup and post-backup scripts on Windows or Linux server. For more information about pre-backup and post-backup scripts, see Pre and post backup scripts for File server.

  1. Under the Pre/Post Script settings tab, provide the following information:

    New Backup Policy- Pre-Post Script Settings.png
    • Windows Server
      • Enable Scripts: Use it to enable the execution of pre and post backup scripts on Windows servers. When you enable this setting, the Scripts Location field gets enabled.
      • Scripts LocationSpecify the folder path containing the pre_script.bat and post_script.bat backup scripts.
    • Linux Server:
      • Enable ScriptsUse it to enable the execution of pre and post backup scripts on Linux servers. When you enable this setting, the Scripts Location field gets enabled.
      • Scripts LocationIn the Specify scripts location field, specify the folder path containing the pre_script.sh and post_script.sh backup scripts.
    • Skip backup if: Select one of the following options. 
      • Pre-script is not present at the specified location
      • Pre-script execution fails
    • Pre-script is not present at the specified location: Select this option to skip the backup operation when the pre-backup script is unavailable at the location specified in the Scripts Location field.
    • Pre-script execution fails: Select this option to skip the backup operation when the pre-backup script execution fails.
    • Abort pre/post script execution if it does not complete in XX Hours/Minutes: Select the time in hours or minutes after which the backup script execution aborts. If the script execution time limit is not specified,  the pre-backup and post-backup scripts run until the script execution is complete or 1 year, whichever is less. 
  2. Click Finish. The created backup policy is listed on the Manage Backup Policies page. 

Copy a File server backup policy

To create multiple copies of a backup policy without having to create a backup policy each time, you can create a copy of an existing backup policy.

When you create a copy of a backup policy, the newly-created backup policy is identical to the policy that it was copied from. You can modify the properties of this backup policy according to your requirements.

To copy a file server backup policy

  1. Log on to Management Console. 
  2. Select the workload from the Protect menu. Note that if the All Organizations menu is enabled, you have to first select an organization and then select the workload.
  3. In the navigation pane on the left, click Backup Policies
  4. Select the backup policy that you want to copy, and then click Use as template. 
  5. In the New Backup Policy window, enter the following details:

    New backup policy name: The name for the new backup policy
    Description (Optional): A description of the new policy
     
  6. Click Save.

    New Backup Policy.png

Note: The Selected backup policy field displays the name of the backup policy that you selected to copy . 

Update backup policy schedule

  1. Log in to the Management Console. 
  2. Select the workload from the Protect menu. Note that if the All Organizations menu is enabled, you have to first select an organization and then select the workload.
  3. In the navigation pane on the left, click Backup Policies.
  4. In the right pane, click the backup policy whose schedule needs to be updated. 
  5. In the Summary tab, under the Backup Schedule section, click Edit.
  6. On the Edit Backup Policy Schedule page, update the following:
    •  Backup Frequency: The days on which you want backups to repeat.
    • Start at (Server Timezone): The time when you want backups to start.
    • Backup Window (Hrs): The duration after which you want backup operations to stop. For example, if you set Start at to 9 AM and you set the duration to 2 hours, backups from your server start at 9 AM and stop at 11 AM, even if they do not complete.
    • Max Bandwidth: The maximum bandwidth that each server can consume while backing up data to Druva.  For a scheduled backup, the job will consume the assigned bandwidth. However, for manually triggered backup, the job will consume the available bandwidth on your network. The maximum bandwidth that a backup job can consume is 2 Gbps (2000 Mbps).
    • Remove: The remove icon is enabled if you have added more than one schedule. If you have added only one schedule, it cannot be removed.
    • Add Schedule: Use Add Schedule to create as many schedules as you want.
    • Ignore backup window for first backup: The option to ignore the specified backup duration for the first backup job. You can disable this option to enforce backup duration for the first backup job.

Advanced Settings for Linux Servers

  • Enable Smart Scan: For Linux server backup sets, you can enable Smart Scan if you have a lot of files that haven’t changed recently. Skipping these files makes incremental backups faster.
    This option does not apply to Windows servers since Windows servers use the USN journal to detect changed data.
  • Smart Scan Settings: You can select the following settings if Smart Scan is enabled. Smart scans follow the backup schedule for the policy.
    • Skip Scanning ACLs or permissions for unmodified files: Select this option to skip scanning the Access Control Lists or permissions of files that have not changed recently.
    • Only scan files created/modified in the last X months: Only scan files that were created or modified in the last <number of > months. You can select 1, 3, 6, 9, or 12 months for the duration. All files that are older than the specified duration are skipped from Smart Scans.
    • Full Scan Schedule: Even if you enable the smart scan, you can still run a full scan. You can choose to run a full scan every 24 weeks or less. We recommend that you run a full scan every four weeks. Also, specify the preferred day, time, backup window, and bandwidth.

      Backup Window is the duration after which you want backup operations to stop. For example, if you set Start at to 9 AM and you set the duration to 2 hours, backups from your server start at 9 AM and stop at 11 AM, even if they do not complete.

      Max. Bandwidth specifies the maximum bandwidth that each server can consume while backing up data to Druva. For a scheduled backup, the job will consume the assigned bandwidth. However, for manually triggered backup, the job will consume the available bandwidth on your network.

      Note: The maximum bandwidth that a backup job can consume is 2 Gbps (2000 Mbps).

      Note:

      • Smart scan does not apply to Windows server backup sets since Windows uses the USN journal to scan and detect changed files.  If you enable the Smart scan option for Windows servers (NTFS or ReFS), Druva ignores the Smart scan setting in the configuration and displays the Smart scan is not needed for NTFS/ReFS message in the progress logs.
      • If you change the Backup Content setting under the backup set, the subsequent scan is a full scan.
  1. Click Save.

Update retention details 

If you are a cloud-derived administrator or a group-derived administrator, you can update the retention period of the existing backup policies. While updating a retention period, you can specify the duration for which you want Druva to retain daily, weekly, monthly, and yearly recovery points. The changes made to the existing retention period get applied to the existing and the new recovery points created after updating the retention period. 

To update a retention period

  1. Log in to the Management Console. 
  2. Select the workload from the Protect menu. Note that if the All Organizations menu is enabled, you have to first select an organization and then select the workload.
  3. In the navigation pane on the left, click Backup Policies
  4. In the right pane, click the backup policy whose retention period needs to be updated. 
  5. In the Summary tab, under the Retention section, click Edit. In the Edit Retention dialog box you can change the Storage tier from Warm to LTR. 

    Note: Modification of Storage tier from/to Archive tier to/from Warm/LTR tier is not possible.

    Edit the duration for which the Daily, Monthly, Weekly, and Yearly recovery points should be retained. Toggle the Enable Data Lock option to enable Data Lock for your backup policy.

    Notes:

    • For an Archive backup policy, only the Retain recovery points for field and its value is displayed.
    • For a warm/LTR policies, the values of the following fields are displayed: 
      • Daily recovery points for
      • Monthly recovery points for
      • Weekly recovery points for
      • Yearly recovery points for
  6. Click Save.

Update pre-backup and post-backup script settings

If you are a cloud-derived administrator or a group-derived administrator, you can update the pre-backup and post-backup script settings of the existing backup policies.

While updating the backup script settings of a backup policy, you can specify the location of pre and post backup scripts for execution for Windows and Linux servers. Additionally, you can also configure the setting to skip a backup, if the backup pre-script is unavailable at the specified location.

Procedure

  1. Log in to the Management Console. 
  2. Select the workload from the Protect menu. Note that if the All Organizations menu is enabled, you have to first select an organization and then select the workload.
  3. In the navigation pane on the left, click Backup Policies
  4. In the right pane, click the backup policy whose retention period needs to be updated. 
  5. In the Summary tab, under the Pre/Post Backup Script section, click Edit
  6. In the Edit Pre/Post Script Settings dialog box, update the values of the various fields.
    • Windows Server
      • Enable Scripts: Use it to enable the execution of pre and post backup scripts on Windows servers. When you enable this setting, the Scripts Location field gets enabled.
      • Scripts LocationSpecify the folder path containing the pre_script.bat and post_script.bat backup scripts.
    • Linux Server:
      • Enable ScriptsUse it to enable the execution of pre and post backup scripts on Linux servers. When you enable this setting, the Scripts Location field gets enabled.
      • Scripts LocationIn the Specify scripts location field, specify the folder path containing the pre_script.sh and post_script.sh backup scripts.
    • Skip backup if: Select one of the following options. 
      • Pre-script is not present at the specified location
      • Pre-script execution fails
    • Pre-script is not present at the specified location: Select this option to skip the backup operation when the pre-backup script is unavailable at the location specified in the Scripts Location field.
    • Pre-script execution fails: Select this option to skip the backup operation when the pre-backup script execution fails.
    • Abort pre/post script execution if it does not complete in XX Hours/Minutes: Select the time in hours or minutes after which the backup script execution aborts. If the script execution time limit is not specified,  the pre-backup and post-backup scripts run until the script execution is complete or 1 year, whichever is less. 
  7. Click Save.

Remove a backup policy

If you are a cloud-derived or a group-derived administrator, you can remove backup policies that are not assigned to servers. Before you remove a backup policy, ensure that you assign a new backup policy to the server.

Note: You can delete a backup policy only after 7 days of the deletion of the last backup set mapped to the policy.

Procedure

  1. Log in to the Management Console. 
  2. Select the workload from the Protect menu. Note that if the All Organizations menu is enabled, you have to first select an organization and then select the workload.
  3. In the navigation pane on the left, click Backup Policies
  4. In the right pane, click the backup policy which needs to be deleted. 
  5. From the Summary tab, click Delete.
    Note: You cannot delete backup policies that you have assigned to multiple backup sets.