Manage backup policies
 Business Enterprise Elite
Overview
A backup policy is a set of rules that defines the schedule for automatic backups which occur on virtual machines configured for backup. You can create a backup policy and assign it to one or more virtual machines. After you assign backup policy to a virtual machine, the virtual machine is backed up according to the schedule defined in the associated backup policy.
Configuring a backup policy helps administrators simplify management of data backups across multiple virtual machines.
Note: Backup operations follow the time zone of the server.
Backup policy defines parameters such as,
- The start time of the automatic backup
- Duration for which the automatic backup should continue
- The period for which a recovery point is retained in the Druva Cloud
- The bandwidth at which the automatic backup should transfer data from virtual machines to Druva Cloud
- Backup set is enabled or disabled for long term retention. To know more, see About long term retention.
In this section
Best practices
Best practices provide you an idea on how you can design or create a backup policy that shall fulfill your requirement.
Follow these best practices when creating a new backup policy to backup virtual machines in your environment.
- Druva supports backup for different data types, such as backup of SQL server databases, files and folders on a server, VMware virtual machines, and Hyper-V virtual machines. Administrators must create separate backup policy for each server type, that is, separate backup policy for SQL server databases, separate backup policy for files and folders, and separate backup policy for Hyper-V virtual machines.
- It is recommended that the administrators should create separate backup policies depending on criteria like number of virtual machines and the frequency of data change on those virtual machines. You can create as many backup policies as required.
- The schedule in a backup policy can depend on the following:
- Volume of data on virtual machines.
- Availability of bandwidth for data transmission to Druva Cloud.
Examples- If the data change in virtual machines is infrequent, you can create a backup policy that includes bi-monthly backups and assign it to the virtual machines.
- For the virtual machines that have high volumes of data activity, you can create a backup policy that includes weekly backups.
- If you expect a large dataset during backups, you can schedule longer backups to run during off-peak hours, such as weekends, while allowing for small-sized backups during off-peak hours within the work day.
Example
You can create a backup policy that defines a schedule of an 8-hour long backup to run at night time, or on weekends. Or you can also configure a backup policy that defines short-burst backups to run in between, after every third day. - You can also consider changing a backup policy configuration at regular intervals.
Example
You might create a backup policy to include three automatic backups. You can update this policy later, to include more backups, depending on the virtual machine data needs.
About Retention
Retention defines the rules for retaining your backups (recovery point) within the storage. Use the retention period to define the duration for which you want to retain your historical backups.
The objective of retention is to keep important data for future access, depending on how critical it is. Retention also ensures that backups that are no longer required are cleaned from your storage periodically, resulting in less storage utilization and costs.
The retention period would not be honored for the most recent recovery point when a server or VM or backup set is disabled. This allows you to restore the latest recovery point later if required.
Retention should consider the value of your data and the compliance requirements. The different types of data will be retained for different durations. For example, a bank's retention period for customers' financial records is different from facilities inventory records.
The main factors to consider while defining a retention period are:
- Compliance requirements
- Storage costs
- Type of data
Retention period settings
Druva follows the Grandfather-Father-Son (GFS) retention model wherein, in case of an overlap, the retention setting of the longer period (Son-Father-Grandfather relation) is considered. The recovery point is expired as per the settings of the higher period. For example, in case there is an overlap between the daily and weekly retention period, the weekly retention period is considered. So daily is the smallest unit and weekly overrides daily > monthly overrides weekly > yearly overrides monthly.
Also, Druva follows the Gregorian calendar for tracking days.
While backup schedules are configured on an hourly, daily, or weekly basis the last recovery point created by the backups on that particular day will be retained as per the retention setting.
You can define the following durations to retain recovery points.
| Retention Period | Description |
|---|---|
| Daily recovery points |
Druva retains all the recovery points that are created for the number of days specified in Daily recovery points. Druva considers midnight as the end of a day. If you have configured Druva to back up your server multiple times within a day, Druva retains all the recovery points for the days specified. |
| Weekly recovery points (Son) |
The number of weekly recovery points that Druva should retain. Druva treats the latest recovery point in the week as the weekly recovery point. Druva considers midnight on Sunday as the end of the week. |
| Monthly recovery points (Father) |
The number of monthly recovery points that Druva should retain. Druva treats the latest recovery point in the month as the monthly recovery point. Druva considers midnight of the last day of a month as the end of the month. |
| Yearly recovery points (Grandfather) |
The number of yearly recovery points that Druva should retain. Druva treats the latest recovery point in the year as the yearly recovery point. Druva considers the midnight of the last day of the year as the end of the year. |
The recovery point name displayed on the Management Console is recovery point creation time as per the server time zone, on which the backup occurred. Druva considers the time zone of the server for retaining the recovery points as per the retention setting.
Default retention period settings
If you are registering the server under default organization, Druva provides a default backup policy with the following retention settings:
- Daily recovery points: 14 days
- Weekly revisions: 4 weeks
- Monthly revisions: 3 months
- Yearly revisions: 3 years
Note: The above default retention settings are applicable for Warm storage and Long Term Retention (LTR) tiers.
Example
The following diagram illustrates the recovery points that will be available on a given day ( Feb 9 in this example) based on the retention settings you have configured. In this example the policy is created and backups start on Dec 30 of the previous year.
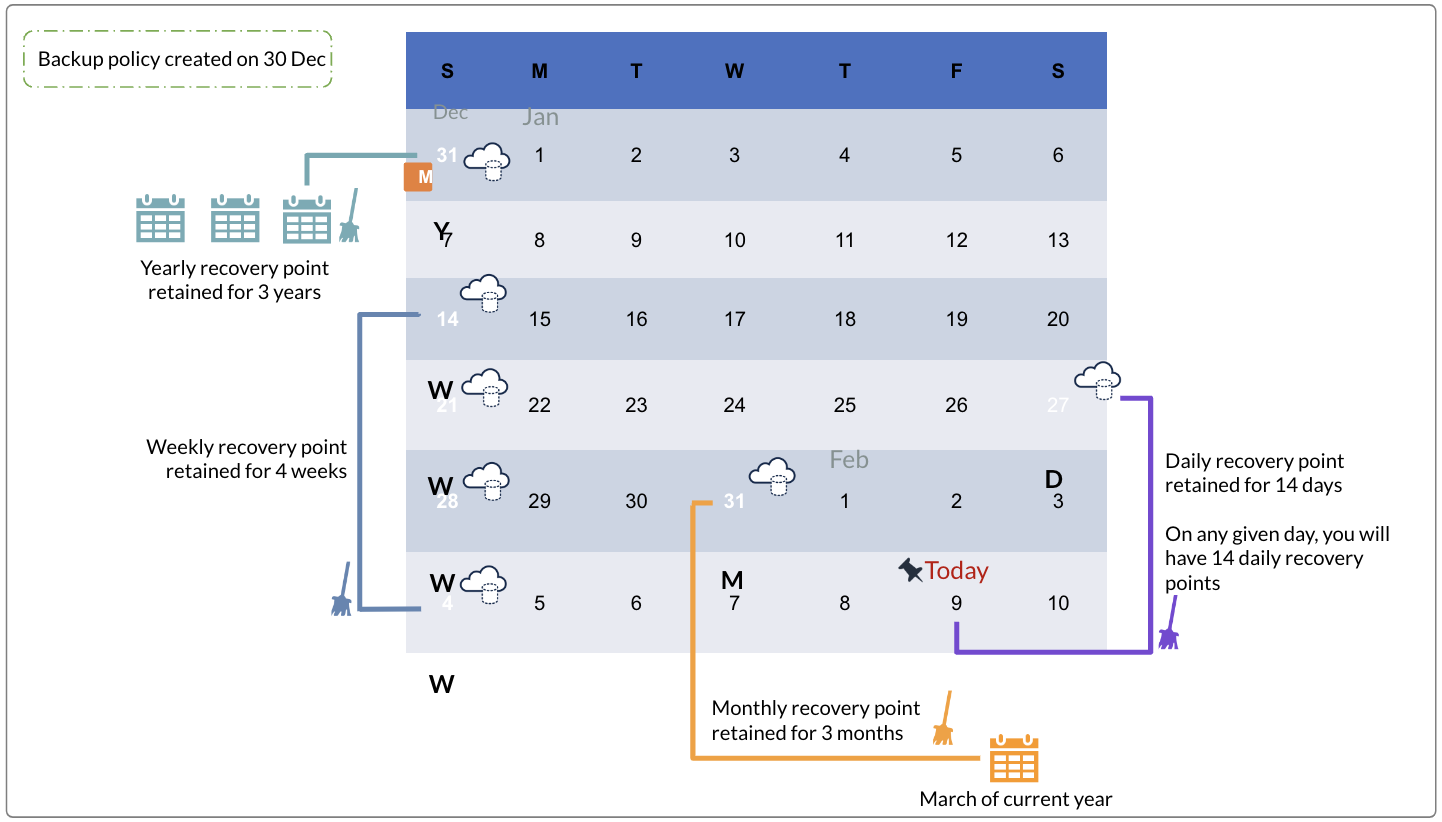
On 9 Feb you will have 17 recovery points or recovery points to restore as described in the table.
Note: Daily is the smallest unit and weekly overrides daily and monthly overrides weekly and yearly overrides monthly.
|
Recovery points resulting from |
Description |
|---|---|
| Daily retention setting | You will have 11 ( 14 daily less 2 weekly less 1 monthly) recovery points (starting from 27 Jan) created due to the daily retention settings. |
| Weekly retention setting | You will have 4 recovery points for 14 Jan, 21 Jan, 28 Jan and 4 Feb created due to the weekly settings. The weekly recovery points that coincide with the daily recovery points (28 Jan and 4 Feb) will be considered and retained as per the weekly setting. So, even though the daily retention period expires for these dates the recovery points will be retained as per the weekly settings (4 weeks). |
| Monthly retention setting | You will have 1 monthly recovery point of 31 Jan. This recovery point will be available for the next 3 months as it is a monthly retention point. So even though the 14 days daily retention period expires after 9 Feb, the recovery point will be available for the next 3 months. |
| Yearly retention setting | You will have one recovery point for 31 Dec due to the yearly retention setting. This recovery point will be available for 3 years. |
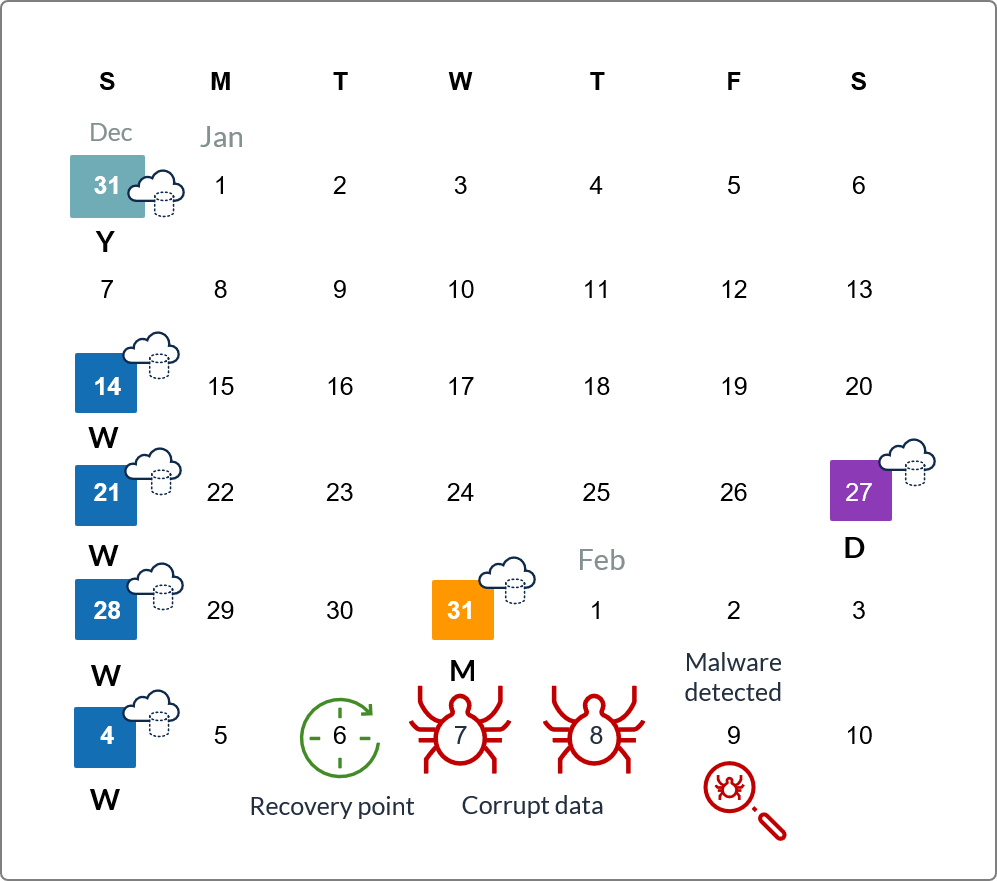
Impact of retention period settings on recovery point objective (RPO)
In continuation with the example above, so let us say malware was detected on 9 Feb evening. After investigation, it was discovered that the data till 7 Feb is corrupted. In that case, the recovery point available to you will be of 6 Feb which is available due to the daily recovery point. However, there could be a data loss of data backed between 7 Feb and 9 Feb.
Considerations
- Any changes that you make to the existing retention policies will be applied to all the new as well as the existing recovery points.
- Retention periods are applicable for recovery points that reside on CloudCache and Druva Cloud.
- Druva runs a retention expiration algorithm to delete the recovery points that have crossed the expiration period. This algorithm does not delete thawed recovery points. For more information, see Recovery points.
Create a Hyper-V backup policy
Add or create a new Hyper-V backup policy based on your Organization needs to backup virtual machines based on different schedules.
You can also copy an existing Hyper-V backup policy and modify it to suit your needs. For more information, see Copy a Hyper-V backup policy.
Procedure
- Log in to the Management Console.
- select the workload from the Protect menu. Note that if the All Organizations menu is enabled, you have to first select an organization and then select the workload.
- In the left navigation pane, click Backup Policies.
- In the top right corner, click New Backup Policy. The New Backup Policy wizard appears. The wizard contains the following sections:
- General
- Backup Schedule
- Retention
- Hyper-V Settings
- In the General tab, enter the following information:
Click Next.Field Description Name Enter a name for the backup policy. Description Enter a description for the backup policy. - In the Backup Schedule tab, specify the following settings, keeping in mind to minimize the end-user impact of the backup.
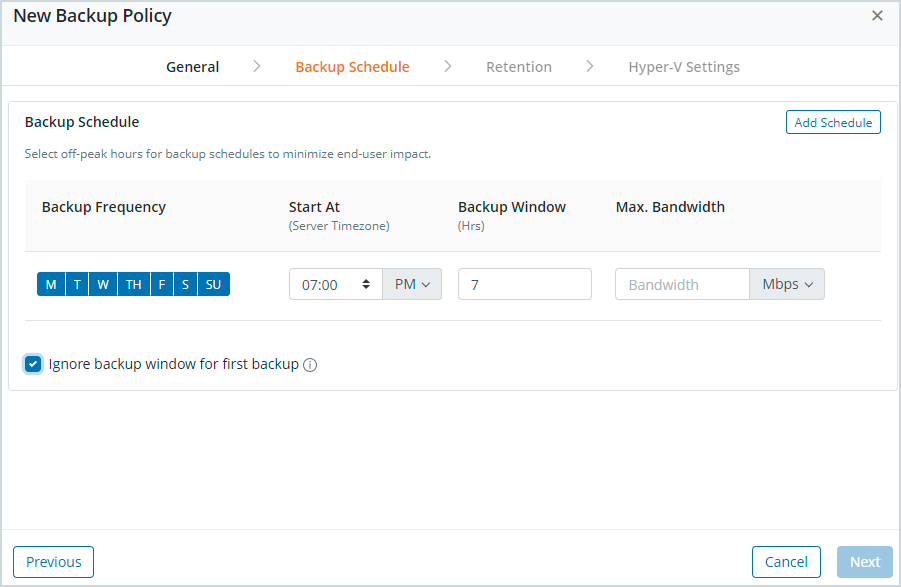
Field Description Backup Frequency Select the days on which you want the backups to run. Start at (Server Time zone)
Select the off-peak time, in 12 hour format, when you want backups to start.
Note: Backup operations follow the time zone of the server.
Backup Window (Hrs)
The duration after which you want backup operations to stop.
For example, if you set Start at to 9 AM and you set the Backup Window to 2 hours, backups from your server start at 9 AM and stop at 11 AM, even if they do not complete.
Max. Bandwidth
The maximum bandwidth that each virtual machines can consume while backing up data to Druva. - For scheduled backup, the job will consume the assigned bandwidth.
- However, for manually triggered backup, the job will consume the available bandwidth on your network.
Note: The maximum bandwidth that a backup job can consume is 2 Gbps (2048 Mbps).
- Click Add Schedule to add multiple schedules. You can delete a schedule by clicking the cross icon next to a schedule.
- By default, the Ignore backup duration for first backup option is enabled. When this option is enabled, it ignores the specified backup duration until the first backup job is complete. First backup job is complete when the first recovery point is created. You can disable this option to enforce backup duration for the first backup job.
- Click Next.
- In the Retention tab, provide the following details:
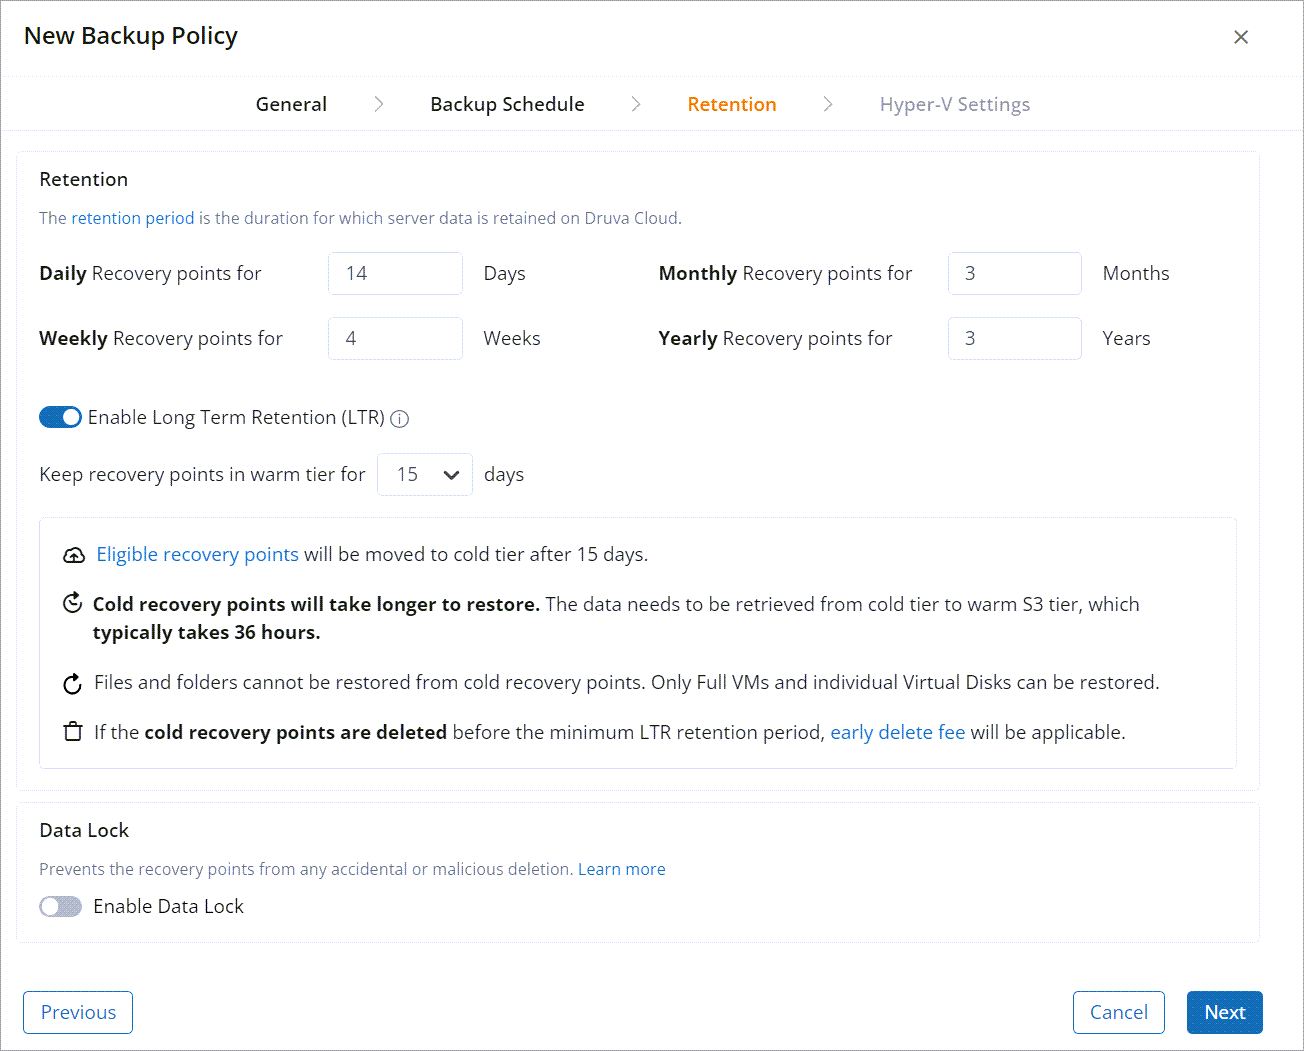
Field Description Daily recovery points for
Duration in number of days, for which you want to retain all the daily recovery points.
Weekly revisions for
Specify the number of weeks for which you want to retain the latest weekly recovery point.
Monthly revisions for
Specify the number of months for which you want to retain the latest monthly recovery point.
Yearly revisions for
Specify the number of years, for which you want to retain the latest yearly recovery point.
Enable Long Term Retention
Toggle to enable or disable LTR for the backup policy. You can enable LTR only if the retention period is greater than or equal to one year. To know more about LTR, refer to About Long Term Retention.
In the Keep recovery points in warm tier drop-down list, specify the duration in days to retain the recovery points in the warm tier. For example, 15, 30, 45, and 60 days. To know more about the impact of changing the threshold on the existing recovery points, see Impact of changing threshold on existing recovery points.
Enable Data Lock Toggle to enable the Data Lock for the backup policy. For more information about Data Lock, refer to Data Lock for preventing malicious or accidental deletion of recovery points.
Note: Once you apply Data Lock to the backup policy, you cannot:
- Disable Data Lock.
- Delete the recovery points, backup sets, and backup policy.
- Edit the retention period in the backup policy.
- Associate another backup policy to the Data Lock-enabled backup set.
Note: Ensure that you enter a value in at least one of the fields. Druva treats the values in the empty fields as zero.
- Click Next.
- In the Hyper-V Settings tab, specify the following settings:
Field Description Enable Hyper-V tools quiescing Hyper-V tools quiesce applications using Microsoft VSS to ensure application consistency. - Click Finish.
Backup policy is created and listed on the Backup Policies page. Click the name of Hyper-V backup policy to view its details. The backup policy can now be assigned to virtual machines.
Duplicate Hyper-V backup policy
You can copy the existing backup policies to create multiple copies of backup policies. When you copy a backup policy, the newly-created backup policy is identical to the policy that it was copied from. You can modify the settings of this policy according to your requirements.
Prerequisites
There must be at least one existing Hyper-V backup policy defined in your Druva environment.
To copy a VMware backup policy
- Log in to the Management Console.
- select the workload from the Protect menu. Note that if the All Organizations menu is enabled, you have to first select an organization and then select the workload.
- In the left navigation pane, click Backup Policies.
- In the right pane, select the policy that you want to copy to a new policy, and then click Duplicate Policy.
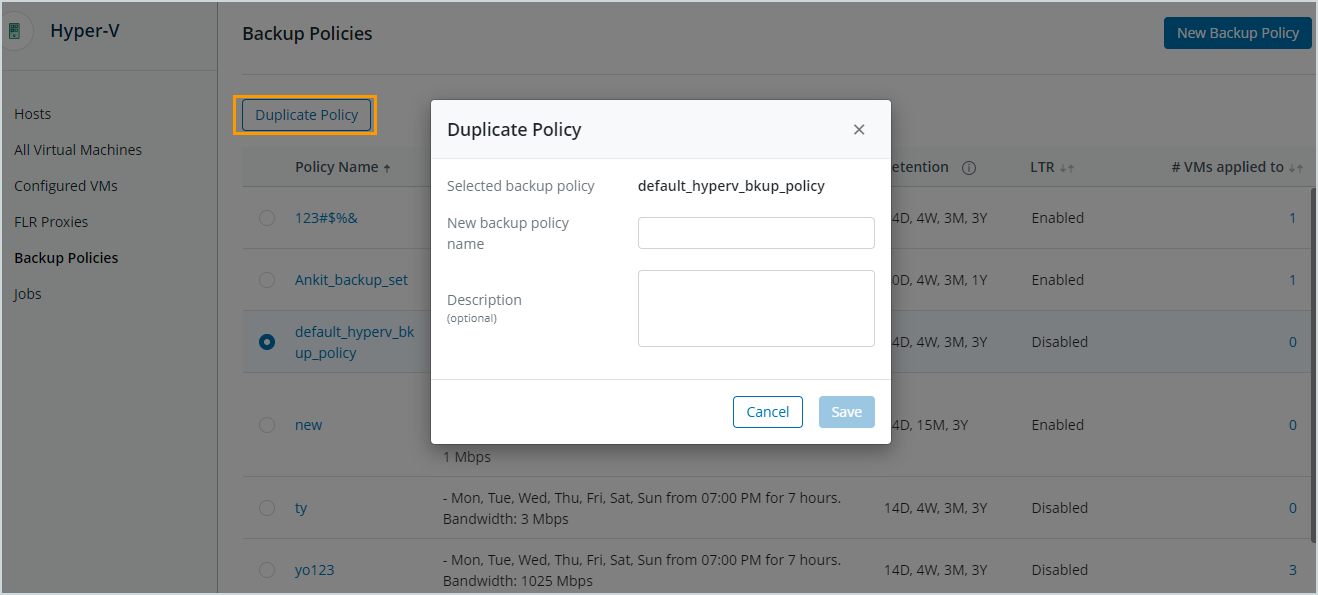
- In the New Backup Policy dialog box, enter the following information:
- New backup policy name: Enter the name for the new backup policy.
- Description (optional): Enter a description of the new backup policy.
- Click Save.
Backup policy is created with settings similar to the original backup policy and listed on Manage Backup Policies page. Click the name of the backup policy to view its details. You can edit the settings as per your requirement and save it. You can then assign the backup policy to a virtual machine, which defines the backup schedule.
Update a backup policy
You can update an existing Hyper-V backup policy anytime as per your requirements. You can update details such as the name, description, backup schedule, retention settings, and Hyper-V settings.
To update a backup policy:
- Log in to the Management Console.
- select the workload from the Protect menu. Note that if the All Organizations menu is enabled, you have to first select an organization and then select the workload.
- In the left navigation pane, click Backup Policies.
- In the right pane, click the policy to view policy details.
- In the Backup Policies page, the Summary tab is displayed by default. You can edit the Overview, Backup Schedule, Retention, and Hyper-V settings.
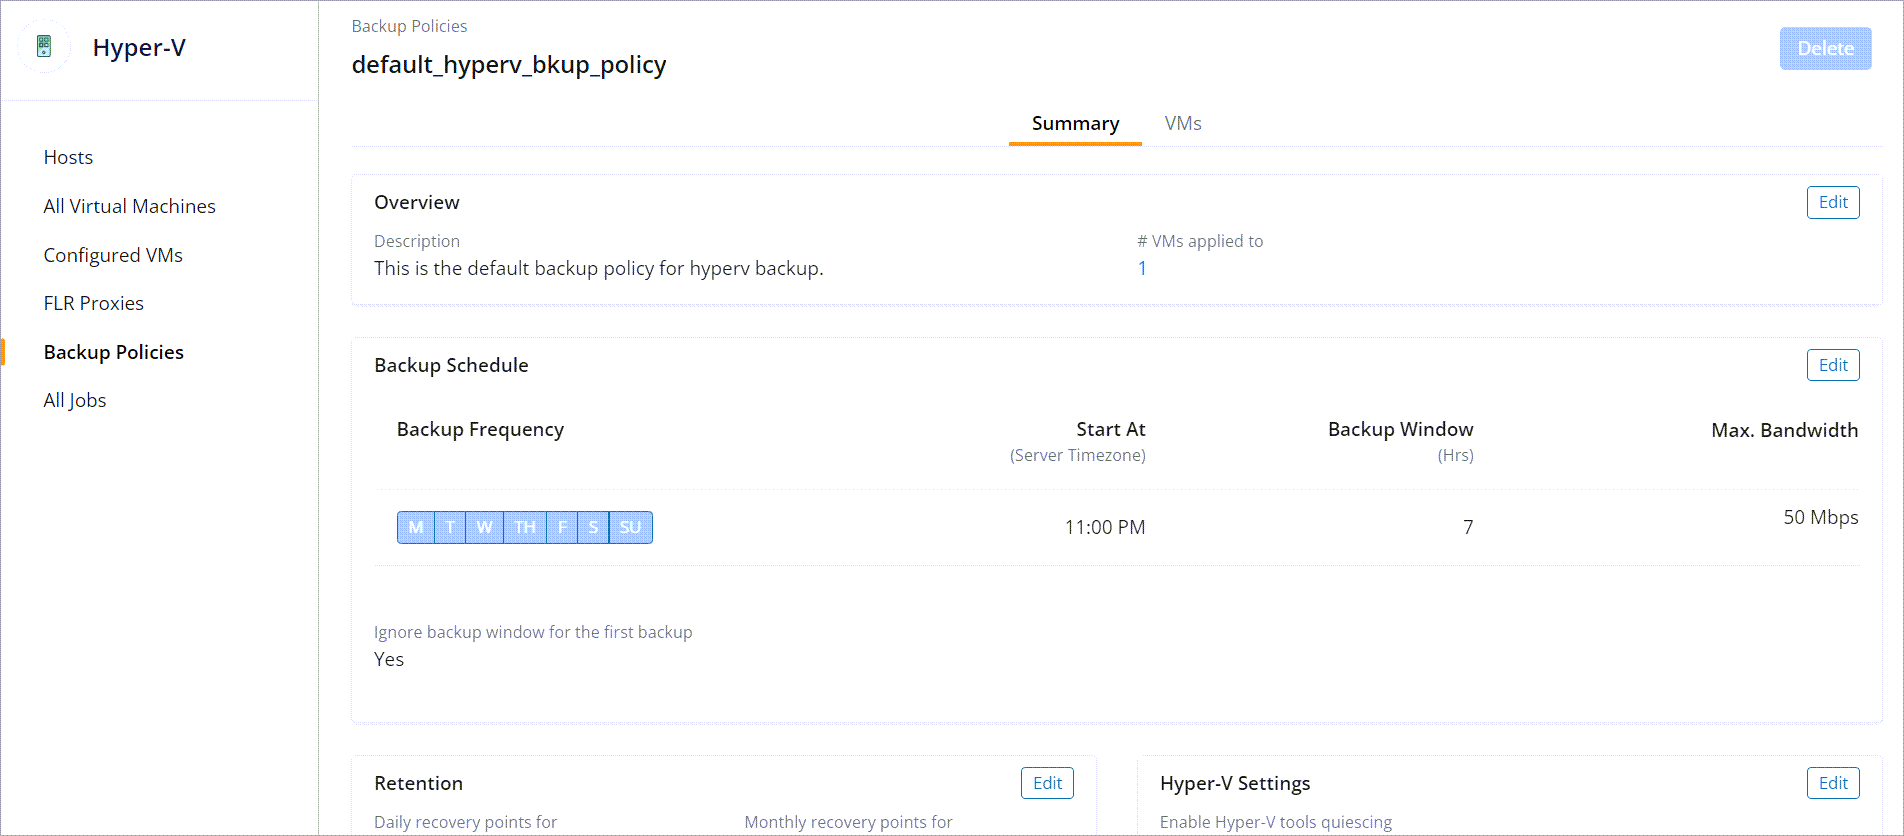
Click the Edit button in each section to edit the settings in that section. For detailed field descriptions, see Create a Hyper-V backup policy.
View list of virtual machines associated to a backup policy
To view list of virtual machines associated to a backup policy:
- Log in to the Management Console.
- select the workload from the Protect menu. Note that if the All Organizations menu is enabled, you have to first select an organization and then select the workload.
- In the left navigation pane, click Backup Policies.
- In the right pane, click the Hyper-V backup policy for which you want to view the list of associated virtual machines. The Summary tab is displayed by default.
- Click the VMs tab.
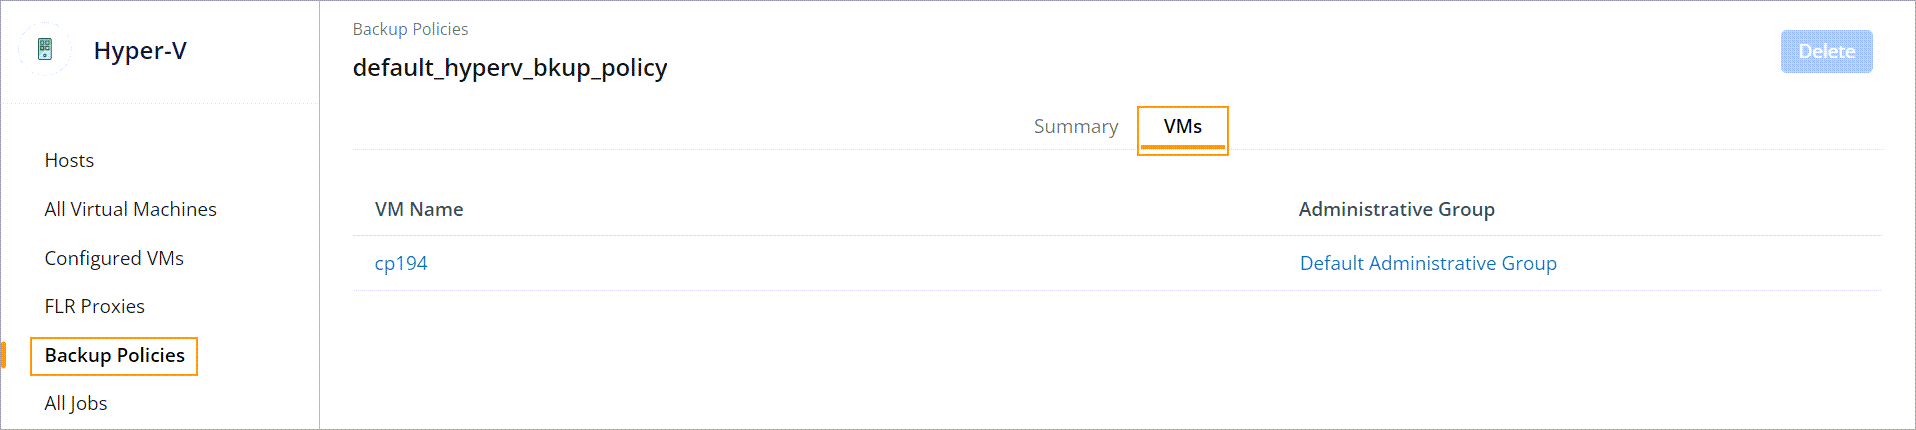
- Click on the virtual machine name to view its details.
Delete a backup policy
Only a cloud administrator and a cloud-derived administrator can remove or delete a backup policy from the Druva environment based on the following criteria,
- The backup policy you intend to remove must not be associated with any virtual machine.
- If the backup policy you intend to remove is associated with virtual machines, then you must update the virtual machines and apply a new backup policy to the virtual machines.
Prerequisites
- You must be a cloud administrator and a cloud-derived administrator.
- The backup policy you intend to remove must not be associated with any virtual machine.
Note:
- You can delete a backup policy only after 7 days of the deletion of the last configured virtual machine mapped to the policy.
- If the backup policy has Data Lock enabled, you cannot manually delete this backup policy.
Procedure
- Log in to the Management Console.
- select the workload from the Protect menu. Note that if the All Organizations menu is enabled, you have to first select an organization and then select the workload.
- In the left navigation pane, click Backup Policies.
- Click the backup policy that you want to delete. The Summary tab is displayed by default.
- Click Delete.
If the prerequisites mentioned earlier are satisfied, the backup policy is removed from Druva. Otherwise, you must take appropriate steps to satisfy the criteria and then try again.