Upgrade NAS proxy on Windows and Linux from Management Console
 Business Enterprise Elite
 You can upgrade the NAS proxy to the latest versions by downloading the latest version from the Druva portal.
Note:
- Before upgrading from Hyrbid Workloads agent to the Enterprise workloads agent, ensure that sufficient free space is available on the disk/drive.
For Windows, the amount of free space required on C: drive should be more than the size of folder C:\ProgramData\Phoenix\NAS\state.- Before triggering an upgrade, it is advisable to close the applications (such as Notepad or Explorer) that are accessing any files or folders in the C:\ProgramData\Phoenix directory.
This topic describes how you can upgrade NAS proxy to the most recent version on a Windows and Linux server.
Note: The NAS proxy upgrade feature is supported from version 4.5 and above. You must manually upgrade to version 4.5 or above to use this feature.
Note: For Windows, if the agent is already installed on a custom location and an auto upgrade is performed, then the agent is installed at:
- default install location, C:\Program Files\Druva\Phoenix Agent\ (for agent version prior to 7.0.0)
- C:\Program Files\Druva\EnterpriseWorkloads\(for agent version 7.0.0 and later)
Therefore, all the binaries or executable files are moved from the custom location to the default location.
Limitations
- If you have installed a hotfix on your existing Druva version, you cannot automatically upgrade to the next version from the Druva portal. You must manually upgrade to the next available version.
- If the server running NAS proxy restarts during the upgrade, you must either perform a manual upgrade or roll back the upgrade.
- After triggering the update, if you have any ongoing scheduled backup and restore jobs, they will resume after the upgrade.
- If the old version is not present the server machine, then upgrade rollback will fail. In this scenario, you must manually upgrade or roll back the client.
To upgrade NAS proxy
-
Log in to the Management Console.
- Select the workload from the Protect menu. Note that if the All Organizations menu is enabled, you have to first select an organization that has your NAS device and then select the workload.
- NAS Proxies can be upgraded from the Mapped Proxies page and the All Proxies page. The Client Version column on these pages displays the current client status.
.png?revision=1)
| Status | Icon | Description |
|---|---|---|
|
Latest |
|
The client version is current and the most recent version. |
|
Not Upgradable |
|
The proxy cannot be upgraded to the latest version from the Management Console. |
|
Upgrade Scheduled |
|
The proxy upgrade is in progress.
|
|
Upgradable |
|
The current proxy version can be upgraded to the latest available version. |


- To upgrade the NAS proxy from the:
- Mapped Proxies page
- In the device-specific navigation pane on the left, select the NAS device from the Device dropdown.
- In the device-specific navigation pane on the left, click Mapped Proxies.
- In the right pane, select the proxy that needs to be upgraded, and then click Upgrade.

You can upgrade one or more proxies at the same time. - In the Upgrade Confirmation dialog box, click Yes.
- All Proxies page
- In the left pane, click All Proxies.
- In the right pane, select the proxy that needs to be upgraded, and then click Upgrade. You can upgrade one or more proxies at the same time.
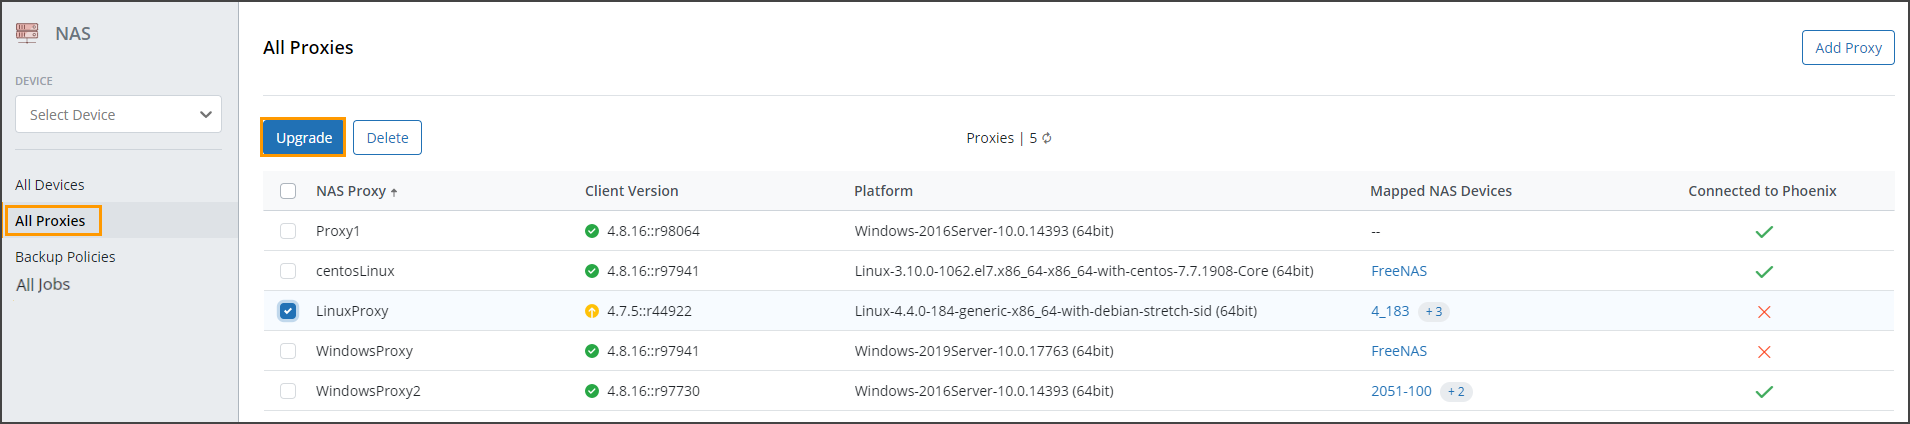
- In the Upgrade Confirmation dialog box, click Yes.
- Mapped Proxies page