Install the agent and register a server
 Business Enterprise Elite
To enable data backup from your servers, you must first register those servers. During registration, Druva generates an activation token that you must use to activate the instances of Enterprise Workloads agent installed on your servers. Activation ensures that the Enterprise Workloads agent establishes a persistent connection with Druva Cloud, thus enabling backups from the servers on which they are installed.
This article includes the following sections:
Download the agent and generate activation token
- Log in to the Management Console.
- Select the workload from the Protect menu. Note that if the All Organizations menu is enabled, you have to first select an organization and then select the workload.
- Click Register New Server.
- On the Register Server page, under the Download and Install Agent on the Server section, do one of the following:
- If you have not yet downloaded the Enterprise Workloads agent installer, click Check Pre-requisite to check the Enterprise Workloads agent prerequisites. In the Select OS dropdown, select the operating system of the server where you will install the Enterprise Workloads agent, and then click Download. The agent download starts on the same browser page. The agent is not downloaded on the destination server unless you click Download through the Management Console on the destination server.
Note: Using this Enterprise Workloads agent, you can protect MS SQL, NAS, and Hyper-V workloads on a Windows Server or Linux Server. For more information, see Common agent installation and activation.
- If the Enterprise Workloads agent has already been downloaded, proceed to the Activate Server for Backup section.
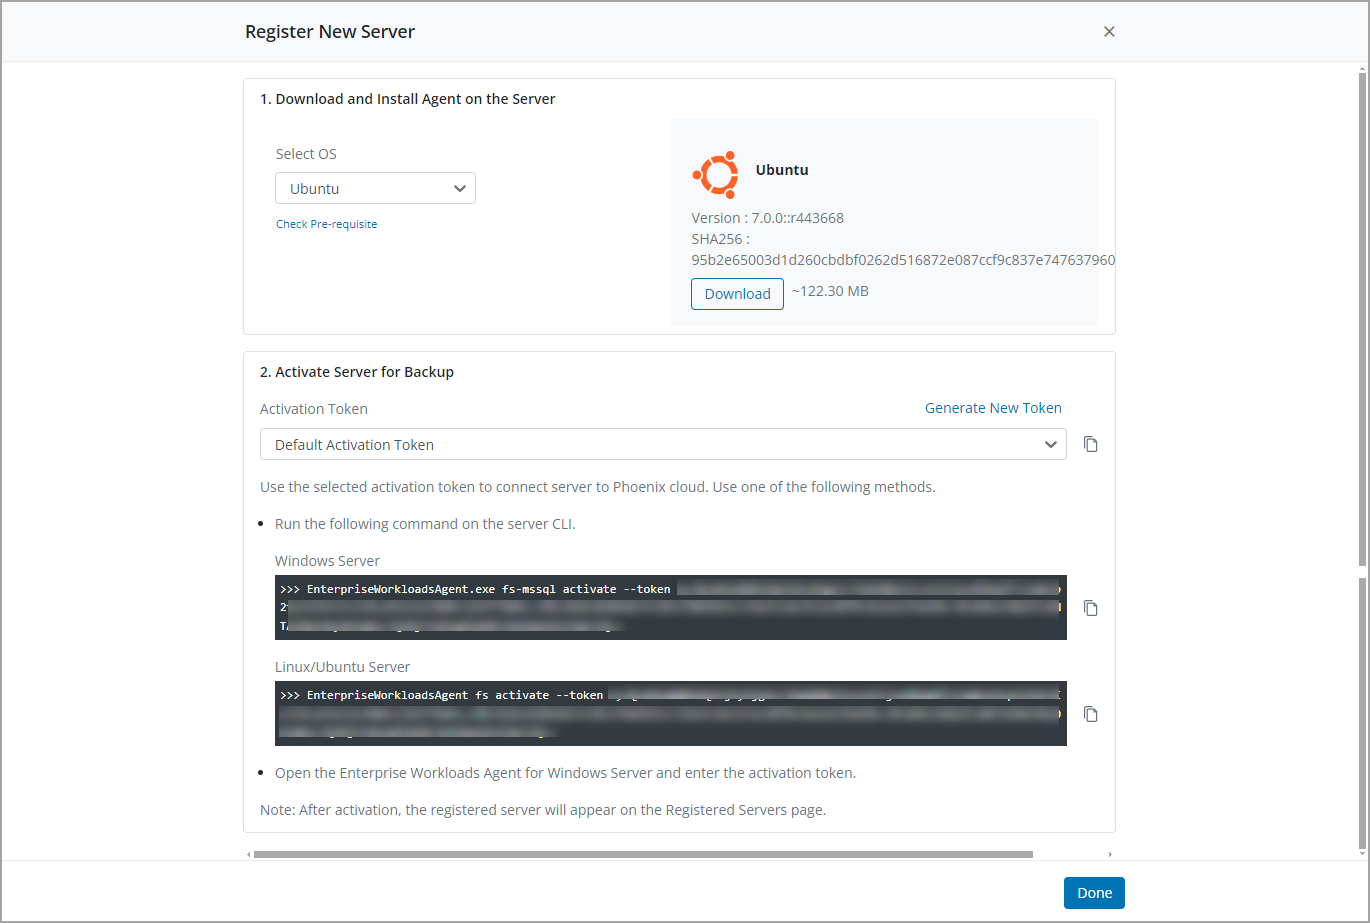
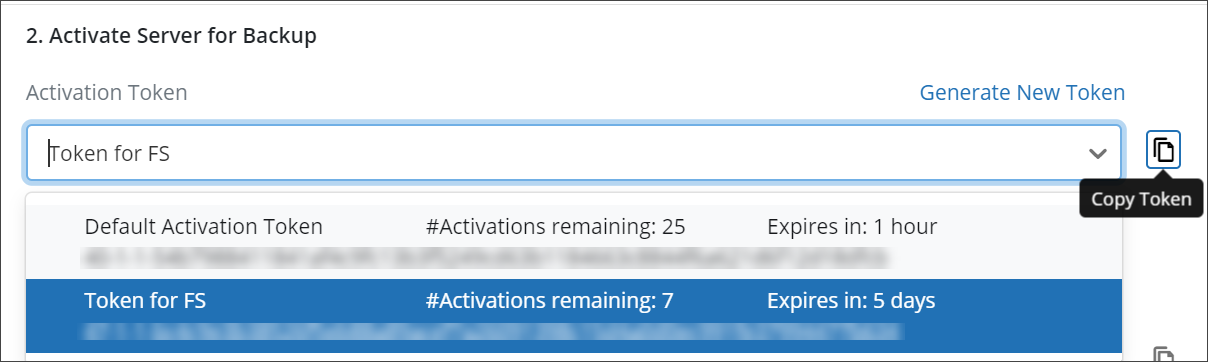
- Under the Activation Token section, if there aren't any existing tokens, a Default Activation Token is generated. This token is valid for 25 servers and for 7 days. If this token has expired, click Generate New Token. In the Generate Token dialog box, enter the following details, and then click Generate.
Field
Description Token Label
A short description of the activation token.
Note: You cannot leave this field empty.
This token can activate
The number of servers that the activation token can activate. The default value is 25 servers.
The token expires in
The number of days after which the activation token expires. The default value is 7 days.
- In the Generate Token window, you can copy the generated token by clicking the Copy Token icon. Click Done.

Note: Enterprise Workloads agent lists the activation token under Manage > Activation Tokens. For more information on managing activation tokens, see Manage activation tokens
- To use a pre-existing activation token, click the drop-down under the Activation Token field.
Install and activate Enterprise Workloads agent on a Windows server
This topic provides information about how you can install Enterprise Workloads agent on a File server with Windows operating system.
Before you begin
Install the agent
- Go to the location where you have downloaded the Enterprise Workloads agent installer.
- Double-click the Enterprise Workloads agent installer.
- Click Next.
- Use local system account for installing the agent on the Windows server.
Note: Ensure that the available disk space is at least twice the size of the installer file.
- In the Install location box, type or select the full path to the installation home directory.
- Click Install.
- After the installation completes, click Finish.
Command-line install
- From the command prompt, run the following command:
msiexec /i <path to Phoenix msi> /qn /quiet /log <path to log file> /norestart (for agent version prior to 7.0.0)

msiexec /i <path to EnterpriseWorklaods msi> /qn /quiet /log <path to log file> /norestart (for agent version 7.0.0 and later)
For example:
msiexec.exe/i C:\Users\Administrator\Downloads\Phoenix-6.3.5-440885.msi /qn /quiet /log C:\Users\Administrator\Downloads (for agent version prior to 7.0.0)

msiexec.exe/i C:\Users\Administrator\Downloads\EnterpriseWorkloads-UnifiedAgent-7.0.0-446266.msi/qn /quiet /log C:\Users\Administrator\Downloads (for agent version 7.0.0 and later)
Activate the agent
After you install Enterprise Workloads agent on a Windows server, you must activate that Enterprise Workloads agent using the activation token that Druva generated at the time of registering servers. The token functions as a unique identifier and performs a one-time authentication of Enterprise Workloads agents.
After authentication, Enterprise Workloads agents establish a persistent connection with Druva Cloud.
Note:
- We recommend that you use a single token to activate servers that share something in common. For example, you might want to use a token to activate all servers that are geographically co-located.
- If your network infrastructure uses a Web proxy, you must configure it before activation. For more information, see Configure Web proxy.
Procedure
- From the Register New Server dialog box in the Management Console, click Copy Command to copy the activation token command (CLI activation) or Copy Token (activation via the Enterprise Workloads agent shortcut).
- Double-click the Enterprise Workloads Agent shortcut on the server where the Enterprise Workloads agent needs to be activated.
The Enterprise Workloads Agent window displays.
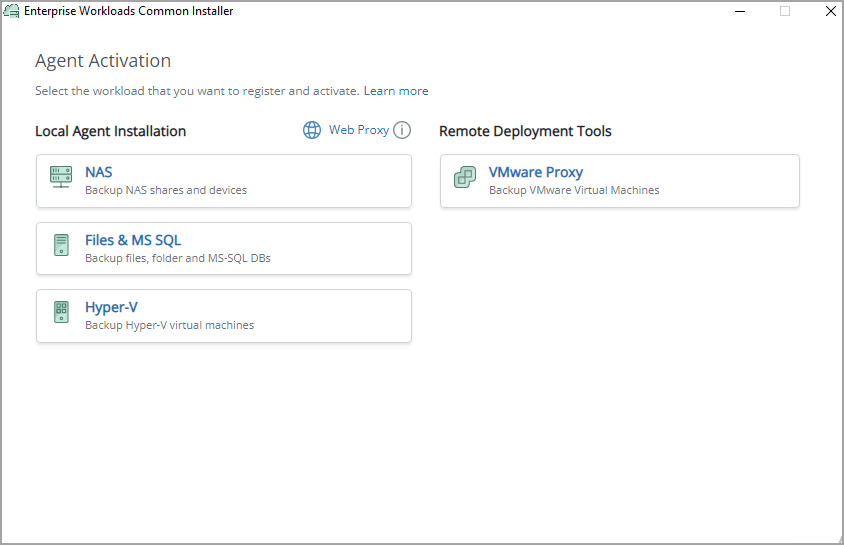
- Select FS & MS-SQL under Agent Activation section,
- Select the type of Cloud deployment: Public Cloud or Gov Cloud.
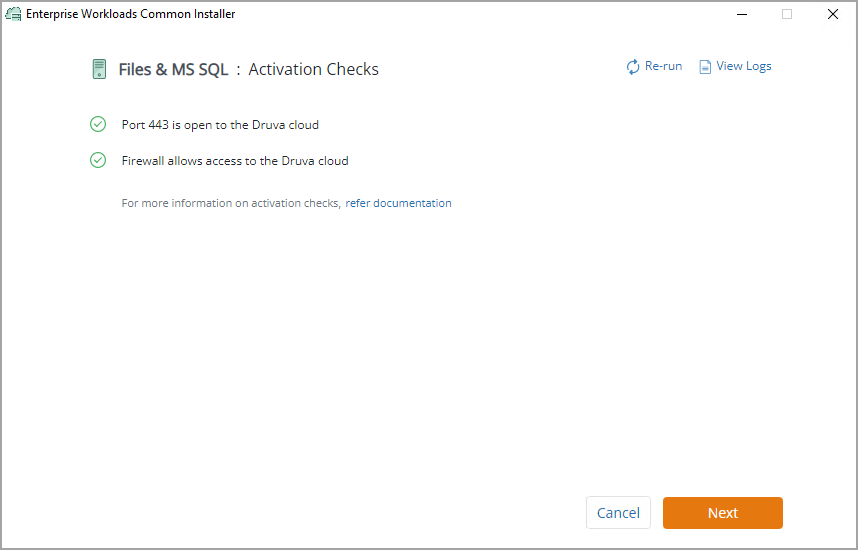
- A set of in-built activation checks are run and the result is displayed. Click Next.
- The Agent Activation page for FS & MS-SQL is displayed.
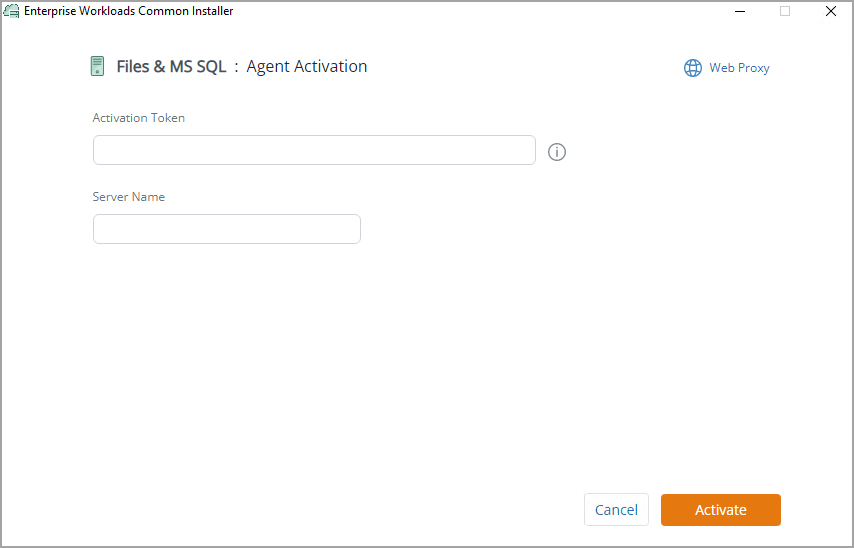
- Enter the following details:
Field Description Activation Token Paste the copied activation token. Note: This is the token copied from the Register New Server dialog box.
Server Name Enter a unique server name in the current Organization for each workload of the same type. Note: The server name should not contain any special characters.
- Click Activate.
The backup readiness checks will run to ensure that your system is equipped for successful backup operation.
Command-line activation
If you choose to mass deploy Enterprise Workloads agents using third-party tools, you can use the command-line method to activate the Enterprise Workloads agent. By default,
- HybridWorkloadsAgent.exe is located at C:\Program Files\Druva\Phoenix Agent (for agent version prior to 7.0.0)
- EnterpriseWorkloadsAgent.exe is located at C:\Program Files\Druva\EnterpriseWorkloads (for agent version 7.0.0 and later)
From the command prompt, run the following command:
- For Druva Cloud:
HybridWorkloadsAgent.exe fs-mssql activate -t <token> -n <ServerName> (for agent version prior to 7.0.0)
For example:
HybridWorkloadsAgent.exe fs-mssql activate -t 32931-228-1762-591132241ce4fb2e14fca792cbf532f4a2359eb0bf1b96f82211373ebea7c23b -n WIN-RFE3
EnterpriseWorkloadsAgent.exe fs-mssql activate -t <token> -n <ServerName> (for agent version 7.0.0 and later)
For example:
EnterpriseWorkloadsAgent.exe fs-mssql activate -t 32931-228-1762-591132241ce4fb2e14fca792cbf532f4a2359eb0bf1b96f82211373ebea7c23b -n WIN-RFE3
where <token> represents the activation token that Druva generated at the time of registering server.
- For GovCloud:
HybridWorkloadsAgent.exe  fs-mssql activate -g -t <token> -n <ServerName> (for agent version prior to 7.0.0)
For example:
HybridWorkloadsAgent.exe fs-mssql activate -g -t 32931-128-1762-591132241ce4fb2e14fca792cbf532f4a2359eb0bf1b96f82211373ebea7c23b -n WIN-REFTY
EnterpriseWorkloadsAgent.exe fs-mssql activate -g -t <token> -n <ServerName> (for agent version 7.0.0 and later)
For example:
EnterpriseWorkloadsAgent.exe fs-mssql activate -g -t 32931-128-1762-591132241ce4fb2e14fca792cbf532f4a2359eb0bf1b96f82211373ebea7c23b -n WIN-REFTY
| Field | Description |
|---|---|
| token (-t, --token string) |
Paste the copied activation.
|
| ServerName (-n, --ServerDisplayName string) |
Provide the display name for the client in Druva. |
| GovCloud ( -g, --gov-cloud) |
Enable GovCloud. |
Note: The server name is not case sensitive. You cannot have one server registered as "ABC and another as "abc". Druva will display the error message "Server display name already exists. Cannot register the server with same display name".
You can upgrade Enterprise Workloads agents to their latest available version. For more information, see Agent upgrades.
The ServerName parameter is optional. The defined server name is displayed on the Registered Servers page if you provide the server name. If you do not provide a server name, then Druva picks up the hostname of the server by default and displays it in the Registered Servers page.
To back up networked storage, see Backup and restore NAS shares.
Install and activate Enterprise Workloads agent on a Linux server
Install on CentOS or RHEL Linux, or SLES
- Go to the directory that contains Enterprise Workloads agent installer.
- Run the following command:
rpm –ivh <package name>
For example:
rpm –ivh druva-phoenix-client-7.0.0-131748.x86_64.rpm (for agent version prior to 7.0.0)
rpm -ivh EnterpriseWorkloads-UnifiedAgent-7.0.0-447428-x86_64.rpm (for agent version 7.0.0 and later)
Note: Ensure that the available disk space is at least twice the size of the installer file.
where <package name> represents the file name (along with the extension) of the installer.
Install on Ubuntu
- Go to the directory that contains Enterprise Workloads agent installer.
- Run the following command:
dpkg -i <package_name>
For example:
dpkg -i druva-phoenix-client-6.3.5-131748.amd64.deb (for agent version prior to 7.0.0)

dpkg -i EnterpriseWorkloads-UnifiedAgent-7.0.0-447428-amd64.deb (for agent version 7.0.0 and later)
Note: Ensure that the available disk space is at least twice the size of the installer file.
where <package name> represents the file name (along with the extension) of the installer.
Activate the agent
After you install Enterprise Workloads agent, you must activate that Enterprise Workloads agent by using the activation token generated at the time of registering servers. The token functions as a unique identifier and performs a one-time authentication of Enterprise Workloads agents. After authentication, Enterprise Workloads agents establish a persistent connection with Druva Cloud. The instructions are the same for activating Enterprise Workloads agent on CentOS, Ubuntu, RHEL, and SLES Linux.
Note:
- We recommend that you use a single token to activate servers that share something in common. For example, you might want to use a token to activate all servers that are geographically co-located.
- If your network infrastructure uses a Web proxy, you must configure it before activation. For more information, see Configure Web proxy.
Procedure
- From the Register New Server dialog box in the Management Console, click Copy Command to copy the activation token.
- On the Linux server, open the terminal and navigate to:
- opt/Druva/Phoenix/bin (for agent version prior to 7.0.0)
- /opt/Druva/EnterpriseWorkloads/ (for agent version 7.0.0 and later)
- Paste the copied command as explained below:
-
Public Cloud
HybridWorkloadsAgent fs activate -t <token> -n <ServerName> (for agent version prior to 7.0.0)
For example:
HybridWorkloadsAgent fs activate -t 32931-228-1762-591132241ce4fb2e14fca792cbf532f4a2359eb0bf1b96f82211373ebea7c23b -n WIN-RFE3
EnterpriseWorkloadsAgent fs activate -t <token> -n <ServerName> (for agent version 7.0.0 and later)
For example:
EnterpriseWorkloadsAgent fs activate -t 32931-228-1762-591132241ce4fb2e14fca792cbf532f4a2359eb0bf1b96f82211373ebea7c23b -n WIN-RFE3
-
GovCloud
HybridWorkloadsAgent fs activate -g -t <token> -n <ServerName> (for agent version prior to 7.0.0)
For example:
HybridWorkloadsAgent fs activate -g -t 32931-228-1762-591132241ce4fb2e14fca792cbf532f4a2359eb0bf1b96f82211373ebea7c23b -n WIN-RFE3
EnterpriseWorkloadsAgent fs activate -g -t <token> -n <ServerName> (for agent version 7.0.0 and later)
For example:
EnterpriseWorkloadsAgent fs activate -g -t 32931-228-1762-591132241ce4fb2e14fca792cbf532f4a2359eb0bf1b96f82211373ebea7c23b -n WIN-RFE3
where,
- <token> represents the activation token that Druva generated at the time of registering server.
- <ServerName> represents the tag to the server that you want to activate. You can tag a server during activation or after activation. For example, if you add the 'druva_file_server' tag to your server, you can search for the server on the Druva portal using the 'druva_file_server' name. This is an optional argument. If you do not provide any value for this argument, the FQDN of the server is assigned as the default value for this attribute.
Note: The Server Name is not case sensitive. You cannot have one server registered as "ABC and another as "abc". Druva will display the error message "'Server display name already exists. Cannot register the server with same display name".
On Linux servers, Enterprise Workloads agent writes logs to /var/log/Phoenix (for agent version prior to 7.0.0) and /var/log/Druva (for agent version 7.0.0 and later). The free space at this location should be at least 1% of your source data size.
The ServerName parameter is optional. If you provide the server name, then the defined server name is displayed in the Registered Servers page. If you do not provide a server name, then Druva picks up the hostname of the server by default and displays it in the Registered Servers page.
Configure Web proxy
Enterprise Workloads agent connects to the Druva Cloud through the internet. If your network infrastructure uses a Web proxy, configure the Enterprise Workloads agent to use Web proxy to establish a connection with the Druva Cloud. You can configure the Web proxy either from the user interface or command line.
Configure Web proxy using the user interface
This procedure applies only to Windows servers.
Before you begin
Ensure that Enterprise Workloads agent is running before starting proxy settings.
Procedure
- Double-click the Enterprise Workloads Agent application.
- In the Agent Activation window, select Configure Web Proxy.
- Select the My network infrastructure uses a Web proxy check box to enter the details.
The Web Proxy options are displayed.
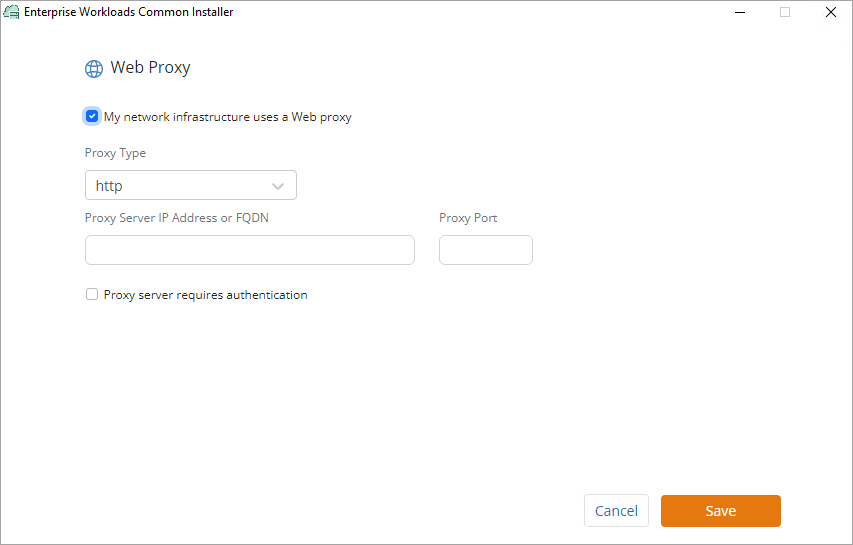
- In the Proxy Type drop-down list, select one of the supported proxy types(http, socks4, socks5). The default selection is http.
- In the Proxy Server IP Address field, enter a valid IP address of the proxy server.
- In the Proxy Port field, enter the respective port number.
- If you want to add authentication to your proxy server, select the Proxy server requires authentication check box and add relevant username and password in their respective fields.
- Select the My network infrastructure uses a Web proxy check box to enter the details.
- Click Save.
The Web proxy is configured.
Configure Web proxy servers using the command line
Before you begin
Ensure that the Enterprise Workloads agent or Enterprise Workloads agent service is running before starting proxy settings.
Procedure
- Open the command line interface window.
- In the command prompt, run the following command on Windows server to set the Web proxy:
HybridWorkloadsAgent.exe web-proxy-config -s -t <proxy_type> -i <ProxyHost_IP>:port -u <Proxy_user> -p <Proxy_password> (for agent version prior to 7.0.0)

Enterprise WorkloadsAgent.exe web-proxy-config -s -t <proxy_type> -i <ProxyHost_IP>:port -u <Proxy_user> -p <Proxy_password> (for agent version 7.0.0 and later)
For example: HybridWorkloadsAgent.exe web-proxy-config -s -t http -i 172.34.23.218:80 -u johndoe -p pass23 Enterprise WorkloadsAgent.exe web-proxy-config -s -t http -i 172.34.23.218:80 -u johndoe -p pass23 - (Optional)You can use the following command in Windows to fetch the current proxy configuration:
HybridWorkloadsAgent.exe web-proxy-config -g (for agent version prior to 7.0.0) Enterprise WorkloadsAgent.exe web-proxy-config -g (for agent version 7.0.0 and later) - In the terminal, run the following command on Linux server to set the Web proxy:
HybridWorkloadsAgent web-proxy-config -s -t <proxy_type> -i <ProxyHost_IP>:port -u <Proxy_user> -p <Proxy_password> (for agent version prior to 7.0.0)

Enterprise WorkloadsAgent web-proxy-config -s -t <proxy_type> -i <ProxyHost_IP>:port -u <Proxy_user> -p <Proxy_password> (for agent version 7.0.0 and later)
For example: HybridWorkloadsAgent web-proxy-config -s -t http -i 172.34.23.218:80 -u johndoe -p pass23 Enterprise WorkloadsAgent web-proxy-config -s -t http -i 172.34.23.218:80 -u johndoe -p pass23 - (Optional)You can use the following command in Linux to fetch the current proxy configuration:
HybridWorkloadsAgent web-proxy-config -g (for agent version prior to 7.0.0)

Enterprise WorkloadsAgent web-proxy-config -g (for agent version 7.0.0 and later)
The Web proxy is configured successfully.Field Description Get_web-proxy
(-g, --get)Fetches the current Web proxy configuration for the agent. Set_web_proxy
(-s, --set)Sets the current Web proxy configuration for the agent. Proxy_type
(-t, --proxy-type string)Agent supports the following proxy types: - http
- socks4
- socks5
Note: If you do not provide the type, http is applied by default.
Proxy_IP
(-i, --host string)Valid IP or URL of proxy server. Port Respective proxy port number. Proxy_user
(-u, --user string)Valid proxy user name. Proxy_password
(-p, --pass string)Valid proxy password. Note: Do not use quotes for proxy_IP, proxy_user or proxy_password.
Additional information
- The TMG drops IDLE connections after defined timeout duration, due to which agent does an aggressive retry with server.
Note: In TMG application, it is recommended to set connection timeout value to 5 minutes.
- The configuration file path for Workload agent and Cache Server are as follows:
Agent Path Windows
- C:\ProgramData\Phoenix\<WorkloadName>\Phoenix.cfg (for agent version prior to 7.0.0)
- C:\ProgramData\Druva\EnterpriseWorkloads\Config.yaml (for agent version 7.0.0 and later)
Linux /etc/Phoenix/<WorkloadName>/Phoenix.cfg (for agent version prior to 7.0.0)
/etc/Druva/EnterpriseWorkloads/Config.yaml (for agent version 7.0.0 and later)
- If the proxy-details setting fails, ping the proxy-server IP from same machine and check for proxy_user and proxy_password.
Steps to delete a Web proxy once it is set up successfully
You can delete the successful set up Web proxy in the following three ways.
Using the user interface
This is applicable only to Windows Servers.
- Clear the My network infrastructure uses a Web proxy check box.
- Click Save.
Using the command line
- Open the command line interface window.
- In the command prompt, run the following command on the Windows server to remove the Web proxy:
HybridWorkloadsAgent.exe web-proxy-config -r (for agent version prior to 7.0.0)

EnterpriseWorkloadsAgent.exe web-proxy-config -r (for agent version 7.0.0 and later)
orHybridWorkloadsAgent.exe web-proxy-config –remove EnterpriseWorkloadsAgent.exe web-proxy-config -remove (for agent version 7.0.0 and later)
- In the terminal, run the following command in the Linux server to remove the Web proxy:
HybridWorkloadsAgent web-proxy-config -r (for agent version prior to 7.0.0)

EnterpriseWorkloadsAgent web-proxy-config -r (for agent version 7.0.0 and later)
orHybridWorkloadsAgent web-proxy-config --remove (for agent version prior to 7.0.0) EnterpriseWorkloadsAgent web-proxy-config -remove (for agent version 7.0.0 and later)
Note: Enter -r or –remove command to remove the Web proxy.
Updating the configuration file
- Log in to the required server.
Note: For agent version 7.0.0 and later, do not perform the below steps from 2-6. To verify if proxy is unset or not, go to C:\ProgramData\Druva\EnterpriseWorkloads\Config.yaml, and verify the following parameters:
proxy_config: enabled: false,
host: ""
password: ""
port: ""
proxy_type: ""
username: "” - Stop the Enterprise Workloads agent Services, navigate to C:\ProgramData\Phoenix\<WorkloadName> (for agent version prior to 7.0.0), and copy the Phoenix.cfg file.
- Open the Phoenix.cfg with notepad and remove the below entries:
- PROXY_USER
- PROXY_SERVER
- PROXY_TYPE
- PROXY_PASSWD2
- Set "USE_PROXY = False" in the same file. (Only values in a double quote)
- Save the Phoenix.cfg file.
- Start the Enterprise Workloads agent Services.