Manage backup set
 Business Enterprise Elite
This topic provides an overview of what backup set is. It also provides instructions to add and delete a backup set attached to your server.
Overview
A backup set is a combination of workload, backup content, and backup policy. A backup set is defined for a server and you can attach multiple backup sets to your File Servers.
You can add backup sets from the server details page.
This topic describes the following sections:
Add a backup set
You can create multiple backup sets to back up different files and folders, and databases at different schedules. Before you create a backup set, review the following:
- For a File server, you can add multiple folders across volumes to the same backup set. If you do not need distinct backup retention for different data on the physical server, do not create separate backup sets.
- Ensure that you do not create multiple backup sets with the overlapping backup content. The overlapping content gets backed up multiple times.
- You can create any number of backup sets to configure with a physical server. However, the Enterprise Workloads agent can simultaneously back up three backup sets.
You can add a backup set to the server from the Registered Servers screen of the File Servers page. You can add a backup set while configuring a registered server. For more information see Configuring backup settings.
View details of the backup sets attached to the server
- Log in to the Management Console.
- Select the workload from the Protect menu. Note that if the All Organizations menu is enabled, you have to first select an organization and then select the workload.
- In the left pane, click Registered Servers.
- In the right pane, click the server name whose backup set details you want to view. This brings up the server details page.
- In the server details page, the Configured Backup Sets section displays the details of all the backup sets attached to the server.
View backup sets attached to the backup policy
You can view the backup sets associated with a backup policy on the Manage Backup Policies page.
- Log on to Management Console.
- Select the workload from the Protect menu. Note that if the All Organizations menu is enabled, you have to first select an organization and then select the workload.
- In the left pane, click Backup Policies. The right pane shows the list of all backup policies created for the File Servers.
- In the right pane, under the Policy Name column, click the backup policy whose backup sets you want to view. This brings up the policy details page.
- In the policy details page, click the Backup Sets tab. The Backup Sets tab displays the following details about the backup sets:
- Backup Set: The name of the backup set associated with the backup policy.
- Server Name: The name of the file server associated with the backup set.
- Backup Content: The content rule associated with the backup set.
- Administrative Group: The administrative group that the file server is associated with.

Edit a backup set
You can change the name of the backup set, backup content, and backup policy applied to the backup set.
- Log in to the Management Console.
- Select the workload from the Protect menu. Note that if the All Organizations menu is enabled, you have to first select an organization and then select the workload.
- In the navigation pane on the left, click File Backup Sets.
- In the right pane, click the backup set that needs to be edited, click more options, and then select Edit.
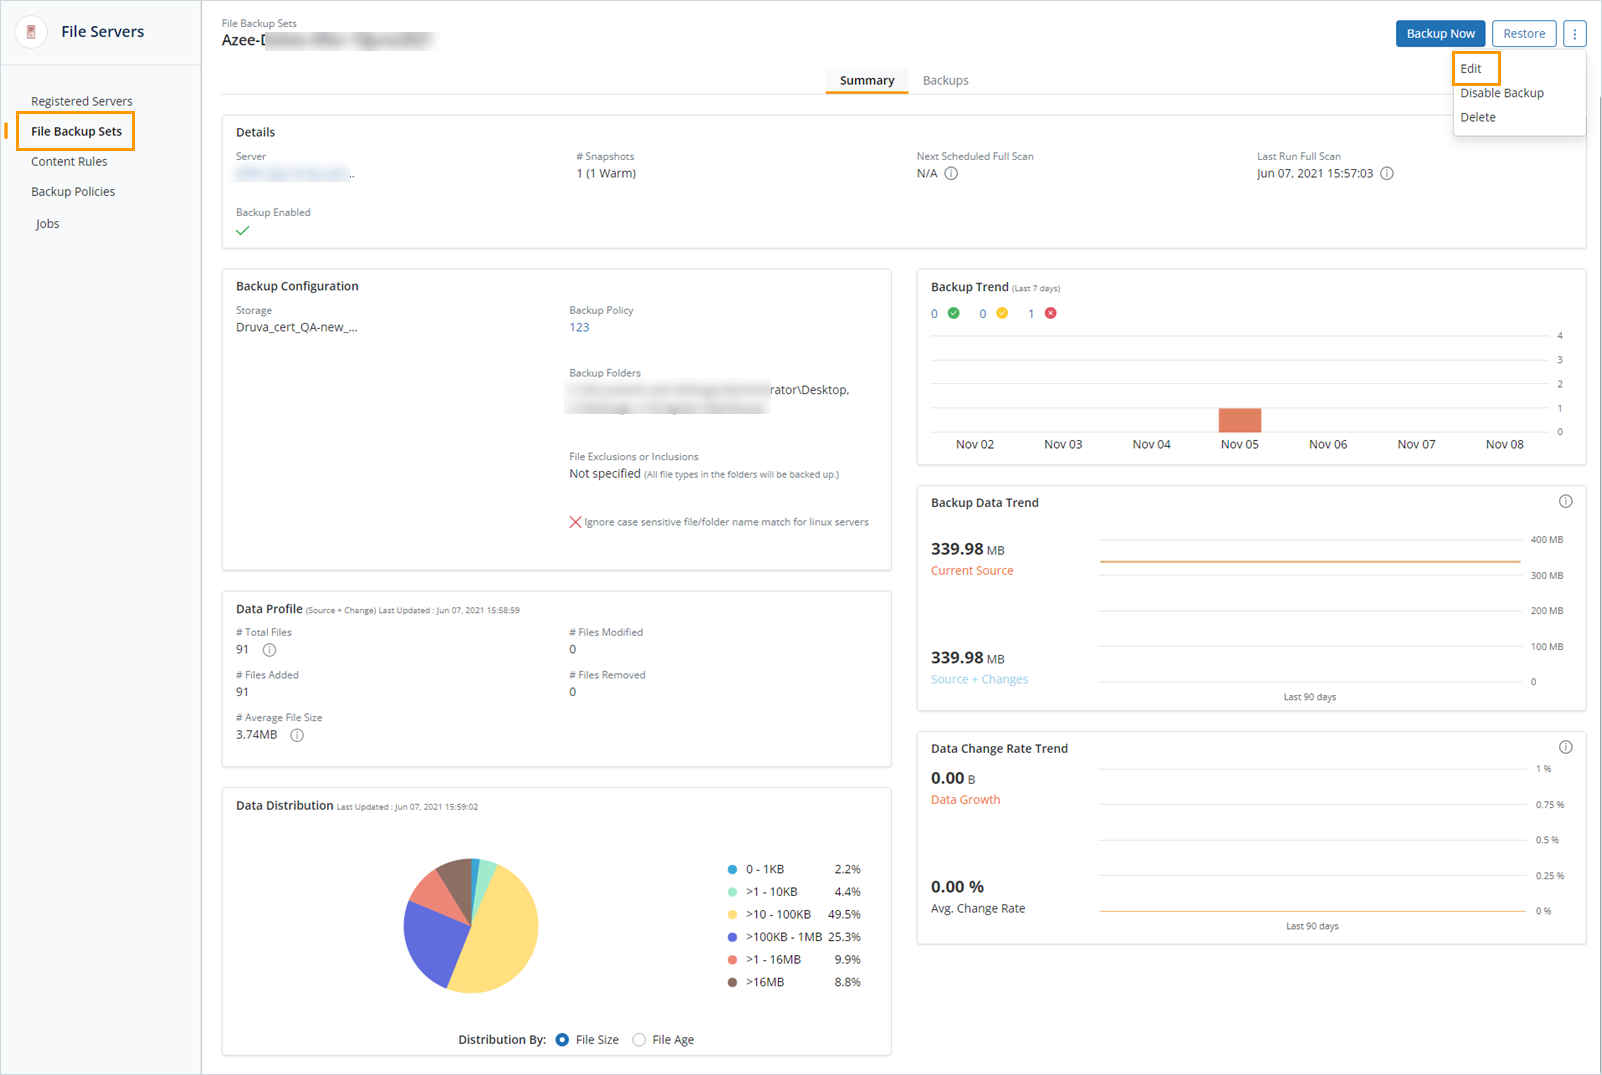
- The Edit Backup Set dialog box opens.
Note: Only one backup set can be edited at a time.
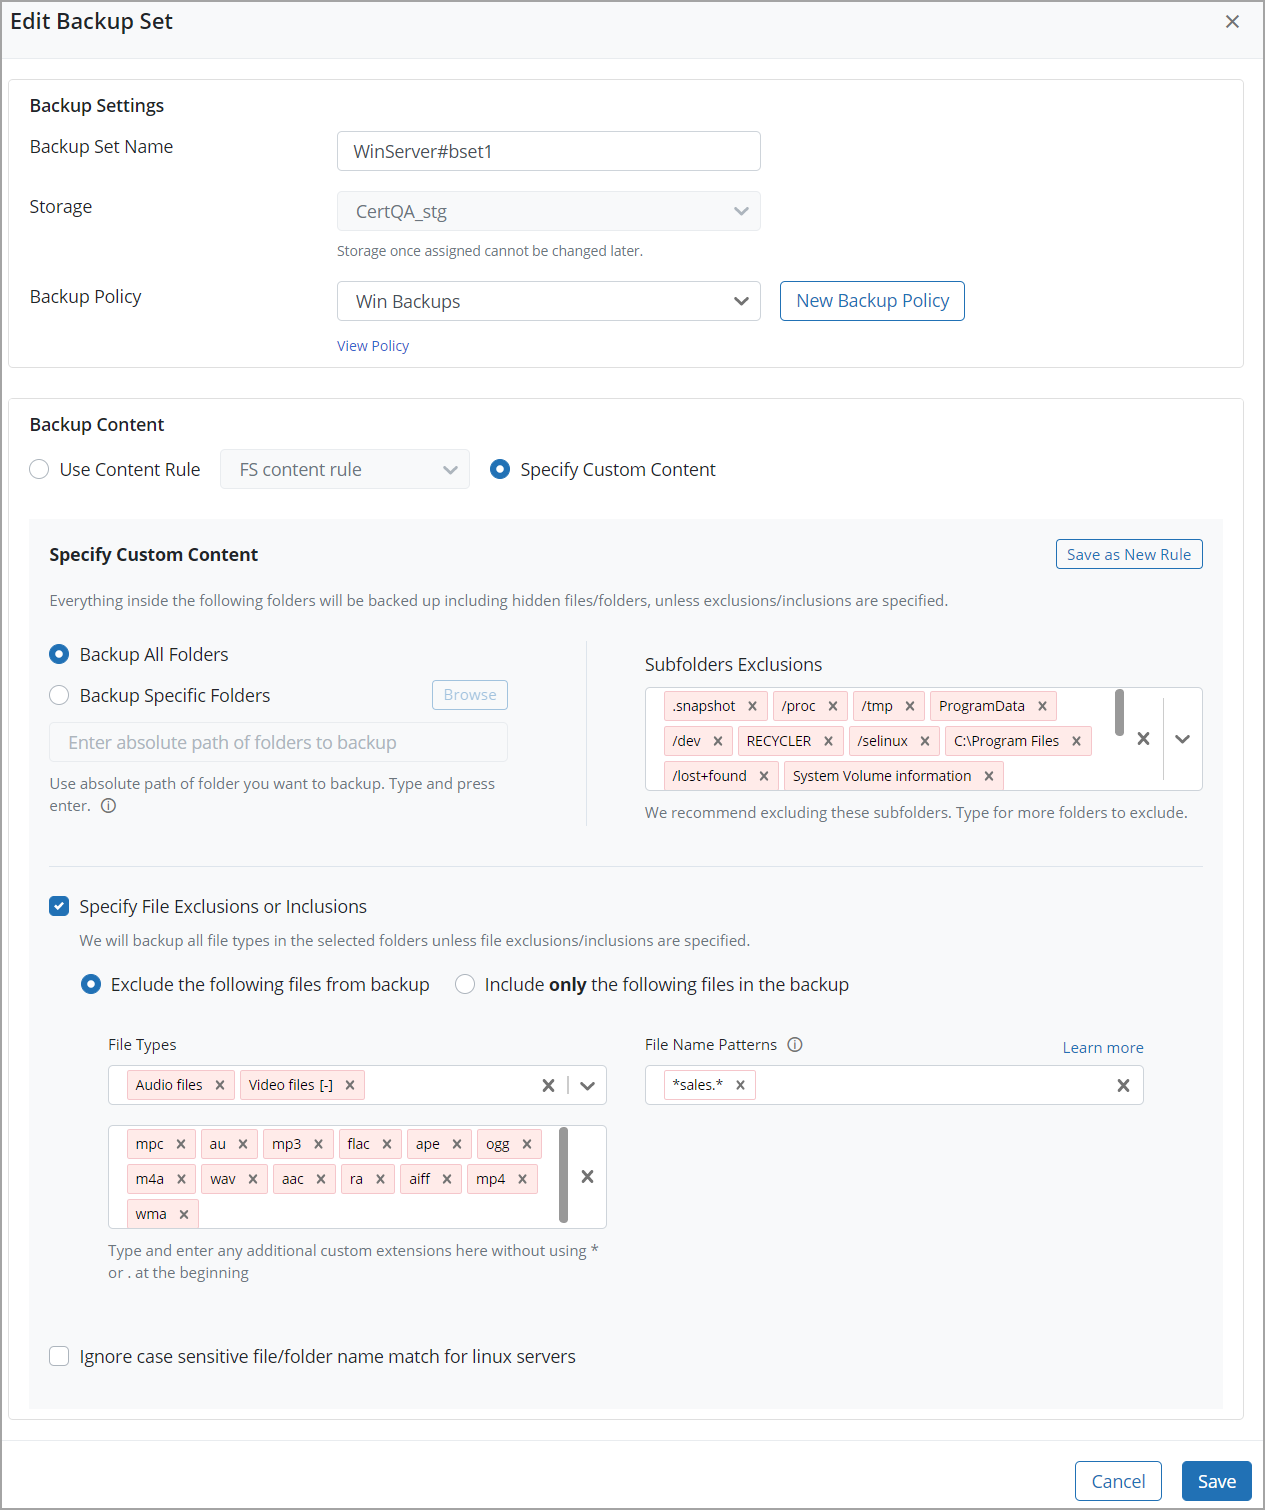
- In the Edit Backup Set window, in the Backup Set Name field, change the name of the backup set if required.
- In the Backup Policy field, from the Backup Policy drop-down list, select the required backup policy to attach it to the server. For more information about how to create a new backup policy, see Add a new backup policy.
-
In the Backup Content section, choose between one of the following options to select content for your File server
- Use Content Rule: Select the Use Content Rule option to use an existing, pre-created content rule to back up files and folders on your file server. When you select an existing content rule, the Content Rule Details section displays the folders included and subfolders excluded from backups. The Content Rule Details section also shows the included/excluded File Types, File extensions, and File Patterns. If you have selected the Ignore case sensitive file/folder name match for linux servers option, the Content Rule Details section, displays it with a green tick. If this is deselected, the Content Rule Details section displays it with a red cross.
- Note: The Content Rule Details cannot be edited from here. For more information on how to edit a Content Rule, see Edit a Content Rule.
- Specify Custom Content: Select the Specify Custom Content option to select the folders, file types and file patterns to be included in or excluded from the file server backups. You can save the selected folders, excluded subfolders, and included/excluded file types, extensions, and file patterns as a new content rule. For more information about the content rule and custom content, see Add a content rule.
-
You can use the Ignore case sensitive file/folder name match for linux servers option to ignore the case of the entered text for Linux servers.
- Click Save.
Note: The Save button is disabled if:
- You select Specify Custom Content and then Backup Specific Folders but don't enter any absolute folder paths.
- You enter an unsupported file extension or file pattern.
Correct the error and then click Save.
Disable and enable backup of backup set
You can disable or enable the backup of backup sets. After disabling, the backups from the File backup sets stop temporarily. The disabled backups resume after you enable the backup from this File backup set.
Notes::
- The most recent recovery point cannot be deleted as long as the file server exists in the Management Console, regardless of whether the file server is marked as inactive or disabled.
- The retention period would not be honored for the most recent recovery point when a file server is disabled. This allows you to restore the latest recovery point later if required.
Procedure
- Log in to the Management Console.
- Select the workload from the Protect menu. Note that if the All Organizations menu is enabled, you have to first select an organization and then select the workload.
- In the left pane, click Registered Servers.
- In the right pane, under the Server Name column, click the server name whose backup you want to enable or disable. This brings up the server details page.
- In the Configure Backup Sets section, select the backup set whose backup you want to enable or disable. Choose one of the following:
- Click more options and then select Enable Backup to enable the backup of the backup set.
- Click more options and then select Disable Backup to disable the backup of the backup set.
Notes:
The Enable Backup button is available only for the servers that are currently disabled. You can continue to restore servers that you have disabled.
Delete recovery points
If you are a cloud administrator, you can delete warm recovery points from File servers that you no longer require. If you are a group administrator, you can delete warm recovery points for File servers belonging to the administrative groups that you manage. After you delete a recovery point, Druva purges the recovery point data from the warm storage, thus freeing up space. Cloud administrators and data protection officers can delete cold recovery points. The cold recovery points also get deleted as per the retention period defined in the backup policy.
Note: You cannot delete the most-recent recovery point of the File server.
Procedure
- Log on to Management Console.
- Select the workload from the Protect menu. Note that if the All Organizations menu is enabled, you have to first select an organization and then select the workload.
- In the left pane, click Registered Servers.
- In the right pane, under the Server Name column, select the server whose recovery points you want to delete. This brings up the server details page.
- In the server details page, under the Configured Backup Sets section, click the backup sets whose recovery points you want to delete. This brings up the file backup set details page.
- In the backup set details page, click the Backups tab. The Backups tab displays all the recovery points for that backup set.
- Select the recovery point that you want to delete, and then click Delete.
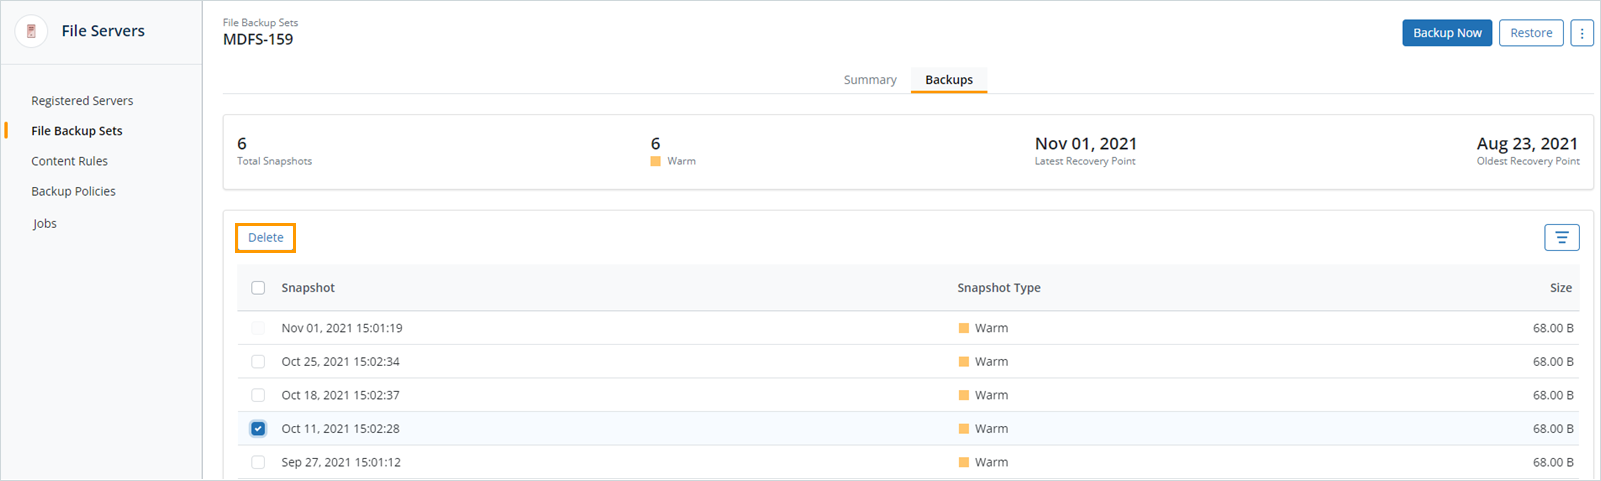
Note: If the backup set has just one recovery point, it cannot be deleted.
Delete a backup set
If you are a cloud administrator, you can delete a backup set attached to your configured server. Druva retains the jobs, reports, and alerts corresponding to the deleted backup set.
- Log on to Management Console.
- Select the workload from the Protect menu. Note that if the All Organizations menu is enabled, you have to first select an organization and then select the workload.
- In the left pane, click Registered Servers.
- In the right pane, under the Server Name column, click the server whose backup set you want to delete. This brings up the server details page.
- In the Configured Backup Sets section, under the Backup Set column, click the backup set that you want to delete. This brings up the backup set details page. In the backup set details page, click More Options next to Restore, and select Delete.
- A confirmation dialog is displayed. Provide a reason in the Reason for deletion box and click Delete.
The reason is required to confirm your action and to prevent any accidental deletion. This is a mandatory field, and you can use a minimum of 10 characters and a maximum of 150 characters to provide the reason for deletion.
Note that all deletion requests with a reason will be reported to the Audit Trails.
For more information, see View Admin Audit Trails page.