Managing Reports
Apply filters
You can apply filters on the section level or at the report level to generate customized reports. For example, you can add a filter for date and generate a report for the specified time period.
To apply a filter the report
-
In the filter pane
click (+) Add.
-
Select the column type based on which you want to filter the report
-
Click Apply.
-
The report is displayed as per the created filter.
To apply a filter to section
-
Click the
filter option.
-
Select the column type based on which you want to filter the section
-
Click Apply.
Manage a report subscription
As an MSP administrator, you can manage subscriptions to the reports by creating a new subscription, editing and deleting an existing subscription. By subscribing to reports, you can track all activities for yourself and other administrators. The reports are sent through emails to the subscribed recipients based on the defined schedules.
Create a new subscription
In Managed Services Center, MSP administrators can create a new subscription to receive the reports. While creating it, you can schedule and add subscribers to receive the reports as per your requirement.
Procedure
- Log in to Managed Services Center (MSC).
- On the MSC menubar, click Reports.
- When lists of reports appear, select the report that you want to subscribe to.
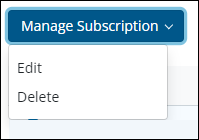
- Click the Manage Subscription button, and then click New Subscription.
- In the schedule section, select the format (CSV or PDF) for the report file and use the toggle to disable or enable the schedule.
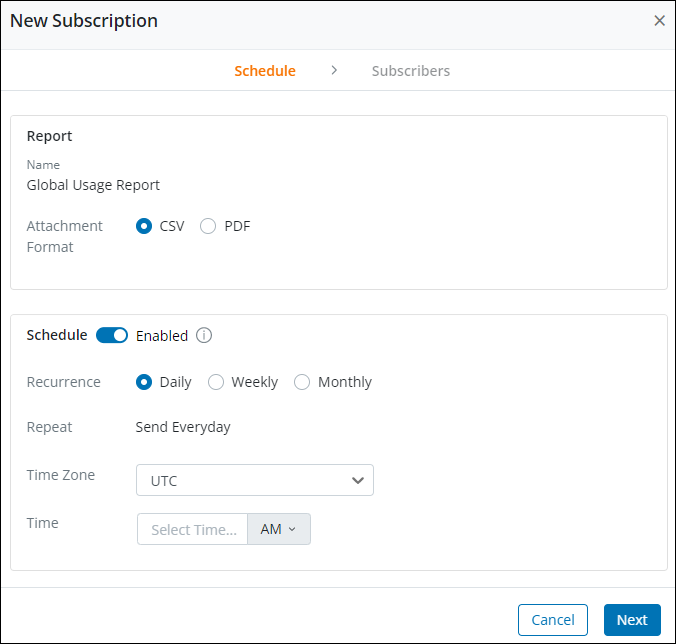
- If the schedule is enabled, select the recurrence type (Daily, Weekly, Monthly).
- Based on the type of recurrence selected, choose the day or date to set the frequency of repetition.
- Select the timezone from the drop-down list, and set the time as per your preference. (By default, UTC Time Zone is selected.)
- Click Next to open the Subscribers section.
- In the Subscribers section, type the email address and click Add below the email text box to receive the report. To add multiple email addresses, press Enter or the Tab key.
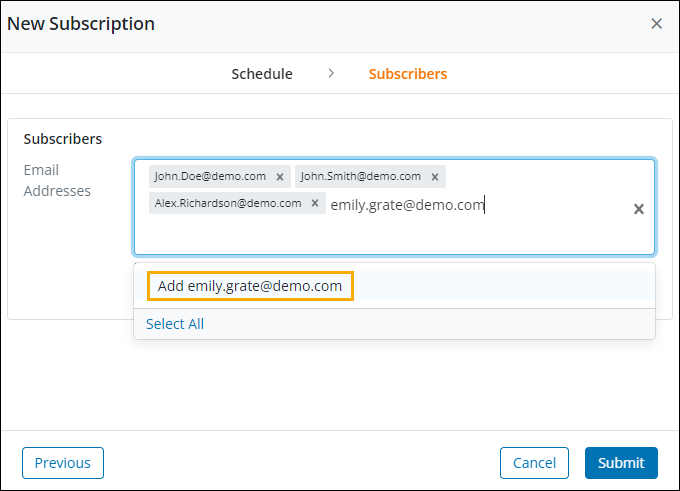
- Click the Submit button to complete the action.
- After completion of an action, Subscription saved successfully message appears.
Click in the email addresses text box, and then press the Spacebar to add role-based email addresses.
Field and description
| Field | Description |
|---|---|
| Schedule section | |
| Attachment Format | Format of the report that you want to receive over an email. It is CSV or PDF format. |
| Recurrence | The reappearance of the email containing the report. The options are Daily, Weekly, and Monthly. |
| Repeat | The Frequency of the interval between two subsequent emails. If you select Weekly or Monthly recurrence, the event is repeated on the selected day or date that you choose. |
| Time Zone | Time zone allows users to select the country or region. By default, UTC is selected. |
| Time | Based on the Time Zone selected, time will be displayed. The administrator’s local time will also be displayed. |
| Subscribers Section | |
| Email Addresses | Email addresses of the subscribers who want to receive the report. |
Manage existing report subscriptions
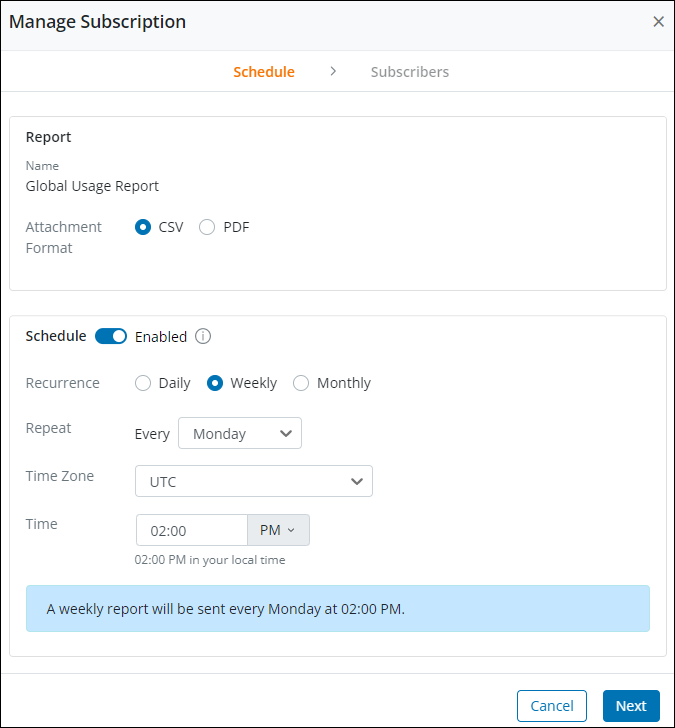
In Managed Services Center, MSP administrators can edit or delete existing subscriptions. It helps MSPs to modify the report file format, the schedule, and the subscribers' list.
Procedure
- Log in to Managed Services Center (MSC).
- On the MSC menubar, click Reports.
- When lists of reports appear, select the report that you want to subscribe to.
- Click the Manage Subscription button, and then click Edit to edit the subscription, or click Delete to delete the subscription.
Edit subscription
Procedure
- Click the Edit button.
- Edit the report format and schedule as per your need, and then click Next to modify the subscribers’ list.
- In the Subscribers tab, type the email address and click Add below the email text box to receive the report. To add multiple email addresses, press Enter or the Tab key.
- Click the Submit button to complete the action. Subscription saved successfully message appears.
Delete the subscription
Procedure
- Click the Delete button.
- When Confirm Subscription Deletion pop-up appears, click Ok to delete the subscription.
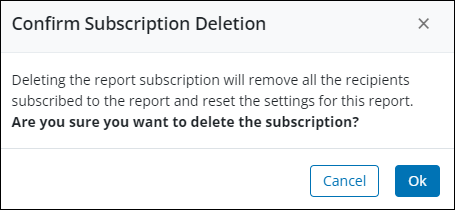
- After successful deletion, Subscription deleted successfully message appears on the screen.
Alternate procedure to manage a report subscription
When reports on Managed Services Center appear in the grid view, MSPs can also manage their subscriptions.
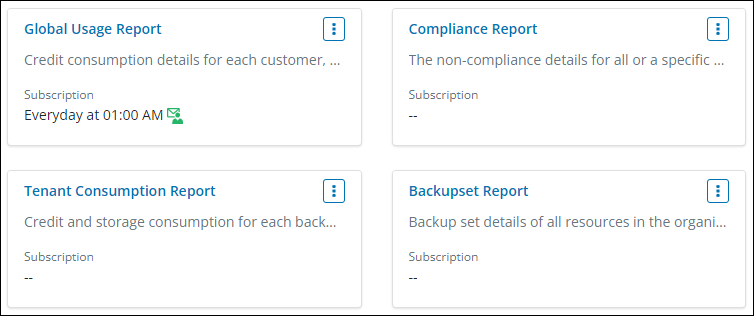
In grid view,
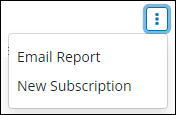
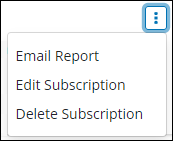
- Click the More icon
 at the top-right corner of every report card.
 - For a new subscription, click the New Subscription button and perform the procedure provided in Create a new subscription.
- For existing subscriptions, click the Edit Subscription or Delete Subscription button, and perform the procedure provided in Manage existing subscriptions.
The report in tabular format is sent through an email to the subscribed recipients based on the schedule.
Email a report
MSP administrators can configure the MSC portal to send a report to the intended recipient’s email addresses on demand.
To email a report
-
Log in to the Managed Services Center.
-
In the top navigation, click MSP Reports.
-
Click the report that you want to send to the administrators
-
On the Report Details page, click Email Report.
The Email Report page opens with the report name listed in the Summary section. -
Select the Attachment Format. You can choose PDF or CSV.
-
In the Recipients section, enter the email addresses of the administrators to whom you want to send reports.
-
Select the Add me to the recipient’s list check box to add your email address to the list of recipients’ email addresses.
-
Click Send Email.
The report is generated in tabular format and sent through an email to the intended recipients.
Download report sections
You can download the information of a report in a PDF, CSV, or CSV-Summary format.
To download a report:
- From the upper right page, click the ellipsis button
 ->Download and select the download format you want.
 - Click the required format.
- To download the report in PDF format, click the PDF
option. The requested report is downloaded in pdf format.
- To download the report in CSV or CSV-Summary format:
- Click the CSV option or CSV-Summary option.
- Click one of the following options:
- I’ll wait: If you click this option, the report is downloaded after some time.
- Provide Email: If you click this option, you need to provide your email address and click Submit to get notified about the completion of the report generation.