Monitor Jobs
Overview
The Jobs page lists all the triggered backup and restore activities for your customer configured workloads.
Jobs are generated for all the scheduled activities of configured resources for Hybrid Workloads such as servers, databases,virtual machines, and Saas Apps like Microsoft 365 apps.
Each job is associated with a unique job identification number. A job can hold a specific status during its lifetime. If a job fails, an error is generated on the Job Details page.
Monitor Jobs for Hybrid Workloads
Access Path
To access the Hybrid Workloads Jobs page,
On the MSC Console menu bar, click Jobs > Hybrid Workloads.
The Hybrid Workloads page displays the following types of Jobs
Description
Backup Jobs
The Backup Jobs tab from the Jobs page provides an overview of the Backup jobs for Hybrid Workload.
This page provides the status of the customer’s backed-up data.

| Field | Description |
| Customer | The name of the customer for which the job is generated. |
| Organization | The name of the organization. |
| Service Plan | The service plan that the customer subscribed to. Clicking the service plan redirects you to the service plan details page. |
| Job ID | A unique identification number associated with the job. Clicking the Job ID link redirects you to the job details page on the Phoenix Management Console. |
| Data Source | The resource name, such as server, database, or virtual machine for which the backup or restore job is generated. |
| Workload |
The type of workload for which the backup or restore job is generated. |
| Status |
The status of the triggered job The status can have one of the following values:
|
| Start Time |
The time when the job started. You can view the time in your preferred time zone. For more information, see Set Timezone. |
| End Time |
The time when the job ended. You can view the time in your preferred time zone. For more information, see Set Timezone. |
Restore Jobs
The Restores tab from the Jobs page displays the following restore statistics applicable for the last 60 days:

| Field | Description |
| Customer |
The name of the customer for which the restore is performed. Select the customer name to navigate the customer summary page. |
| Organization |
The name of the organization. Select the organization name to navigate the organization details page on the Hybrid Workloads Management Console. |
| Service Plan |
The service plan that the customer subscribed to. Select the Service Plan to navigate the service plan details page. |
| Job ID |
A unique identification number associated with the job. Select the Job ID to navigate the job details page on the Hybrid Workloads Management Console. |
| Data Source | The resource name, such as server, database, or virtual machine for which the backup or restore job is generated. |
| Workload |
The type of workload for which the restore job is generated. |
| Status |
The status of the triggered job The status can have one of the following values:
Note: A failed job is displayed with an error code. Hover over on the error code to view the error message. The error code hyperlink redirects to the exact error message description on the documentation portal.
|
| Start Time |
The time when the restore job started. You can view the time in your preferred time zone. For more information, see Set Timezone. |
| End Time |
The time when the restore job ended. You can view the time in your preferred time zone. For more information, see Set Timezone. |
DR Jobs
You view the details of various disaster recovery jobs from the Disaster Recovery page.
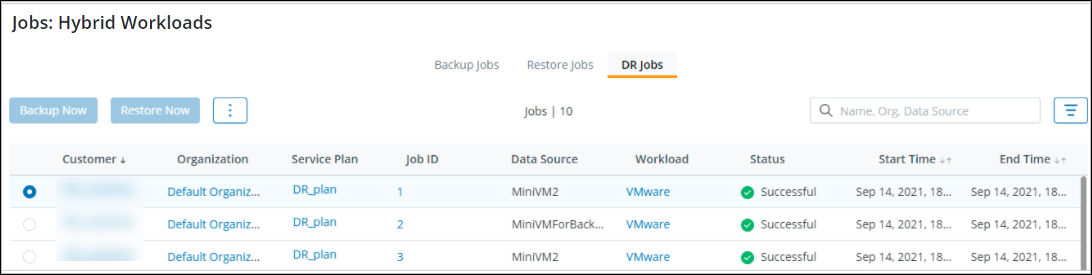
The Backup Jobs, Restore Jobs, and DR Jobs tabs on the Job Details page provide the following details:
| Field | Description |
| Customer |
The name of the customer for which the job is generated. Select the customer name to navigate the customer summary page. |
| Organization |
The name of the organization. Select the organization name to navigate to the organization details page on the Hybrid Workloads Management Console. |
| Service Plan |
The service plan that the customer is subscribed to. Select the Service Plan to navigate to the service plan details page. |
| Job ID |
A unique identification number associated with the backup or restore job. Select the Job ID to navigate the job details page on the Hybrid Workloads Management Console |
| Data Source | The name of the resource, such as server, database, or virtual machine for which the backup or restore job is generated. |
| Workload | The type of workload for which the restore job is generated. |
|
Status |
The status of the triggered job. The status can have one of the following values:
|
| Start Time |
The time when the DR failover operation started. You can view the time in your preferred time zone. For more information, see Set Timezone. |
| End Time |
The time when the DR failover operation ended. You can view the time in your preferred time zone. For more information, see Set Timezone. |
Search
You can search the Customer, Organization and Data source with the help of Search option.
Filters
The following filters to view the Jobs based on your preference.
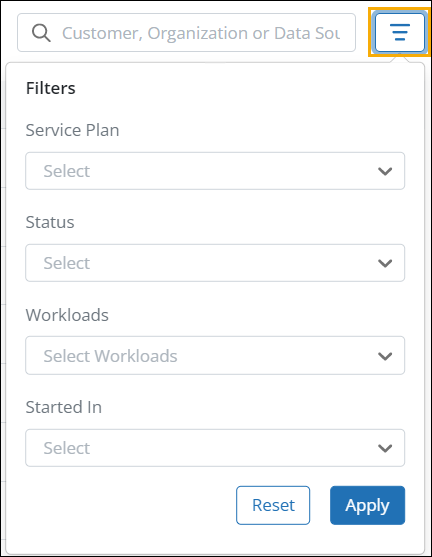
| Service Plan | Status | Workloads | Started In |
| Select the Service whose data you want to view |
|
Select the workload whose data you want to view. |
Select one of the following options based on when DR Jobs was started:
|
Set Timezone
You can view the Job timestamps, that is, the Start Time and End Time, in your preferred time zone.
Select the preferred timezone from the Timezone drop-down list.
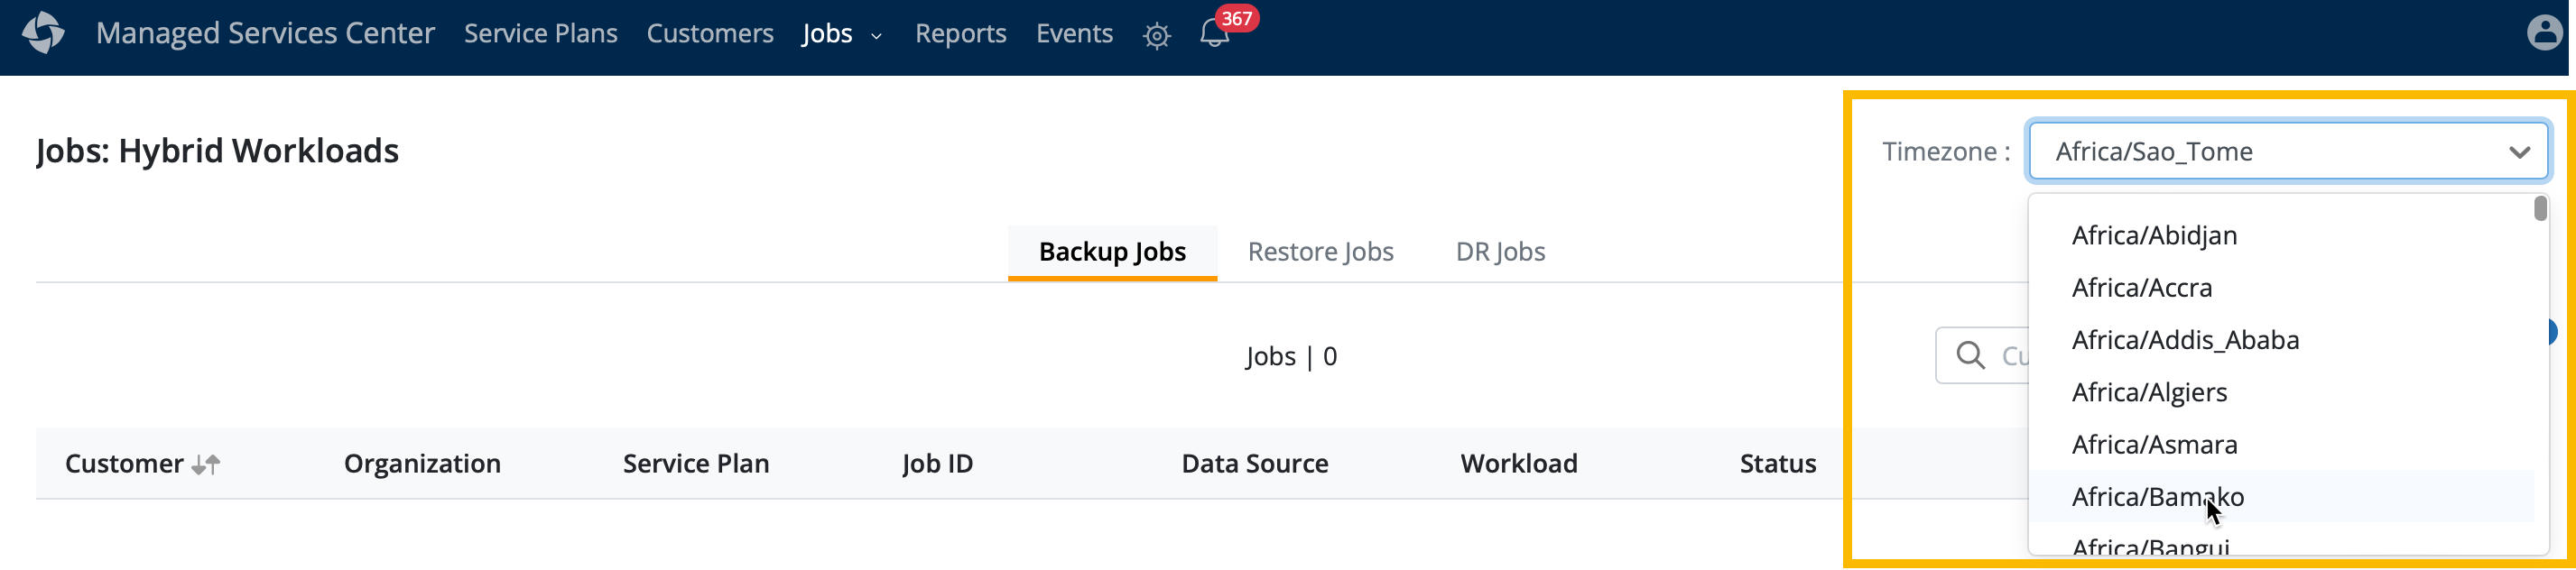
All the Start Time and End Time values for the Jobs in progress are automatically displayed based on your selected timezone.
- Timezone field is currently available only for Hybrid Workloads Jobs.
- By default, the timezone is set to MSC Console timezone (Timezone selected while creating your account by Druva Support).
- To change the default timezone of your MSC Console, raise a case with Druva Support.
Monitor Jobs for Microsoft 365
Access Path
On the MSC Console menu bar, click Jobs > Microsoft 365.
The Microsoft 365 page displays the following types of Jobs
Last Backups
Get a comparative view of all the customer’s backup jobs in different states. The information on the Jobs page can be helpful to see the status about the jobs and take any remediate action, if required.
For example, you can view the number of last successful backups and the backup failed jobs for customers. So if the failed jobs number is alarming for a particular app for customer, you can get in touch with the customers to remediate.
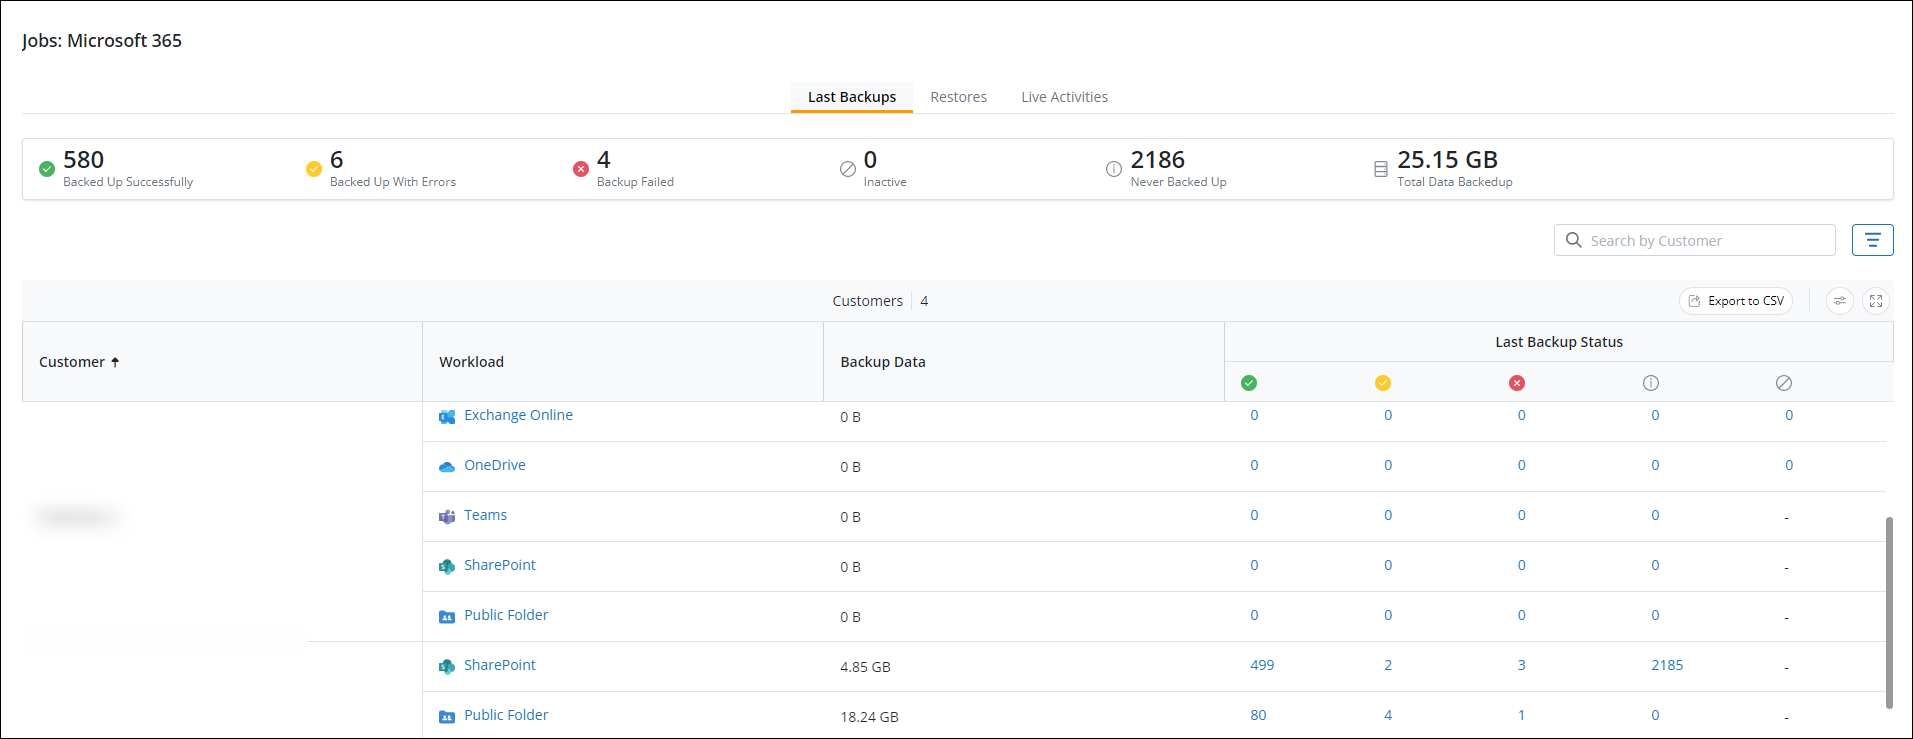
The following table lists the fields and table columns on the Last Backups tab.
| Fields | Description |
| Customer | The name of the customer for which the last backup activity occurred. |
| Workload | The name of the Microsoft 365 app configured for backup. |
| Backup Data | The size of the data backed up during the last backup activity. |
| Last Backup Status | The summary and last backup status of the entities. |
The Last Backup Activities card provides an overview of the live backup activities.

- Backed up Successfully: The total number of successful backups.
- Backed up With Errors: The total number of Microsoft 365 apps for which the last backup was completed with errors.
- Backup Failed: The total number of failed backups.
- Inactive: The total number of Inactive backups.
- Never Backed up: The total number of Microsoft 365 apps that were never backed up.
- Total Data Backedup: The total size of the backed up data.
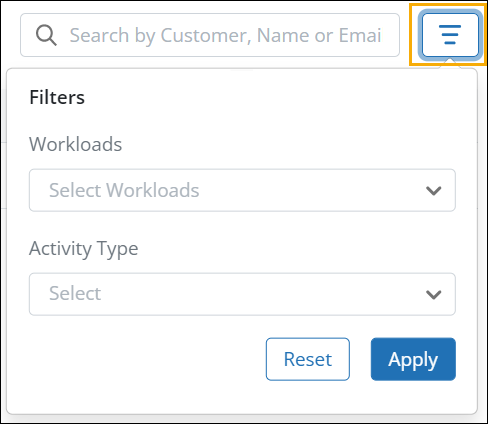
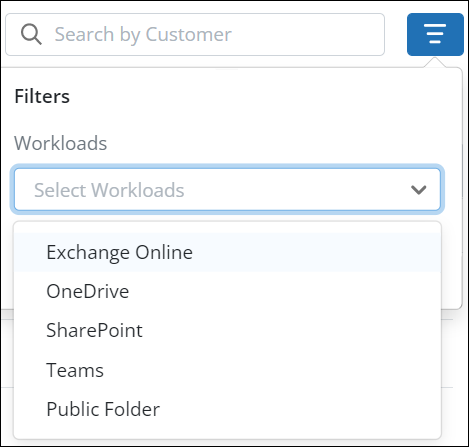
Using Filters
You can utilize the Search option to filter backup activities by a Customer.
OR
Filter the backup activities by Workloads.
The following table lists the categories available under each filter.
Restores
Get a consolidated view of Restore activity for the last 60 days.
MSP admin can get a comparative view of all the customer's restore actions in different states.
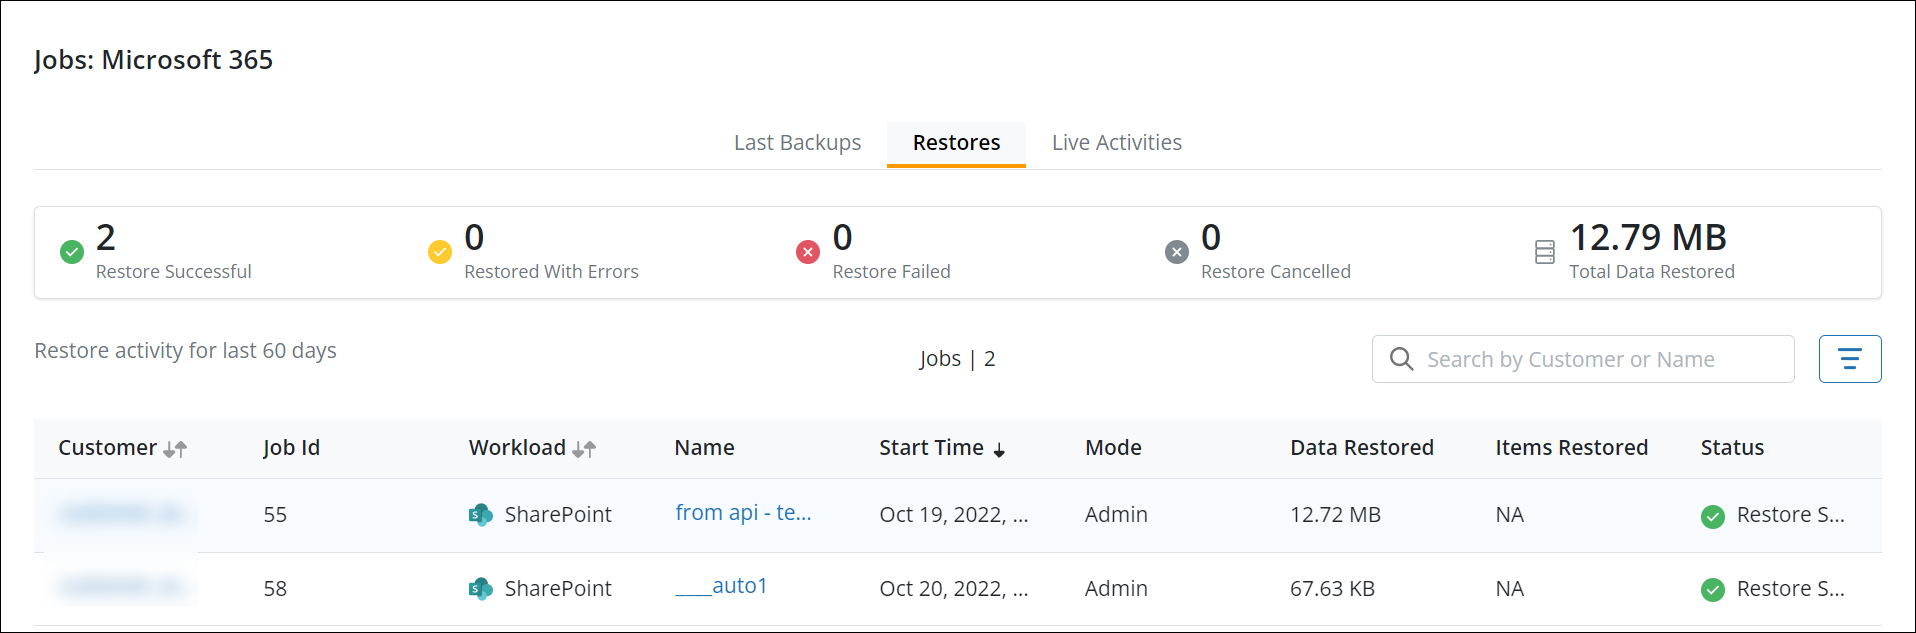
The following table lists the fields and table columns on the Restores tab.
| Field | Description |
| Customer | Name of the customer who initiated the restore activity. |
| Job ID |
The unique identification number associated with the job. |
| Workload | The name of the Microsoft 365 app for which the restore job is performed. |
| Name | The user who initiated the restore activity. Click the name to navigate to view the User details. |
| Mode | The Mode of restore activity, which can be admin or user-initiated restore mode. |
| Data Restored | The size of the restored data. |
| Items Restored | The number of items restored from the data set. |
| Status | The status of the restore activity. |
Restore Activities
The Restore Activities card provides an overview of the live restore activities.

- Restore Successful: The number of workloads for which the restore is successful.
- Restore Completed with Errors: The number of workloads for which restore is successful without any errors.
- Restore Failed: The number of workloads for which restore failed.
- Restore Canceled: The number of workloads for which restore is canceled.
- Total Data Restored: The total size of the data restored.
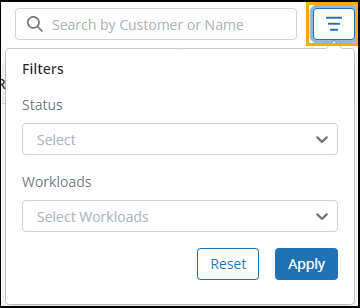
Using Filters
You can utilize the Search option to filter restore activities by a Customer.
OR
Filter the backup activities by Workloads.
The following table lists the categories available under each filter.
Live Activities
The Live Activities displays the in-progress backup and restore jobs for Microsoft 365 customers.
Additionally, you can:
- Search for user-specific activities
- Pause and resume the auto-refresh of live activities status
- Apply filters to view specific activities
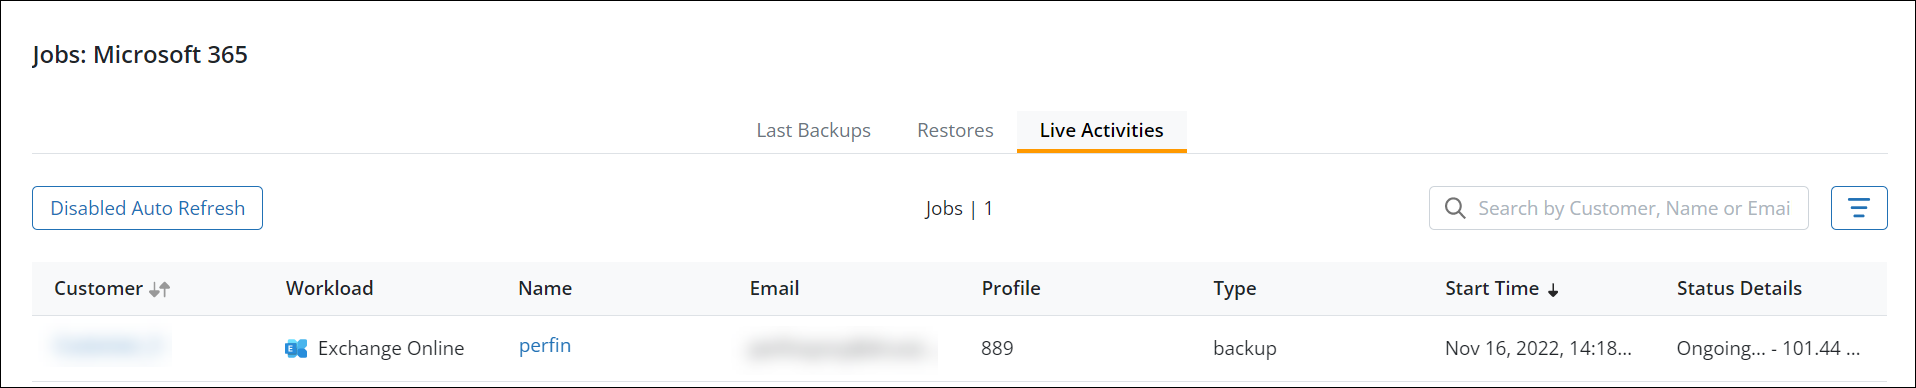
The following table lists the fields on the Live Activities page.
| Field | Description |
| Customer | Name of the customer associated with the device for which the activity is in progress. |
| Workload | The type of workload for which the live activity is performed. |
| Name | The user who initiates the restore activity. |
| The email address of the user. | |
| Profile | The name of the profile associated with the user for which the activity is in progress. |
| Type | Displays the Type of activity. For example, Backup or Restore activity. |
| Start time | The date and time when the backup or restore activity is started. |
| Status Details | The current status of the live activity. The following status is displayed based on the progress of the activity:
|
Configure Auto-refresh of Live Activities
The auto-refresh functionality enables you to refresh the status of the live activities. Once enabled, the information that appears on the Live Activities page is updated every 15 seconds.
Note: Restore requests older than 30 days are canceled and removed from the Live Activities list. Additional information about auto-canceled requests is available in the Restore Activity Report.
Enable Auto refresh of Live Activities
To enable the Auto-refresh of the live activities,
- On the Live Activities page, click the Enable Auto Refresh button.
- On the confirmation window, click Enable Auto Refresh.

Note: In the list view, only the top 100 activities are displayed by default. To view the next set of live activities, you need to disable auto-refresh.
Disable Auto refresh of Live Activities
The disable auto-refresh functionality enables you to stop updating the status of the live activities, but the live activities will still run in the background.
To disable the auto-refresh of the live activities,
- On the Live Activities page, click the Disable Auto Refresh button.
- On the confirmation window, click Continue.

Using Filters
You can utilize the Search option to filter live activities by a Customer.
OR
Filter the backup activities by Workloads and Activity Type
The following table lists the categories available under each filter.