How to set up and install a Trusted Certificate from a Certification Authority (CA)
This article applies to:
- OS: Windows
- Product edition: On-Premise
Overview
inSync uses SHA256, SSL v3 self-signed certificate in X.509 PEM format for encrypting transmission between the inSync Server and Client. It also uses the same certificate to encrypt transmission from inSync Web page of a user.
If the certificate is self-signed, web browsers will not trust it. Hence, the user will get a warning while accessing inSync Web Client using any web browser. The warning prompts the user to avoid visiting the site since it is not trusted.
To address this warning, the user has to provide a trusted certificate from a Certification Authority (CA). inSync Client users can log in to inSync Client and Web, only when the connection to inSync Master is secured using a Signed SSL/TLS Certificate.
Types of Certificates and Private Keys available
- PEM/CRT/CER/KEY: The PEM format is the most common format of certificates issued by CAs. PEM certificates usually have extensions such as .pem, .crt, .cer, and .key. They are Base64 encoded ASCII files and contain "-----BEGIN CERTIFICATE-----" and "-----END CERTIFICATE-----" statements. Server certificates, intermediate certificates, and private keys are issued in the PEM format. inSync and other similar servers also use PEM format certificates.
- P7B: The PKCS#7 or P7B format is usually stored in Base64 ASCII format and has a file extension of .p7b or .p7c. P7B certificates contain "-----BEGIN PKCS7-----" and "-----END PKCS7-----" statements. A P7B file only contains certificates and chain certificates and not the private key.
- PFX: The PKCS#12 or PFX format is a binary format for storing the server certificate, any intermediate certificates, and the private key in one encrypted file. PFX files usually have extensions such as .pfx and .p12. They are typically used on Windows machines to import and export certificates and private keys.
Note: inSync supports only Traditional PEM-Encoded non-Encrypted Private Key (PKCS#1 Format). The PEM private key format uses the header "-----BEGIN RSA PRIVATE KEY-----" and footer lines "-----END RSA PRIVATE KEY-----".
Prerequisites to set up and install a Trusted Certificate
You need a signed certificate from a trusted CA to validate the inSync environment.
inSync accepts any one of the following three types of certificates:
- A single Wildcard Certificate for the entire environment (Edge, Master, and Node)
- A SAN certificate, which requires the FQDN of all the servers for validation.
- A separate SSL certificate for each server from the certification authority.
Creating a new certificate for inSync on Windows
Creating a new certificate involves the following steps:
- Install OpenSSL
- Export private key and create CSR
- Enroll online to request SSL certificate from the CA
- Export the primary, intermediate and root certificates from the certificate bundle
- Import the certificate into inSync
Install OpenSSL
- Download and install the latest version of OpenSSL (full installation). The download link can be found at:
http://slproweb.com/products/Win32OpenSSL.html. - OpenSSL requires Visual C++ 2008 redistributables, which are available from the same website. The bitness of Visual C++ will depend on the bitness of the downloaded openSSL. Once the OpenSSL is installed, navigate to OpenSSL directory and run the following command:
Set OPENSSL_CONF=c:\openssl-win32\bin\openssl.cfg
This command sets the location for OpenSSL configuration file.
Note: Failing to run the above command will result in the following error:
WARNING: Can’t open config file: /usr/local/ssl/openssl.cnf
Export Private Key and Create CSR
You need the CSR (server.csr) to apply for a certificate from a CA. The private key (myserver.key) must also create the SSL certificate towards the end of your procedure.
Follow these steps to achieve both:
- Open command prompt as an administrator and change the directory to C:\OpenSSL-WinXX\bin>.
- To create a CSR request and get the private key, use the command:
openssl req -out server.csr -new -newkey rsa:2048 -nodes -keyout server.key
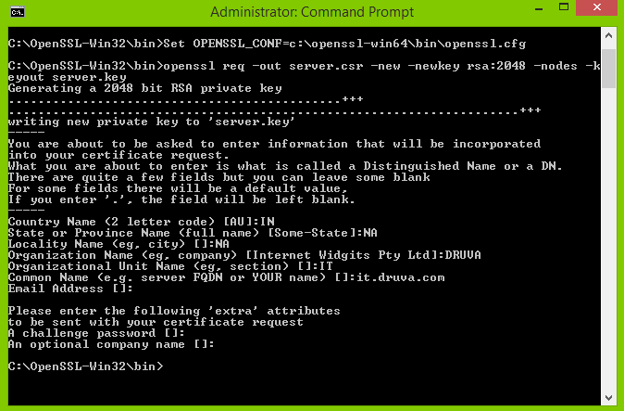
- Enter the details to complete the CSR.
Common Name must be the FQDN of the inSync Storage Node Server. This creates two files server.csr and server.key. - Convert the server.key to RSA format using command:
openssl rsa -in server.key -out myserver.key
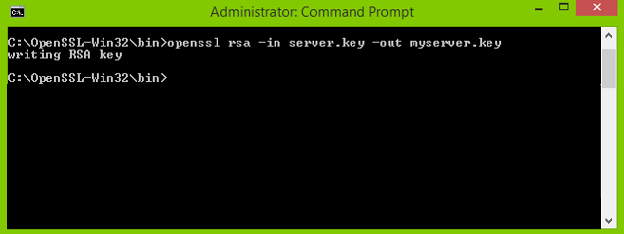
You now have the myserver.key file in the required RSA format.
Thus, the CSR and private key are now created.
The next step is to get the SSL certificate from the CA.
Enroll online to request SSL certificate from the CA
Use one of the following approach to obtain the SSL certificate from the CA:
- Open server.csr in a text editor and copy its contents to the online enrollment form. The CA verifies the server.csr details and issues a signed SSL certificate.
OR - Contact the CA vendor to assist you in creating the SSL certificate.
The next step after receiving the signed SSL certificate is to export the primary, intermediate, and root certificates from the certificate bundle to create a new inSyncServerSSL.key.
Export the Primary, Intermediate, and Root certificates from the Certificate Bundle:
Generally certificates are available in two formats to download from the CA:
- CRT/PEM/CER
- PFX
Based on the certificate formats you plan to set up, you can choose to follow the appropriate export method from below:
- Create chained SSL certificate in inSync server using PEM package
- Create chained SSL certificate in inSync Server using PFX package
Create chained SSL certificate in inSync server using PEM package
PEM packages usually come with two files:
- Trusted certificate
- Private key
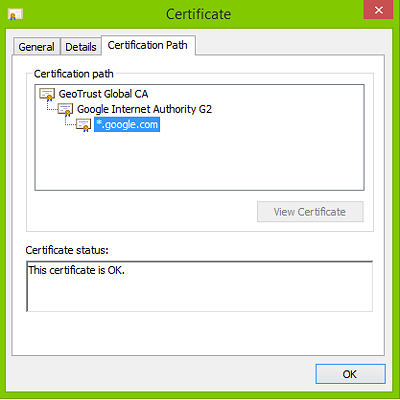
To identify the certificate, double-click it and check the certification path.
To create a chained SSL certificate:
- Create a new file called inSyncServerssl.key using Notepad++.
- Open the private key file and copy its contents to inSyncServerSSL.key.
- Open the CRT/PEM certificate, obtained from the CA, in Notepad++/Wordpad.
- Copy the certificate contents to inSyncServerSSL.key.
If the steps are followed correctly, the certificate appears as follows:
-----BEGIN RSA PRIVATE KEY-----
<Myserver.key>
-----END RSA PRIVATE KEY-----
-----BEGIN CERTIFICATE-----
<primary>
-----END CERTIFICATE-----
-----BEGIN CERTIFICATE-----
<Intermediate>
-----END CERTIFICATE-----
-----BEGIN CERTIFICATE-----
<Root>
-----END CERTIFICATE-----
You can observe that the private key is kept at the top of the list in the inSyncServerSSL.key file. Thus, the contents of the PEM certificate are retained in their original order. - Directly Import the certificate into inSync after creating the chained SSL certificate using the above steps.
Create chained SSL certificate in inSync Server using PFX package
PFX usually has the private key embedded in it.
If the certificate is PFX:
- Get the RSA private key:
- Copy the .pfx certificate to the C:\OpenSSL-Win64\bin\ folder.
- Open command prompt and navigate to C:\OpenSSL-Win64\bin.
- Run the below command to get the .PEM first:
openssl pkcs12 -in <filename.pfx> -nodes -nocerts -out key.pem
- To extract the RSA private key from the PEM, run the following command:
openssl rsa -in key.pem -out myserver.key
- Get the pkcs#7 certificate from PFX
- Install the certificate on the local computer using MMC > Certificates snap-in.
- From the Certificates folder, right-click on the certificate and export it.
- While exporting, select No to not export the private key and click Next.
- Select Cryptographic Message Syntax Standard – PKCS #7 Certificate (.P7B) and Include all certificates and click Next.
- Save the certificate.
- Get PEM from Pkcs#7
- Double-click on the exported .P7B certificate. It opens the certificate manager snap-in.
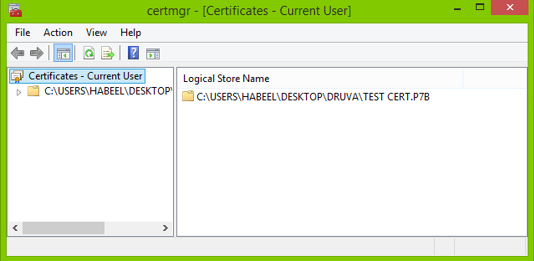
- Expand the Certificates folder and navigate to the certificates.
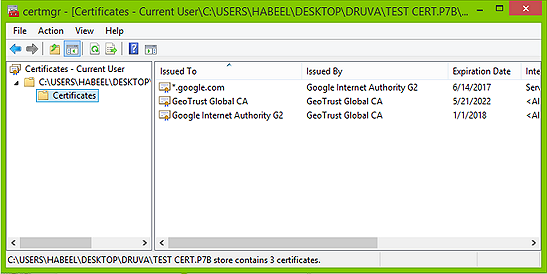
- Double-click the primary certificate, confirm the hierarchy from the Certification Path tab and note it down.

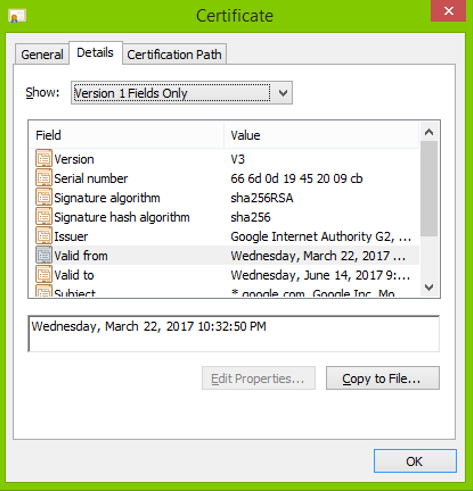
- Open Details tab and click Copy to File.
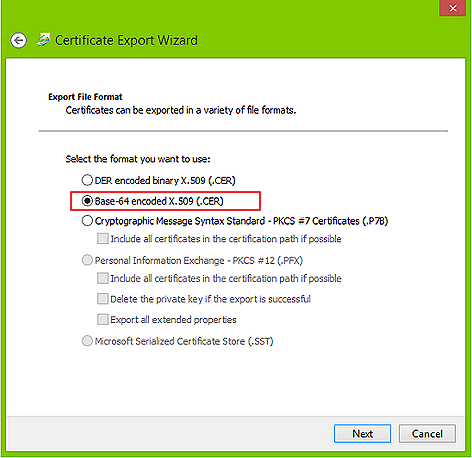
- On the Certificate Export Wizard, select Base-64 encoded X.509 (.CER) and click Next.
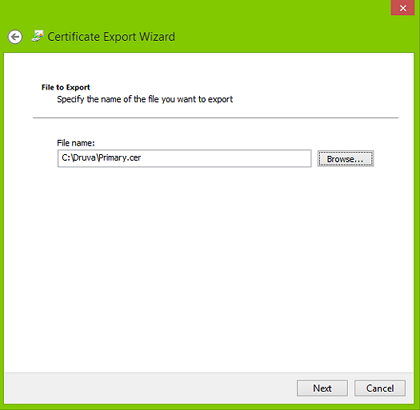
- Click Browse to save the certificate as primary.cer and complete the wizard.
- Open the intermediate certificates in the same order and save the certificates as Base-64 encoded X.509 (.CER) with the names as intermediate1.cer, intermediate2.cer and so on till all the intermediate certificates are saved in .cer format.
- Perform the same steps to copy the root certificate to save in the .cer format.
- When you open the .cer files with Notepad++/Wordpad, you will see the certificate in its base form.
You have four files:- Private key: myserver.key
- Primary certificate - primary.cer
- Intermediate certificate - intermediate.cer
- Root certificate - root.cer
- Double-click on the exported .P7B certificate. It opens the certificate manager snap-in.
- Open each the .cer/.pem and msyserver.key file in a separate Wordpad/Notepad++.
- Copy the contents of each file into a new Wordpad file in the following order:
-----BEGIN RSA PRIVATE KEY-----
<Paste Myserver.key>
-----END RSA PRIVATE KEY-----
-----BEGIN CERTIFICATE-----
<Paste primary.cer>
-----END CERTIFICATE-----
-----BEGIN CERTIFICATE-----
<Paste Intermediate.cer>
-----END CERTIFICATE-----
-----BEGIN CERTIFICATE-----
<Paste Root.cer>
-----END CERTIFICATE----- - Ensure there is no line space between two certificates.
- Save this file as inSyncServerSSL.key with file type as All Files.
- Copy the inSyncServerSSL.key to C:\OpenSSL-Win32\bin folder and test the certificate with following command and verify if it is valid:
C:\OpenSSL-Win32\bin\ openssl s_server -cert inSyncServerSSL.key -www
The expected output is "Accept".
Import the certificate into inSync
You can import the certificate from:
- inSync Management Console
- C:\ProgramData\Druva\inSyncCloud\inSyncserver folder manually
To install the certificate on:
- Master please refer article How to install SSL certificate on inSync Master?.
- Node please refer article How to install SSL certificate on Node Server?
- Edge please refer article How to install SSL certificate on Edge Server?