How to configure SSO for Druva Cloud Platform using Azure AD as IdP
This article applies to:
- Product edition: Druva Cloud Platform (DCP)
Overview
This article describes the steps to configure SSO for Druva Cloud Platform ( DCP ) using the IDP Azure AD.
Configuration steps:
- Configure the Druva app on Azure portal
- Configure Azure AD Single Sign-On
- Configure DCP to use Azure AD login
- Assign Users/Groups in Azure AD to use DCP app
- Enable SSO for administrators
- Enable SSO for Users
- Only a Druva Cloud administrator can set up Single Sign-on.
- Configure Single Sign-on based on the applicable scenarios:
- New inSync customers (on-boarded after July 14, 2018) must configure Single Sign-on using the Druva Cloud Platform Console. For more information, see Set up Single sign-on.
- Existing inSync customers who have not configured Single Sign-on until July 14th, 2018, must configure Single Sign-on using the Druva Cloud Platform Console. For more information, see Set up Single sign-on.
Configure the Druva app on Azure portal
To configure the app:
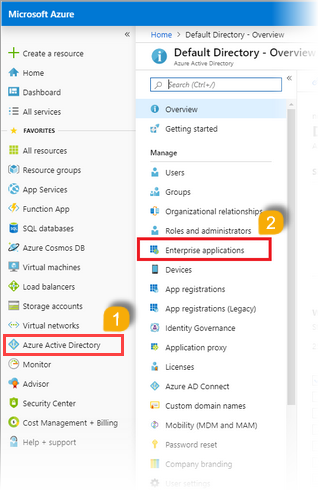
- Login to the Azure portal (URL: portal.azure.com) with the Azure Administrator account credentials.
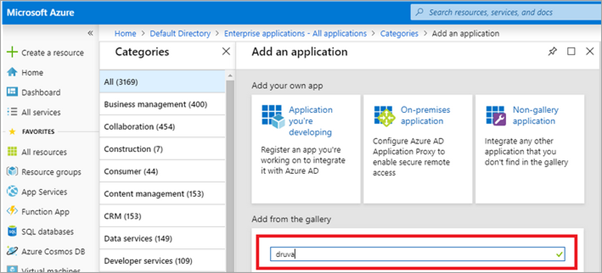
- Navigate to Azure Active Directory > Enterprise Applications > All applications.

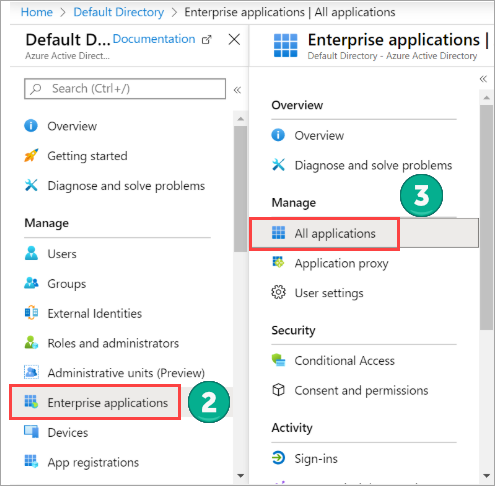
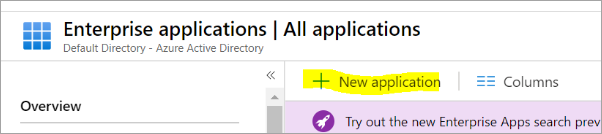
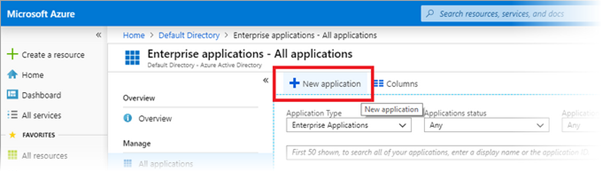
- On the Enterprise applications page, click New application.
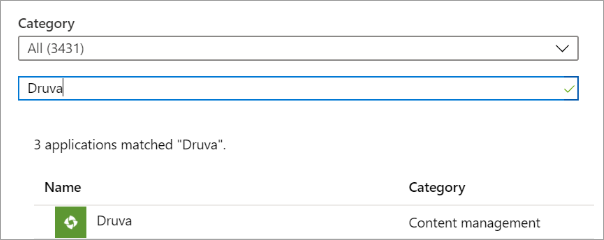
- Search for the application name Druva in the search bar as shown below.
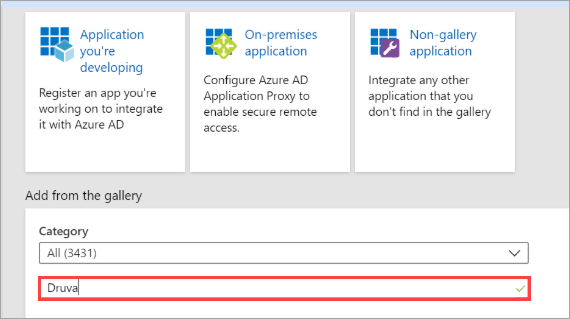
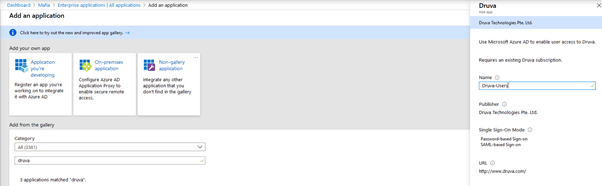
- Select Druva application from the search output list and click Add.
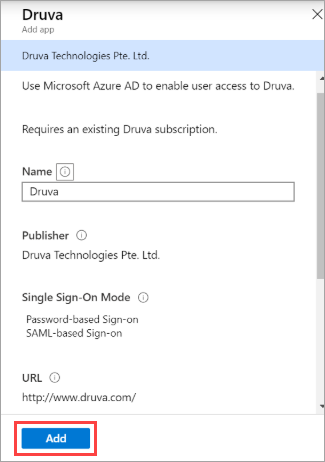
Note: The name of the application can be modified as required. For example, Druva or Druva Cloud Platform.
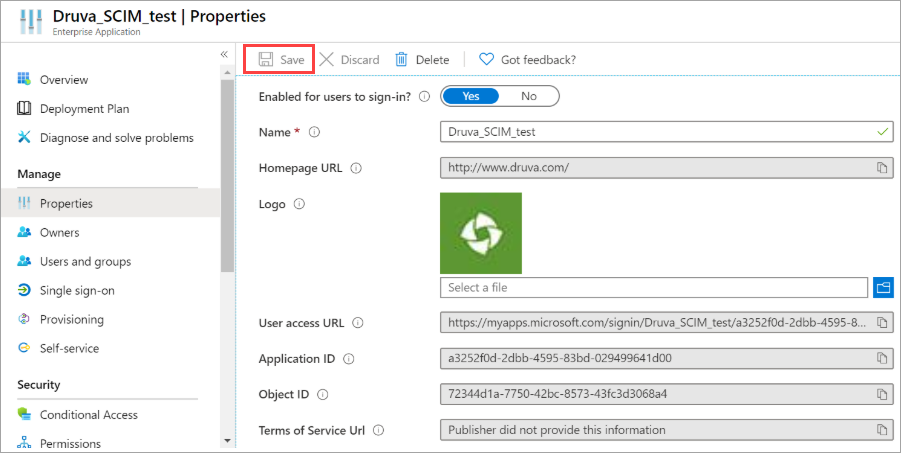
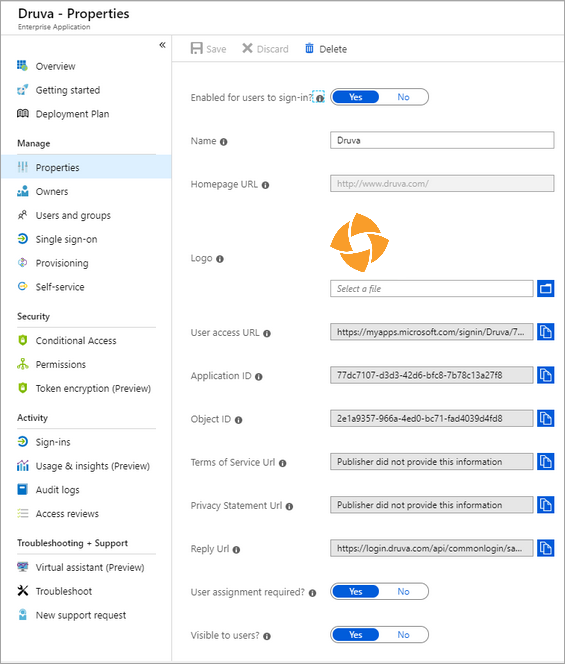
- After adding the application, navigate to Enterprise Application, and select the Druva application from the list.
- Go to Manage > Properties. To identify the application distinctly, upload an image here and click Save when done.
Configure Azure AD Single Sign-On
To configure Azure AD SSO:
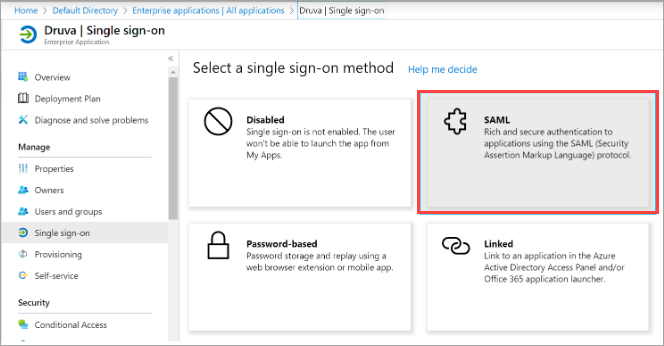
- On the Druva application integration page of the Azure portal, click Single sign-on.
- On the Single sign-on window, set Mode as SAML based Sign-on to enable the single sign-on.
- Under the Basic SAML Configuration section, you can see two parameters - auto-filed Identifier (Entity ID) and Reply URL (Assertion Consumer Service URL).
- Click Edit and make sure that you have selected the following parameters as default and save the changes.
Identifier (Entity ID):
- For Public Cloud:
DCP-login
- For Gov Cloud:
DCP-loginfederal
Reply URL (Assertion Consumer Service URL):
- For Public Cloud:
https://login.druva.com/api/commonlogin/samlconsume
- For Gov Cloud:
https://loginfederal.druva.com/api/commonlogin/samlconsume
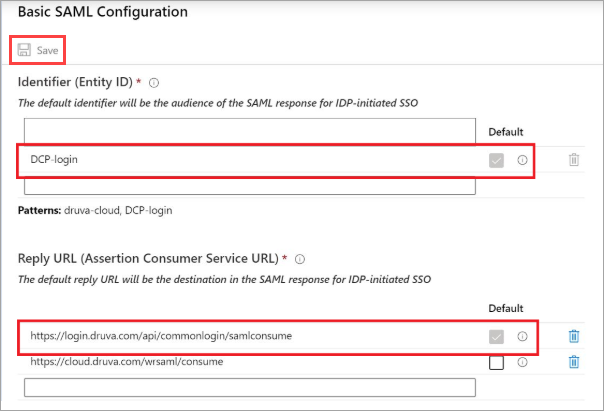
- Click Save.
- Under User Attributes & Claims, click Edit.
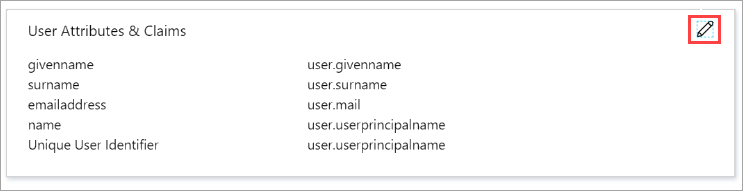
- You can choose to delete all the attributes added by default as Druva Cloud Platform does not use these attributes for authentication.
Note: You cannot delete Claim name : http://schemas.xmlsoap.org/ws/2005/0...nameidentifier as this is the mandatory claim for the name identifier.
- Do the following steps to generate the SSO token:
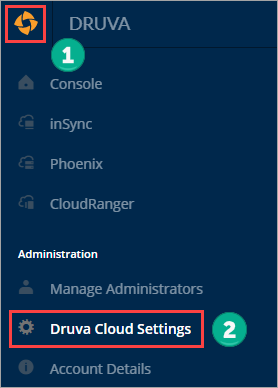
- Click the Druva logo
 to access the Global Navigation Panel > Druva Cloud Settings > Access Settings. The Access Settings window appears.
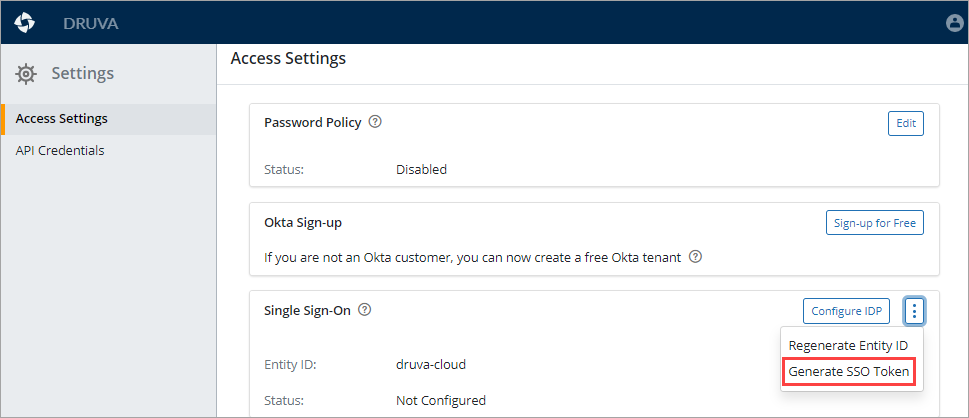
- In the Single Sign-On section, click Generate SSO Token. The Single Sign-On Token window appears.
Note: Copy this token to a notepad, as we will need this further.
- Click the Druva logo
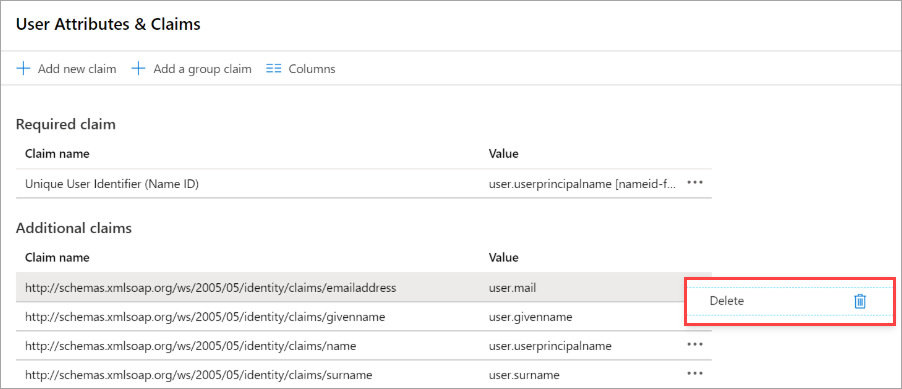
- Click Add New Claim and enter the attributes described in the table below. Preserve the order and case of the attribute name when you enter the names.
Attribute name Value emailAddress user.mail druva_auth_token
SSO Token generated from DCP Admin Console, without quotation marks.
For example: X-XXXXX-XXXX-S-A-M-P-L-E+TXOXKXEXNX=Azure automatically adds quotation marks around the auth token.
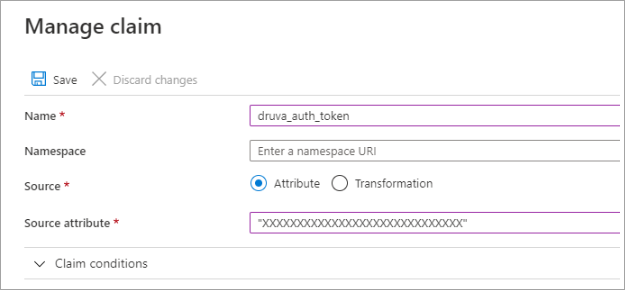
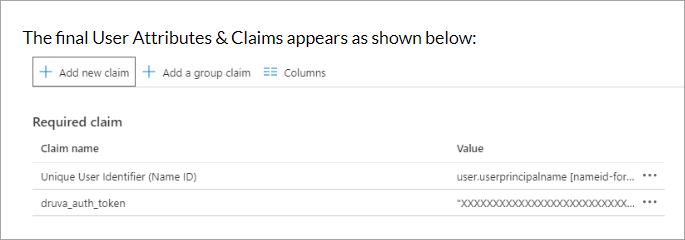
Click Save. The User Attributes & Claims page appears as follows:
-
On the SAML Signing Certificate section, click Certificate (Base64) and save the certificate file (Druva.cer) locally.
-
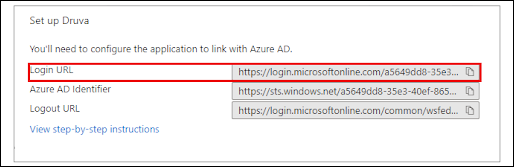
Under Set up Druva section, copy the Login URL to a notepad/textEditor/Wordpad for future use.
Sample of ‘Login URL’ : https://login.microsoftonline.com/xx...xxxxxxxx/saml2
Configure DCP to use Azure AD login
Only a Druva Cloud administrator can set up Single Sign-on.
To configure SSO on Druva:
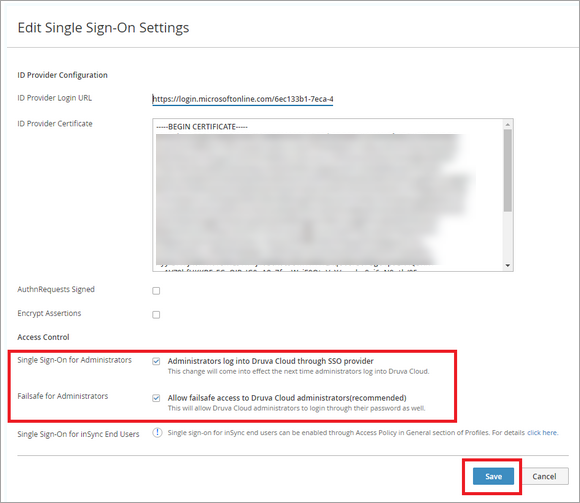
- Open a new browser window and log in to DCP Management Console.
- ( https://console.druva.com/admin ) as an Administrator.
- Click the Druva logo to access the Global Navigation Panel > Druva Cloud Settings > Access Settings. The Access Settings window appears.
- On the Single Sign-On section, click Edit.

- Copy the Login URL obtained from Step 11 ( https://login.microsoftonline.com/xx...xxxxxxxx/saml2 ) to the ID Provider Login URL field.
- Open the Certificate (Base64) downloaded earlier (Druva.cer) in notepad (obtained from point no 9) and copy all the content in ID Provider Certificate field.
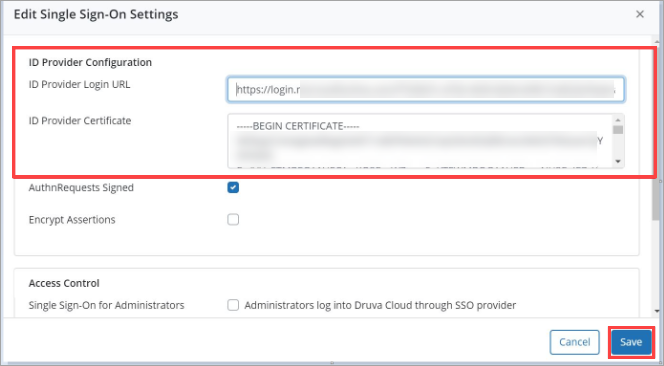
- Click Save.
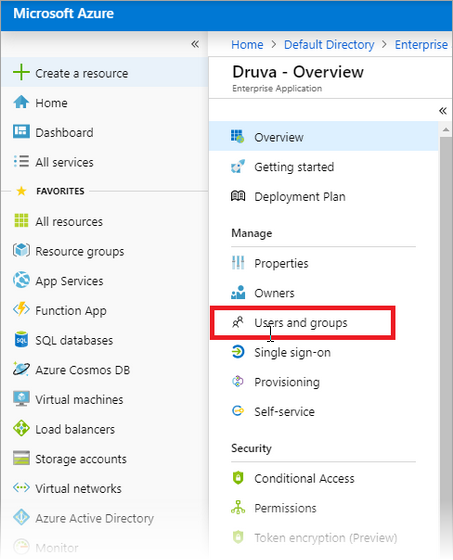
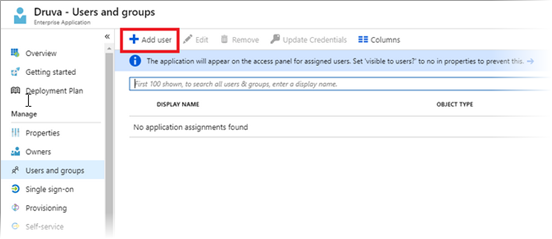
Assign Users/Groups in Azure AD to use DCP app
- On the Azure portal, navigate to Enterprise applications > All applications, select Druva applicaiton created during initial configuration from the applications list.
- Click Users and groups > Add user.
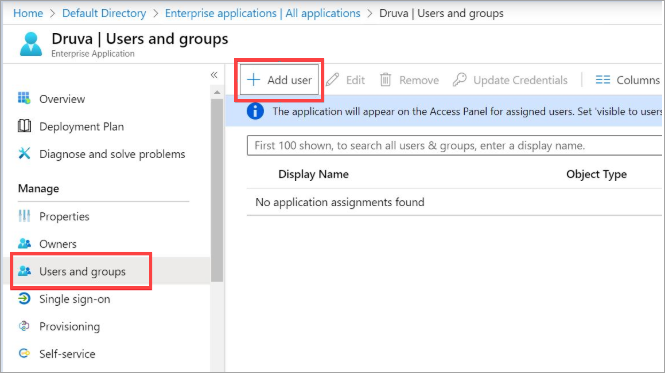
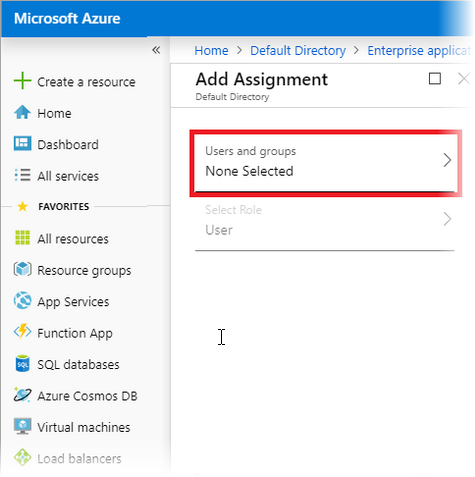
- Select Users and groups on the Add Assignment window.

- On the Users and groups window, select the Users or Group that you want to assign the Druva App in the Users list.
- Ensure that the User or Admin account selected has a corresponding account created in the Druva Cloud Platform.
- Click Select on Users and groups window.
- Click Assign on Add Assignment window.
Enable SSO for administrators
- Click the Druva logo to access the Global Navigation Panel > Druva Cloud Settings > Access Settings. The Access Settings window appears.
- On the Single Sign-On section, click Edit.
- Select Administrators log into Druva Cloud through SSO provider.
Druva recommends enabling Failsafe for Administrators so that they have to access the DCP console in case of any failures in IdP. It also enables the administrators to use both SSO and DCP password to access the DCP console. - Click Save. This enables the access to Druva Cloud Platform using SSO.
Enable SSO for users
This section applies for inSync users. If you intend to use SSO for Druva Phoenix, please skip this section.
To enable SSO for users, enable SSO for an existing user profile. Alternatively, create a new profile and enable SSO for this profile. Subsequently, assign the users to this profile to enable access using SSO.
Step-1: Create a new profile or update an existing profile:
- To create a new profile and enable SSO, see Create a profile.
- To enable SSO in an existing profile, see Update a profile.
Step-2: Assign users to the profile:
To assign uses to the profile with SSO enabled, follow the steps described in Update the profile assigned to users.
(IDP Initiated SSO Only) Configure the Linked App for Single Sign-On for inSync Users in Azure Portal.
If you want your users, as well as Admins, to access Druva from Azure Apps using Single Sign-On, then you will need to use 2 separate Apps - one for Admins and the other for Users.
Admin-app will have the exact same settings as explained previously.
User App will need to be linked with the Admin App using the “Linked App” option.
1. Login to the Azure portal (URL: portal.azure.com) with the Azure Administrator account credentials.
2. Navigate to Azure Active Directory > Enterprise Applications.
3. On the Enterprise applications page, click New application.
4. Search for the application name Druva in the search bar as shown below.
5. Select Druva application, name it as Druva-Users for example, to differentiate it from the previous app that we had created and add it.
6. Now go back to the Enterprise Applications – All Applications tab -> search for the previous Druva app that we had created for the Admins.
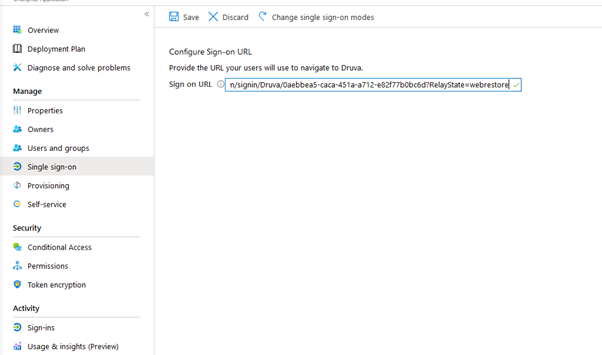
7. Click on that App’s properties and copy the “User Access URL”. Make a note of it.
8. This URL will look like this:
9. In this URL, delete the string tenantId=xxxxxxxx-xxxx-xxxx-xxxx-xxxxxxxxxxxx
10.Replace it with the string RelayState=webrestore
11.Now the URL will look like:
https://myapps.microsoft.com/signin/Druva/0aebbea5-caca-451a-a712-e82f77b0bc6d?RelayState=webrestore
12.Go back to the new app that we had created for the Druva-Users.
13.On the left hand side, click on the “Single Sign-On” and select “Linked”

14.Copy the URL that we had created in the step # 11, and paste it the Single Sign On URL field:
15.Save the configurations
16.On the Azure portal, navigate to Enterprise applications > All applications, select Druva-Users application created during initial configuration from the applications list.
17.Click Users and groups.
18.Click Add User.
19.Select Users and groups on the Add Assignment window.
20.On the Users and groups window, select the Users or Group that you want to assign the Druva App in the Users list.
Enable SSO for users in inSync Admin Console:
This section applies for inSync users. If you intend to use SSO for Druva Phoenix, please skip this section.
To enable SSO for users, enable SSO for an existing user profile. Alternatively, create a new profile and enable SSO for this profile. Subsequently, assign the users to this profile to enable access using SSO.
Step-1: Create a new profile or update an existing profile:
-
To create a new profile and enable SSO, see Create a profile.
-
To enable SSO in an existing profile, see Update a profile.
Step-2: Assign users to the profile:
To assign uses to the profile with SSO enabled, follow the steps described in Update the profile assigned to users.