Import users from your AD/LDAP
Overview
You can configure inSync to automatically as well as manually import the users from your Active Directory (AD) or LDAP at regular intervals. During each interval, inSync queries your AD/LDAP to retrieve details of the users who were added to your AD/LDAP since the last query. inSync then creates inSync user accounts for these new users.
Note:
- inSync does not import users that are in Disabled state in your AD/LDAP.
inSync does not populate users if the email Address field is blank for a user account in your AD/LDAP dirctory.
Prerequisites
Ensure that you have completed the following configurations:
- Installed the AD/LDAP Connector. For more information, see Install or upgrade AD/LDAP Connector.
- Configured the AD/LDAP Connector. For more information, see Configure AD/LDAP Connector.
- Registered your AD/LDAP with inSync. For more information, see Register your AD/LDAP.
- Created the inSync Profile. For more information, see Create a Profile.
- Created an AD/LDAP Mapping. For more information, see Create an AD/LDAP mapping.
Auto-import configuration process
To configure an existing AD/LDAP Mapping for user auto-import, do the following steps:
- On the inSync Management Console menu bar, click Users > Deployment.
- Under the Mappings tab, click on the AD/LDAP Mapping from the list for which you want to configure user auto-import.
- In the Mapping Configuration section, click Edit, the Mapping Configuration window appears.
- Identify the Profile to which inSync must assign users that you want to auto-import from your AD/LDAP.
Note: Ensure the following if you plan to use the AD/LDAP password method for user login:
- Do not select a profile to which you have added users individually by using a CSV file.
- Ensure that the login method for the selected profile is set to AD/LDAP Account.
For more information, see Configure the user login mechanism.
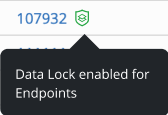
The data lock enabled profile has the following icon:
If you select this profile, you cannot:
- Delete the snapshots, users, and devices associated with the profile.
- Change profile of users.
- Remove the license of the user.
For more details, see Data Lock.
- Select the Auto import new users checkbox.
- Click Ok to save the settings.
Manual import configuration process
To manually import users for the AD/LDAP Mapping, do the following steps:
- On the inSync Management Console menu bar, click Users > Deployment.
- Under the Mappings tab, click the AD/LDAP mapping that you want to use to import user details.
- Click
 Import New Users.
 - Under the Select Users for Import tab, select the check box for each user that you want to import.
If you want to view all the users that you have selected for import, click the Selected Users tab.Note: You can search for specific users, that you want to import, by typing their User Name in the Search user box.
- Click Import Users. The list of imported users appears.
- (Optional) Send activation emails to users or download their activation keys:
- To send an activation email to users, select their names and click Send Keys by Email. Users who receive the activation email can install and activate inSync client on their devices.
- To download activation keys for users, select their names and click Save Keys. You have to activate inSync client for users whose activation keys you have downloaded.
- Click Done.
Next Step
Configure the frequency at which inSync must import or sync users from your AD/LDAP.
For more information, see Configure the user import or sync frequency.