Access legal hold data using WebDAV
Overview
You can access the user's Legal Hold data from endpoints such as computers and mobiles, and from cloud applications using WebDAV.
inSync supports multiple PST file formats to export email data through WebDAV, providing IT and legal teams with flexible options to collect data on Legal Hold.
Step 1 of 2: Obtain WebDAV access details
To access Legal Hold data by using WebDAV, you must obtain the WebDAV access details. The WebDAV access details include your credentials and URLs to the storage where user data resides. If the users’ data is backed up on multiple storages, multiple WebDAV URLs are created.
Note: inSync Cloud administrator can also access WebDAV using an API token. To know more, see Access WebDAV using API token as an authentication mechanism.
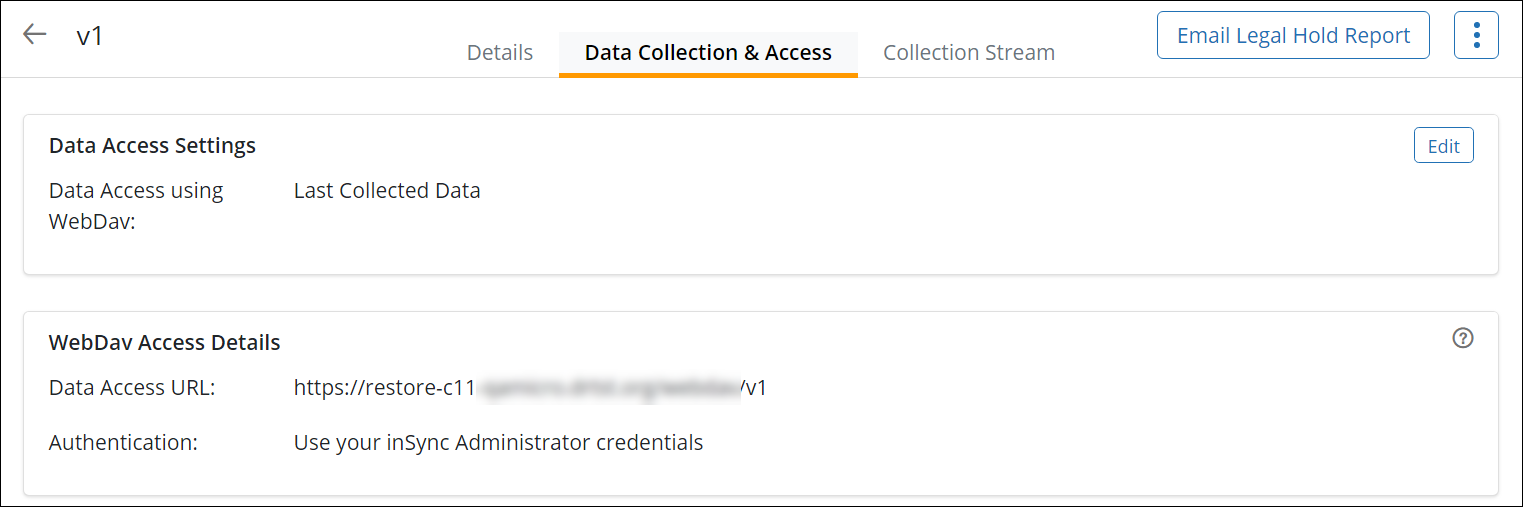
To obtain the WebDAV access details
- Click the relevant Legal Hold policy.
- Click Data Access. The data access URL and authentication details appear in the WebDAV Access Details area.
Access WebDAV using API token as an authentication mechanism
Only inSync Cloud administrator can access WebDAV using an API token. API token can only be generated by an inSync Cloud administrator and used to access WebDAV using any of the methods described in Step 2 of 2: Select a method for WebDAV access.
To log on to WebDAV, specify the email address of the inSync Cloud administrator who generated the API token as the Username and API token as Password when prompted for it.
Email address of the inSync Cloud administrator who generated the token is displayed in the Generated by field in the Access token for inSync APIs area.
To generate an API token:
- On the inSync Management Console menu bar, click
 > Settings. The Settings page appears.
 - Click the inSync APIs tab. The Access token for inSync APIs page appears.
- Click Copy Token. The token is copied to your clipboard.
The Copy Token button is available only when the authentication token is valid. - If the token has expired, then click Create New Token and run the following steps:
- In the Expire on field, specify the expiry date of the authentication token.
- Click Done.
Note:
- API token is associated with the email address of the inSync Cloud administrator, who generated the token.
- If inSync Cloud administrator use Single Sign-On for login, use API token to log on to WebDAV.
- inSync Cloud administrator who enabled the Single Sign-On can access WebDAV using both, API token and inSync username and password.
- Legal administrators cannot use API token to log on to WebDAV.
Step 2 of 2: Select a method for WebDAV access
You can access WebDAV by using the following methods:
- Access WebDAV by using HTTP connectors within eDiscovery tools
- Access WebDAV by using a mapped network drive
- Access WebDAV by using a web browser
- Download WebDAV data using Direct Download utility
Access WebDAV by using HTTP connectors within eDiscovery tools
inSync Client collects the EDRM-recommended metadata attributes of data that is backed up from devices of users who are on Legal Hold. inSync then provides WebDAV access to the preserved data and associated metadata. eDiscovery HTTP connector can be used to collect the preserved data and metadata attributes, parse through the data, and help data custodians to analyze and act on them.
For more information about creating a Legal Hold policy and accessing the WebDAV using AccessData, see Create Legal Hold using inSync. For more information about how AccessData can be integrated with inSync to mine data under Legal Hold, see Using inSync with AccessData.
For more information about creating a Legal Hold policy and accessing the WebDAV using Recommind, see Create Legal Hold using inSync. For more information about how Recommind can be integrated with inSync to mine data under inSync’s Legal Hold, see Using inSync with Recommind.
Access WebDAV by using a mapped network drive
Windows OS
Before you begin
If you are using a self-signed certificate, before you access WebDAV, you must first install the self-signed certificate as a Trusted Root Certificate. However, we recommend that you install and use a certificate signed by a Trusted Certificate Authority (CA). Using a self-signed certificate might involve potential security risks.
Procedure
To access WebDAV by using a mapped network drive
- Ensure that WebClient service is running on your computer.
- Click the Start menu.
- Right-click Computer > Map network drive. The Map Network Drive window appears.
- On the Map Network Drive window, provide the appropriate information for each field.
-
Select a drive and enter the WebDAV URL. For example: https://restore-c1-cloud.druva.com/webdav/Legal Hold Policy 1.
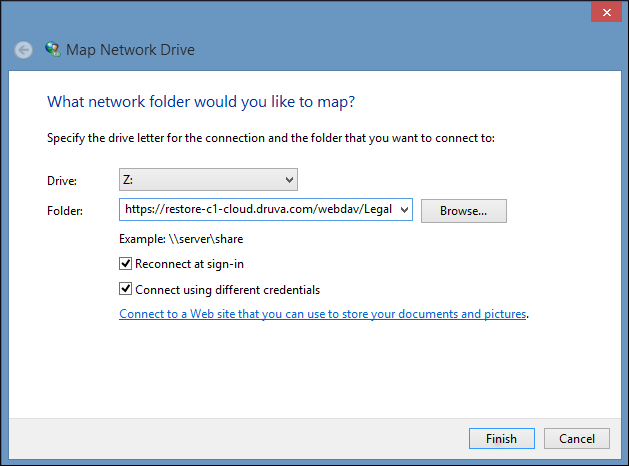
- Select the Connect using different credentials check box.
- Click Finish. The Enter Network Password window appears.
-
- On the Enter Network Password window, provide the username and password of the cloud administrator or legal administrator, and then click OK.
Mac OS
Before you begin
If you are using a self-signed certificate, before you access WebDAV, you must first install the self-signed certificate by using the Keychain Access utility in Mac. By using the same utility, you can then update the Trust setting for this certificate and mark it as a certificate that is always trusted for all users. However, we recommend that you install and use a certificate signed by a Trusted Certificate Authority (CA). Using a self-signed certificate might involve potential security risks.
Procedure
- Open Finder.
- On the menu bar, click Go > Connect to Server. The Connect to Server window appears.
- In the Server Address, type the WebDav URL. For example: https://restore-c1-cloud.druva.com/webdav/Legal Hold Policy 1.
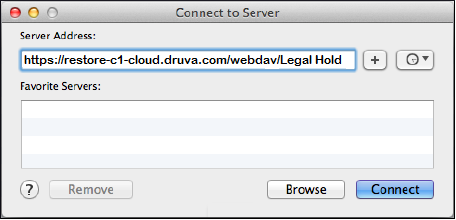
- Click Connect.
- On the Enter Network Password window, provide the username and password of the cloud administrator or legal administrator, and then click Connect.
Access WebDAV by using a web browser
All the additional data collected is denoted with a ++ prefix and suffix. For example, a folder named My Videos for which the Additional Data Collection feature is enabled is denoted as follows ++MyVideos, V1++.
You can use a web browser to access the Legal Hold data via WebDAV, and then download the Legal Hold data to your computer. If the download fails or is interrupted, then you can resume the download by using download manager add-ons that are available for your web browser. The download manager resumes the download from right where it was interrupted.
To access WebDAV by using a web browser
- Open a web browser.
- In the address bar, type the WebDAV URL and press Enter.
Note: If you are using a self-signed certificate, an untrusted certificate alert appears. Depending on the browser that you are using, you can click Proceed anyway, I Understand the Risks, or Continue to proceed. However, we recommend that you install and use a root certificate signed by a Trusted Certificate Authority (CA) because using a self-signed certificate might involve potential security risks.
- Type the username and password.
- Click Ok.
How Legal Hold data is arranged
After the WebDAV authentication, the Legal Hold policy folders appear. The hierarchy of the Legal Hold policy folders is as follows:
 |
|
Before a user is put on Legal Hold, inSync has backed up data multiple times. Over a period of time, the user can modify or rename folders and files at multiple occasions. Therefore, inSync appends a version number to the backed up folders and file names.
inSync checks for the last period (.) in the file or folder name and appends the version number before the period. This preserves the file extensions when versions are appended during backups.
Example:
Version v1 getting appended to Jellyfish.png will appear as:
Jellyfish,v1.png
If you have periods (.) in the folder names, version is appended before the last period in the folder name. This may result in the versions getting appended in the middle of the folder name with periods.
Example:
Folders Field.Reports and Transaction.Summary.Stats when appended with version v2 will appear as:
- Field,v2.Reports
- Transaction.Summary,v2.Stats
The version number indicates the snapshot number in which the folder or file is modified or renamed. A snapshot is a “point in time image” of the backup folders and indicates the state of the backup folders, which at a particular point in time.
Note:
When you download data within a date range, inSync identifies the difference in the data in the last snapshot of the previous day and the first snapshot of the next day of the specified date range and downloads it too.
Example: Assume the following:
- inSync backs up data for a user on a daily basis.
- Snapshot on September 29th, 2019 has the files - File A, B, C, J
- Snapshot on September 30th, 2019 has the files - File A, B, J
- Snapshot on October 01, 2019 has the files - File A, B
- Snapshot on October 02, 2019 has the files - File A, B, C
- Snapshot on October 03, 2019 has the files - File A, C, Z
You specify the download date range as October 01, 2019 to October 02, 2019
Here, inSync downloads the files on October 01 and 02 - File B, C
and also downloads the difference found in the last snapshot of the previous day of date range - File J and the first snapshot of the next day of date range - File Z
So, the files that are actually downloaded are File B, C, J, and Z
If you view all backup data, then different versions of the same folders and files appear. For example:
- My Documents,v1/Jellyfish,v2.png
- My Documents, v1/Jellyfish,v3.png
Where, v2 and v3 are the second and the third version of the same file. This means that the user has modified Jellyfish.png twice.
If you view the last backup data of users, only the latest versions of the folders and files appear. This means that you will see only one version of the folders and files. For example:
- My Documents, v1/Jellyfish,v3.png
Where, v3 is the latest version of the file.
For more information about viewing all backup data, see View snapshots of backup data.
How the cloud apps data is arranged
Arrangement of Exchange Online data
If a user with Exchange Online device is put on Legal Hold, the data is arranged in WebDAV as follows:
- Exchange Online emails are available in .eml file format. The emails are grouped based on year > month > date for ease of accessibility.
- Exchange Online calendar is available in .ics file format, in the following directory structure:
Exchange Online/Calendars/<Calendar Name>/<Calendar Name>/<Event ID>.ics
- Exchange Online contacts are available as .vcf file format, in the following directory structure:
Exchange Online/Contacts/<Contact Folder>/<Contact Folder>/<Contact ID>.vcf
Arrangement of Google Workspace data
Gmail data
If a user with Google Workspace device is put on Legal Hold, then the Gmail data is arranged in WebDAV as follows:
- Gmails are available in .eml file format, in the following directory structure:
Gmail/Mails/<Year>/<Month>/<Date>/<date_time_received-subject_of_email>.eml
Notes:
- The emails are grouped based on year > month > data for ease of accessibility.
- The subject of email can be up to 30 characters.
- If an email has multiple attachments, inSync creates an .eml file for the email and separate.eml files for every attachment after backing up the Gmail data. You can then view and access the .eml files through WebDAV.
- Contacts are available in .vcf file format, in the following directory structure:
Gmail/Contacts/<Contact Folder>/<Contact ID>.vcf
- Calendar events are available in .ics file format, in the following directory structure:
Calendars/<Calendar Name>/<Calendar Name>/<Event ID>.ics
Google Drive data
If a user with Google Workspace device is put on Legal Hold, then the Google Drive data is arranged as follows:
Google Drive/Documents/<Files>