Create a legal hold policy
Overview
Administrators with access to legal hold can create a Legal Hold policy to preserve user backup data and avoid data deletion. When you keep a user on Legal Hold, the backup data for that user is excluded from compaction. inSync does not delete the data that the user backs up from any user device. Administrators can then analyze the user data by using eDiscovery tools.
When you create a Legal Hold policy, inSync provides the following capabilities:
- Preserve the user data from endpoints such as laptops, mobiles, and cloud applications.
- Access newly-created files, modified files, and deleted files between a specific date range for the users who are on Legal Hold.
This capability helps customers reduce the amount of data that is ingested in an eDiscovery tool for processing and reviewing. This enhancement also helps those customers who continue to ship hard disk drives to external vendors or counsel for processing and reviewing.
- Add multiple custodians to a Legal Hold policy by importing a CSV file.
inSync validates and adds all the custodians with valid inSync user accounts to the Legal Hold policy. Administrators can import up to 500 custodians through a CSV file.
Note: Only administrators who have Create and manage Legal Holds right can create a Legal Hold policy.
Procedure
To create a Legal Hold policy
- Access Legal Hold. See Access Legal Hold.
- Click New Legal Hold. The New Legal Hold page appears.

- On the New Legal Hold page, provide the appropriate information for each field.
Field Description Summary Name Enter the name of the Legal Hold policy. Type Select the category of the Legal Hold. Types help you to group Legal Holds into easily identifiable categories. The following are the predefined types:
- Legal Information
- Security
- Human Resources
You can also define a custom type for a Legal Hold. If you want to create a new type, complete the following:
- Click the Type drop-down list and click +Add Type.
- Enter the name of the new type in the Name field and click Add.
- Select the new type from the Type drop-down list.
Custodians Enter Custodian's Name or Email Start typing the name of the user that you want to add to this Legal Hold and select from the drop-down list. You can add multiple users. Click Add to add the selected users to the Legal Hold. Upload CSV
Perform the following steps to add users to the Legal Hold policy by importing a CSV file:
- Under Custodians, click Upload CSV.
- Click Browse.
- Browse and select the CSV file that contains the email IDs of the users whom you want to include in the Legal Hold policy.
- Click Add.
You can add a maximum of 500 users at a time using CSV. If you want to add more than 500 users, create multiple CSV files. For example, if you want to add 1463 users, create the following 3 CSV files:
- CSV File 1 with names of first 500 users.
- CSV File 2 with names of 501 to 1000 users.
- CSV File 3 with names of the remaining 463 users.
Click Download Sample CSV File to understand the format in which the data must be in the CSV file. inSync lists the validated custodians and displays the count of invalidated custodians.
- Click Next.
- In the Additional Data Collection Settings section, select the Enable Additional Data Collection check box if you want to collect additional data for the users associated with this Legal Hold policy,
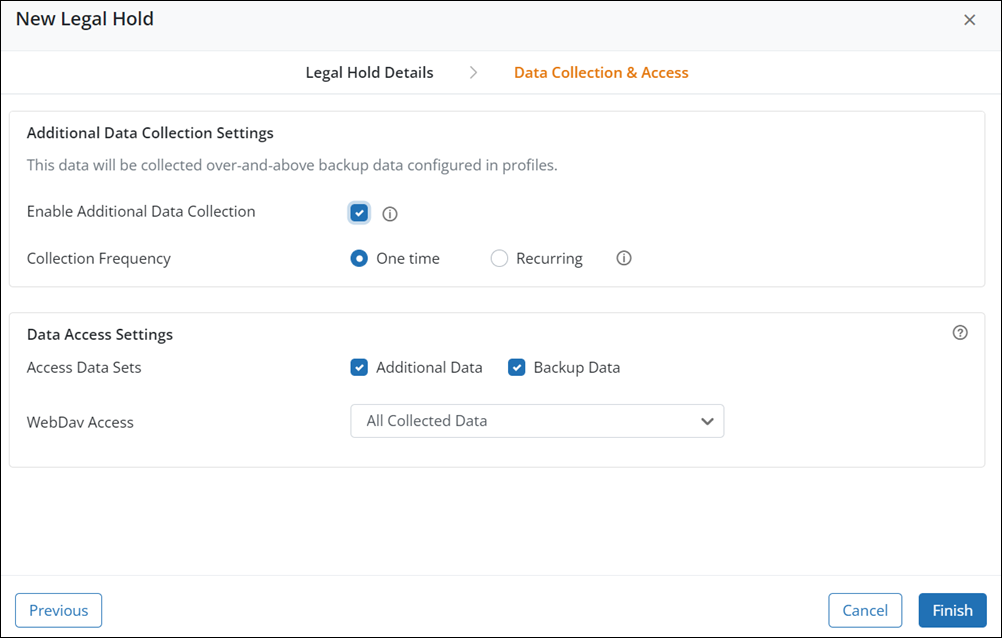
- In the Collection Frequency section, select how frequently you want inSync to collect the additional data. This field is only displayed if you select the Enable Additional Data Collection check box. Select one of the following options:
- One time: Collects data only once for each custodian associated with the Legal Hold.
- Recurring: Collects data once every day for each custodian associated with the Legal Hold. If the backup frequency for any custodian is 2 days or more than 2 days, the additional data collected is as per the backup schedule.
- Under Data Access settings, select Collected Data if you want to allow WebDav access to data backed up for each custodian. If you have selected the Enable Additional Data Collection check box, the Additional Data check box in this section is selected by default.
- In the WebDav Access field, define the kind of WebDAV access that you want to allow. The following options are available in the WebDAV Access field.
Note: Creating a Legal Hold policy does not affect what data is getting backed up.
The policy created is a view created for any administrator to view the backed-up data according to the policy's specifications.
| Field | Description |
|---|---|
| All Collected Data |
Select this option if you want to allow access to all the snapshots for all user devices. |
|
Last Collected Data |
Select this option if you want to allow access to the latest snapshots for all user devices.
|
| Data within a Date Range |
Select this option if you want to allow access to the data backed up in a specific date range. In the Date Range fields, select the start date and the end date for accessing the Legal Hold data. By default, administrators have access to all collected data. If you want administrators to access only deleted files, select the Include Deleted Files Only check box. |
-
Click Finish.