How to search backed up files
The availability of this feature may be limited based on the license type, region, and other criteria. To access this feature, contact your Druva Account Manager or Druva Support.
Overview
Using the Federated Search capability, administrators can quickly find end-user files that are backed up by inSync. You can search for files by file name or checksums.
Following is a list of metadata attributes that inSync indexes for files:
- File name
- File SHA1 hash
Search files by filename
Procedure
- Click the
icon to access the Global Navigation Panel and select Federated Search . The Federated Search page is displayed.
- Enter a part or the entire filename of the file in the search box.
Use the filters and search operators available for file search to narrow down your search results. Start typing a filter value in a filter and inSync will auto-suggest the values that match your string.
- inSync only supports filename as a search query for files. For example, if you want to search "employee reports.txt" file, enter "employee reports" in the search box and select .txt in the File Type filter.
- If you have not selected the Match exact words filter, then all words in the search query should at least contain 3 characters. For example, "em" or "employee re" are invalid search queries whereas "emp" or "employee rep" are valid search queries.
- Search for filenames with special characters is not supported.
The filters available for file search are described in the table below.Filter Name Description File Types Specify a particular file type that you want to search. The file type should be in the following format:
.<file type>
For example, if you want to search PDF files, specify .PDF.
Time Modified Specify a date range to list files modified between the selected dates. For example, when you enter 3 March in the From field and 8 April in the To field, inSync searches files modified between 3 March, 12:00 am to 8 April 11:59 pm. File Size Specify the file size limit to filter files that fall in the desired size limit. File size can be specified in KBs, MBs, and GBs. Data Source Specify a particular data source where you want to search files. Profiles Specify a profile to search files created by users associated to a particular profile.
Legal Holds
Note: This field is displayed only when you access Federated Search as a Legal Administrator.
Select the Legal Holds that you want to search. You can select multiple Legal Holds.
Users Specify a user to search files created by a particular user. Custodians
Note: This field is displayed only when you access Federated Search as a Legal Administrator.
Select the custodians whose backed up data you want to search.
Match exact words Select this check box if you want inSync to match the exact words of your query. For example, if your search query contains 2 characters, select this check box. -
Click the Search icon.
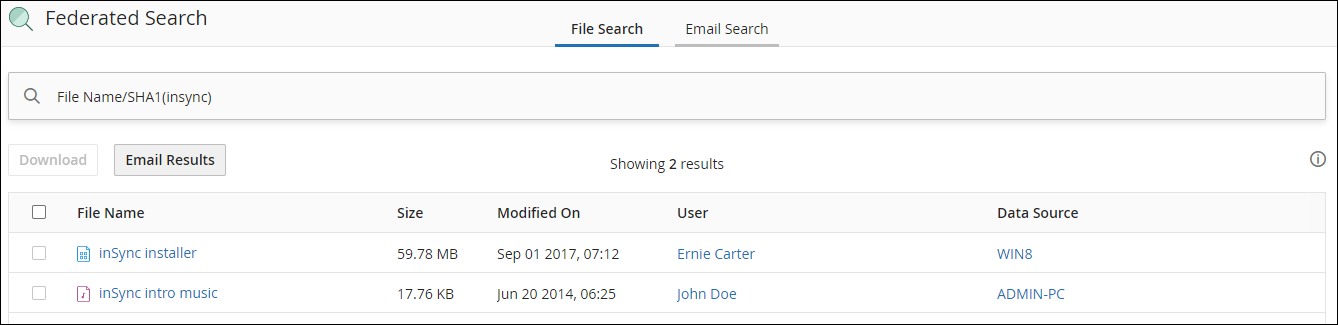
inSync displays a list of files that match your search criteria.
Search files using checksums
inSync allows you to search for files using SHA1 checksums. Checksums can be generated using the command line or third-party tools.
Note: SHA1 checksums-based search is not supported for files backed up via Linux devices.
For Mac OS, use the following command to generate SHA1 checksum:
shasum /<path_to_file>/filename
For Windows OS, you can generate SHA1 checksums by using third-party tools such as the Microsoft File Checksum Integrity Verifier. Refer the documentation of the third party tool you are using for more information on how to generate checksum for a file in Windows OS.
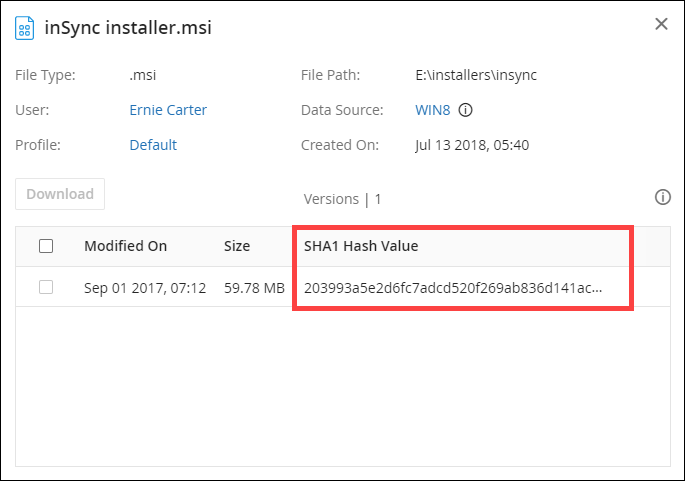
inSync also displays the SHA1 checksum of a file in the search results.
To view the SHA1 checksum of a file
- In the search results, click the file name. In the dialog box, the version(s) of the file is displayed along with the SHA1 hash value.
Procedure
To search for files using checksums
- Click the
icon to access the Global Navigation Panel and select Federated Search . The Federated Search page is displayed.
- Enter the checksum of the file that you want to search in the search box in the following format:
checksum:<SHA1>

- Click the Search icon.
inSync displays a list of files that match your search criteria.
Search files without a file name or SHA1 hash value
This functionality is available only for customers on-boarded after July 13, 2019.
Federated Search enables you to search for files using different file parameters such as size, extension, created time, modified time and so on. This is useful when you don't know the name of the file or the SHA1 hash value of the file but are aware of any of the file parameters. You can use one or a combination of the following parameters to search a file in inSync:
- File Type: Enter the extension name of the file or select the extension name from the drop-down list. You can search for different extension types such as txt, png, mp4, and so on.
- File Size: Define the range of the size of the file.
- Time Modified: Enter the period when the file was modified.
- Time Created: Enter the period when the file was created.
- Data Source: Select the data source where the file resides.
- Profiles: Select the profile that is associated with the user who owns the file.
- Users: Select the user who owns the file.
Download Files
You can download all the files (and any version of a file) that are displayed in the search results for offline review or to ingest the files into a third-party tool and scan the files for review and analysis.
When you download files, inSync does not create an entry in the admin audit trail.
To download files
- Search for the files that you want to download.
- Select the files that you want to download and click Download File.
Latest version of all the selected files are downloaded in a compressed file format. Following is the file naming convention of the downloaded file:
SearchResults-<Date stamp>, <Time stamp>.<file extension of the compressed file format>
To download a particular version of a file
- Search for the file.
- Click the file name. A dialog box opens and all the file versions are displayed with the latest version at the top of the list.
- Select the versions that you want to download and click Download. Selected versions of the files are downloaded in a compressed file format.
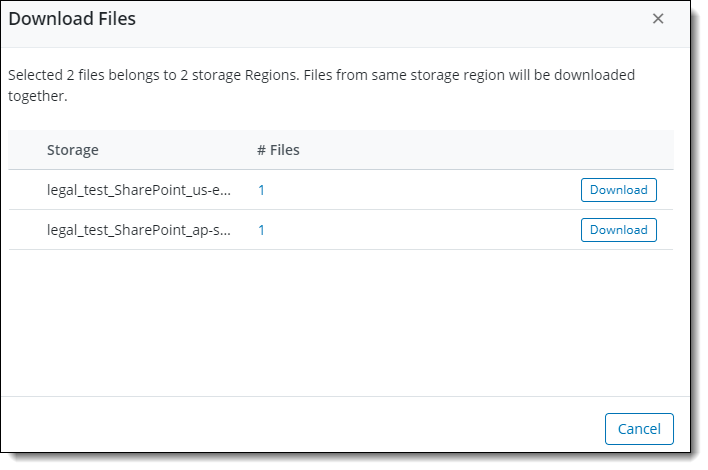
For SharePoint Online files
This is applicable if the Multi-Geo feature is enabled for your tenant.
When you select multiple SharePoint files for download, files that belong to the same storage regions are grouped and downloaded together. Files with the same storage region are combined and the count of the files is displayed. You can select and download all the files for a specific region together.
Delete Files
Use the Federated Search capability to find and delete malicious or sensitive files from the data source or from both, data source and snapshot. You can delete files only if you are using inSync Elite license edition. For detailed information on file deletion, see Defensible Deletion of Files and Emails.
Procedure
- Search for files by filename or checksum.
- Select the files that you want to delete.
- Click more options, and then click Delete. You can choose to delete the files only from the data source or from both data source and snapshot.
- Delete from Data Source: With this option selected, all the versions of the selected files are deleted immediately from the active data source (Device or SaaS Apps). However, all the versions of these files continue to reside in the snapshot (Storage Database) and will be available for search, indexing, and backup. You cannot delete files for inactive or disabled data sources and the files that belong to users on legal hold.
- Delete from Data Source and Snapshot: With this option selected, all the versions of the selected files are deleted immediately from the active data source (Device or SaaS Apps) as well as the snapshot (Storage Database). Files will not be available for search, indexing, and backup. You cannot delete files for inactive or disabled data sources, the files that belong to users on legal hold, and the files within data sources for which Data Lock is enabled.

- Click Delete again in the confirmation message.
- You cannot undo a file delete action.
- When you select a file and click Delete, the selected file is scheduled for deletion. It may take a few minutes for the delete action to complete and for the search results to update the list of deleted files. After a few minutes, if you still see the deleted file in search results, we recommend you check the admin audit trail to view details.
- With the Delete from Source and Snapshot option, you cannot delete:
- Files for inactive or disabled data sources
- Files that belong to users on legal hold
- Files within Data Sources for which Data Lock is enabled
Quarantine Files
While going through the search results, if you learn about a non-compliant file, now you can use Federated Search to find all possible matches of that file and quarantine them.
inSync moves the quarantined files to the Quarantine Bay so that inSync Client users cannot access the file or any of its previous versions present in the snapshots. During the quarantining process, you can also choose to delete the non-compliant files from their data sources. This ensures that you meet regulatory requirements of retaining copies of the file in snapshots and eliminate the risk of the non-compliant data being shared across other users in the organization.
- Only inSync Cloud administrator can quarantine files.
- You can quarantine a maximum of 8000 files per user.
- Quarantined files do not appear in search results.
- Administrators can only download quarantined files. You cannot restore quarantined files. End users can restore or download the quarantined files through inSync Web or inSync Client. However, the restored or downloaded file is blank and displays zero data.
Procedure
- Search for files by filename or checksum.
- Select the files that you want to quarantine.
- Click more options, and then click Quarantine.
- (OPTIONAL) If you want to immediately block access to the file, you can choose to delete the file from the data source.
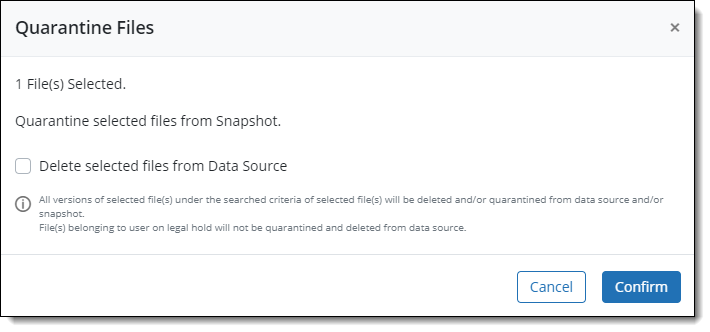
- Click Confirm.
inSync quarantines the file and all previous versions of the file and also creates an entry in the admin audit trail for this action. An audit trail entry is also created if the quarantine fails. The successfully quarantined files are listed on the Quarantine Bay page. From here, you can download the file for detailed inspection and also delete the file if it's found to be malicious.
Note: You can quarantine a maximum of 8000 files per user. Assume for user X, you quarantine 4500 files once and then quarantine another 4500 files. As you have a total of 9000 files scheduled for quarantine, inSync will quarantine only 8000 files for user X.
However, after you complete the required inspection of the file, if you find that the file does not pose a threat, you can un-quarantine the file. This will enable users and administrators to access the file and download or restore it.
Procedure to Un-Quarantine a file
- On the inSync Management Console, click Data Governance > Federated Search, and then click Quarantine Bay on the left pane.
The list of quarantined files is displayed. - Select the file that you want to un-quarantine, and click Un-Quarantine.
The file is removed from the quarantine bay and an entry is created in the admin audit trail for this action.
Email Search Results
The search results show a maximum of 1000 results that match your search query. inSync displays the search results progressiuser-baseding the search results while scrolling. Using the Email Result option, up to 20,000 search results in CSV format can be sent to the email address of the Administrator who is logged in.
Procedure
- Search for files by filename or checksum.
- Click more options, and then click Email Results. The search results are emailed to you in CSV format.
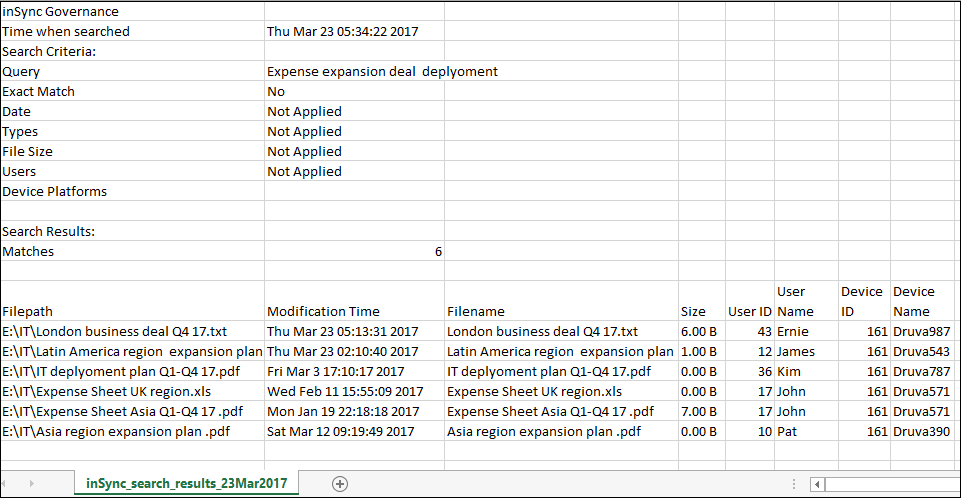
The fields in the CSV file are explained in the following table.
| Filter Name | Description |
|---|---|
| Time when searched | Displays the date and time stamp when the search query was run. |
| Query | Displays the search query that was entered. |
| Exact Match, Dates, Types, Files Size, Users, Device Platforms | Each filter is represented in a separate line and it displays the value that you used for each filter. If you have not applied a particular filter then, it displays Not Applied beside that filter name. If you have applied a filter, then the value of the filter is displayed beside the filter name. |
| Matches | Displays a numeric value of the number of search results that matched your search query. |
| Filepath | Displays the path where the file is located. |
| Modification Time | Displays the time when the file was last modified. |
| Filename | Displays the name of the file that match your search result. |
| Size | Displays the file size. |
| User ID | Displays the unique ID for the user. |
| User Name | Displays the name of the user that is associated with the User ID. |
| Device ID | Displays the unique ID of the device. |
| Device Name | Displays the name of the device where the file is stored. |
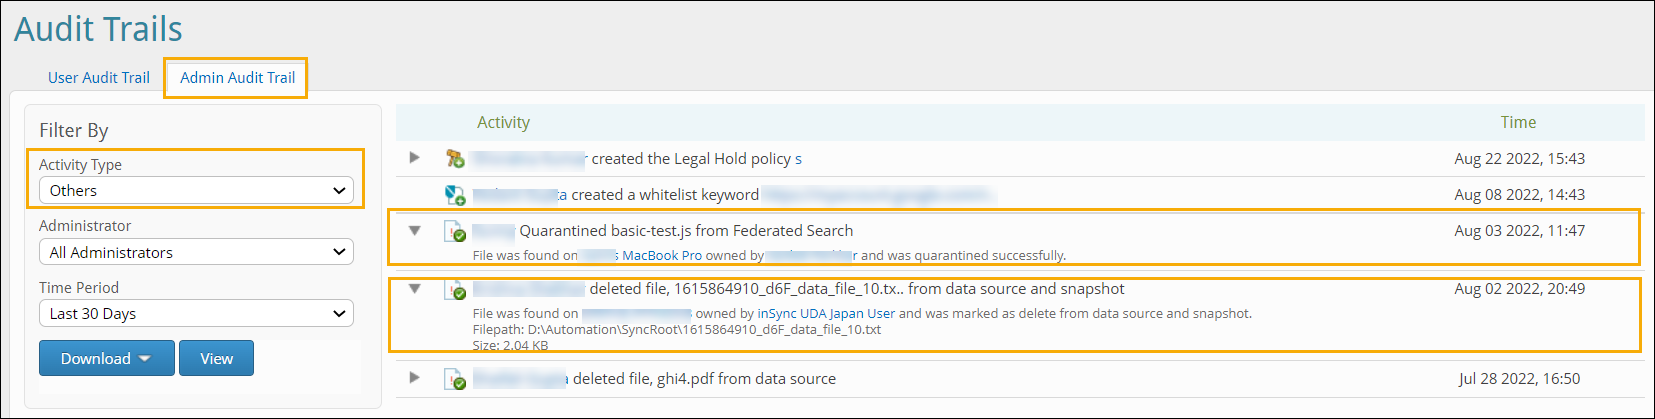
Admin Audit Trails for troubleshooting
For any of the quarantine and delete actions on files, inSync the creates an entry in the admin audit trail for them. An audit trail entry is created for both success and failure quarantine and delete actions. To view the details, click Federated Search > Audit Trails > Admin Audit Trail. Select Others as the Activity type to fetch Federated Search audit details.

Search for users by legal admin
Legal admin must be assigned to a custom role that has a combination of Legal Hold Management rights > View Legal Hold, Data Governance > Access Federated Search plus any one or all of the following rights - User Management, Deployment Management, Profile Management, Backup and restore management, Data Governance, Alerts and Reports Management, CloudCache Management. Legal administrators get access to profile(s) assigned to them by the cloud administrator and can search and view details of all users mapped to those profile(s) in addition to legal hold users.
If the legal admin has extended rights, they can search and view details of all users mapped to the assigned profile(s) in addition to legal hold users.
Procedure to search and view all users
- From the global navigation bar, click Federated Search. The File Search tab appears.
- Search for files by filename or checksum. Select the Data Source as per your requirement. For example, Devices.
- Select the All Users option if you want to search and get a view of all users including users on legal hold.
- Select the profile from which you want to fetch the users. This field is displayed only for Devices and supported user-based SaaS Apps.
- Enter the user names whose details you want to view. Click Search.
Procedure to search and view only legal hold users (Custodians)
- From the global navigation bar, click Federated Search. The File Search tab appears.
- Search for files by filename or checksum. Select the Data Source as per your requirement. For example, Devices.
- Select the Users on Legal Hold option if you want to search and get a view of only users put on legal hold.
- Select the legal hold policy from which you want to fetch the users.
- Enter the custodian names whose details you want to view. Click Search.
The cloud and legal administrators cannot search and view users and their data if user Data Privacy settings are enabled.