Ransomware Recovery for Servers
Introduction
The risk of a cybersecurity failure is no longer limited to the reputation of a company, or something to be borne by its customers, but is an existential risk to the company itself. Ransomware extorts the business with the one universal thing all businesses value – their own data. Needless to say, you need to be well prepared for this danger.
In this article, we will help you understand how Ransomware Recovery by Druva can help save the day in case you are unfortunately attacked by ransomware.
In case of an infection, to quarantine is to isolate the infected parts in order to contain the infection and not allow it to spread. To this effect, Ransomware Recovery enables you to quarantine infected snapshots on the impacted resources, which helps safeguard your system from further infection by barring users or administrators from downloading or restoring data to other resources.
To reduce downtime and loss of productivity, you can restore the data from the latest secure snapshot that you deem safe and get the resource operational again.
Here's how you can use Ransomware Recovery to quarantine infected snapshots in the following ways:
- Manually search for the impacted resource and quarantine the infected or all the snapshots.
- Integrate Ransomware Recovery with third-party security and incident response solutions and automate the response to quarantine the resources using Ransomware Recovery APIs.
Ransomware Recovery for Servers supports only NAS Shares and Windows/Linux file servers.
Know the impact of quarantining
- After you quarantine snapshots, access to the quarantined snapshots is blocked for the administrators and the users of that resource.
- Administrators and users cannot download data or restore data from the quarantined snapshots.
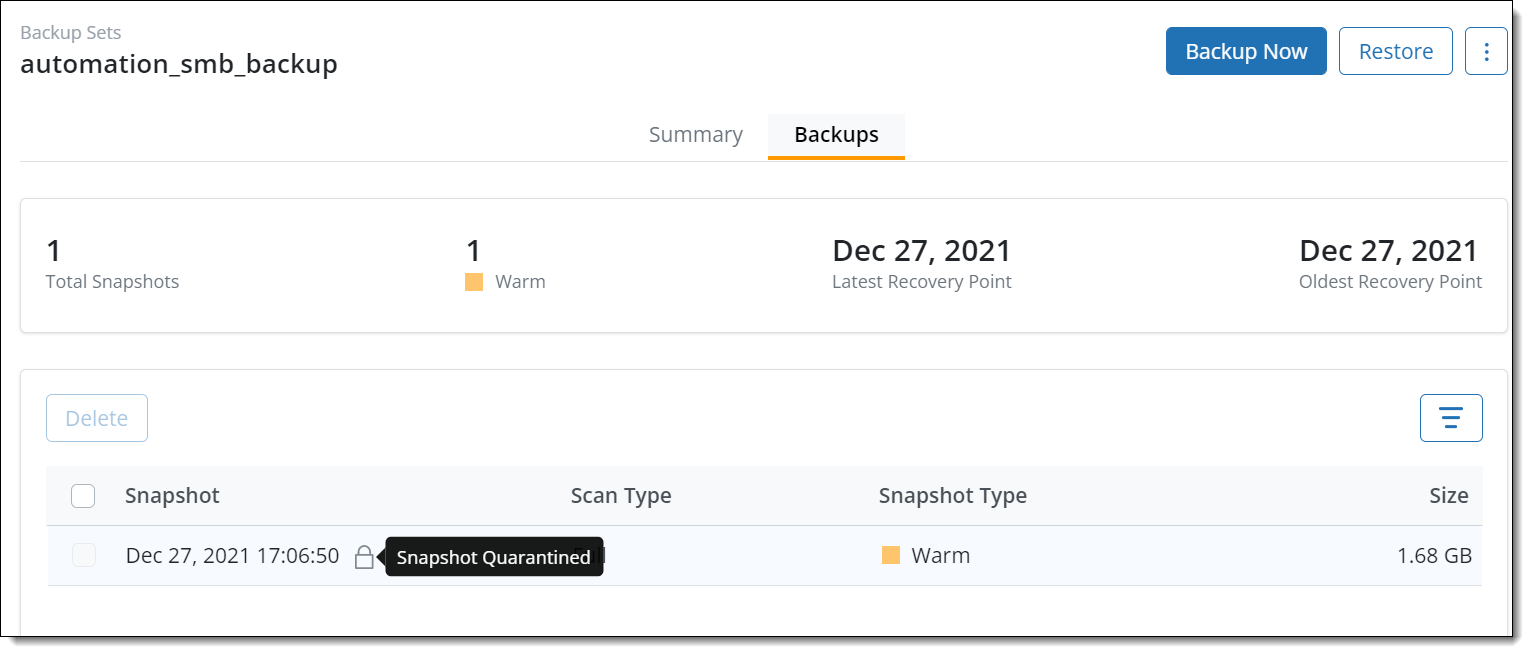
You can identify quarantined snapshots by the ( ) icon displayed beside the snapshot creation timestamp in the Restore Data window.
The data in the unquarantined (clean) snapshots of the resource are still accessible and can be viewed, downloaded, or restored by administrators.
Decide your approach
Druva enables you to set up your response to the Ransomware Recovery. You can either manually quarantine snapshots on an impacted server or automate the quarantine process by integrating with third-party security and incident response solutions using Ransomware Recovery APIs.
Manually quarantine infected snapshots
The manual way of quarantining the snapshots on a resource is helpful when you get to know about an impacted server from a trusted source such as the server administrator himself or alerts raised by your security infrastructure and antivirus software about a potential risk.
Prerequisites
Identify the potential date when the resource was infected by ransomware. It helps you decide from which date onwards you want to quarantine the snapshots on the resource.
Note: If you are unaware or not sure about the date, you can start quarantining the snapshots of the impacted resource from the current date or from January 6, 2020, a system-defined limit, before which you cannot quarantine snapshots in Druva.
You can always talk to the people in your organization whose servers are impacted and track their potential activities such as the files they downloaded or interacted with on a particular day that infected the server.
Choose the best way to quarantine the resource
You can manually quarantine servers using any of the following available methods -
- Search and then quarantine a resource - Use this option when you want to search for an impacted resource, identify the snapshots, and then take quarantine action on the snapshots. To use this option, see Search and quarantine a resource.
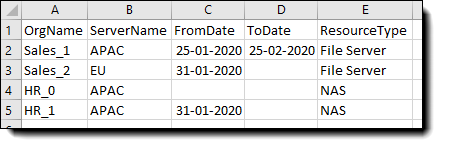
- Quarantine resources in bulk using CSV - Use this option when you have to quarantine multiple servers and have the following information available with you to save on your efforts -
- Organization Name - The name of the organization that contains the server that you want to quarantine.
- Server Name - Name of the server that you want to quarantine.
- From Date - The date from which you want to quarantine the snapshots, in the YYYY-MM-DD format. This should be the date on which the server was impacted. If you do not enter a date, Druva will start quarantining all snapshots of the server from January 6, 2020.
- To Date - The date till which you want to quarantine the server, in the YYYY-MM-DD format. If you want to quarantine snapshots in a specific time period, enter the date till which Druva should quarantine snapshots. If you do not enter a date, Druva will keep quarantining snapshots indefinitely.
To use this option, see Quarantine snapshots in bulk using CSV. - Resource Type - The server type such as File Server or NAS.
Search and quarantine a resource
Use this option when you want to search for a server, identify the snapshots, and then quarantine it.
Procedure
- Log in to Druva Cloud Platform (DCP) Console.
- On the DCP Console dashboard, under Cyber Resilience, click the Ransomware Recovery service.
- On the left pane, click Quarantine Bay to view a list of all quarantined resources.
- Click Add Resources > Find Resources. Select Files (File Server and NAS) as the resource type.
- Search for the impacted servers. You can search for servers using either one or a combination of the Organizations, Workload Type, and Workload Name.
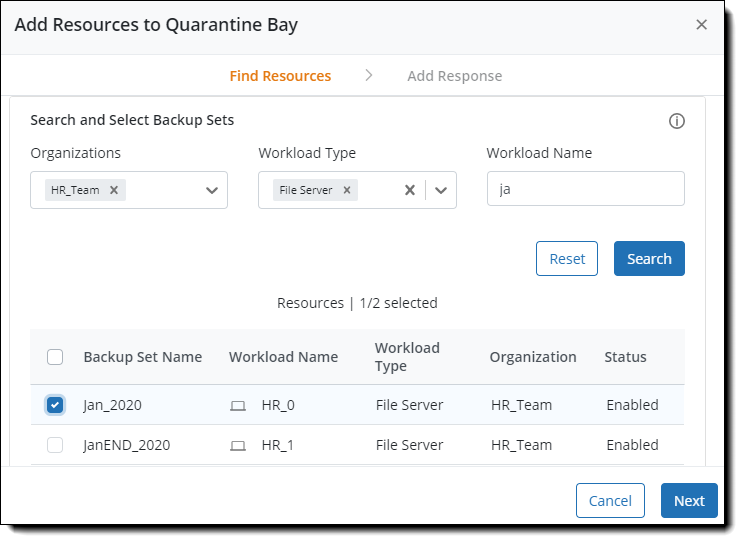
- Select the servers on which you want to quarantine the snapshots and click Next.
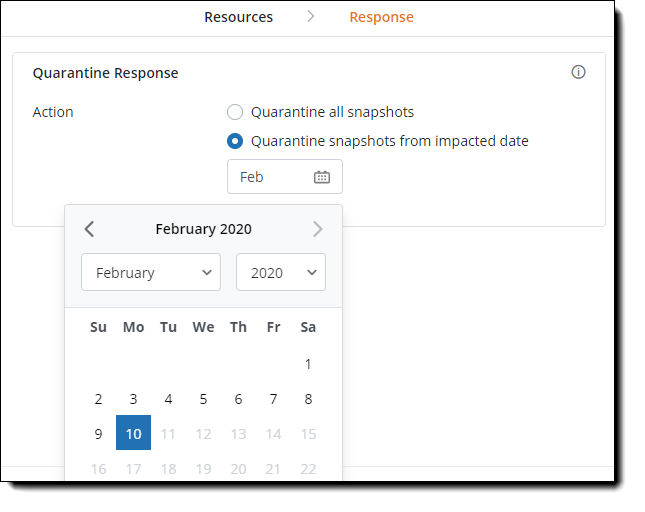
- On the Quarantine Response page, select one of the following based on the information available with you -
- Quarantine all snapshots from the impacted date - Choose this option only if you are sure about the date when the resource was impacted. If you are not sure about the date choose the next method, Quarantine all snapshots.
When you choose - Quarantine all snapshots from the impacted date - you can specify a particular date from which you want to quarantine all the snapshots. Druva will keep quarantining all the snapshots formed on the server due to Druva backups. Select a date from which you want to mark all the snapshots as quarantined.- You can select snapshots for quarantine not earlier than January 6, 2020.
- Druva uses UTC timezone to quarantine a resource. You must factor in the difference between the server time zone and UTC zone while selecting the dates.
- Quarantine all snapshots - Choose this method to quarantine snapshots if you are not sure about the exact date when the resource may have been impacted. When you choose - Quarantine all snapshots - Druva will quarantine all the snapshots after January 6, 2020 (a system-defined limit) and keep quarantining all the snapshots formed on the server due to Druva backups.
- Quarantine all snapshots from the impacted date - Choose this option only if you are sure about the date when the resource was impacted. If you are not sure about the date choose the next method, Quarantine all snapshots.
7. Click Finish.
Druva starts quarantining the snapshots from the mentioned date and also quarantines the snapshots created as part of the regular Druva backups. See What's next to take the suggested course of action.
Quarantine snapshots in bulk using CSV
Use this option when you want to quarantine snapshots for multiple servers.
Procedure
- Log in to Druva Cloud Platform (DCP) Console.
- On the DCP Console dashboard, under Cyber Resilience, click the Ransomware Recovery service.
- On the left pane, click Quarantine Bay to view a list of all quarantined resources.
- Click Add Resources > Import CSV. The Import from CSV dialog box appears.
- Download the sample CSV file.
- Open the CSV file and provide the following information in the required format:
- Organization Name - The name of the organization that contains the server that you want to quarantine.
- Server Name - Name of the server that you want to quarantine.
- From Date - The date from which you want to quarantine the snapshots, in the YYYY-MM-DD format. This should be the date on which the server was impacted.
If you do not mention any date, Druva will start quarantining all snapshots of the servers from January 6, 2020.
- Resource Type - The server type such as File Server or NAS.
- To Date - The date till which you want to quarantine the server, in the YYYY-MM-DD format. If you want to quarantine snapshots in a specific time period, enter the date till which Druva should quarantine snapshots.
If you do not mention any end date, Druva will keep quarantining snapshots indefinitely.
- Save the CSV.
- On the Import from CSV dialog box, select the CSV file and click Import.
After the validation of CSV, Druva starts quarantining the snapshots on the servers of the organizations mentioned in the CSV.
You have successfully quarantined the infected resources, which will now help contain the ransomware attack. Refresh the Quartine Bay > Servers page to view the quarantined list of servers.
What’s next?
Now that you have now quarantined the infected snapshots, you might be wondering what to do next? You can take the following actions to contain the ransomware and bring up the resource to resume productivity.
We highly recommend that you work with your Data Security and IT teams to take appropriate steps to resolve such a situation.
- Exclude the suspected file types from being backed up. Once you identify the name, file type, file extension, of the ransomware, you can exclude those file types and restrict them from being backed up from other servers.
- Share the impacted server data with the Data and Information security team of your organization for further analysis of the infected data and the server.
- Allocate a new server to the user. When you are replacing the infected server with a new server, you can restore the last clean snapshot to the new server during using Restore To Alternate Location option. Once you replace the server, ensure that you unquarantine future snapshots of the impacted server. Otherwise, Druva will keep quarantining the snapshots even in the new server. To unquarantine a resource, see Unquarantine a resource.
Unquarantine a resource
After you have completed the required inquiry into the impacted resources with the help of your Data Security and IT teams, you may find that some resources were falsely marked as ransomware impacted. In this case, you might want to remove the resource and the snapshots from the quarantined state and mark it as clean!
After you unquarantine the snapshots, Druva administrators and users can again securely restore and download data from those clean snapshots resulting in no loss of data.
Procedure
- Log in to Druva Cloud Platform (DCP) Console.
- On the DCP Console dashboard, under Cyber Resilience, click the Ransomware Recovery service.
- On the left pane, click Quarantine Bay > Servers.
- Select the resource that you want to remove.
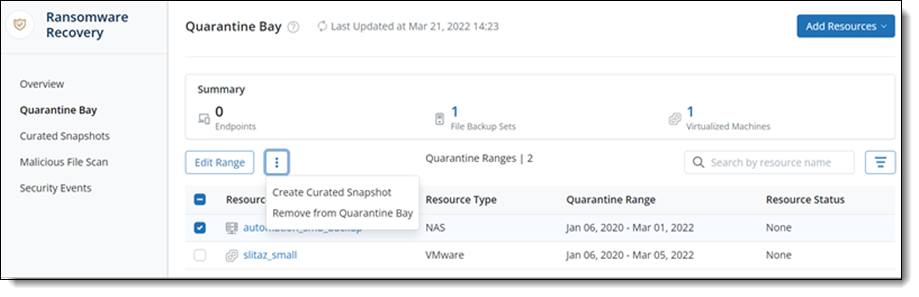
- Click more options > Remove from Quarantine Bay.
Once removed, users and administrators can access the data in the unquarantined snapshots and can download and restore it.
Delete infected snapshots of a resource
You cannot delete snapshots of a resource if Data Lock is enabled for that resource in the backup policy.
You might have to clean the existing server or provide a new server to the user after your Data or Information Security teams have completed their analysis on the impacted server.
After receiving access to the new server, the user can restore the last clean snapshot of the old server. Once the restore activity is complete, you can delete the infected snapshots of the server.
Snapshot deletion is an irrecoverable activity. You cannot access and recover any data from the deleted snapshots. The deleted snapshots are not displayed in the Restore Data window in the DruvaManagement Console.
Procedure
- Log in to Druva Cloud Platform (DCP) Console.
- On the DCP Console dashboard, under Cyber Resilience, click the Ransomware Recovery service.
- On the Overview page, click Quarantine Bay > Servers.
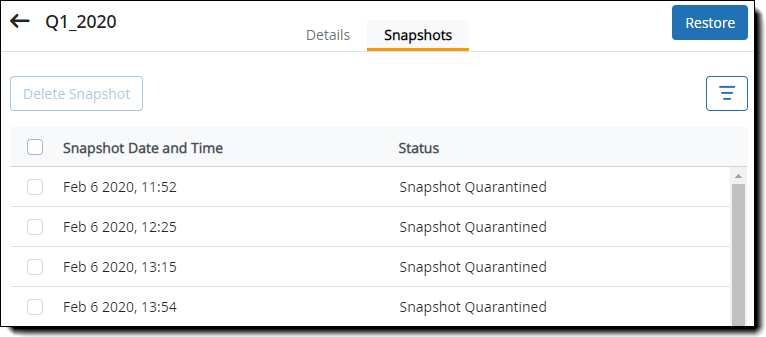
- Click the resource name to view the snapshots of that resource.
- Click the Snapshots tab. The list of all the infected snapshots is displayed.
- On the Confirm Deletion confirmation pop-up, specify the reason for deletion (the reason is mandatory with a character limit between 10-150) and then click Delete. Data once deleted cannot be retrieved. The reason for deletion will be captured in the Audit Trail for auditing purposes.
Note: In the case of deleted backupsets, you cannot view the quarantine range for those backupsets. However, you can retrieve the deleted backupsets and view their quarantine range with the Rollback Action option.
Automatically quarantine infected snapshots using APIs
You can use APIs to integrate Ransomware Recovery with your existing security tools or build custom scripts to automatically take action if there is a ransomware attack.
Here are a few links to help you get started:
- To learn more about Druva APIs, visit our developer portal.
- See the Ransomware Recovery APIs to try out the APIs that we offering to make your organization more secure.
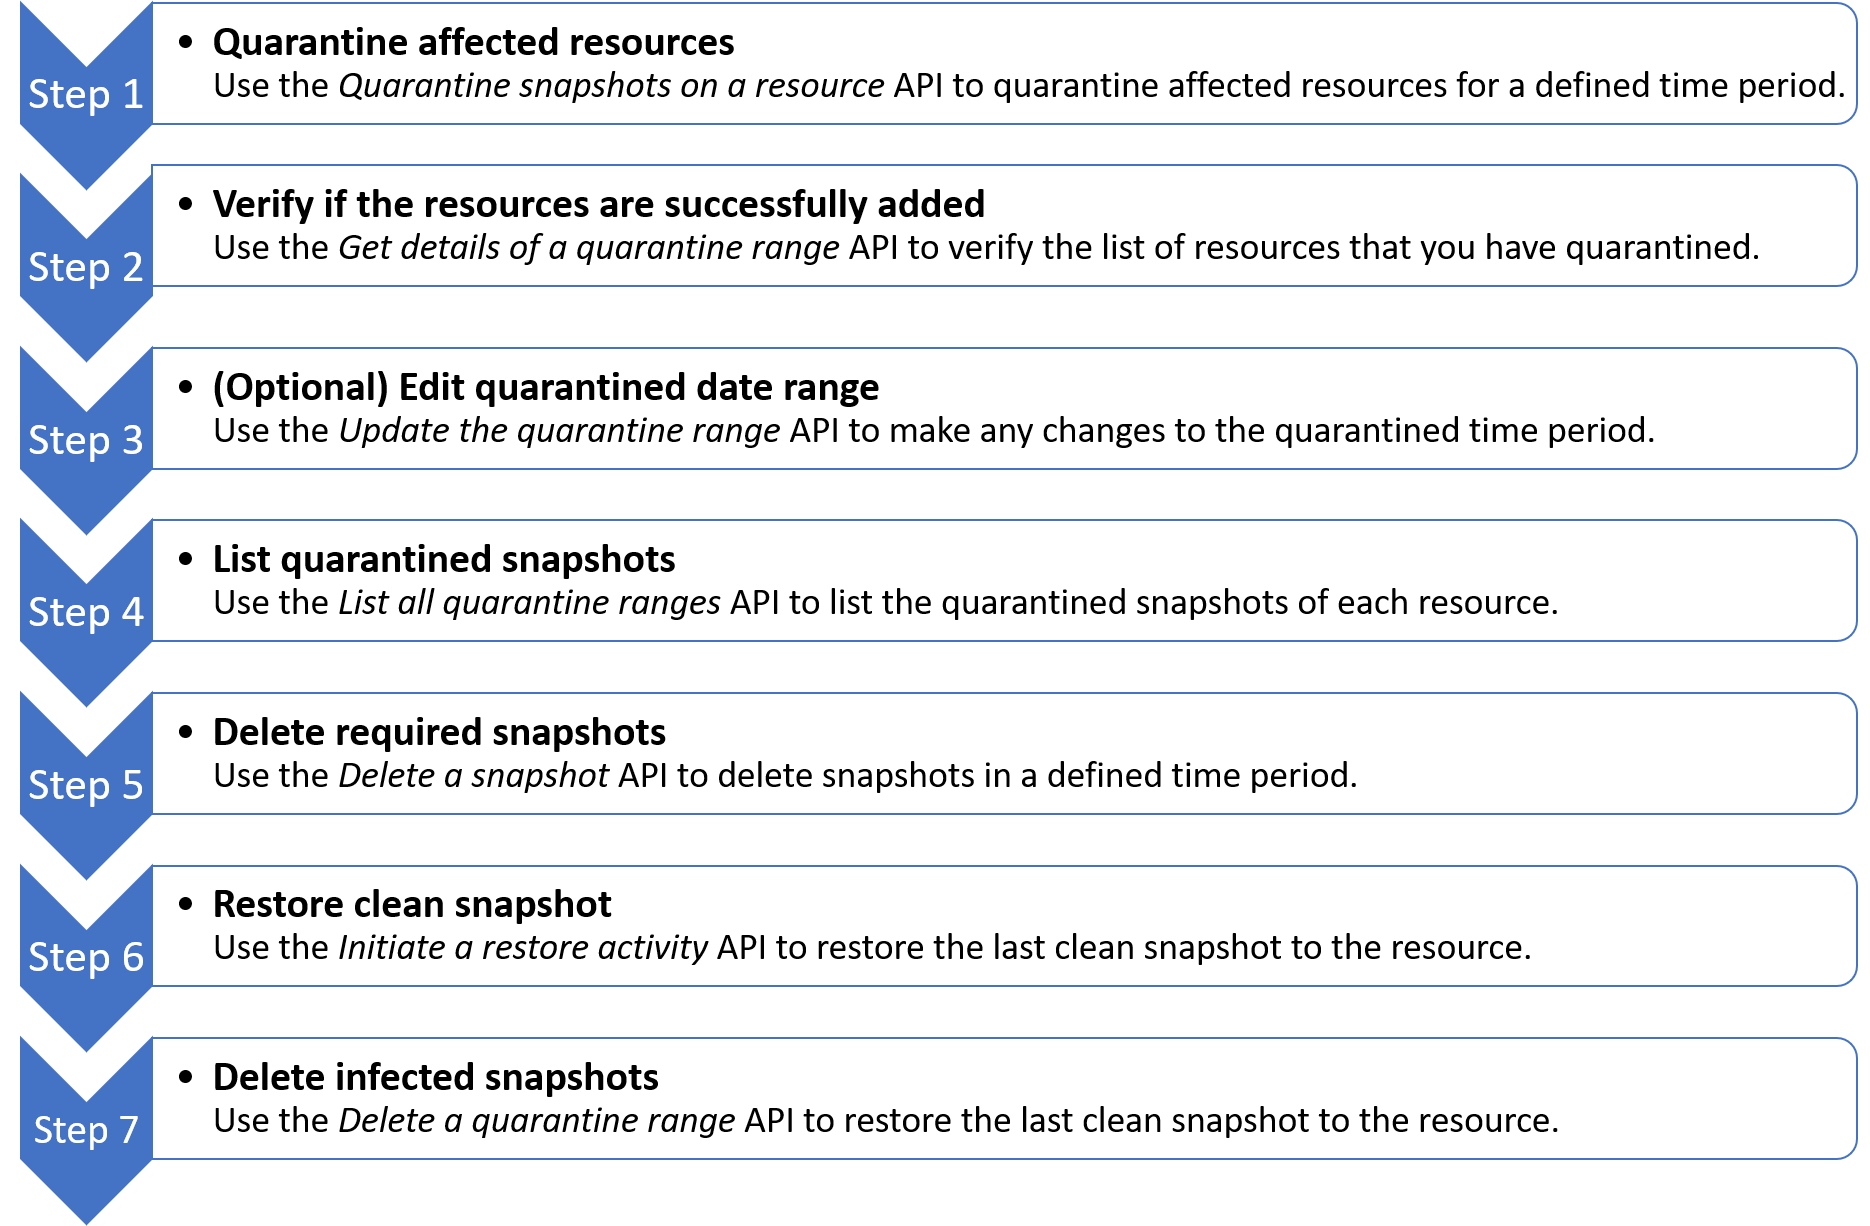
The following is a probable workflow if you know the IDs of the infected servers and the date of infection and want to quarantine snapshots using APIs.