Reports
Druva CloudRanger provides an end-to-end reporting functionality that allows you to generate and customize cross-account Reports on Backup and Restore status, Schedules, and Disaster Recovery Plans across AWS accounts.
Reports provide historical data for analytics and monitoring of your backup environment. You can instantly generate and view a report, export it in PDF or CSV format, or subscribe to a report and get them delivered on a specified date and time.
The Reports subscription functionality allows users to generate and manage subscriptions to the following reports:
- Resource Schedule
- Resource Restore Status
- Resource Protection Status:
- Resource Backup Status
- Licensing
- EC2 Credit Storage Consumption
- DR Plan
- AMI Deletion
To generate and view Reports, click Reports from the top menu bar:
Note: Administrators with Admin View or read-only access can also generate and subscribe to reports from the management console.
- If you are provisioned with Org Admin view privileges, you can generate and download reports for all AWS accounts within that organization.
- If you are provisioned with Group Admin view privileges, you can generate reports for only those AWS accounts to which you have view access.
|
Responsibility |
Org Admin |
Org Admin (view) |
Group Admin |
Group Admin (view) |
|---|---|---|---|---|
|
Generate and email reports |
 1 1 |
1 |
2 |
2 |
|
Subscribe to reports |
1 |
 |
2 |
|
Note:
- 1 All accounts within an Organization
- 2 Account-level access only
Report Types
Druva CloudRanger Reports allows you to generate and manage subscriptions to the following reports.
Resource Schedule Report
This report provides a summary of resource schedule status, allowing administrators to view scheduled resources across AWS accounts.
This detailed report provides the organization-level information on Resource Name and Type, Region, Druva CloudRanger Account, the associated Schedule Name, the Action scheduled, and current Status.
Resource Restore Status Report
This report provides administrators a summary of the resource restore status across AWS accounts managed on Druva CloudRanger.
This report provides the following information:
- Summary of resources categorized by Resource Type and Region.
- Total restores that were Successful and that Failed.
- Detailed report with information on Backup Type and ID, Druva CloudRanger Account, Resource Type, Restore Type, location Restored To, the Restore Status with Timestamp, and Restored By (the user who initiated the restore).
Resource Protection Status Report
This report provides a summary of resource protection and backup status, allowing administrators to identify those resources in their Druva CloudRanger accounts that are protected.
This report provides the following information:
- Summary of Total Resources and Protected resources categorized by Resource Type.
- Detailed report with information on Resource Name and Type, Region, Account, Protection Status, Last Backup Status, as well as Backup Start Time and End Time.
Resource Backup Status Report
This report provides a summary of resource backup status, allowing administrators to understand the recurring backup status of resources. This report only displays information on resources that are backed up on Druva CloudRanger.
This report provides the following information:
- Summary of resources categorized by Resource Type and Region.
- Total Backups that were Successful and that Failed.
- Detailed Report with information on Resource Name and Type, Region, Account, Backup Policy associated, Backup Start Time and Finish Time, Status, as well as the Backup Type and Size (in GB). The report also displays information on backup copies stored across regions or accounts under the Is Copy column, based on whether the Additional Copies field is enabled on the associated backup policy.
Licensing Report
Organizations can now control and monitor their license consumption with the new Licensing report to ensure that the utilization is within their subscription limits.
The Licensing report provides administrators a summary of the license utilization across all AWS accounts at the organization level and can only be generated as a monthly report.
Note: The Licensing report is an organization-level report that is generated across all AWS accounts. To subscribe to the Licensing report, navigate to the Subscription tab, define the Schedule, and then select All Accounts under the Report tab.
- ►Sample report
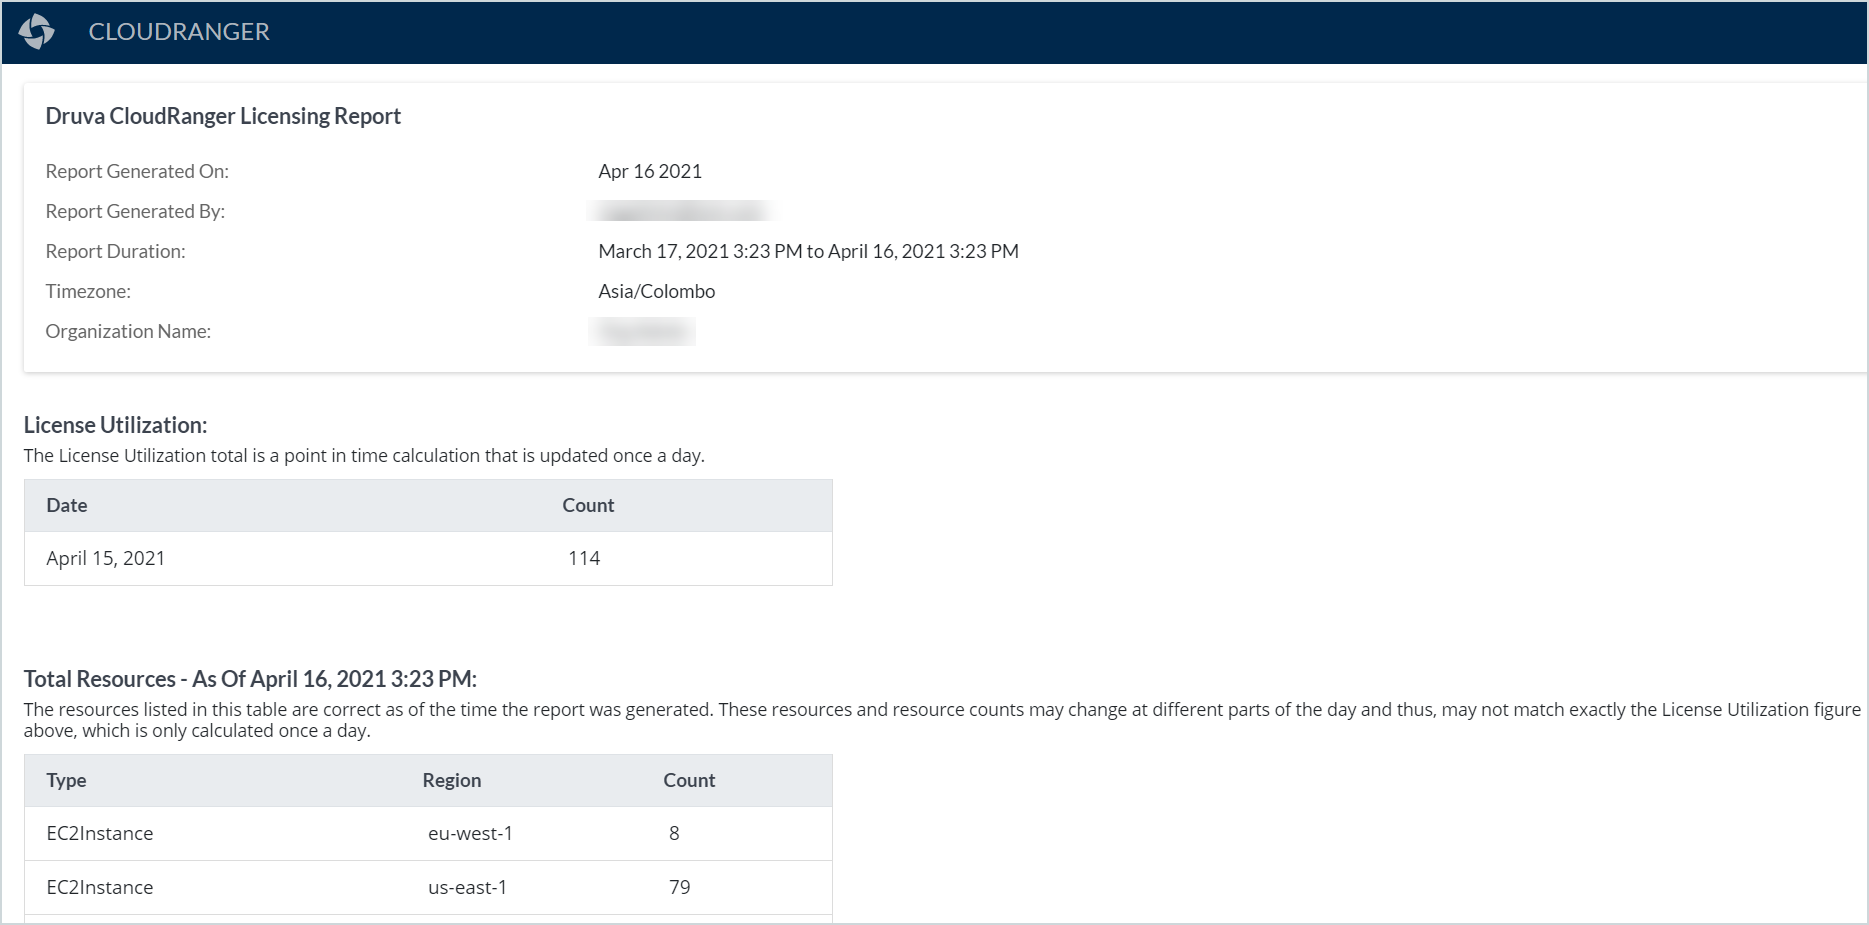
The Licensing report provides the following information:
- Summary of License Utilization, the point-in-time licenses utilized updated once a day.
- Summary of Total Resources that are considered towards License utilization, categorized by Resource Type, Region, and License Count.
Note: The resource counts displayed are calculated at the time of report generation, and might change during the course of the day. Consequently, the counts displayed here may not match the License Utilization, which is a point-in-time calculation that is updated once a day.
- Detailed Report on Unique Resources including information on Resource ID and Type, Region, and Account name.
For more information on licensing, see License Utilization.
EC2 Storage and Credit Consumption Report
The Storage and Credit Consumption report offers insights into the backup-wise storage and credit consumption for individual EC2 resources in an organization. The report provides information on consumption at the resource level, with associated details on backup and disk usage, estimated credit consumption, and the LTR savings within the chosen period. The report offers insights into the status of each storage consumption job run for each resource, based on which you may analyze your consumption and initiate appropriate action.
When generating the EC2 Storage and Credit Consumption report, you may specify AWS Tags as part of the report definition criteria. Tags are key and value pairs that act as metadata to help identify and organize your AWS resources. Based on the Key selected, you will need to specify the appropriate Value. For example:
Key: Environment; Value: Specify Environment Name
The report provides the following information:
- Total AWS Source volume data (customer’s source data as per the filter selected) (GB/TB)
- Total Druva Storage Consumption (for All EC2 resources that are backed up to Druva Cloud in the selected filter) (GB/TB)
- Total LTR saving credits (total credits saved on data stored in cold tier)
- ►Sample report
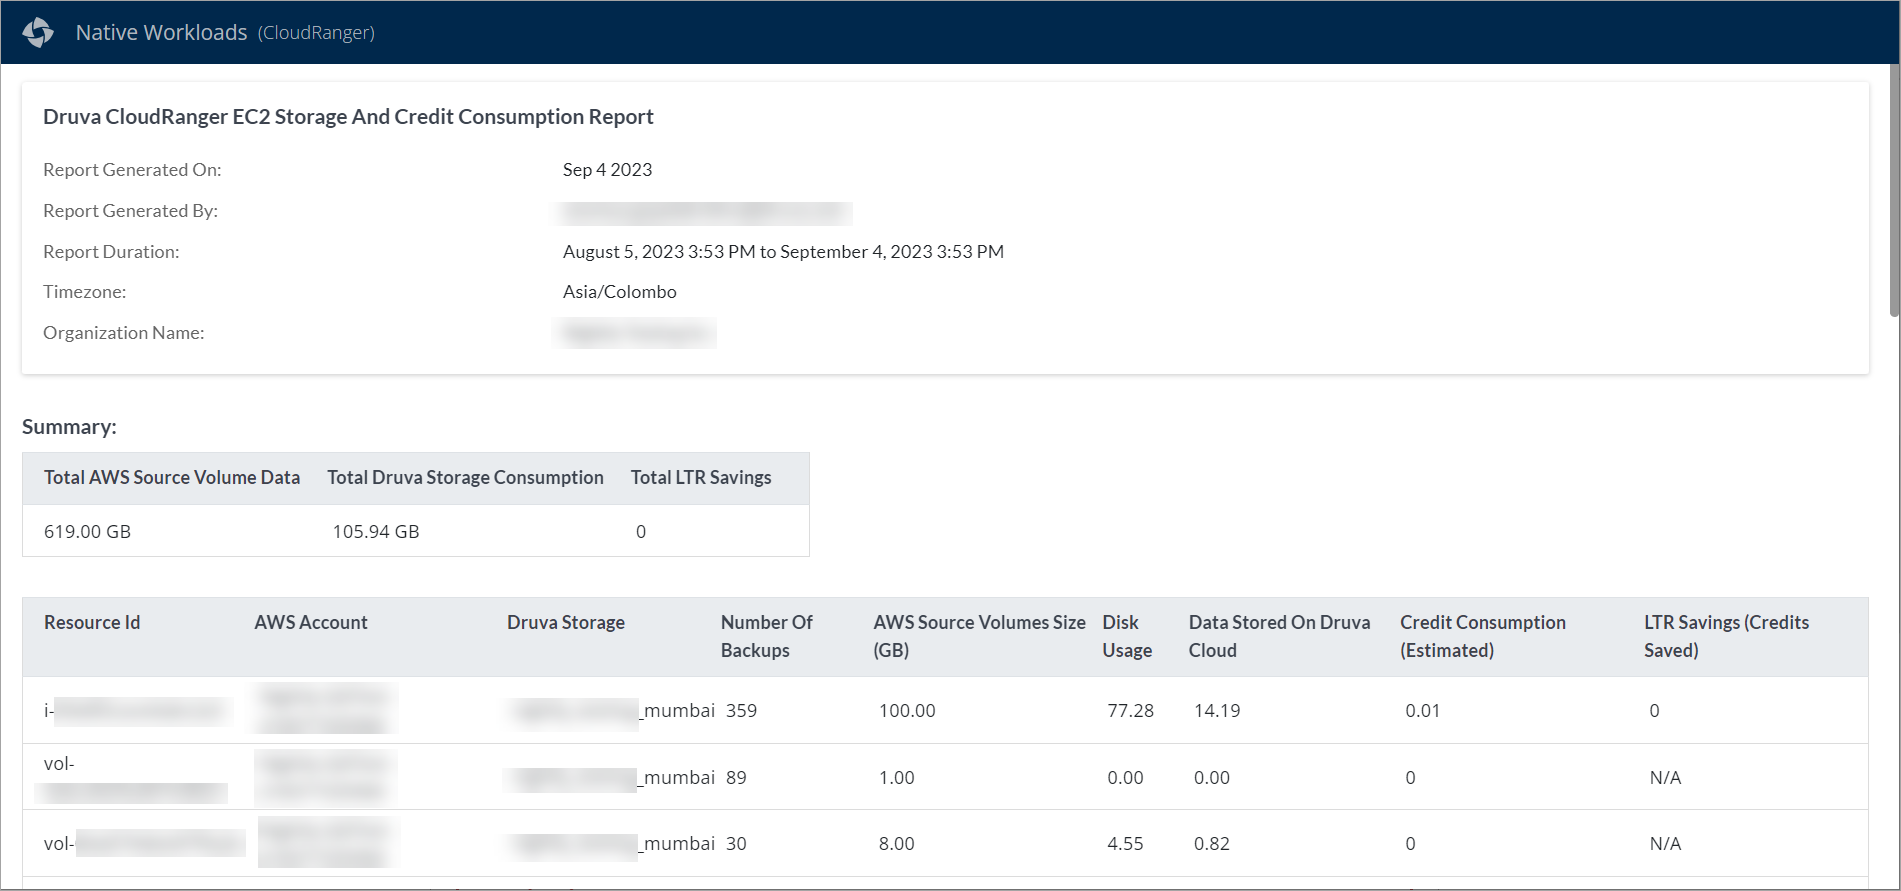
The following table details the information in the EC2 Credit & Storage Consumption report.
| Field | Description |
|
AWS Account |
The AWS Account associated with the selected organization, for which the report is generated. |
|
Number of Backups |
The total number of backups generated for that resource within the selected time period. |
|
AWS Source Volume Size |
The size of the AWS source data at the time of the last backup. |
|
Disk Usage |
Number of blocks read during data transfer. |
|
Data Stored on Druva Cloud (Source + Changed) |
The amount of backup data generated at the source for that corresponding server. This includes the initial full backup and the incremental data from all subsequent backups |
| Credit consumption (Estimate) |
The estimated credit consumption over the chosen time period. |
|
LTR Savings (Credits saved) |
Credits saved because of long term retention. |
Note: When selecting a Daily subscription schedule for the EC2 Storage and Credit Consumption Report, be advised that the Druva Storage Scheduler is set to run every day at 10:30 am GMT. To ensure that the report accurately reflects daily consumption, we recommend that you set the report generation to an appropriate time within your chosen Time Zone. For more information, see Manage Report Subscriptions.
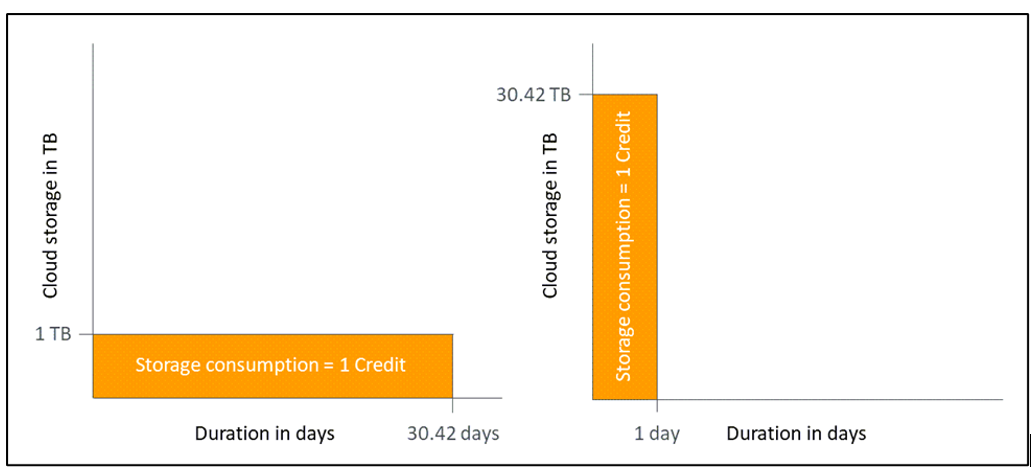
Credits
Druva credits measure the prepaid storage that you can purchase based on the amount of storage your backups consume on the Druva Cloud. One Druva credit allows you to store 1 TB of compressed and deduplicated data on the Druva Cloud for a period of one month. A credit is expressed in TB-Month.
You may purchase Druva credits depending on the volume of your organization’s data to be stored in the Druva Cloud. For example, if your organization needs to store an average of 10 TB of deduplicated data in the Druva Cloud each month over the next 1 year, you will need to purchase 120 credits (TB-Months) that would be consumed as data stored within Druva Cloud.
Credit consumption
Druva billing mechanism charges for the actual storage consumed in the Druva Cloud. However, for a more accurate calculation, Druva calculates the actual credits in TB-Days and then converts the value into TB-Months. Druva converts the credits in TB-Months into a daily equivalent in TB-Days by dividing the credits by 12 and multiplying by 365.
1 TB-Month = (1/12) * 365 = 30.42 TB-Days
Credits are then reduced by the daily amount stored in the Druva Cloud, post deduplication. If the Druva Cloud stores 1 TB of data over 30.42 days, Druva consumes one credit. Similarly, Druva consumes one credit if the Druva Cloud stores 30.42 TB data in one day as illustrated in the following diagram.
DR Plan Report
This report provides administrators a summary of disaster recovery plans managed across accounts, and associated resource information.
This report provides the following information:
- Resource details including Resource Name and Type.
- DR plan-related information including Plan Name, Source Account and Region, Target Account and Region, RPO and RTO details, and the Status of the disaster recovery.
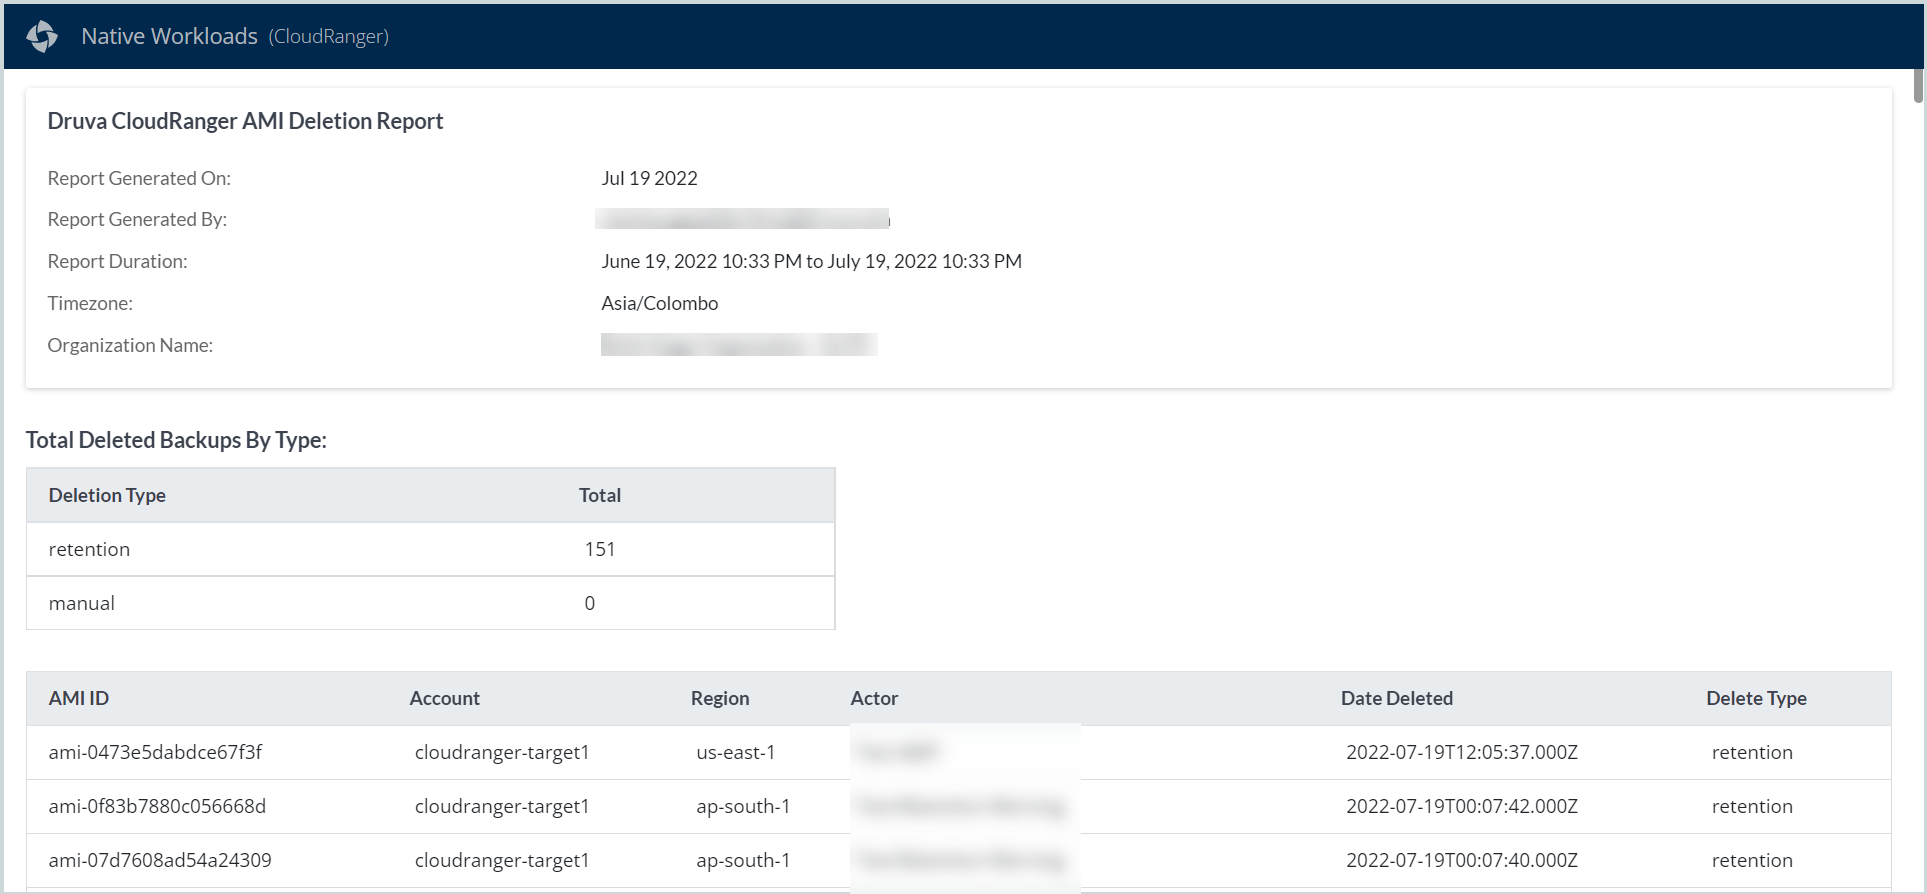
AMI Deletion Report
This report provides a summary of AMIs that have been deleted, either manually or as part of the policy-level retention specified.
The AMI deletion report offers a comprehensive view of all AMIs deleted across one or more accounts, over a 7-day, 30-day, or 90-day period.
- Summary of total AMIs deleted categorized by manual or retention-based deletion.
- Detailed information including AMI ID, Account, Region, Date Deleted, and the Delete Type (manual or retention). Depending on the Delete Type, the Actor column displays the Policy Name (retention) or the user email ID (manual deletion).
- ►Sample report
Generate Reports
The Reporting functionality allows you to view and generate reports across AWS accounts.
To generate a report:
- Log into the Druva CloudRanger console, and click Reports from the top menu bar:

- On the Reports tab, select the report that you wish to generate and click Generate report.
- Depending on the report type selected, specify the following criteria based on which the report will be generated:
- For: Select the time period for which the report is to be generated. You may choose to include data from the Last 7 days, Last 30 days, Last 90 days. or specify a Custom date range.
Note:
- The EC2 Storage and Credit Consumption report can be generated for a period across the Last 30 days or Last 90 days only,
- The Custom date range must be no longer than a period of one year prior to the current date. All data for reporting is retained only up to a year, and the custom range to generate reports cannot exceed this window.
- In accounts: The Druva CloudRanger account from which to generate the report. You can choose to select an individual account or All accounts for cross-account reporting.
- Filter by: Select the resources or Storage based on which to filter the report data.
4. Click Generate report.
You may generate the report as a .pdf or as a .csv file. Use the down-arrow against Generate report to:
- View in Browser
- View and Download PDF; or
- View and Download CSV
Druva CloudRanger downloads and saves the selected report to your device.
Email Reports
Druva CloudRanger offers options to email a specific report to a chosen recipient.
To email a report to a particular recipient:
- Log into the Druva CloudRanger console, and click Reports from the top menu bar:
- On the Reports tab, select the report that you wish to generate and click Email Report.
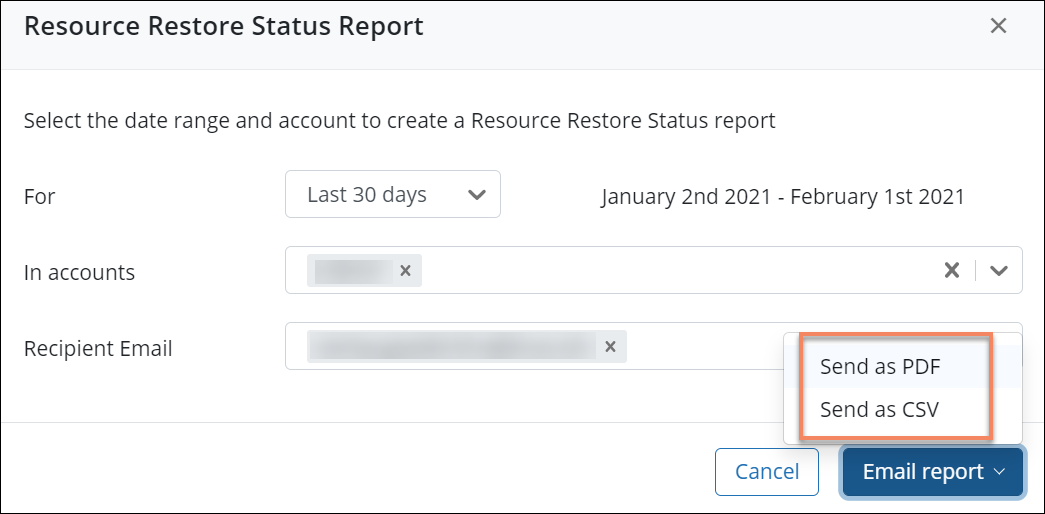
- Depending on the report type selected, specify the following criteria based on which the report is to be generated:
- For: Select the time period for which the report is to be emailed. You can choose to include data from the Last 7 days, Last 30 days, or the Last 90 days.
- In accounts: The Druva CloudRanger account from which to generate the report. You can choose to select an individual account or All accounts for cross-account reporting.
- Recipient Email: Specify the email ID of the recipient(s) to which the report is to be sent. You can choose to select from the list of registered user email IDs or enter a new one.
- Click Email report.
You can choose to email the report as a .pdf or as a .csv file. Use the down-arrow against Email report to:- Send as PDF, or
- Send as CSV
Druva CloudRanger initiates an email to the recipient with the report included as an attachment, in the chosen format.
Manage Report Subscriptions
Druva CloudRanger offers a Report subscription functionality that enables administrators to subscribe to specific reports as part of monitoring and compliance. Report subscriptions allow you to create and manage email schedules for periodic delivery of specific reports to chosen recipients.
Add New Report Subscription
To create a new report subscription:
- Log into the Druva CloudRanger console, and click Reports from the top menu bar.
- Select the Subscriptions tab and click Add New Subscription.
- On the Report page, select the reports to be subscribed to and the filter criteria based on which the reports are to be generated.
| Field | Description |
| Subscription | Specify a name for the report subscription. |
|
Accounts |
Specify the associated Druva CloudRanger account(s) from which to generate the reports. |
|
Select Report |
Select the report to schedule an email subscription. |
|
Filter By |
Select the appropriate filter criteria based on which the reports will be delivered.
Note: The options displayed will depend on Report selected. No filters apply for the Resource Restore Status and Resource Protection Status reports. |
4. Click Add Report to add multiple reports to a subscription. Click Save and Continue.
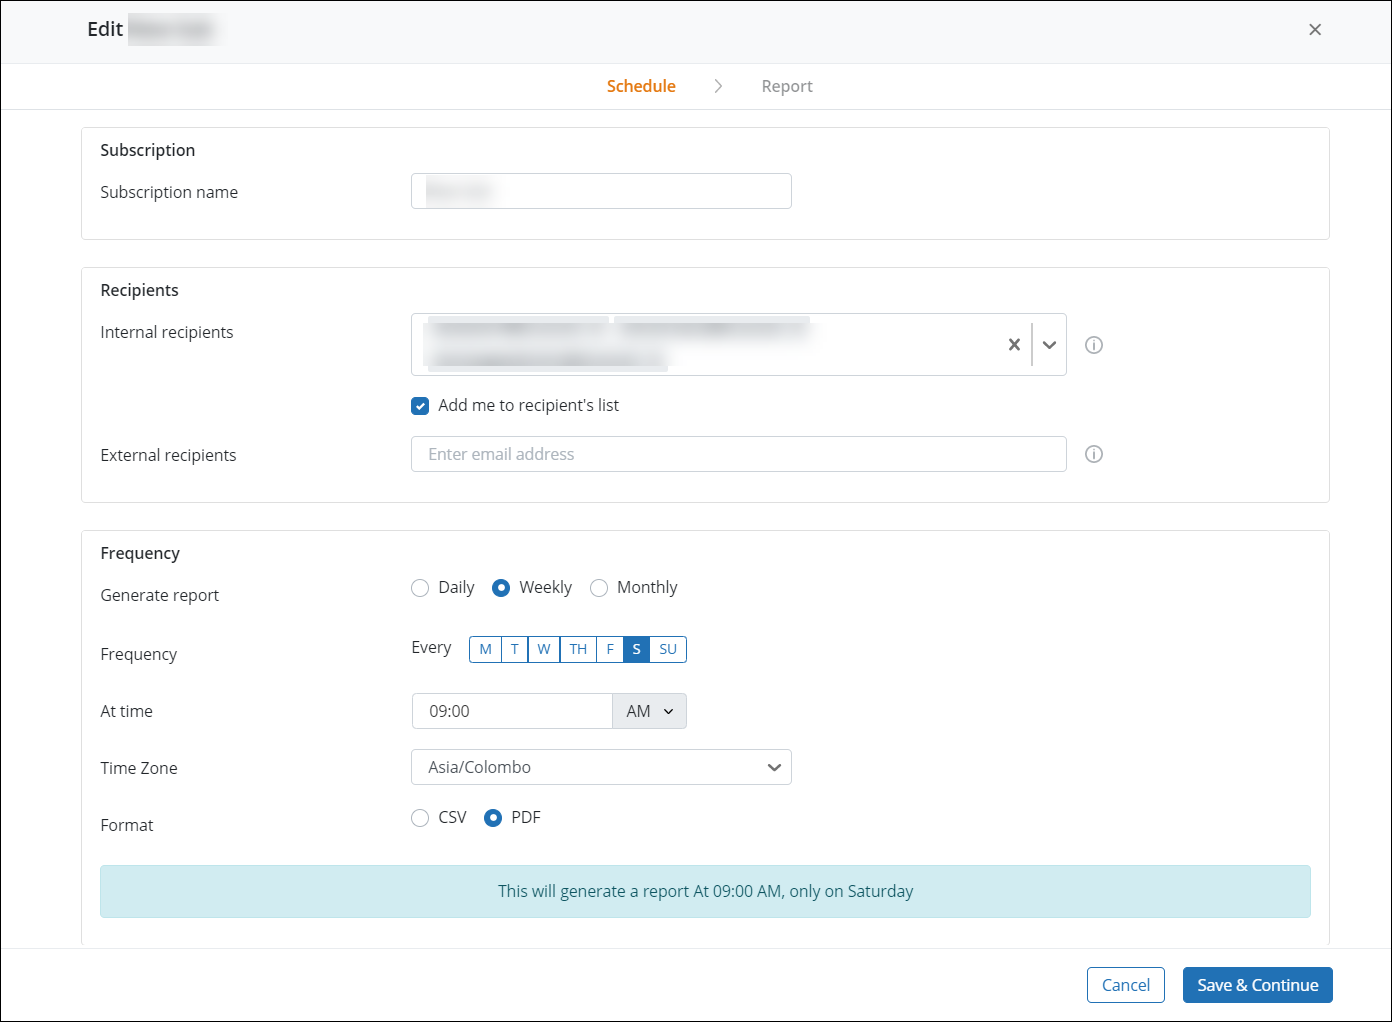
5. On the Schedule page, specify the subscription schedule, frequency, and format based on which each report is to be generated.
| Field | Description |
| Recipients | |
| Internal Recipients |
Specify the internal recipient(s) to whom the report is to be emailed to. Note: You can only select Druva CloudRanger users as internal recipients. |
|
Add me to recipient’s list |
[Optional] Select this checkbox to add the logged-in user to the list of internal recipients. |
|
External Recipients |
[Optional] Select this checkbox to add the logged-in user to the list of internal recipients. |
| Frequency | |
| Generate Report |
Select the report generation frequency, that is Daily, Weekly, or Monthly.
|
|
Frequency |
Select options based on how often to send the reports. Note: The Frequency is only enabled if you click the Weekly or Monthly option on Generate Report. You can modify the default values displayed. Weekly: Every Saturday at 09:00 AM |
| Time Zone | Select the time zone that applies to the report frequency specified. |
|
Format |
Select the report format, that is CSV or PDF files. |
6. Click Save.
Druva CloudRanger displays a summary of the report subscription and the recipients under the Subscription tab.
View Report Subscriptions
To view predefined report subscriptions:
- Log into the Druva CloudRanger console, and click Reports from the top menu bar.
- Select the Subscriptions tab.
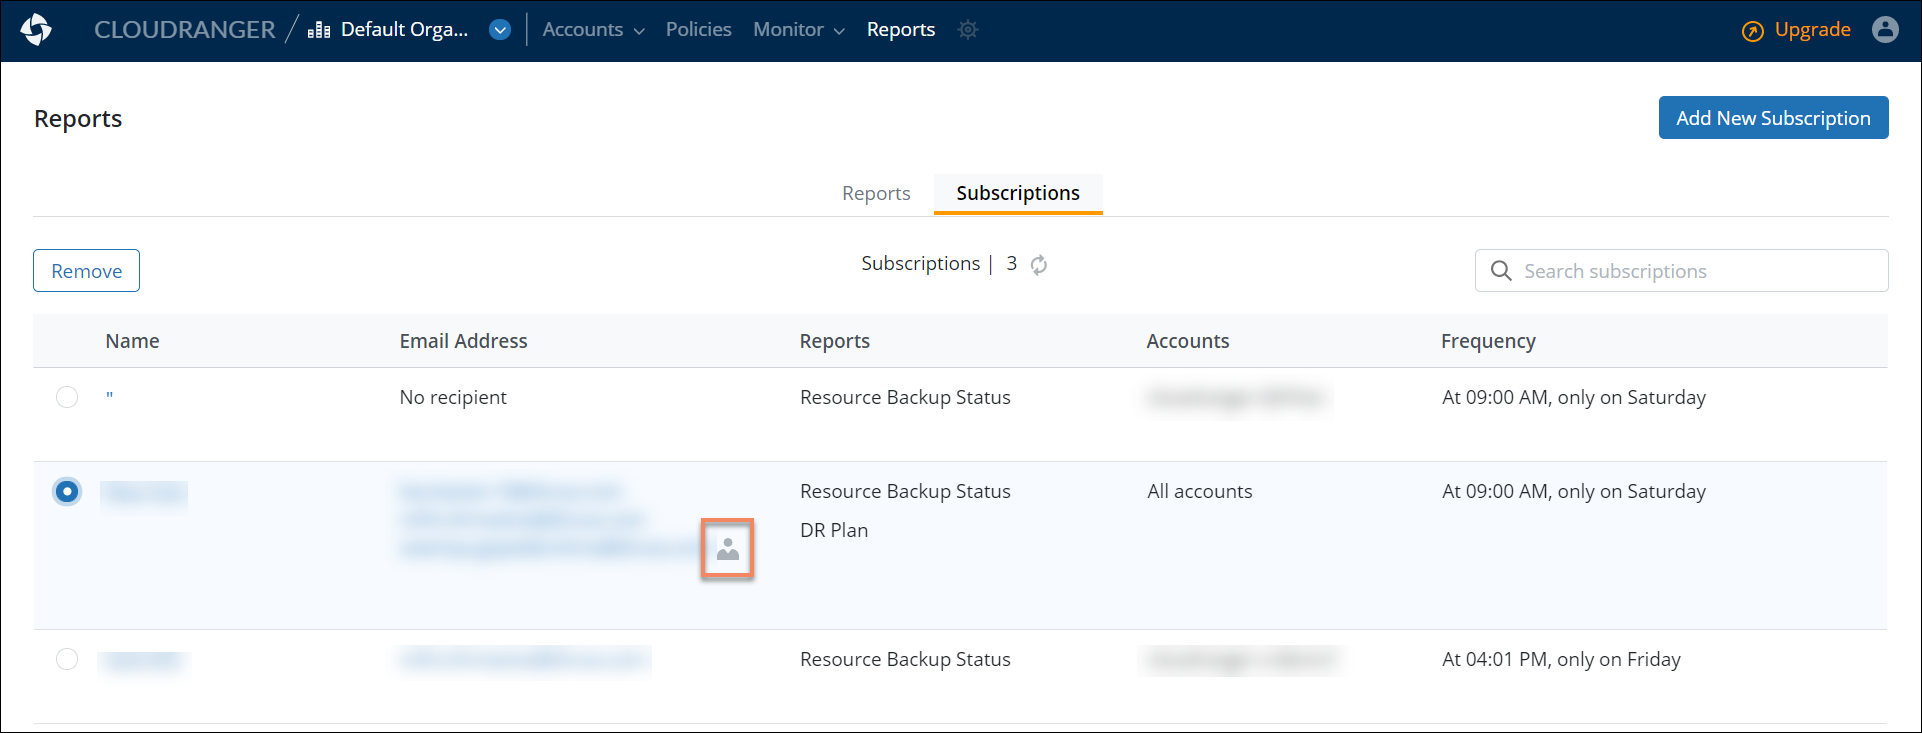
This page displays a summary of the report subscriptions, the email recipients, and a list of reports subscribed to. You may edit or delete subscriptions, as well as manage a particular recipient’s subscription
Modify Report Subscription
To edit a predefined report subscription:
- Log into the Druva CloudRanger console, and click Reports from the top menu bar.
- Select the Subscriptions tab and click the subscription to be modified.
- You can edit the subscription Schedule, including the frequency, recipients, and format of the report.
- Navigate to the Report tab to manage the reports subscribed to and the filter criteria.
Manage Recipient's Subscription
You can view and manage reports that each email recipient is subscribed to. To edit subscriptions for a particular recipient:
- Log into the Druva CloudRanger console, and click Reports from the top menu bar.
- Select the Subscriptions tab.
Note: Subscription recipients who are administrators are indicated by
 .
. - Select the recipient’s Email Address to modify their subscriptions.
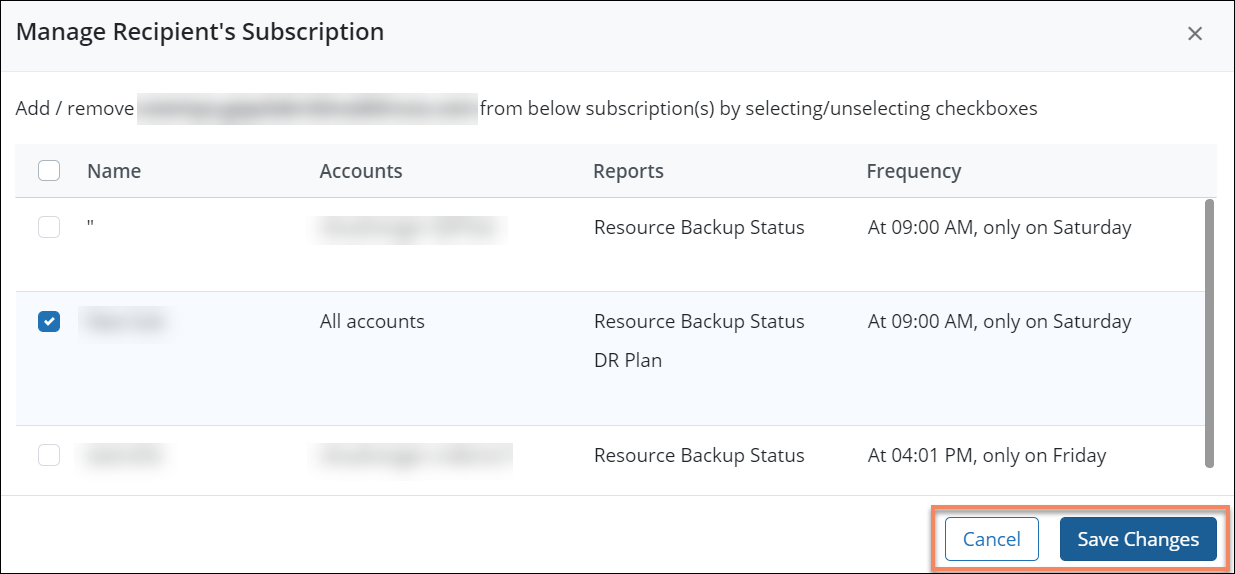
- To add a new report subscription for the chosen recipient, select the subscription Name checkbox.
To remove an existing subscription for the recipient, clear the subscription Name checkbox. - Click Save Changes.
Delete Report Subscription
To delete a predefined report subscription:
- Log into the Druva CloudRanger console, and click Reports from the top menu bar.
- Select the Subscriptions tab.
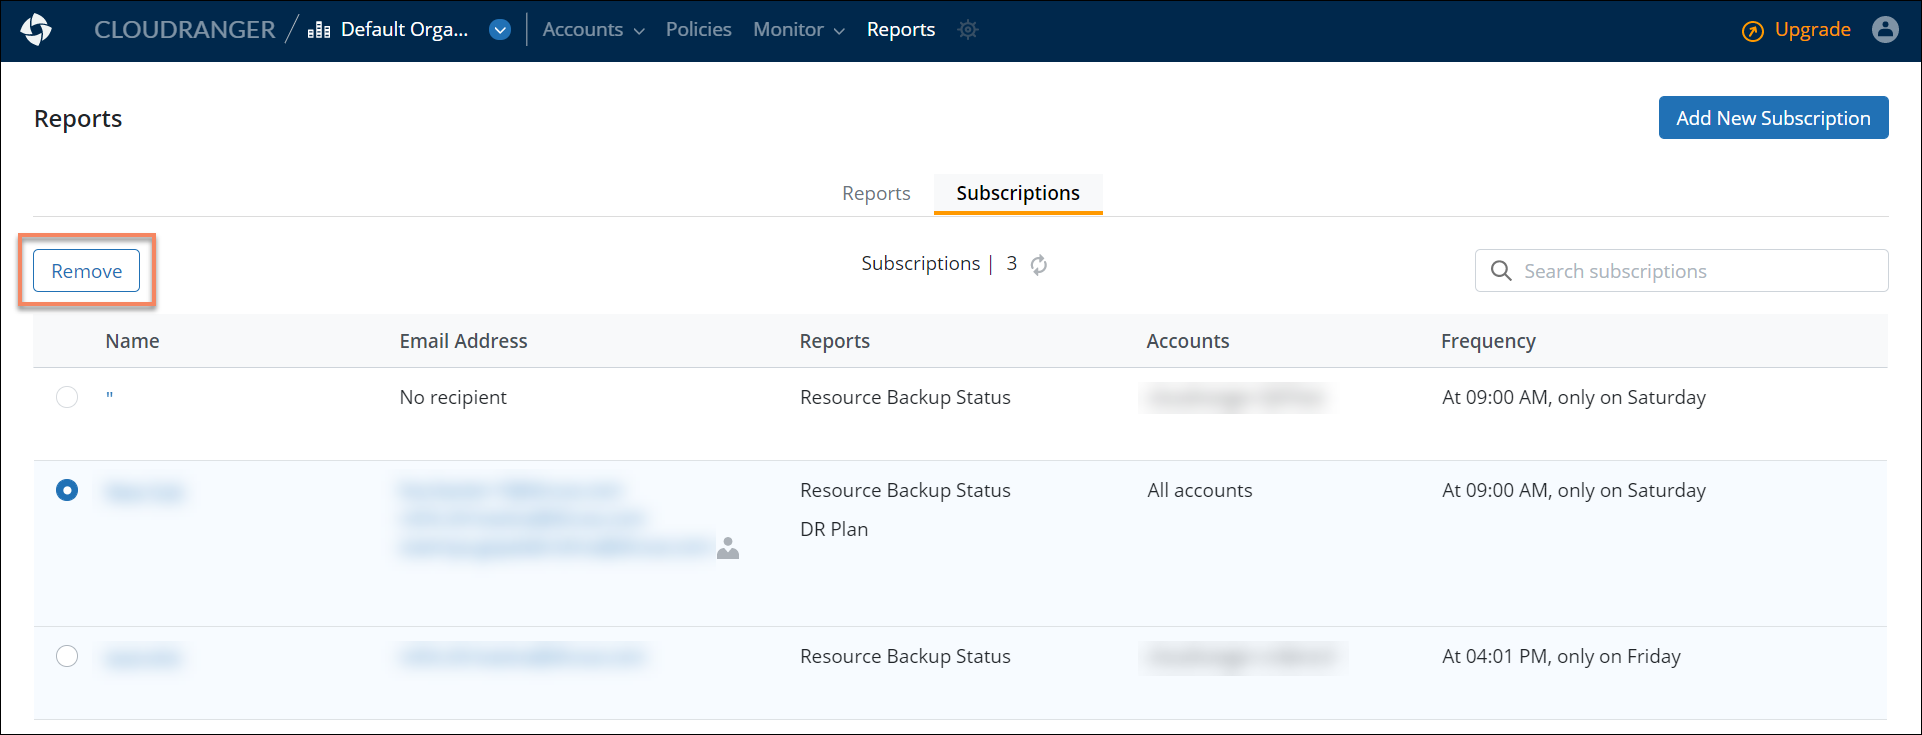
- To delete a subscription, select the subscription Name and then click Remove.
- A confirmation dialog appears. Click Confirm.