Automated Disaster Recovery Workflow
Overview
With Automated Disaster Recovery, (ADR), Druva CloudRanger offers an enhanced disaster recovery model to keep your AWS data secure and recoverable from any region-specific or account-specific outages. With disaster recovery, you can validate RTO and RPO objectives to ensure business continuity with significant cost savings.
The disaster recovery testing functionality allows you to test the failover of the Amazon Machine Interface (AMIs) and snapshots defined in the backup policy. Based on the test results, you can expand your resource capacity or select a different target environment to reduce RTO or you may increase backup frequency to minimize the RPO. Testing can be run on-demand or automated based on a defined schedule.
Key advantages
- Improved flexibility with Sync Schedules to schedule the cloning of your source AWS environments. Define the frequency and schedule criteria when your source environments are cloned and synchronized with the target environments, as per a user-defined schedule (similar to schedules in a backup policy).
- Resource Rules to identify resources that you wish to recover from the source environment.
- Intelligent real-time feedback confirming or otherwise, your backup strategy meets your Recovery Point Objective (RPO).
- AWS cross-account disaster recovery plans.
- Enhanced testing options and flexibility in choosing instance sizes for disaster recovery.
- Support for Amazon RDS resources as part of DR plans.
DR Plans currently do not support automated recovery of full RDS clusters.
Automated Disaster Recovery Workflow
The Automated Disaster Recovery workflow in Druva CloudRanger is shown below:
| Steps | Description |
| Step 1: Create an Environment | Identify and group the resources that need to be protected. |
| Step 2: Clone the Environment | Create a replica of the source environment in the target region. |
| Step 3: Set up a Sync Schedule | (Optional) Create a Sync Schedule to periodically sync the Target environment with the Source. |
| Step 4: Setup a Backup Policy | (Optional) Create backup copies using the backup plan. The backup copies will be used to restore the resources in the target region. |
| Step 5: Create a Disaster Recovery Plan | Define the RTO and RPO - the downtime your organization can manage and the amount of data loss that your organization can absorb. |
| Step 6: Testing the Disaster Recovery Plan | Test the disaster recovery plan before implementing it. You may also create a schedule to test the disaster recovery plan. |
| Step 7: Executing the Disaster Recovery Plan | If required, perform the failover with the click of a button. |
Before you begin
Before you begin with Automated Disaster Recovery, ensure that you have the following:
- At least one AWS resource in your account that you want to protect.
- Access to the accounts if you plan to perform cross-account disaster recovery.
Step 1: Create an Environment
This is the first step in setting up Disaster Recovery. In Druva CloudRanger, an environment refers to a logical grouping of your AWS resources that you want to protect in case of a disaster. With Automated Disaster Recovery, you can failover these resources with the click of a button.
Note: Creating a source environment does not create or update existing resources or configurations in your AWS account.
To create an environment:
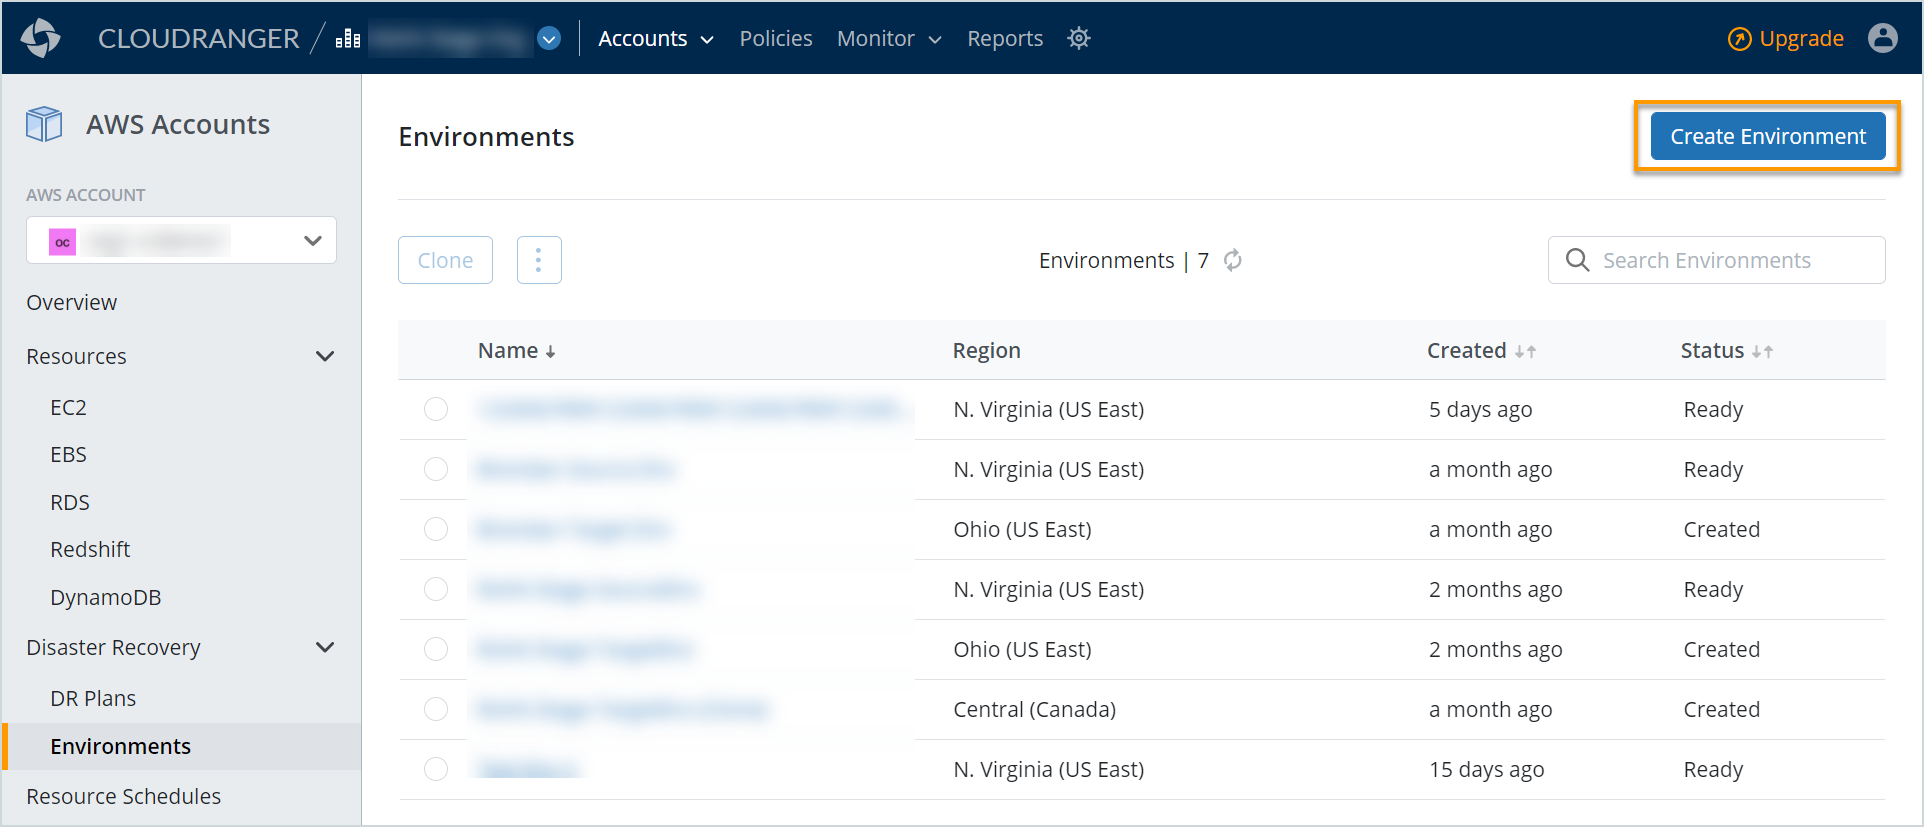
- Log into your Druva CloudRanger console and navigate to Disaster Recovery > Environments.
-
Click Create Environment.
Field
Description
Name
The name of the environment.
Description
(Optional) The description of the environment.
Region
The storage region where you want to create your source environment.
Select the required region from the list. Based on the region selected, the associated VPCs are displayed.Add Resources VPC
Select the VPC, which has the resource that you want to protect.
All the associated Subnets and Security Groups are selected by default.Note: If the VPC contains an RDS instance, you will have the option to select the DB Subnet Groups.
-
Click Save Environment.
Step 2: Clone the Environment
The next step is to clone the source environment to a region where you want to failover in case of a disaster. Druva CloudRanger clones the source environment to the region or account that you have selected. Cloning essentially replicates the source infrastructure in the target region, which allows the resources to be failed over quickly and seamlessly.
To clone an environment:
- Log into your Druva CloudRanger console and navigate to Disaster Recovery > Environments.
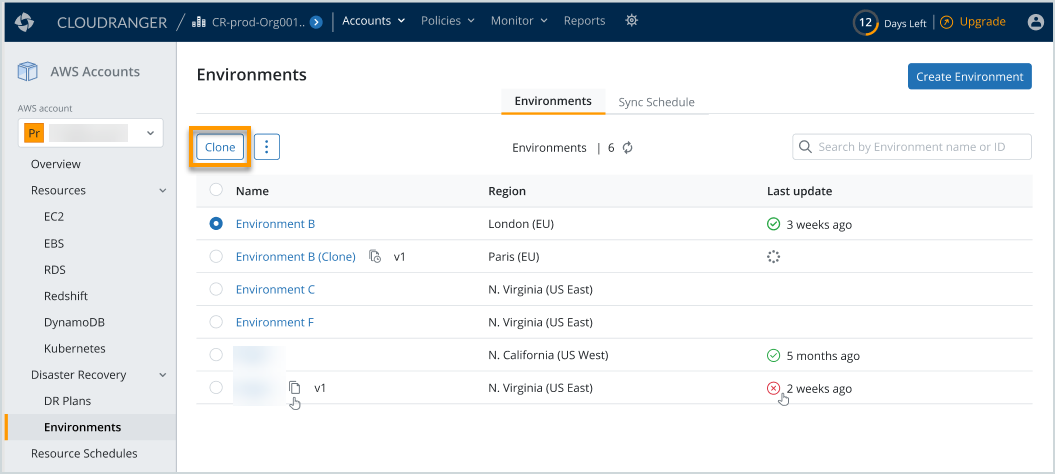
- Select the environment that you wish to clone, and then click Clone.
-
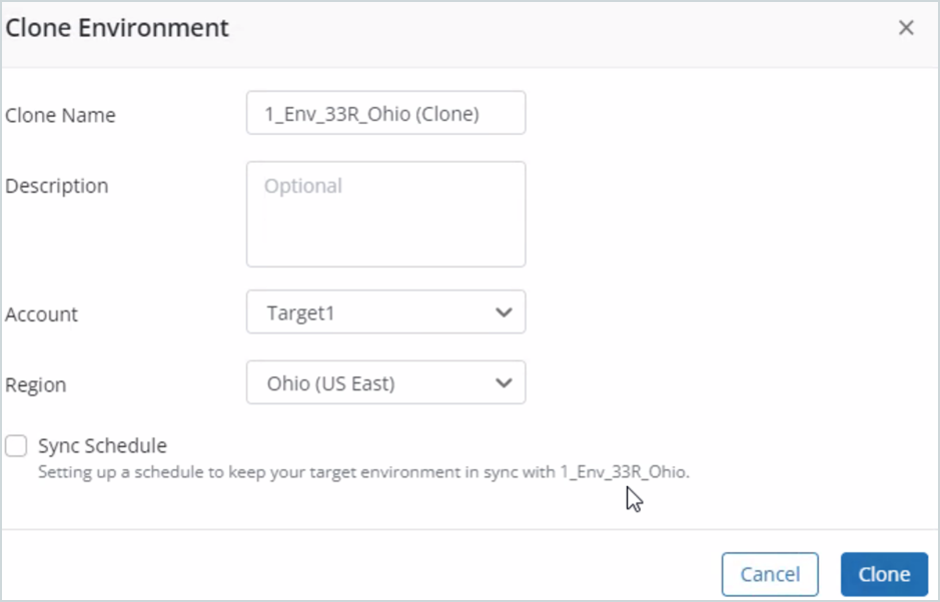
On the Clone Environment page, specify the following:
- Select the Account where you want to clone the source environment so you can perform cloning across accounts.
Note: For cross-account mapping, you will need to have access granted to the account where you wish to clone the source environment.
- Select the Region where you want to clone the environment.
- Optionally, you may choose to create a Sync Schedule to manage your environment cloning and periodically synchronize your target environment with the source. To create a Sync schedule, select Sync Schedule and then specify the cloning frequency and schedule.
For more information, refer to Step 3: Set up a Sync Schedule.
4. Click Clone.
The CloudFormation process is initiated, which can take some time depending on the size. You can view the CloudFormation stack being created and the cloning status on your AWS console.
Note: Once the clone is ready, you can view the cloned environment in the list of environments. By default, the suffix ‘clone’ is appended at the end of the cloned environment name.
Verifying the status of the cloning process
Status in Druva CloudRanger
- You can view the status of the job initiated for the cloning process on the Jobs page.
- To access Jobs, navigate to Monitor > Jobs from the top bar, and then click the Disaster Recovery tab.
Status on AWS console
- You can also view the status of the cloning process within your AWS console.
- Navigate to CloudFormation and select the region where the environment is being cloned.
Download CloudFormation stack
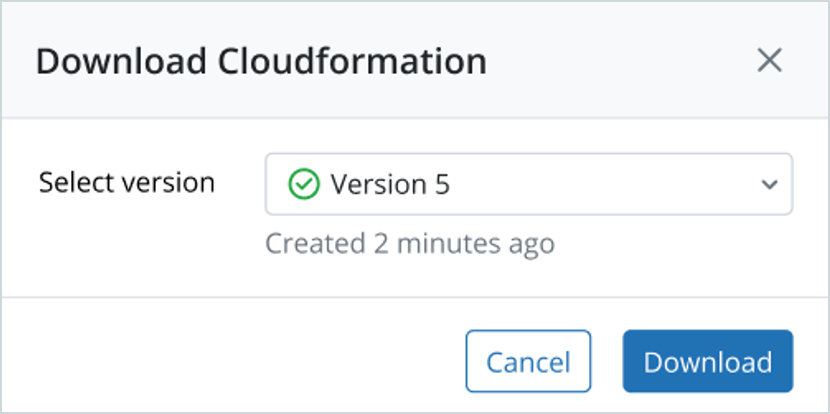
Once you clone an environment, the CloudFormation stack is updated and the new cloning status will be updated on your AWS console. Once the process is complete, you can download the updated CloudFormation template.
-
To download, select an environment clone and then click Download CloudFormation:
-
Select the appropriate version and click Download.
Note:
The option to select the CloudFormation version will be available only when you select an environment clone. Druva CloudRanger will store the previous five versions of the CloudFormation for a target environment.
Selecting a source environment will automatically download the latest CloudFormation.
Step 3: Set up a Sync Schedule
A Sync Schedule allows you to automate your environment cloning by periodically synchronizing a target environment with the source.
Note: You can define a Sync Schedule only for a cloned environment (the target environment on which the DR failover will be initiated).
To create a Sync Schedule:
- Log into your Druva CloudRanger console and navigate to Disaster Recovery > Environments.
- Select the target environment for which you want to define a sync schedule.
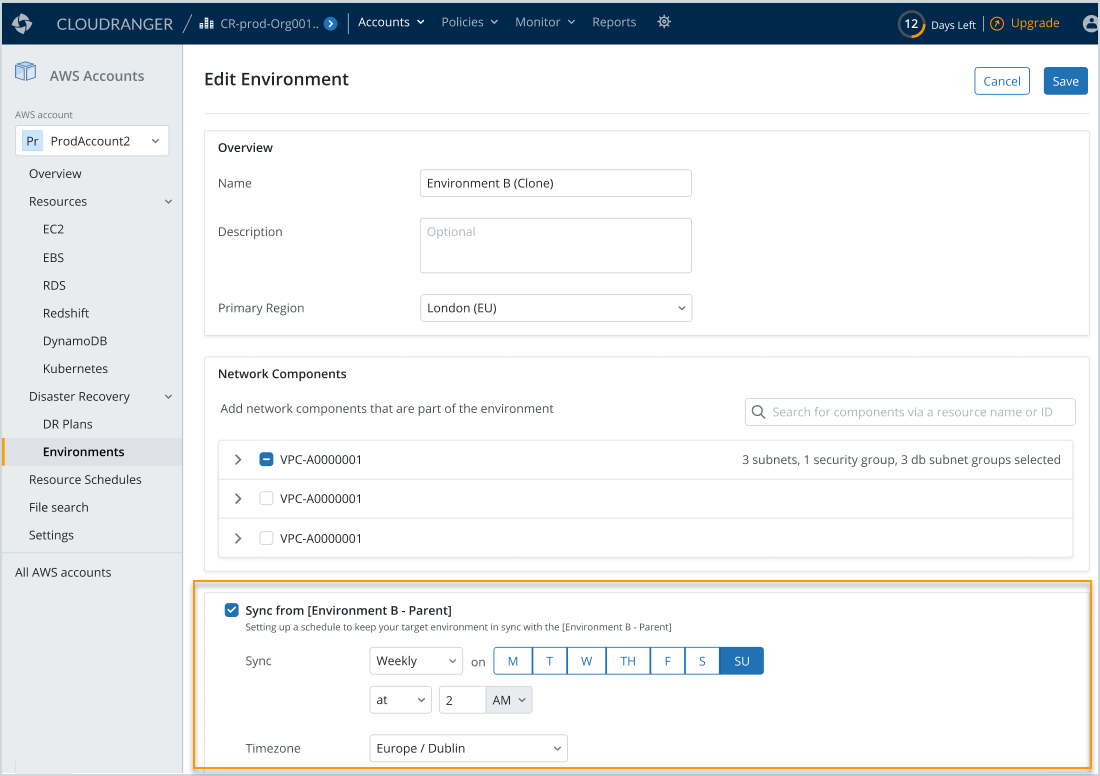
- Select the Sync From checkbox and define the schedule to ensure that your target environment is periodically synchronized with the source.
- Sync: Choose the sync frequency by day, week, or month.
For example:
Sync Weekly on Monday at 2:00 AM
Sync Monthly on the 1st day of the month every 30 minutes - Timezone: Select the time zone that applies to the sync frequency specified.
- Sync: Choose the sync frequency by day, week, or month.
You can choose to disable an active Sync Schedule, and then enable it based on your business requirements.
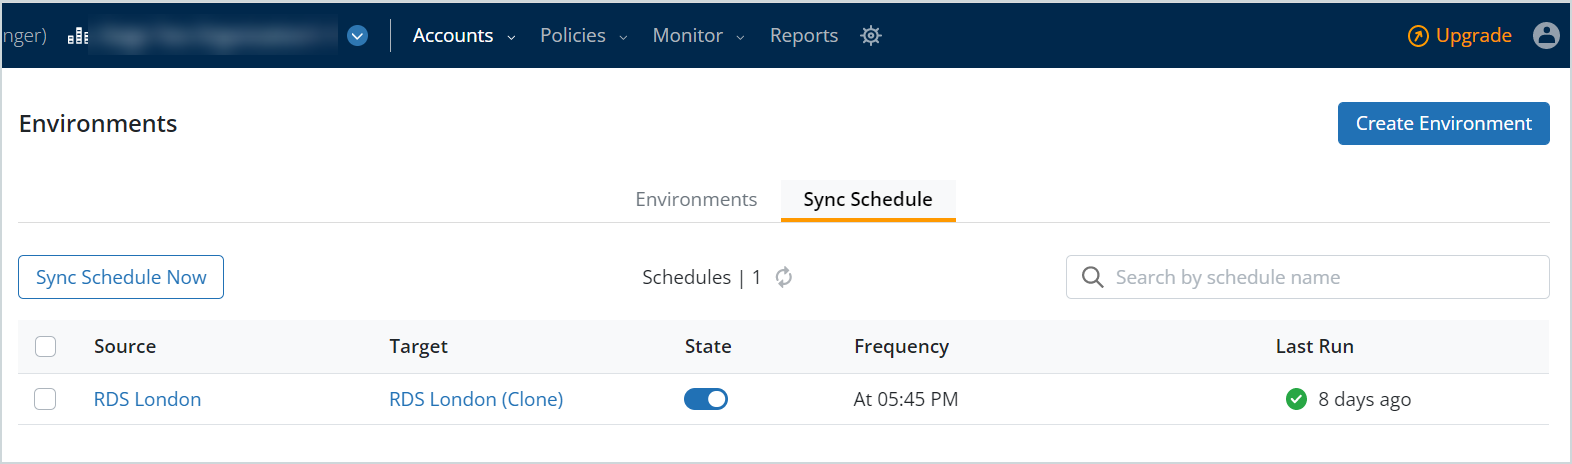
To view all active schedules, navigate to the Sync Schedule tab on your Environments listing page:
Note: The availability of this feature may be limited based on the license type, region, and other criteria. To access this feature, contact your Druva Account Manager or Support.
Step 4: Set up a Backup Policy
You can create a new backup policy or use an existing backup policy to create backups in the cloned or target region. This enables Druva CloudRanger to restore instances using the backup copies.
To create a backup policy, refer to Creating backup policies.
Executing the backup policy
Once you have created the backup policy, make sure that it has been executed at least once so that a backup copy is available at the target location.
To execute a backup policy:
- On the top navigation bar, click Policies and then select the policy you wish to execute.
- Click Execute Now to initiate the backup policy.
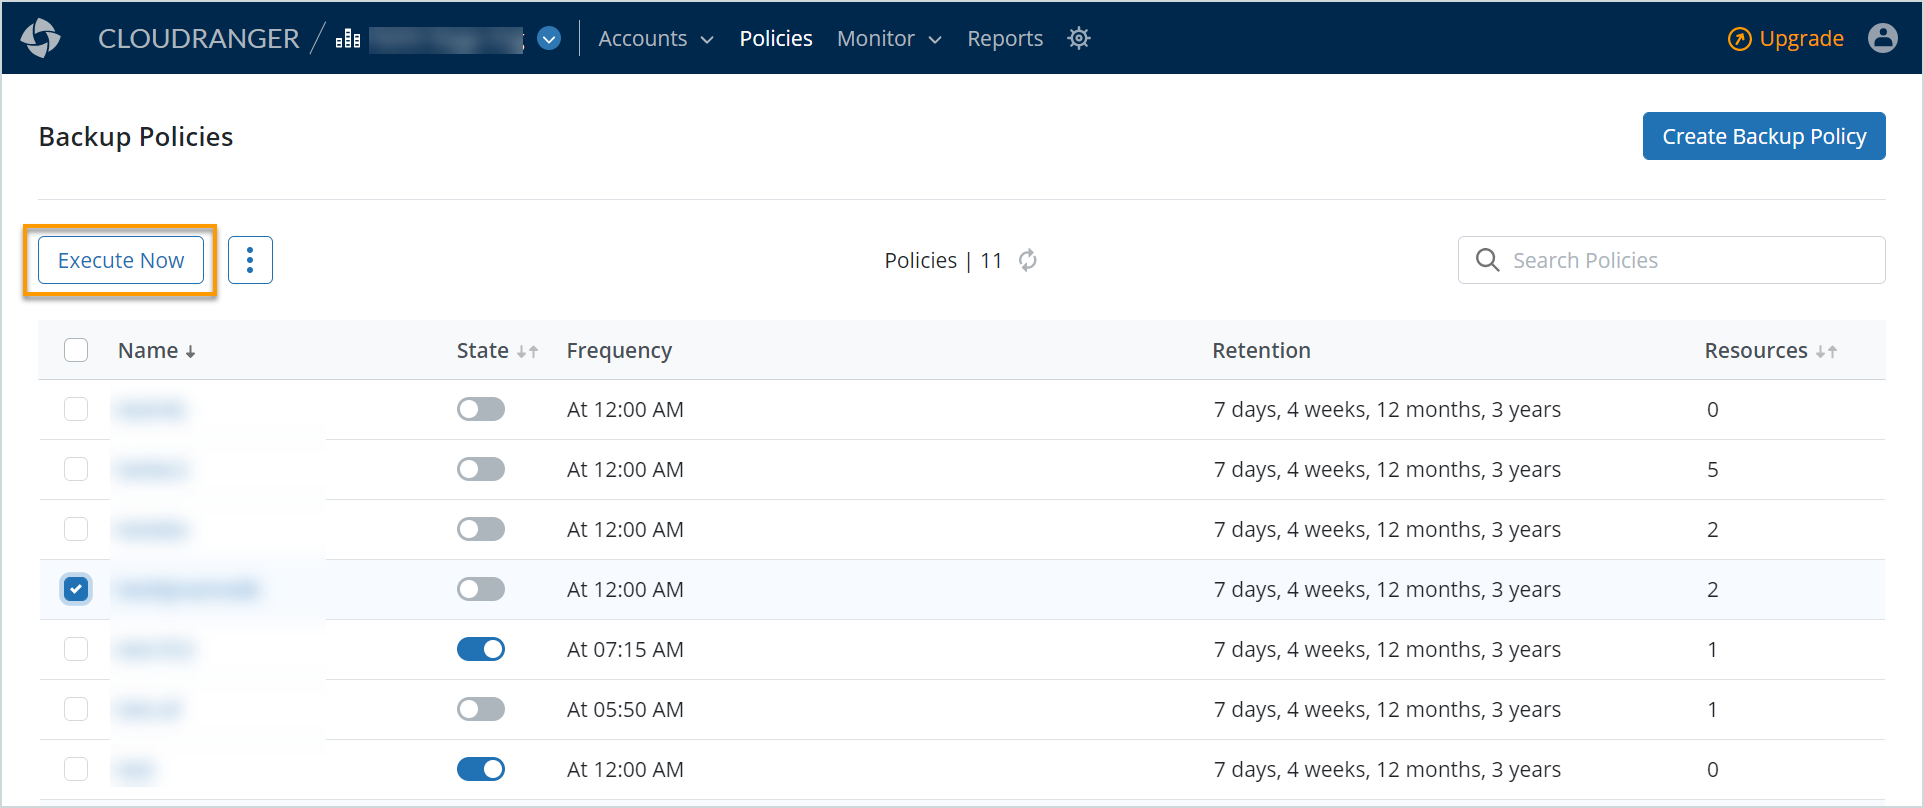
The subsequent backups that are generated on policy execution may be reviewed under the relevant resource Backups page.
Note: The details of the policy execution can also be viewed on the Jobs page. Navigate to the Disaster Recovery tab to review the progress of the backup operation from the source region and copy to the target region.
Step 5: Create a Disaster Recovery Plan
A disaster recovery plan is a structured set of instructions designed to recover resources in the event of a failure or disaster. Disaster Recovery aims to get you back to the production-ready setup with minimal downtime.
Having a disaster recovery plan in place enables you to protect critical resources and to quickly restore resources to replicate a product-ready setup.
To create a disaster recovery plan:
- Log into your Druva CloudRanger console, and navigate to Disaster Recovery > DR Plans.
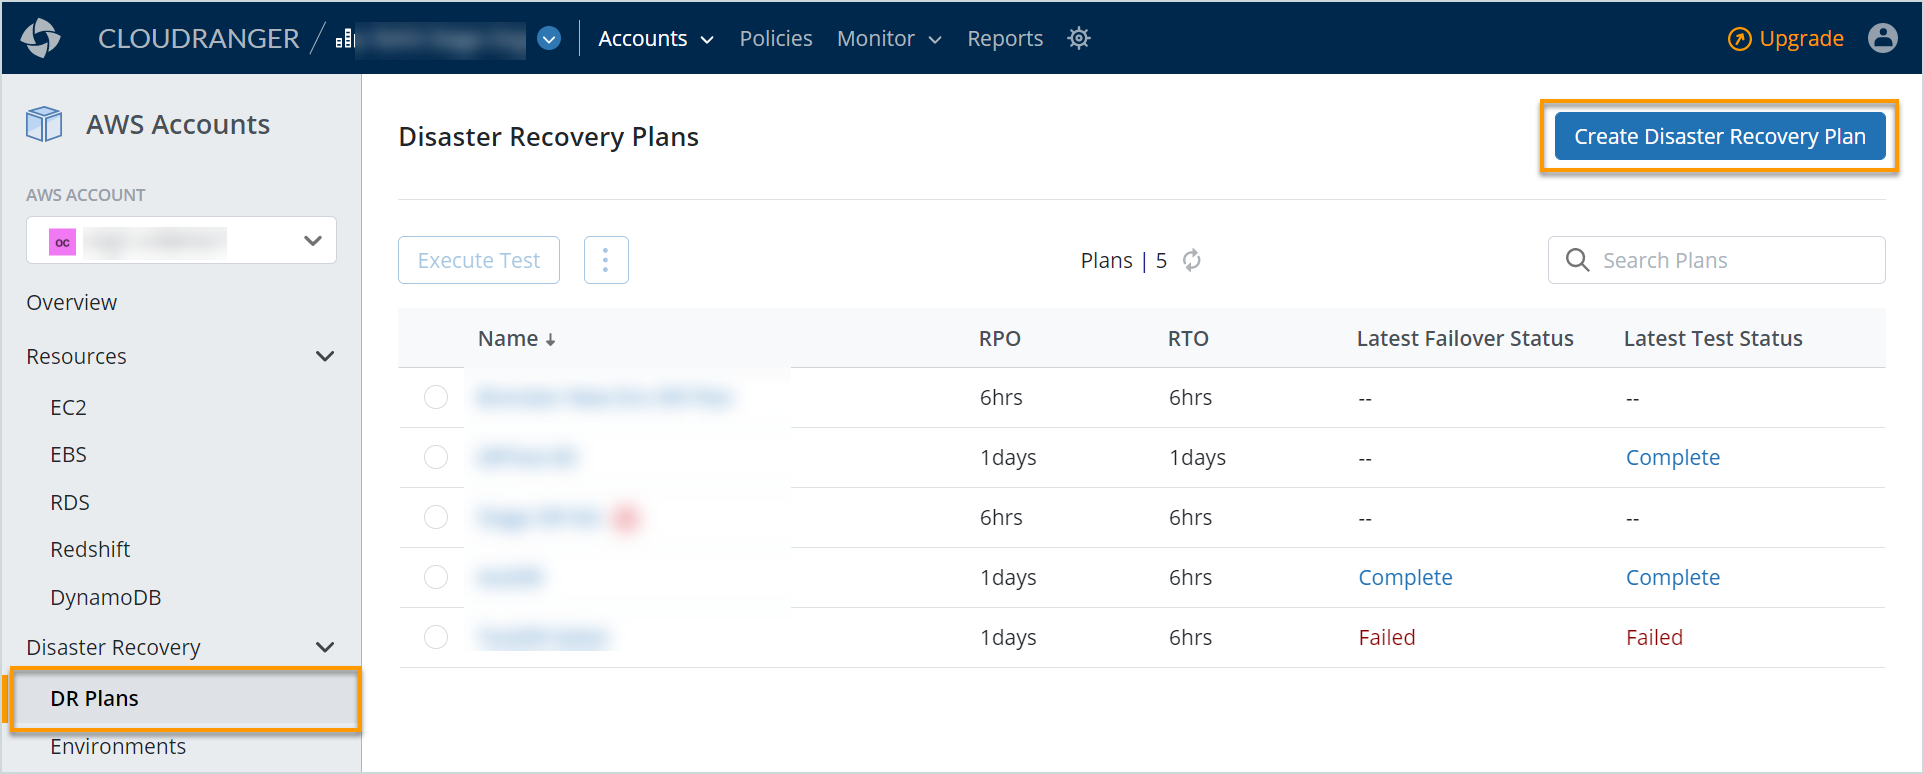
- Click Create Disaster Recovery Plan.
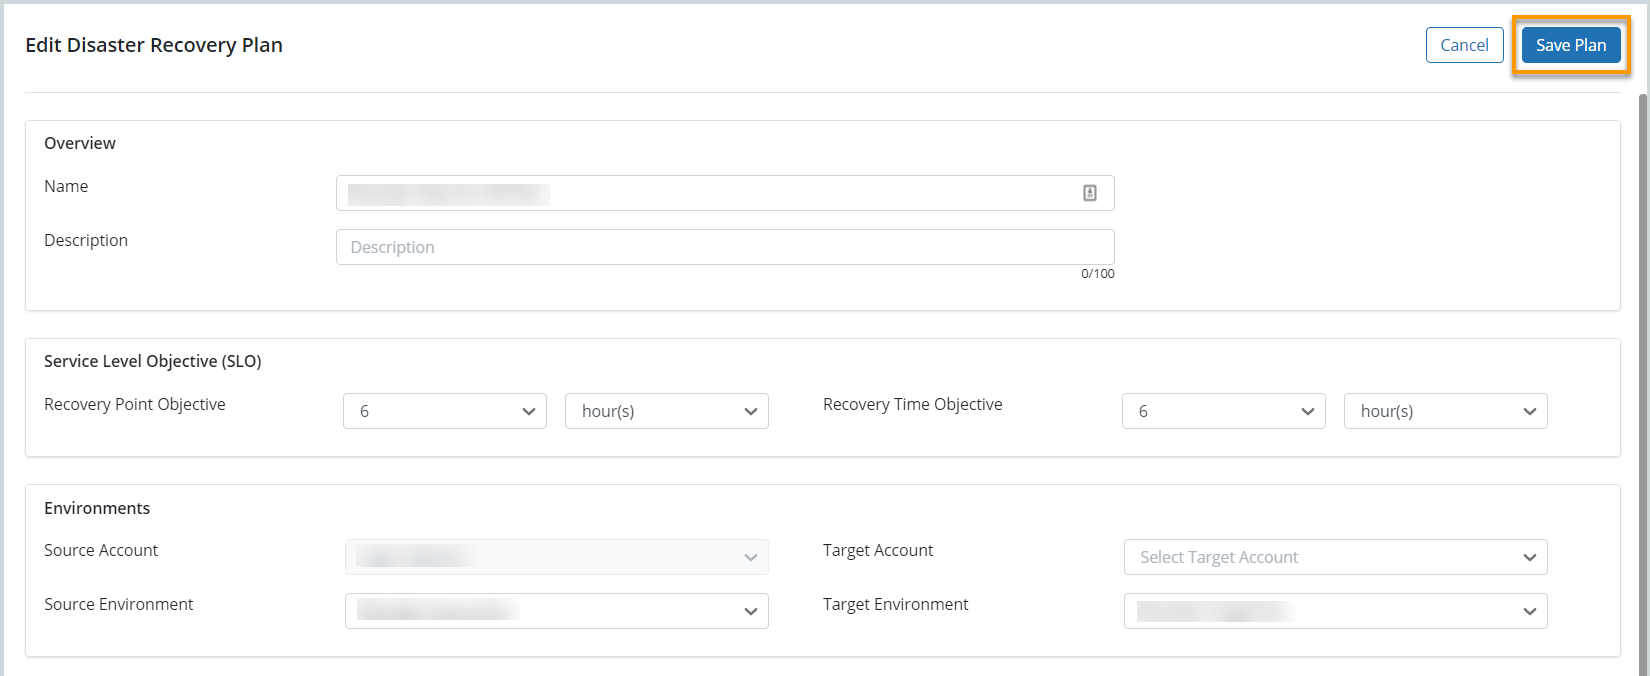
Specify the following to create a DR plan.
| Field | Description |
| Name | The name of the DR plan. |
| Description | (Optional) The description of the DR plan. |
| Service Level Objective (SLO) | |
|
Recovery Point Objective (RPO) |
Specify the RPO as per your business policy. |
|
Recovery Time Objective (RTO) |
Specify the RTO as per your business policy. |
| Environments | |
| Source Account | The source account is by default the CloudRanger account in which you are currently creating the DR plan. |
| Source Environment | Select the source environment, applicable within the Source Account. |
| Target Account | Select the target account. You can select the same source CloudRanger account as the target account. |
| Target Environment | Select the target environment, applicable within the Target Account specified previously. |
| Component Mapping | |
| Source VPC | Based on the Source Environment selection, the Source VPC and associated attributes are listed. |
| Target VPC | Based on the Target Environment selection, the Target VPC and associated attributes are listed. If you have cloned the environment, both Source and Target VPCs are populated. |
3. Use Resource Rules to identify resources you wish to recover from the source environment.
i. Click Add to identify resources to include or exclude as part of the DR plan.
DR Plans currently do not support the automated recovery of full RDS clusters.
ii. On the Add Rule page, specify the filter criteria to identify specific resources to include or exclude.
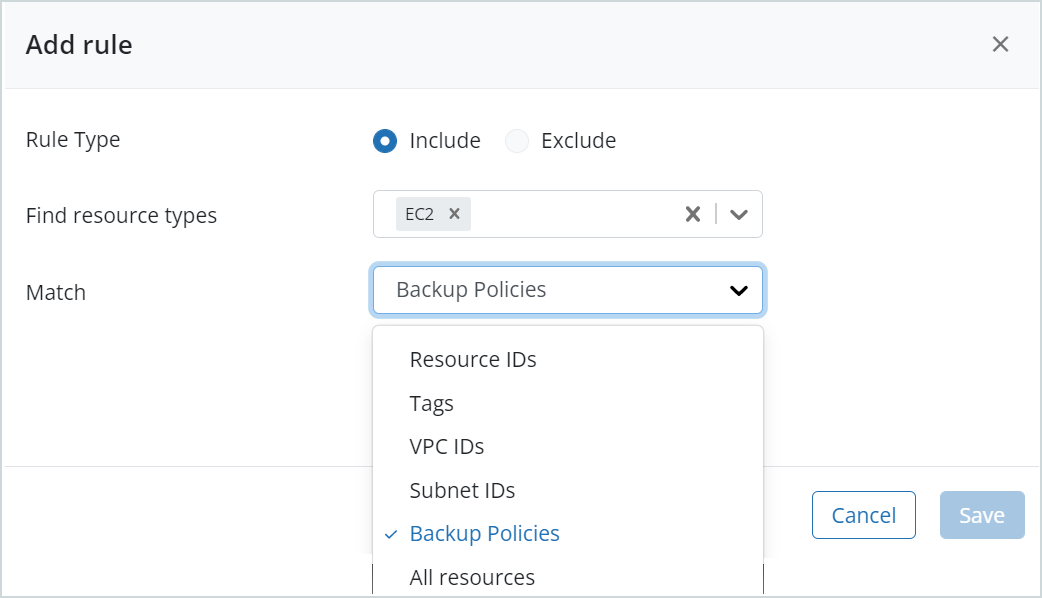
- Rule Type: The option selected here will identify resources to include or exclude as part of the DR plan.
- Find Resource types: Select the Resource Type, for example, EBS Volume, EC2, RDS, or Redshift.
You may select All resource types to filter resources across resource types. - Match: Select the match criteria by Resource IDs, Tags, VPC IDs, Subnet IDs, Backup Policies, or select All resources. Based on the Match selected, you will need to specify the appropriate criteria values.
- Resource IDs: Select this option to filter resources by ID.
- VPC IDs or Subnet IDs: Select these criteria to filter resources based on the associated VPCs or Subnets.
For example: Select VPC IDs to filter by VPC ID or VPC Name. - Tags: You can also include or exclude resources using resource Tags.
Tags are standardized, case-sensitive key-value pairs that act as metadata to help identify and organize your AWS resources. Select Tags under Match and then specify the key and an associated value, as part of managing resources for disaster recovery.
For example: Tags: Backup Type; Values: Daily
Note: When multiple tags are defined as part of include/exclude, this translates to an ‘AND’ condition. In other words, Druva CloudRanger will select resources that satisfy all the specified tags. Use tags judiciously to ensure that you can narrow down to the appropriate subset of resources to which the DR plan will apply.
- Backup Policies: Select Backup Policy to filter resources associated with a specific policy. You can select one or more backup policies defined within the chosen Account.
Note: Once you define the filter criteria and associated values, the resources that match all the selected filters within the Source Environment will be included as part of the Rule.
iii. Click Save.
Continue to define more rules to include or exclude specific resources as part of the DR plan. The resources identified are then displayed under Include or Exclude Resources, based on your selection criteria.
To eliminate a specific resource from the list of Resource Rules, select the checkbox against that rule and click Delete.
How Include/Exclude conditions apply on Druva CloudRanger:
- You can create multiple include and exclude rules.
- Include rules: When multiple include rules are defined, this translates to an ‘OR’ condition. In other words, resources are matched against each include rule, and do not have to meet all specified conditions concurrently.
- Exclude rules: Exclude rules take precedence when the same resource is matched based on the include and exclude criteria selected.
An exception to this is when an EC2 resource is selected within include and an EBS volume within exclude. In such a scenario, the EBS volume that is part of EC2 will not be excluded from the DR plan. - When multiple tags are defined as part of include/exclude, this translates to an ‘AND’ condition.
Note: The Resource Status indicates the backup status for the list of resources selected as part of the Resource Rule.
- Protected – Indicates that all the resources identified by a rule are protected by a valid backup policy
Partially Protected – Indicates that some of the resources identified are protected by a backup policy
Not Protected – Indicates that none of the resources identified by a rule are protected by a backup policy
It is recommended that all resources identified as part of a DR plan are covered by a valid backup policy. For more information, see Create Backup Policies.
5. Specify the encryption key mapping information and the Advanced options for your DR plan.
| Field | Description |
| SSH Key Mappings | |
|
Source SSH Key |
Select the source SSH key. To backup encrypted resources onto the Target Environment, you will need to define the encryption keys used in the source environment for the DR plan. |
|
Target SSH Key |
Select the SSH key for the target environment with which you want to encrypt the instance after it is restored. |
|
Instance Profile Mappings |
Select the Instance Profile Mapping if the source instance has a specific IAM role attached to it, which governs access to that instance. |
| Advanced | |
|
Target Instance Type |
Select the target instance type that should be restored after the failover in the target region. In case, an instance type is not available in the target region, select an option to instruct Druva CloudRanger to:
|
|
Test Plan Instance Type |
Select an instance type that will be used during the testing of the disaster recovery plan. Choose an instance type carefully to avoid incurring costs. |
| Shutdown source servers after failover | Select this option to shut down the servers in the source region after failover to the target region.6. |
6. Click Save Plan.
Step 6: Testing the Disaster Recovery Plan
Once you have defined your DR plan, it is time to test the DR plan so that you can initiate a failover of resources to the target region, when necessary. You can now easily try this on the resources in the cloned environment without touching your production environment.
To test execute a DR plan:
- Log into your Druva CloudRanger console and navigate to Disaster Recovery > DR Plans.
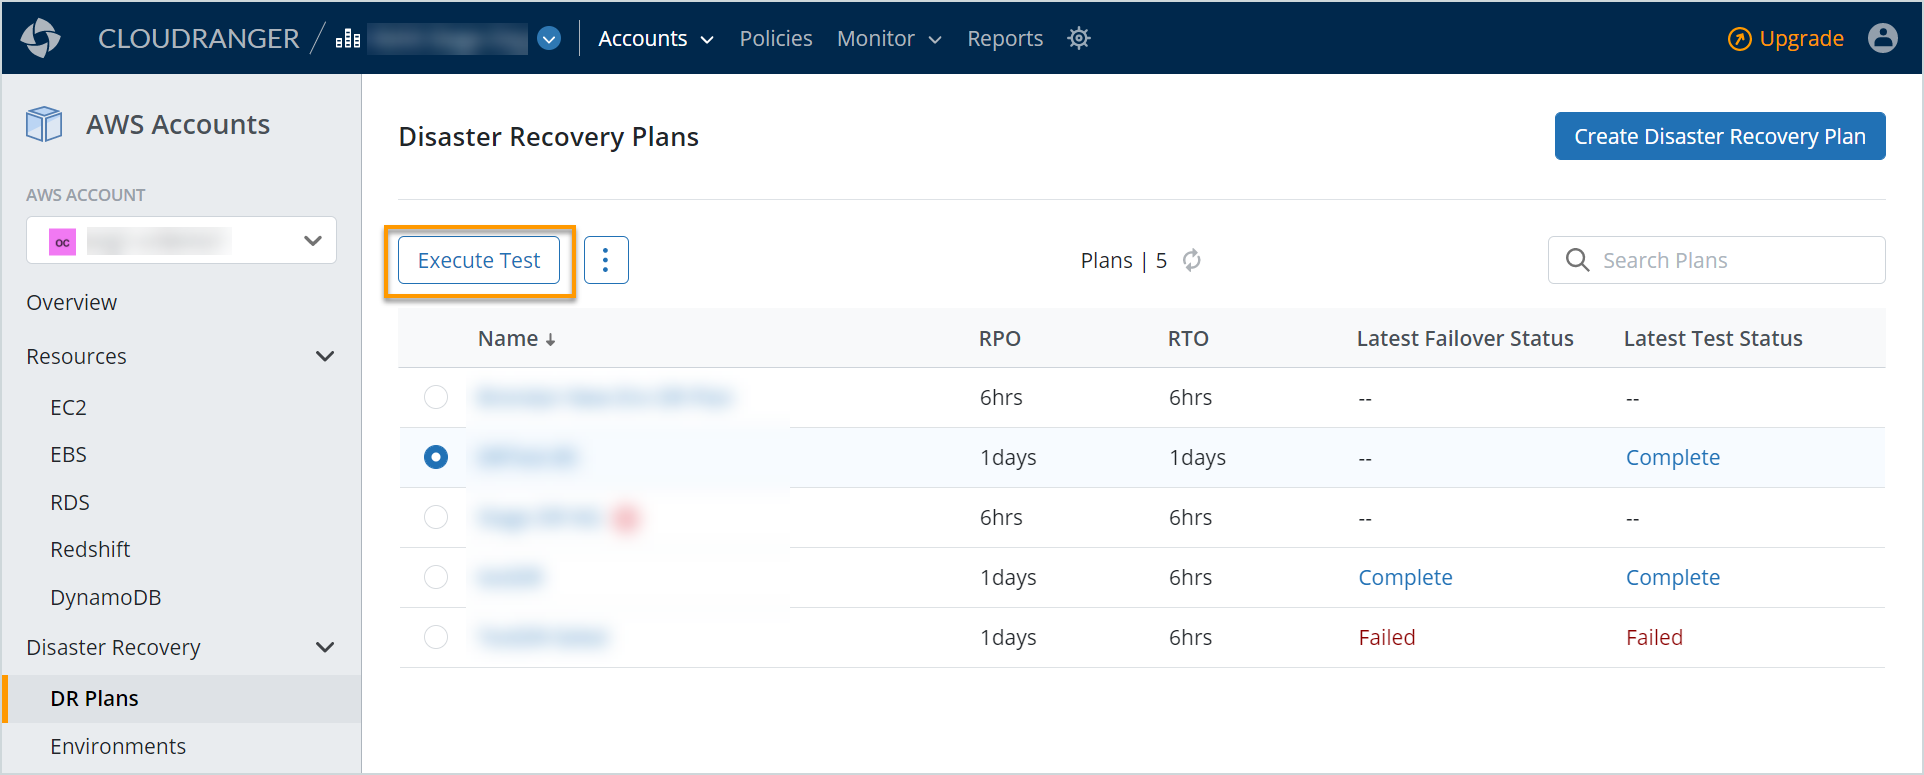
- Select the DR plan you wish to test and then click Execute Test.
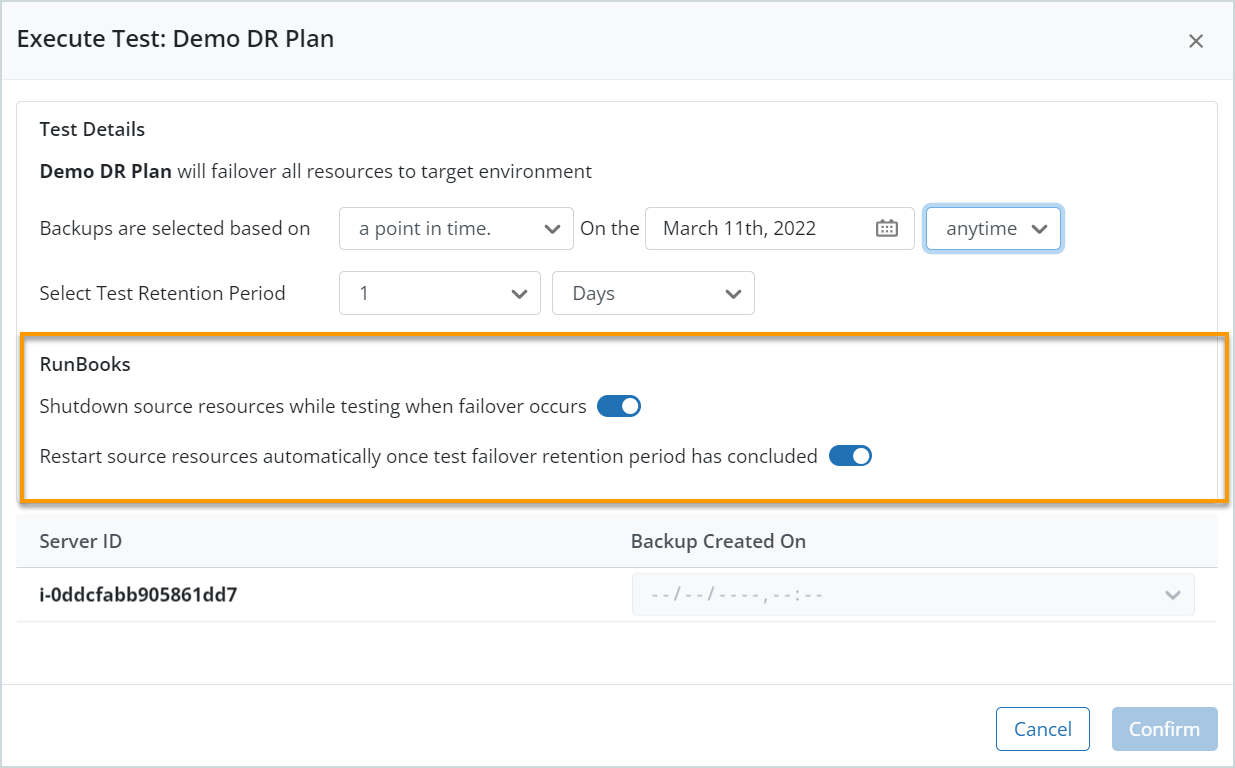
- Select the backup criteria for the failover.
Select point in time to define the exact date and time for the failover or select the standard RPO that you have defined in the DR plan. - Specify the Test Retention Period for the instance in the target region, in hours, days, weeks, months, or years.
- RunBooks: Runbooks are standardized SOPs and can be used as part of your ADR testing strategy. Use Runbooks to automate server shutdown or restart of based on your DR failover plan testing parameters specified:
- Server shutdown: To initiate a shutdown, upon failover, of all source servers defined within the DR Test Plan, enable Shutdown source resources while testing when failover occurs toggle.
Note: Enabling this runbook on test plans running within a Production environment will shut down all associated Production resources.
- Server restart: To restart source instances post the failover retention period enable the Restart source resources automatically once test failover retention period has concluded toggle.
6. Click Confirm.
Automating the test execution of the Disaster Recovery Plan
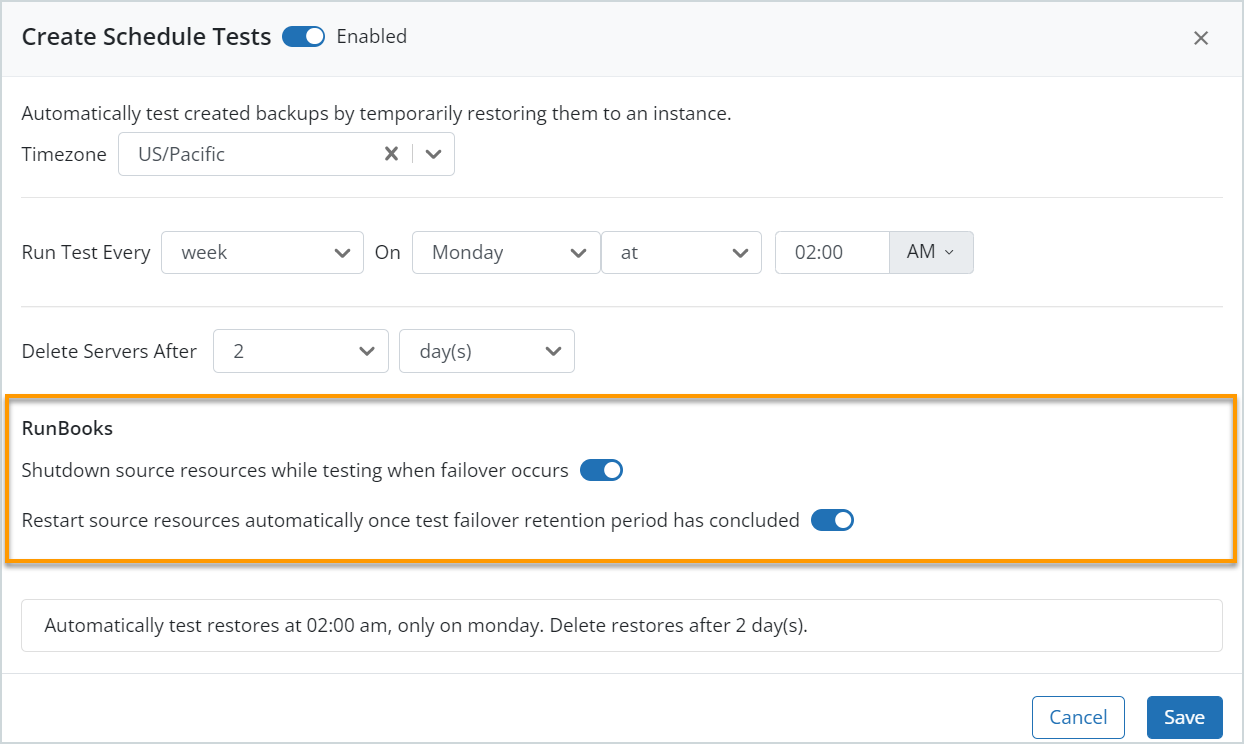
You can choose the frequency of the schedules where you would like to automatically test created backups by temporarily restoring them to an instance.
To create a test schedule:
- Log into your Druva CloudRanger console and navigate to Disaster Recovery > DR Plans.
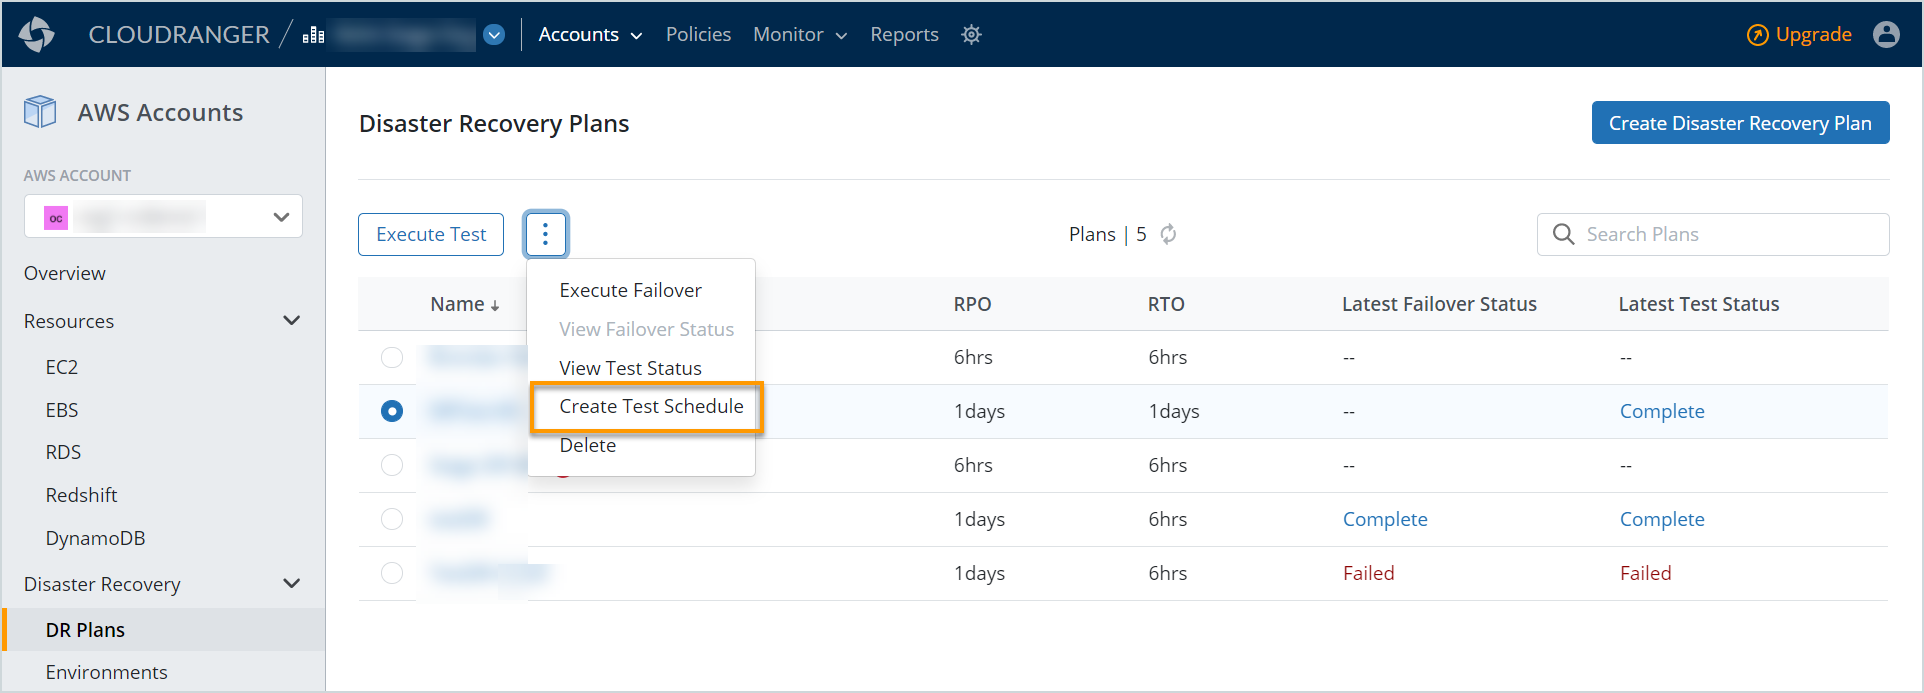
- Select the DR plan for which to schedule testing and then select Create Test Schedule.
- Set the Create Schedule Tests option to Enabled.
- Select the Timezone that applies to the DR test schedule.
- Specify the execution schedule.
For example, Run Test Every weekday at 20:00. - Specify the retention time of the servers in hours, days, weeks, months, or years.
For example, Delete Servers After 4 weeks. - RunBooks: Runbooks are standardized SOPs and can be used as part of your ADR testing strategy. Use Runbooks to automate server shutdown or restart of based on your DR failover plan testing parameters specified:
- Server shutdown: To initiate a shutdown, upon failover, of all source servers defined within the DR Test Plan, enable Shutdown source resources while testing when failover occurs toggle.
Note: Enabling this runbook on test plans running within a Production environment will shut down all associated Production resources.
- Server restart: To restart source instances post the failover retention period enable the Restart source resources automatically once test failover retention period has concluded toggle.
- Review the test schedule summary, and then click Save.
Step 7: Executing the Disaster Recovery Plan
Once you have tested the disaster recovery plan, you can execute your disaster recovery plan manually, if required.
To execute the disaster recovery plan:
- Log into your Druva CloudRanger console and navigate to Disaster Recovery > DR Plans.
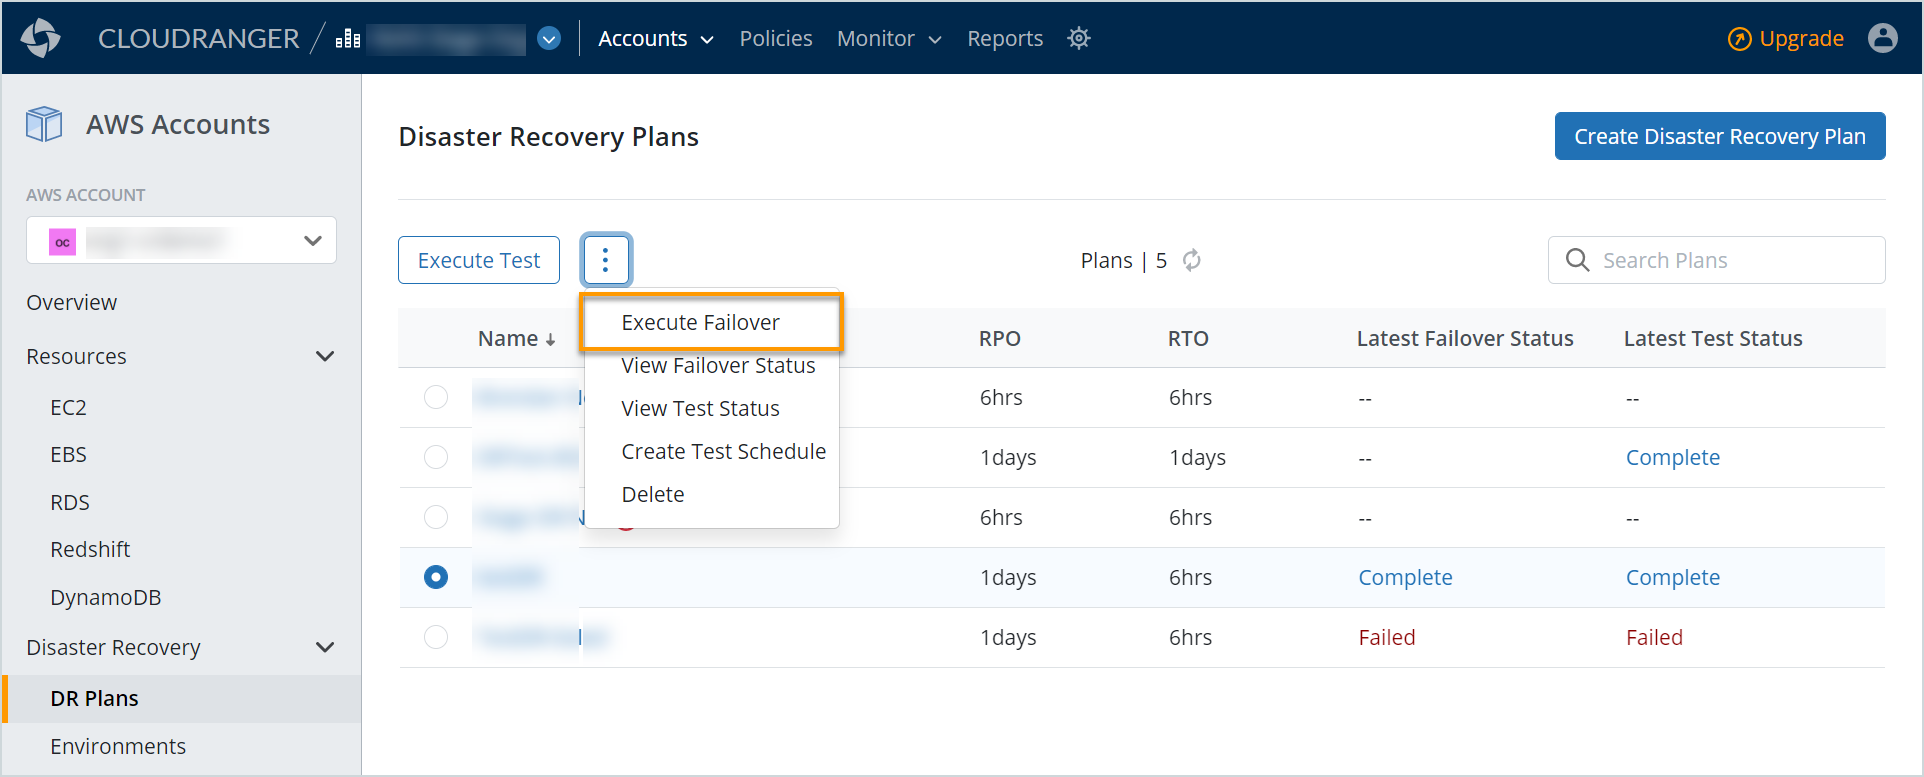
- Select the disaster recovery plan and click Execute Failover.
- Select the backup criteria for the failover.
Select point in time to define the exact date and time for the failover or select the standard RPO that you have defined in the DR plan.
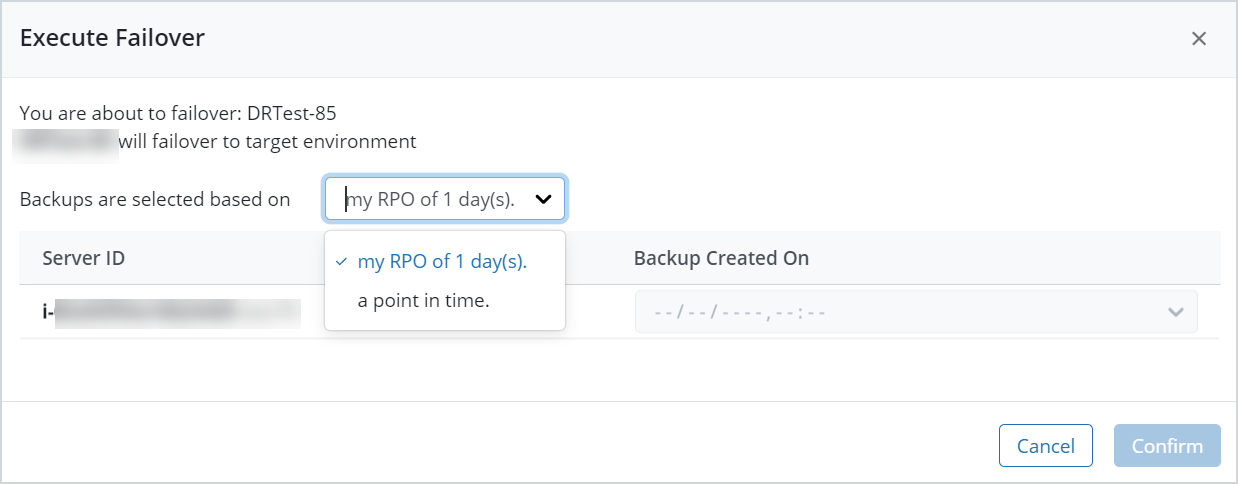
- Click Confirm.
Druva CloudRanger will then initiate the failover of the resources specified to the target environment as defined in the DR plan.