inSync Client Quick Start Guide
Welcome to inSync Client - a lightweight and easy to use application that runs silently in the background on your device without interrupting your regular work. It protects your important files, emails, photos, and videos, by backing it up securely to inSync Cloud.
This document will get you started with the important tasks that you can do using inSync Client:
- View your inSync account details
- Backup and restore your data
- Configure the inSync Client settings
- Sync your data securely across multiple devices
- Share your files and folders and collaborate with others
How to get started
If inSync Client is already installed on your device, you can see the inSync icon  in the menu bar, system tray, or as a shortcut on your desktop.
If you do not see the icon, install inSync Client on your device in these three easy steps:
- Refer to the inSync Client invitation email for your account details and the inSync Client download link.
- Install inSync Client.
- Activate inSync Client.
Launch inSync Client
- On a Windows device: Click the inSync icon shortcut on your desktop or in the system tray.
- On a Mac device: Click the inSync icon on the Menu bar or Launchpad.
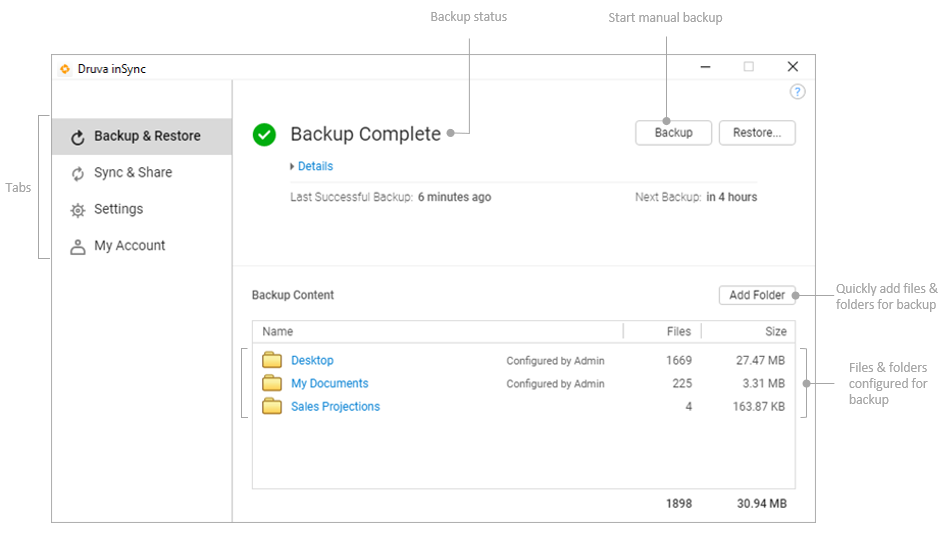
Get to know the inSync Client interface
View your inSync account details
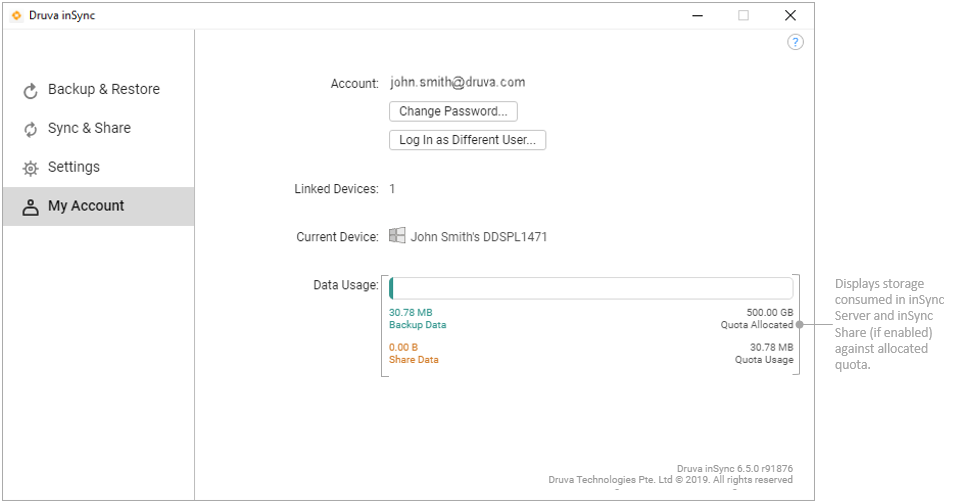
Account
This is your registered email address, which is your inSync username. InSync registers the devices and cloud app accounts for backup with this email address.
inSync password
You can set a new password here. Note that you cannot change the password if you use an SSO or AD/LDAP password for login.
Define privacy for your inSync data
You can allow or prevent administrators from accessing the backed up data or the inSync Share data. With access to your data, administrators can do the following:
- Restore data for you.
- View and download your backed up data.
- View and download your inSync Share data.
To set your preference for data privacy, select or clear the 'Allow admins to view/download my backup and share data' checkbox on the My Account tab. For detailed information, see 'admins to view/download my backup and share data' checkbox on the My Account tab. To know more, see Control privacy of your backup data.
Linked Devices
The number of devices that are linked to your account.
Current Device
The name of the current device on which you are using inSync Client.
Usage Summary
This section provides information about the amount of storage space that you are using.
- Backup Data: The actual size of data backed up from all your Data Sources. Data Sources includes your linked devices and Cloud Apps accounts. It is the storage that you have consumed from your allocated Quota Usage.
- Quota Usage: The total storage limit that is allocated to you.
- Share Data: The actual size of data you have shared using inSync Share. This information is displayed only if inSync Share is enabled.
- Quota Allocated: The total size of data that you can share using inSync Share. This information is displayed only if inSync Share is enabled.
Backup and restore your data
Let's take a look at the important tasks that you can do on the Backup & Restore tab.
Add files and folders for backup
By default, inSync Client backs up files and folders that are configured by your administrator. You can view these files and folders under Backup Content. While you cannot modify or remove these files and folders from the backup cycle, you can add additional files, folders, or an entire drive for backup.
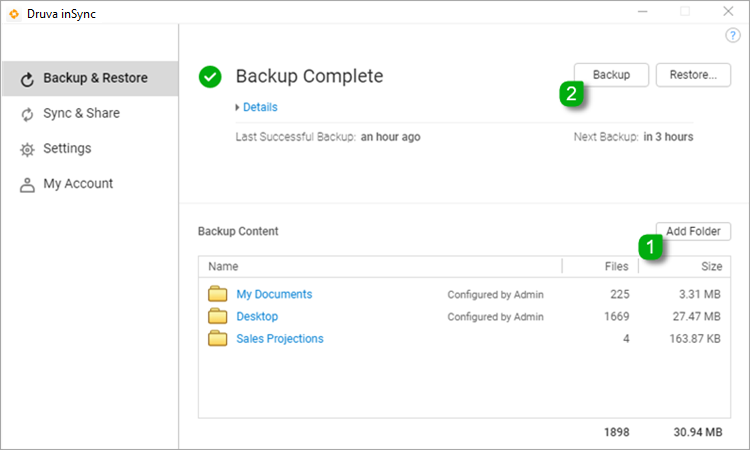
To configure files and folders for backup:
- On the Backup & Restore tab, click Add Folder.
- Navigate to the file location, and select the required files and folders.
- Click Backup to instantly back up the selected files and folders to inSync.
The selected files and folders are displayed in the Backup Content section.
For detailed instructions, see Manage folders for backup.
Start a manual backup
inSync Client automatically backs up data on your device at regular intervals. However, you can manually start a backup anytime by clicking the Backup button on the Backup & Restore tab.
Restore or download your data
You can restore or download the data backed up by inSync on a new or existing device by using the restore capability. inSync Client backs up your data and retains it as snapshots. A snapshot is created each time inSync performs a successful backup on your device. During the restore process, inSync displays all your configured devices and cloud app accounts along with all the snapshots.
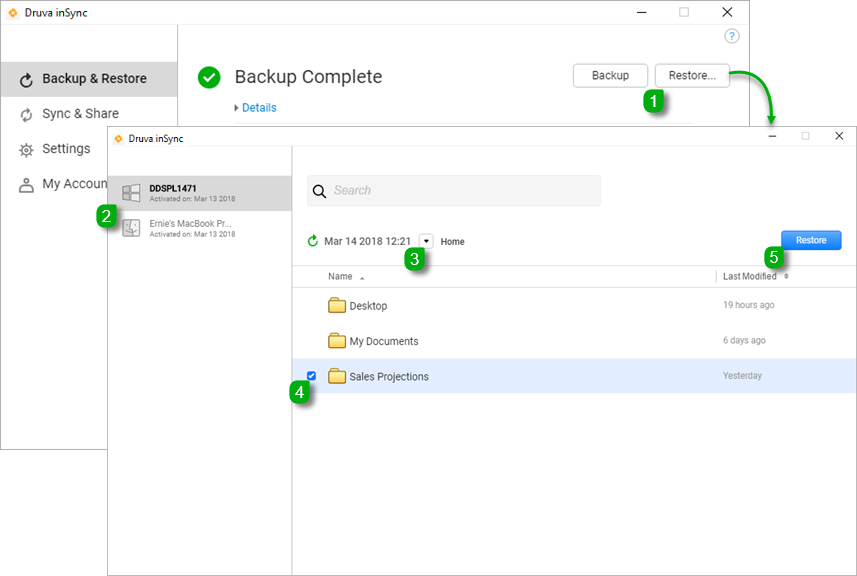
To restore data on your device:
- On the Backup & Restore tab, click Restore. A new window with details of all your data sources and inSync snapshots is displayed.
- In the left-pane, select the data source under Devices for which you want to restore data. Snapshots for that data source are displayed.
- Under Snapshots, browse and select the snapshot from which you want to restore data. Snapshots are displayed in the MM DD YYYY hh:mm format.
- In the right-pane, search and select the file/folder that you want to restore.
- Select the file/folder and click Restore.
For detailed instructions, see Restore and download backup data.
Configure the inSync Client settings
You can view or modify the inSync Client settings only if your administrator has configured the option for you.
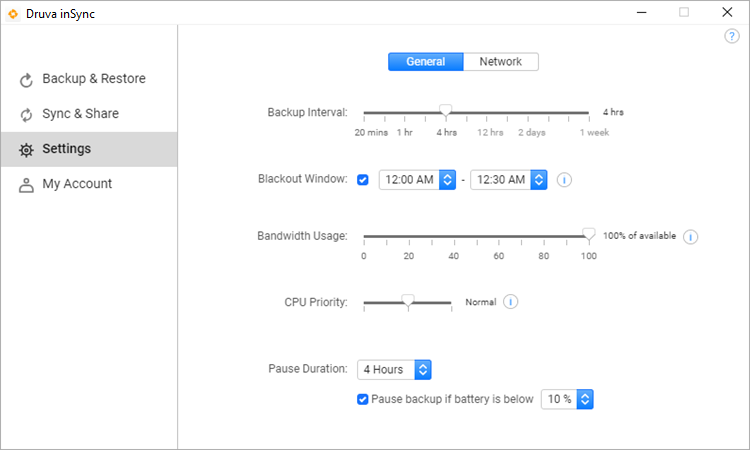
Update backup interval
By default, inSync automatically backs up data on your device at the interval that is configured by your administrator. To change the automatic backup schedule, move the Backup Interval slider to your required preference.
Druva recommends that you set the Backup Interval to an optimal value to ensure that your important data is backed up regularly and to minimize the risk of any data loss.
Manage the bandwidth used by inSync
inSync uses your available internet bandwidth to backup or restore data to your device. You can define the bandwidth percentage that inSync should use. This ensures that all the applications on your device get a fair share of the available network bandwidth. However, setting a lower bandwidth can result in longer backup cycles.
To set the network bandwidth used by inSync Client, move the Bandwidth Usage slider to the preferred setting.
While starting a backup or restore activity, inSync automatically calculates the percentage of the available bandwidth. For detailed information and instructions, see Update network bandwidth.
Assign CPU priority for inSync Client
Use the CPU Priority slider to control the CPU performance of your inSync Client. Druva recommends that you set the CPU priority to an optimal value. Note that a higher CPU priority may affect the performance of other applications on your device, while a lower CPU priority may increase the time required for backup.
For detailed instructions, see Update the CPU priority.
Define pause duration and blackout window
You can always pause an ongoing backup or block the inSync Client tasks for a specific time period.
- Pause Duration: Select the duration that inSync should pause the backup for. By default, the inSync pause duration is four hours. inSync automatically resumes the backup operation after the selected pause duration expires.
- Pause backup if laptop battery is below: Select this check box and click the battery percentage level at which inSync Client must pause the backup operation.
- Blackout Window: To block the inSync Client tasks for a specific period of time, select the Blackout Window check box and select the time range from the drop-down list.
Block inSync Client activity on a particular network
You can block backups on networks that include your data card, personal mobile hotspots, or Mi-Fi devices to minimize your personal hotspot or Mi-Fi data usage and costs. You can block inSync activity only on networks that have a 24 bit or more subnet mask.
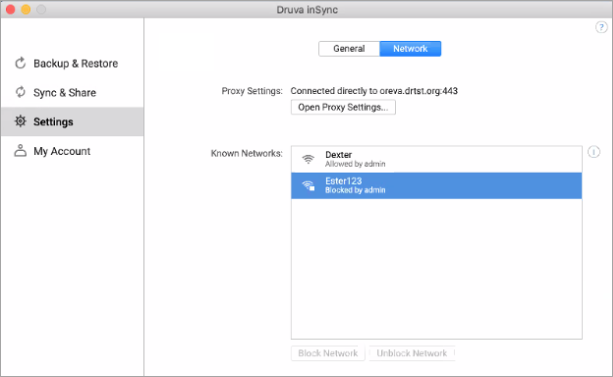
- On the Settings tab, click Network. The Known Networks area displays the list of networks and provides information on which networks are available for backup and the networks that are blocked for backup by your administrator.
- Select the required network, and click Block Network.
Sync and Share your data
Sync & Share in an optional feature in inSync Client. If the feature is available for you, you can sync the backed up data to other devices, and share your files and folders with colleagues as well as guest users who do not have inSync Client installed on their device. For more information, see About inSync Share.
Access inSync Share
You can access inSync Share through inSync Client or from your internet browser by performing the following steps:
- Open inSync Share from inSync Client:
- On the Sync & Share tab, click Web. inSync Share opens in a new browser window.
- Open inSync Share from a browser:
- Open a browser.
- If you are an inSync Cloud user, type https://cloud.druva.com/home, and press Enter.
- If you are an inSync On-Premises user, type https://<inSync Master URL>/home, and press Enter.
- On the inSync Web Login page, type your username and password and click Login.
Share your files and folders with others
You can share content backed up by inSync Client in a shared folder. With the right permissions, collaborators can access the shared content. As an owner of the Shared Folder, you can view the activities and actions of the collaborators to track the changes in the files and folders.
For detailed instructions, see Share folders with others.
Sync the folders that are shared with you
Other inSync Client users in your organization can also share their content and collaborate with you. To access the latest copy of the shared files and folders, you can always sync the shared folder. You can see the list of the Shared Folders that you have access to, in the Shared Content tab on inSync Share Web. For more information, see Sync a shared folder to your device.
Collaborate using workspaces
Workspace is a shared folder that is created by your administrator to facilitate sharing of data. Information that is shared in Workspaces is considered as a part of the company's quota usage and not as a part of the user's quota usage. To know more, see Work with workspaces.
Related links
Additionally, you can:
View FAQs
If you have questions regarding inSync Client, see inSync Client FAQs.
View detailed inSync help
To read more about the inSync Client features, see inSync Client 6.6.0 for inSync Cloud.